51单片机入门代码(上篇)
前言
必读
因为一些图片不显示,可以点击以下链接
个人博客文章地址:51单片机入门教程(上篇)(代码+个人理解) – Echo (liveout.cn)
GitHub仓库链接:https://github.com/PGwind/51code
这篇文章是记录我粗略学习51单片机的一些代码,我会加些个人理解以及注释在里面。
因为是囫囵吞枣式学习,所以质量不是很好,后期我会慢慢优化
如果你想要学习单片机,可以观看下面的B站教程并配合本文档学习
本文章使用的51单片机是 普中STC89C52RC
教程
推荐B站视频: 【51单片机入门教程-2020版 程序全程纯手打 从零开始入门】 https://www.bilibili.com/video/BV1Mb411e7re/?share_source=copy_web&vd_source=55024add0415795a359bd7b29ca21142(应该都知道吧)。
资源
B站江科大资源 链接:https://pan.baidu.com/s/1dLED_1VqL66qYItLl5ic4A?pwd=1111 提取码:1111
普中 链接:https://pan.baidu.com/s/1dNCHm9lLMP8pe3rZu3ktZQ?pwd=1111 提取码:1111
1. 入门
原理: 单片机核心
cpu通过配置寄存器来控制驱动器,来控制硬件电路
寄存器:连接软硬件的媒介
[外链图片转存失败,源站可能有防盗链机制,建议将图片保存下来直接上传(img-oEYash0v-1670833987844)(https://yy.liveout.cn/article/Learn/cmicrocpu/22_12/%E5%8D%95%E7%89%87%E6%9C%BA%E6%A0%B8%E5%BF%83.png)]
数据类型
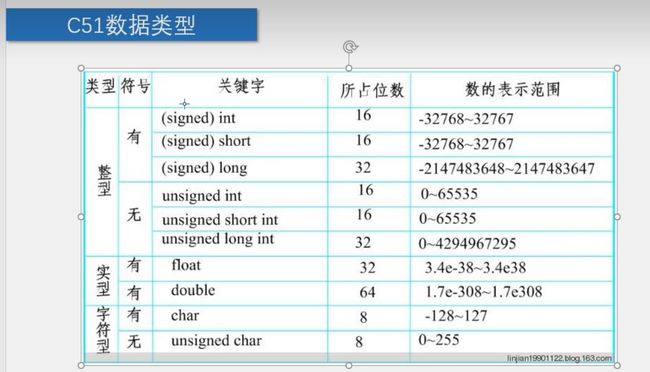
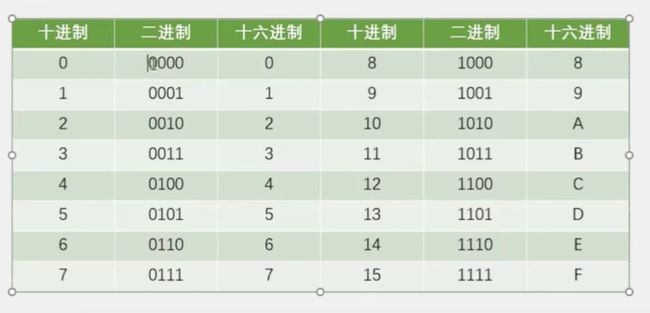
2进制----16进制转换
2. 点灯
原理
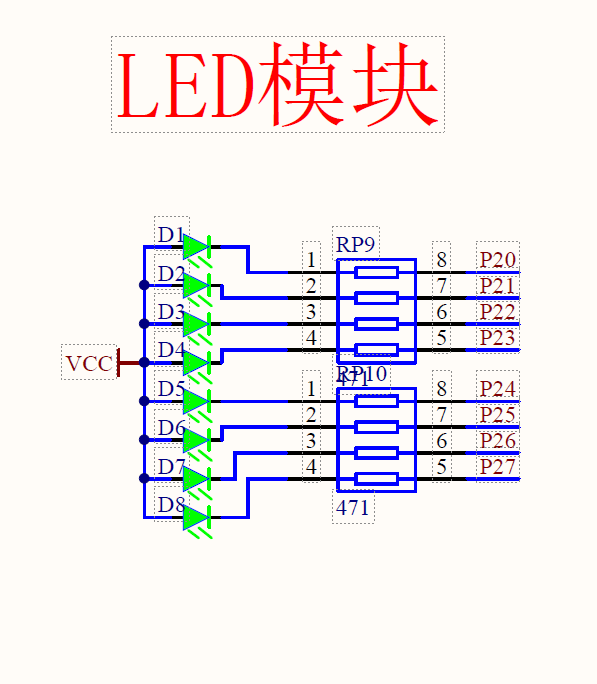
2.1 点亮第一个LED
#include  //右键添加头文件
void main()
{   //2进制转16进制,前缀为 0x 87654321 8个灯序号对应进制
    // 8个1分别为8个led,0则是负极点亮。最后一个0是D1,第一个是D8
    P2 = 0xFE; //1111 1110 点亮第1个led
    P2 = 0x7F; //0111 1111 点亮第8个led
    P2 = 0x5F; //0101 1111 led 6,8亮
    P2 = 0xAA; //1010 1010 led 1,3,5,7亮
    P2 = 0x55; //0101 0101 led 2,4,6,8亮
	while (1) //程序一直运行
	{

	}
}
2.2 LED闪烁
#include
#include
void Delay500ms()		//@11.0592MHz 500ms延迟函数
{
	unsigned char i, j, k;

	_nop_(); //去掉nop不用加头文件#include
	i = 4;
	j = 129;
	k = 119;
	do
	{
		do
		{
			while (--k);
		} while (--j);
	} while (--i);
}

void main()
{

	while(1)
	{
		P2 = 0xFE;
		Delay500ms(); //延迟500ms
	    P2 = 0xFF;
		Delay500ms();
	}
}
2.3 LED流水灯
#include

void Delay500ms()		//@11.0592MHz 延迟500ms
{
	unsigned char i, j, k;

	i = 4;
	j = 129;
	k = 119;
	do
	{
		do
		{
			while (--k);
		} while (--j);
	} while (--i);
}

void main()
{
		while(1)
		{
			P2 = 0xFE; //1111 1110
			Delay500ms();
			P2 = 0xFD; //1111 1101
			Delay500ms();
			P2 = 0xFB; //1111 1011
			Delay500ms();
			P2 = 0xF7; //1111 0111
			Delay500ms();
			P2 = 0xEF; //1110 1111
			Delay500ms();
			P2 = 0xDF; //1101 1111
			Delay500ms();
			P2 = 0xBF; //1011 1111
			Delay500ms();
			P2 = 0x7F; //0111 1111
			Delay500ms();
		}
}
2.4 LED流水灯Plus
#include
void Delay1ms(unsigned int xms)		//@11.0592MHz
{ //xms 为延迟秒数
	unsigned char i, j;
  while(xms)
	{

		i = 2;
		j = 199;
		do
		{
			while (--j);
		} while (--i);
		xms--;
	}
}

void main()
{
	while(1)
		{
			P2 = 0xFE; //1111 1110
			Delay1ms(500); //延迟500ms
			P2 = 0xFD; //1111 1101
			Delay1ms(100); //100ms
			P2 = 0xFB; //1111 1011
			Delay1ms(1000); //1000ms
			P2 = 0xF7; //1111 0111
			Delay1ms(500);
			P2 = 0xEF; //1110 1111
			Delay1ms(200);
			P2 = 0xDF; //1101 1111
			Delay1ms(500);
			P2 = 0xBF; //1011 1111
			Delay1ms(900);
			P2 = 0x7F; //0111 1111
			Delay1ms(500);
		}
	Delay1ms(500);
}
3.独立按键控制LED
原理(高电平、低电平)
电平和电压是有差别的,高电平指的是与低电平相对的高电压,是电工程上的一种说法。
在逻辑电平中,保证逻辑门的输入为高电平时所允许的最小输入高电平,当输入电平高于输入高电压(Vih)时,则认为输入电平为高电平。
在电子和自动化控制中,分为模拟信号和数字信号,在数字逻辑电子电路中,数字信号是二进制的,即只有0信号和1信号。
高电平表示电压高的状态,记为1,一般规定高电平为3.5~5V
低电平表示电压低的状态, 记为0,一般规定低电平为0~0.25V
[外链图片转存失败,源站可能有防盗链机制,建议将图片保存下来直接上传(img-o21HlK7Z-1670833987845)(https://yy.liveout.cn/article/Learn/cmicrocpu/22_12/%E7%8B%AC%E7%AB%8B%E6%8C%89%E9%94%AE%E6%A8%A1%E5%9D%97.png)]
按键松开 高电平 1
按键按下 低电平 0
3.1 独立按键控制LED灯灭
#include
//P2_0就是单片机上面的一个端口,这个端口就是链接右边第一个led灯的
//等于左边七个LED直接不给信号了,只给右边第一个一个亮的信号
void main()
{
	//P2 = 0xFE;
	P2_0 = 1;
	while(1)
	{ // 按下亮,松开灭
		if(P3_1==0) //P3_1控制第一个按键,即P31
		{
			P2_0 = 0; //P2_0是第一个LED,0则亮
		}
		else
		{
			P2_0=1;
		}

        if (P3_0==0)
		{
			P2_1 = 0;
		}
        else
		{
			P2_1 = 1;
		}
	}
}
3.2 独立按键控制LED状态
#include
void Delay1ms(unsigned int xms)		//@11.0592MHz
{
	unsigned char i, j;
	while(xms)
	{
			i = 2;
			j = 199;
			do
			{
				while (--j);
			} while (--i);
			xms--;
	}
}

void main()
{  //按一次亮,再按一次灭
		while(1)
		{
				if(P3_1==0)
				{
					Delay1ms(20); //按下时消抖
					while(P3_1==0); //松开跳出while循环,不松开一直循环,所以灯不会有反应
					Delay1ms(20); //松开时消抖

					P2_0=~P2_0; //取反,灭变亮,亮变灭
				}
		}
}
3.3 独立按键控制LED显示二进制
#include
void Delay1ms(unsigned int xms)		//@11.0592MHz
{
	unsigned char i, j;
	while(xms)
	{
			i = 2;
			j = 199;
			do
			{
				while (--j);
			} while (--i);
			xms--;
	}
}
void main()
{
	  unsigned char LEDNum = 0;
		while(1)
		{
			if(P3_1==0)
			{
				Delay1ms(20);
				while(P3_1==0)
				Delay1ms(20);

				LEDNum++; //0000 0001
				P2 = ~LEDNum; //取反, 1111 1110,第一个LED灯亮
			}
		}
}
3.4 独立按键控制LED移位
0000 0001 -> 0000 0010 -> 0000 0100 …
0x01<<0 0x01<<1 0x01<<2 …
#include
void Delay1ms(unsigned int xms)		//@11.0592MHz
{
	unsigned char i, j;
	while(xms)
	{
			i = 2;
			j = 199;
			do
			{
				while (--j);
			} while (--i);
			xms--;
	}
}
void main()
{
	unsigned char LEDNum = 0;
	P2 = ~0x01; //LED初始化,不然第一次led1不亮
	while(1)
	{
        //按键1右移
		if(P3_1==0) //按键1按下
		{
			Delay1ms(20);
			while(P3_1==0);
			Delay1ms(20);

			LEDNum++; //右移
			if (LEDNum>=8)
				LEDNum=0; //重置

			P2=~(0x01<
4.数码管
LED数码管:由多个发光二极管封装在一起组成“8”字型
输出扫描:显示第一位->显示第二位->显示第三位…,然后快速循环这个过程,最终实现所有数码管同时显示的效果
原理
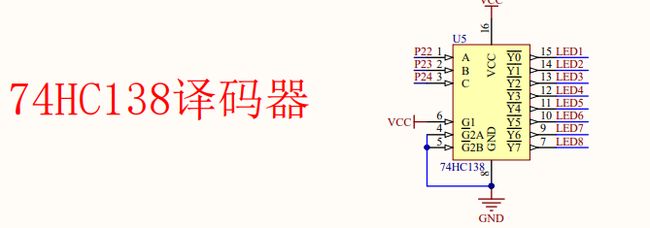
//这里灯的顺序排列我的理解有错误,还没仔细研究。我的单片机111时是Y0,即LED1亮
C(P24)  B(P23)    A(P22)  Y		 LED 8 -> 1
0(4)	0(2)	0(1)	Y7		0 1 1 1 1 1 1 1  LED8
0		0		 1   	 Y6		 1 0 1 1 1 1 1 1  LED7
1		0		 1		 Y2		 1 1 1 1 1 0 1 1  LED3
1		1		 1		 Y0		 1 1 1 1 1 1 1 0  LED1
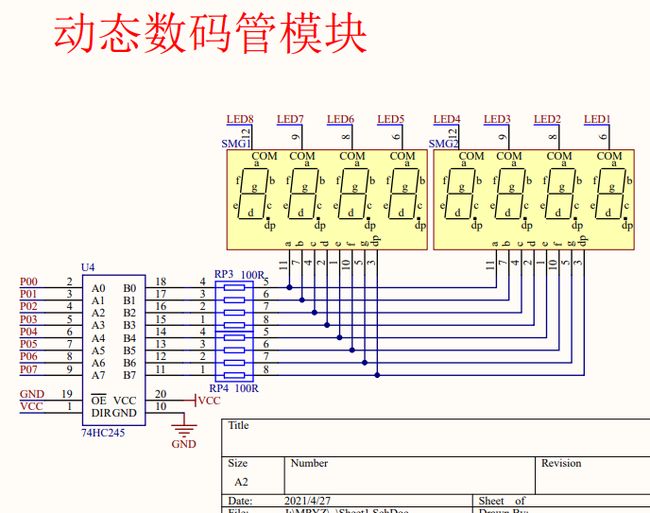
上面是共阴极,公共端为0则亮。如LED7(引脚9)为0,其他为1。即 1011 1111,则LED7亮,其他不亮。
下面是阴码。LED显示7,则b、c为1,其他0。即 0110 0000
4.1 静态数码管显示
点亮一个
#include

void main()
{
    //100,即4,LED4亮
	P2_4 = 1;
	P2_3 = 0;
	P2_2 = 0;
    //P07->P00  0000 0111 ,即0x07,
    //a、b、c为1,即a、b、c亮,显示为7
	P0 = 0x07;
	while(1)
	{

	}
}
模块化
#include
//显示数字的段码存储在数组中
//0~9 -> 0~9
unsigned char NixieTable[]={0x3F,0x06,0x5B,0x4F,0x66,0x6D,0x7D,0x07,
0x7F,0x6F,0x77,0x7C,0x39,0x5E,0x79,0x71,0x00};

void Nixie(unsigned char Location,Number)
{   //Location为LED灯序号,Number为显示数字
	switch(Location)
	{
		case 1:P2_4=1;P2_3=1;P2_2=1;break;
		case 2:P2_4=1;P2_3=1;P2_2=0;break;
		case 3:P2_4=1;P2_3=0;P2_2=1;break;
		case 4:P2_4=1;P2_3=0;P2_2=0;break;
		case 5:P2_4=0;P2_3=1;P2_2=1;break;
		case 6:P2_4=0;P2_3=1;P2_2=0;break;
		case 7:P2_4=0;P2_3=0;P2_2=1;break;
		case 8:P2_4=0;P2_3=0;P2_2=0;break;
	}
	P0=NixieTable[Number];
}

void main()
{
	Nixie(6,2); //第6个LED显示2
	while(1)
	{

	}
}
4.2 动态数码管显示
个人理解:就像早期电影一样,通过视觉残留动态显示。实际上只能有一个LED灯亮
消影:位选 段选 清零 位选 段选 清零
利用延时来抵消人的视觉暂留现象达到消影
#include

void Delay1ms(unsigned int xms)		//@11.0592MHz
{
	unsigned char i, j;
	while(xms)
	{
			i = 2;
			j = 199;
			do
			{
				while (--j);
			} while (--i);
			xms--;
	}
}

unsigned char NixieTable[]={0x3F,0x06,0x5B,0x4F,0x66,0x6D,0x7D,0x07,
0x7F,0x6F,0x77,0x7C,0x39,0x5E,0x79,0x71,0x00};

void Nixie(unsigned char Location,Number)
{
	switch(Location)
	{
		case 1:P2_4=1;P2_3=1;P2_2=1;break;
		case 2:P2_4=1;P2_3=1;P2_2=0;break;
		case 3:P2_4=1;P2_3=0;P2_2=1;break;
		case 4:P2_4=1;P2_3=0;P2_2=0;break;
		case 5:P2_4=0;P2_3=1;P2_2=1;break;
		case 6:P2_4=0;P2_3=1;P2_2=0;break;
		case 7:P2_4=0;P2_3=0;P2_2=1;break;
		case 8:P2_4=0;P2_3=0;P2_2=0;break;
	}
	P0=NixieTable[Number]; //段选
	Delay1ms(1);
	P0=0x00; //清零
}

void main()
{

	while(1)
	{
			Nixie(1,1);
			//Delay1ms(500);  //此延迟用于从第一个led1依次显示数字
			Nixie(2,2);
			//Delay1ms(500);
			Nixie(3,3);
			//Delay1ms(500);
 			Nixie(4,4);
//			Delay1ms(500);
   		Nixie(5,5);
//   		Delay1ms(500);
			Nixie(6,6);
//			Delay1ms(500);
			Nixie(7,7);
//			Delay1ms(500);
			Nixie(8,8);
//			Delay1ms(500);
	}
}
5 .1模块化编程
视频
https://www.bilibili.com/video/BV1Mb411e7re?p=13&vd_source=a1234589a3616351986bc6d13bcbd8f8
代码
头文件
//Delay.h
#ifndef __DELAY_H_
#define __DELAY_H_
void Delay(unsigned int xms)		;
#endif
//Nixie.h
#ifndef __NIXIE_H___
#define __NIXIE_H__
void Nixie(unsigned char Location,Number);
#endif
函数
//main.c
#include
#include "Delay.h"
#include "Nixie.h"
void main()
{
	while(1)
	{
		Nixie(1,1);
		Nixie(2,2);
		Nixie(3,3);
	}
}
其他函数
//Delay.c
void Delay(unsigned int xms)		//@11.0592MHz
{
	unsigned char i, j;
	while(xms)
	{
			i = 2;
			j = 199;
			do
			{
				while (--j);
			} while (--i);
			xms--;
	}
}
//Nixe.c
#include
#include "Delay.h"

unsigned char NixieTable[]={0x3F,0x06,0x5B,0x4F,0x66,0x6D,0x7D,0x07,
0x7F,0x6F,0x77,0x7C,0x39,0x5E,0x79,0x71,0x00};

void Nixie(unsigned char Location,Number)
{
	switch(Location)
	{
		case 1:P2_4=1;P2_3=1;P2_2=1;break;
		case 2:P2_4=1;P2_3=1;P2_2=0;break;
		case 3:P2_4=1;P2_3=0;P2_2=1;break;
		case 4:P2_4=1;P2_3=0;P2_2=0;break;
		case 5:P2_4=0;P2_3=1;P2_2=1;break;
		case 6:P2_4=0;P2_3=1;P2_2=0;break;
		case 7:P2_4=0;P2_3=0;P2_2=1;break;
		case 8:P2_4=0;P2_3=0;P2_2=0;break;
	}
	P0=NixieTable[Number];
	Delay(1);
	P0=0x00;
}
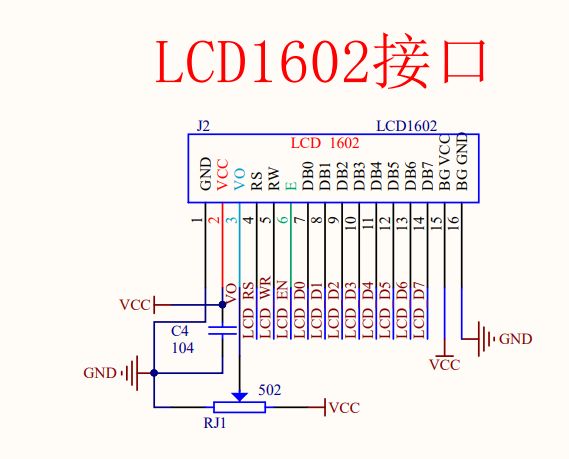
5.2 LCD1602调试工具
LCD与数码管引脚冲突
原理
[外链图片转存失败,源站可能有防盗链机制,建议将图片保存下来直接上传(img-2stC76sm-1670833987845)(https://yy.liveout.cn/article/Learn/cmicrocpu/22_12/LCD%E8%B0%83%E8%AF%95.png)]
代码
记得添加之前定义过的函数和头文件
//LCD1602.h  分别为显示各种进制数组以及字符
#ifndef __LCD1602_H__
#define __LCD1602_H__
void LCD_Init();
void LCD_ShowChar(unsigned char Line,unsigned char Column,char Char);
void LCD_ShowString(unsigned char Line,unsigned char Column,char *String);
void LCD_ShowNum(unsigned char Line,unsigned char Column,unsigned int Number,unsigned char Length);
void LCD_ShowSignedNum(unsigned char Line,unsigned char Column,int Number,unsigned char Length);
void LCD_ShowHexNum(unsigned char Line,unsigned char Column,unsigned int Number,unsigned char Length);
void LCD_ShowBinNum(unsigned char Line,unsigned char Column,unsigned int Number,unsigned char Length);
#endif
#include

//引脚配置:
sbit LCD_RS=P2^6;
sbit LCD_RW=P2^5;
sbit LCD_EN=P2^7;
#define LCD_DataPort P0

//函数定义:
/**
  * @brief  LCD1602延时函数,12MHz调用可延时1ms
  * @param  无
  * @retval 无
  */
void LCD_Delay()
{
	unsigned char i, j;

	i = 2;
	j = 239;
	do
	{
		while (--j);
	} while (--i);
}

/**
  * @brief  LCD1602写命令
  * @param  Command 要写入的命令
  * @retval 无
  */
void LCD_WriteCommand(unsigned char Command)
{
	LCD_RS=0;
	LCD_RW=0;
	LCD_DataPort=Command;
	LCD_EN=1;
	LCD_Delay();
	LCD_EN=0;
	LCD_Delay();
}

/**
  * @brief  LCD1602写数据
  * @param  Data 要写入的数据
  * @retval 无
  */
void LCD_WriteData(unsigned char Data)
{
	LCD_RS=1;
	LCD_RW=0;
	LCD_DataPort=Data;
	LCD_EN=1;
	LCD_Delay();
	LCD_EN=0;
	LCD_Delay();
}

/**
  * @brief  LCD1602设置光标位置
  * @param  Line 行位置,范围:1~2
  * @param  Column 列位置,范围:1~16
  * @retval 无
  */
void LCD_SetCursor(unsigned char Line,unsigned char Column)
{
	if(Line==1)
	{
		LCD_WriteCommand(0x80|(Column-1));
	}
	else if(Line==2)
	{
		LCD_WriteCommand(0x80|(Column-1+0x40));
	}
}

/**
  * @brief  LCD1602初始化函数
  * @param  无
  * @retval 无
  */
void LCD_Init()
{
	LCD_WriteCommand(0x38);//八位数据接口,两行显示,5*7点阵
	LCD_WriteCommand(0x0c);//显示开,光标关,闪烁关
	LCD_WriteCommand(0x06);//数据读写操作后,光标自动加一,画面不动
	LCD_WriteCommand(0x01);//光标复位,清屏
}

/**
  * @brief  在LCD1602指定位置上显示一个字符
  * @param  Line 行位置,范围:1~2
  * @param  Column 列位置,范围:1~16
  * @param  Char 要显示的字符
  * @retval 无
  */
void LCD_ShowChar(unsigned char Line,unsigned char Column,char Char)
{
	LCD_SetCursor(Line,Column);
	LCD_WriteData(Char);
}

/**
  * @brief  在LCD1602指定位置开始显示所给字符串
  * @param  Line 起始行位置,范围:1~2
  * @param  Column 起始列位置,范围:1~16
  * @param  String 要显示的字符串
  * @retval 无
  */
void LCD_ShowString(unsigned char Line,unsigned char Column,char *String)
{
	unsigned char i;
	LCD_SetCursor(Line,Column);
	for(i=0;String[i]!='\0';i++)
	{
		LCD_WriteData(String[i]);
	}
}

/**
  * @brief  返回值=X的Y次方
  */
int LCD_Pow(int X,int Y)
{
	unsigned char i;
	int Result=1;
	for(i=0;i0;i--)
	{
		LCD_WriteData(Number/LCD_Pow(10,i-1)%10+'0');
	}
}

/**
  * @brief  在LCD1602指定位置开始以有符号十进制显示所给数字
  * @param  Line 起始行位置,范围:1~2
  * @param  Column 起始列位置,范围:1~16
  * @param  Number 要显示的数字,范围:-32768~32767
  * @param  Length 要显示数字的长度,范围:1~5
  * @retval 无
  */
void LCD_ShowSignedNum(unsigned char Line,unsigned char Column,int Number,unsigned char Length)
{
	unsigned char i;
	unsigned int Number1;
	LCD_SetCursor(Line,Column);
	if(Number>=0)
	{
		LCD_WriteData('+');
		Number1=Number;
	}
	else
	{
		LCD_WriteData('-');
		Number1=-Number;
	}
	for(i=Length;i>0;i--)
	{
		LCD_WriteData(Number1/LCD_Pow(10,i-1)%10+'0');
	}
}

/**
  * @brief  在LCD1602指定位置开始以十六进制显示所给数字
  * @param  Line 起始行位置,范围:1~2
  * @param  Column 起始列位置,范围:1~16
  * @param  Number 要显示的数字,范围:0~0xFFFF
  * @param  Length 要显示数字的长度,范围:1~4
  * @retval 无
  */
void LCD_ShowHexNum(unsigned char Line,unsigned char Column,unsigned int Number,unsigned char Length)
{
	unsigned char i,SingleNumber;
	LCD_SetCursor(Line,Column);
	for(i=Length;i>0;i--)
	{
		SingleNumber=Number/LCD_Pow(16,i-1)%16;
		if(SingleNumber<10)
		{
			LCD_WriteData(SingleNumber+'0');
		}
		else
		{
			LCD_WriteData(SingleNumber-10+'A');
		}
	}
}

/**
  * @brief  在LCD1602指定位置开始以二进制显示所给数字
  * @param  Line 起始行位置,范围:1~2
  * @param  Column 起始列位置,范围:1~16
  * @param  Number 要显示的数字,范围:0~1111 1111 1111 1111
  * @param  Length 要显示数字的长度,范围:1~16
  * @retval 无
  */
void LCD_ShowBinNum(unsigned char Line,unsigned char Column,unsigned int Number,unsigned char Length)
{
	unsigned char i;
	LCD_SetCursor(Line,Column);
	for(i=Length;i>0;i--)
	{
		LCD_WriteData(Number/LCD_Pow(2,i-1)%2+'0');
	}
}
//输出固定值
#include
#include "LCD1602.h"
void main()
{
	LCD_Init();
	LCD_ShowChar(1,1,'A');
	LCD_ShowString(1,3,"Hello");
	LCD_ShowNum(1,9,123,3);
	LCD_ShowSignedNum(1,13,-66,2);
	LCD_ShowHexNum(2,1,0xA8,2);
	LCD_ShowBinNum(2,4,0xAA,8);
	while(1)
	{
	}
}
//输出变量值
#include
#include "LCD1602.h"
int Result;
void main()
{
	LCD_Init();
	Result = 1+1;
	LCD_ShowNum(1,1,Result,3);
	while(1)
	{
	}
}
//输出变量值Plus 从0开始显示秒数
#include
#include "LCD1602.h"
#include "Delay.h"
int Result=0;
void main()
{
	LCD_Init();

	while(1)
	{
		Result++;
		Delay(1000); //1000ms == 1s
		LCD_ShowNum(1,1,Result,3);
	}
}
6. 矩阵键盘
输入扫描:读取第一行(列)->读取第二(列)->读取第三行(列)…,然后快速循环这个过程,最终实现所有按键同时检测的效果
原理
[外链图片转存失败,源站可能有防盗链机制,建议将图片保存下来直接上传(img-LhsevxtI-1670833987846)(https://yy.liveout.cn/article/Learn/cmicrocpu/22_12/%E7%9F%A9%E9%98%B5%E6%8C%89%E9%94%AE.png)]
6.1矩阵键盘
记得添加之前定义过的函数和头文件
头文件
//MatrixKey.h
#ifndef __MATRIXKEY_H_
#define __MATRIXKEY_H_
unsigned char MatrixKey();
#endif
函数
//main.c
#include
#include "Delay.h"
#include "LCD1602.h"
#include "MatrixKey.h"
unsigned char KeyNum;
void main()
{
	LCD_Init();
	LCD_ShowString(1,1,"Hello Echo"); //第一行显示字符串
	while(1)
	{
		KeyNum=MatrixKey();
		if (KeyNum) //如何没有if,按下一瞬间显示数字,但是松手会重置为0
		{
			LCD_ShowNum(2,1,KeyNum,2);//第2行显示KeyNum,即按下按键键码值
		}
	}
}
//MatrixKey.c
#include
#include "Delay.h"
//Function Definition:
/**
  * @brief 矩阵键盘读取按键码
  * @param  无
  * @retval KeyNumber 按下按键的键码值
  如果按键按下不放,程序会停留在此函数,松手一瞬间,返回按键键码。没有按键按下时返回0
  */

unsigned char MatrixKey()
{
	unsigned char KeyNumber=0;
	P1 = 0xFF; //初始化
	P1_3=0;  //第1列
	if(P1_7==0) {Delay(20);while(P1_7==0);Delay(20);KeyNumber=1;}//第1行
	if(P1_6==0) {Delay(20);while(P1_6==0);Delay(20);KeyNumber=5;}//第2行
	if(P1_5==0) {Delay(20);while(P1_5==0);Delay(20);KeyNumber=9;}//第3行
	if(P1_4==0) {Delay(20);while(P1_4==0);Delay(20);KeyNumber=13;}//第4行

	P1 = 0xFF;
	P1_2=0;  //第2列
	if(P1_7==0) {Delay(20);while(P1_7==0);Delay(20);KeyNumber=2;}
	if(P1_6==0) {Delay(20);while(P1_6==0);Delay(20);KeyNumber=6;}
	if(P1_5==0) {Delay(20);while(P1_5==0);Delay(20);KeyNumber=10;}
	if(P1_4==0) {Delay(20);while(P1_4==0);Delay(20);KeyNumber=14;}

	P1 = 0xFF;
	P1_1=0;  //第3列
	if(P1_7==0) {Delay(20);while(P1_7==0);Delay(20);KeyNumber=3;}
	if(P1_6==0) {Delay(20);while(P1_6==0);Delay(20);KeyNumber=7;}
	if(P1_5==0) {Delay(20);while(P1_5==0);Delay(20);KeyNumber=11;}
	if(P1_4==0) {Delay(20);while(P1_4==0);Delay(20);KeyNumber=15;}

	P1 = 0xFF;
	P1_0=0;  //第4列
	if(P1_7==0) {Delay(20);while(P1_7==0);Delay(20);KeyNumber=4;}
	if(P1_6==0) {Delay(20);while(P1_6==0);Delay(20);KeyNumber=8;}
	if(P1_5==0) {Delay(20);while(P1_5==0);Delay(20);KeyNumber=12;}
	if(P1_4==0) {Delay(20);while(P1_4==0);Delay(20);KeyNumber=16;}

	return KeyNumber; //返回按下按键键码值
}
6.2 密码锁
#include
#include "Delay.h"
#include "LCD1602.h"
#include "MatrixKey.h"

//unsigned char没有符号位,因此能表示0~255,但是密码肯定不能这么短。
//B站视频教程是unsigned char类型,但是我输入时只能到256,改为int类型就行了
int KeyNum;
int Password,Count;

void main()
{
	LCD_Init();
	LCD_ShowString(1,1,"PassWord");
	while(1)
	{
		KeyNum=MatrixKey();
		if (KeyNum)
		{
			if(KeyNum<=10) //如果S1~S2按键按下,输入密码
            {
                 if(Count<4)
				Password*=10; //密码左移一位
				Password+=KeyNum%10; //获取一位密码
            }
             Count++; 。//计次加一
			LCD_ShowNum(2,1,Password,4); //更新显示
		}
        if(KeyNum==11)   //按下S11按键确认
		{
			if (Password==2345) //密码正确
			{
				LCD_ShowString(1,12,"OK"); //显示OK
                  Password=0; //密码清理
				Count=0;  //计数清理
                  LCD_ShowNum(2,1,Password,4); //更新显示
			}
            else
            {
                 LCD_ShowString(1,12,"ERROR");
				//Delay(2000); //延时2s,然后空格替代,不然OK后面会显示ROR
				Password=0;
				Count=0;
				LCD_ShowNum(2,1,Password,4);
				//LCD_ShowString(1,12,"     "); //空格替代
            }
		}
        if (KeyNum==12) //按键S12手动清零
		{
		   		Password=0; //密码清零
				Count=0;   //计次清零
            	 LCD_ShowString(1,12,"     "); //空格替代
				LCD_ShowNum(2,1,Password,4); //更新显示

		}
	}
}
7. 定时器
原理
这章比较难,得多看几遍视频
视频教程:https://www.bilibili.com/video/BV1Mb411e7re/?p=17&spm_id_from=333.1007.top_right_bar_window_history.content.click&vd_source=a1234589a3616351986bc6d13bcbd8f8
定时器个数:3个(T0、T1、T2),T0和T1与传统的51单片机兼容,T2是此型号单片机增加的资源
SySclk:系统时钟,即晶振周期,本开发板上的晶振为11.0592MHz
时钟:给0定时器,给1计数器
基础理解代码:实现led1灯每1s闪烁一次
0~65535 每隔1us计数加一 总共定时时间65535us
给初值6435 离计数器65535 差1000us 所以计数时间为1ms
#include

//定时器0初始化
void Timer0_Init() //这个函数可以通过软件直接生成的!!!,但是没有中断,即最后三个
{
    //定时器
	//TMOD=0x01; //0000 0001  高四位  低四位
    TMOD=TMOD&0xF0; //把TMOD的低四位清0,高四位保持不变
    TMOD=TMOD|0x01; //把TMOD的最低位 置为1,高四位保持不变
	TF0=0; //TF0是进入中断程序后,硬件自动清零
	TR0=1; //定时器从0开始计时

    //TH0,TL0为二进制8位,单独可计256次   低8位计满256后高8位进1
    //设置定时初值
	TH0=64535/256; //高8位次数
	TL0=64535%256; //低8位次数

    //中断
    ET0=1;
    EA=1;
    PT0=0; //设置优先级
}

//主程序
void main()
{
	Timer0_Init();
	while(1)
	{

	}
}

//中断服务程序B
unsigned int T0Count;
void Timer0_Routine() interrupt 1
{
	TH0=64535/256;
	TL0=64535%256; //重新赋值
	T0Count++; //每次加1us,1000次就是1s
	if (T0Count>=1000)
	{
		  T0Count=0; //重新赋值
		  P2_0=~P2_0; //每1s闪烁一次
	}

}
7.1 按键控制LED流水灯模式
头文件
//Delay.h
#ifndef __DELAY_H_
#define __DELAY_H_
void Delay(unsigned int xms);
#endif
//Key.h
#ifndef __KEY_H_
#define __KEY_H_
usigned char Key();
#endif
//Timer0.h
#ifndef __TIMER0_H_
#define __TIMER0_H_

void Timer0_Init();

#endif
函数
//Delay.c
//Function Definition
/**
  * @brief 延迟函数
  * @param  无
  * @retval 1ms
  */
void Delay(unsigned int xms)		//@11.0592MHz
{
	unsigned char i, j;
	while(xms)
	{
			i = 2;
			j = 199;
			do
			{
				while (--j);
			} while (--i);
			xms--;
	}
}
//Key.c
#include
#include "Delay.h"

//Function Definition
/**
  * @brief 获取独立按键键码
  * @param  无
  * @retval 按下按键的键码,范围0~4,无按键按下的返回值为0
  */

unsigned char Key()
{
	unsigned char KeyNum=0;

	if(P2_1==0) {Delay(20);while(P2_1==0);Delay(20);KeyNum=1;}
	if(P2_0==0) {Delay(20);while(P2_0==0);Delay(20);KeyNum=2;}
	if(P2_3==0) {Delay(20);while(P2_3==0);Delay(20);KeyNum=3;}
	if(P2_4==0) {Delay(20);while(P2_4==0);Delay(20);KeyNum=4;}

	return KeyNum;
}
//Timer0.c
#include

//Function Definition
/**
  * @brief 定时器0初始化
  * @param  无
  * @retval 1ms
  */
void Timer0_Init()	//1毫秒@12.000MHz
{
	TMOD &= 0xF0;	//设置定时器模式
	TMOD |= 0x01;	//设置定时器模式
	TL0 = 0x66;		//设置定时初值
	TH0 = 0xFC;		//设置定时初值
	TF0 = 0;        //清除TF0标志
	TR0 = 1;		//定时器0开始计时

	ET0=1;
	EA=1;
	PT0=0;
}
//mian.c (测试) 按键控制灯亮
#include
#include "Timer0.h"
#include "Key.h"

unsigned char KeyNum;

void main()
{
    Timer0_Init(); //定时器0初始化
	while(1)
	{
		KeyNum=Key();
		if (KeyNum)
		{
			if(KeyNum==1) P2_0=~P2_0; //按K1,led1亮,再按一次则熄灭
			if(KeyNum==2) P2_1=~P2_1;
			if(KeyNum==3) P2_2=~P2_2;
			if(KeyNum==4) P2_3=~P2_3;
		}
	}
}
//main.c  流水灯,按下K1改变方向
#include
#include "Timer0.h"
#include "Key.h"
#include "INTRINS.H"

unsigned char KeyNum,LEDMode;

void main()
{
	P2=0xFE;
    Timer0_Init(); //定时器0初始化
	while(1)
	{
		KeyNum=Key();
		if (KeyNum)
		{
			if(KeyNum==1) //按下K1,改变方向
			{
				LEDMode++;
				if(LEDMode>=2) LEDMode=0;
			}

		}
	}
}

void Timer0_Routine() interrupt 1
{
    static unsigned int T0Count;
	TL0 = 0x18; //重新赋值1us
	TH0 = 0xFC;
	T0Count++;
	if (T0Count>=500) //0.5s
	{
		  T0Count=0;
		  if(LEDMode==0)
			  P2=_crol_(P2,1);  //向左移位,并且循环
		  if(LEDMode==1)
			  P2=_cror_(P2,1);  //向右移位,并且循环
	}
}
7.2 定时器时钟
头文件之前都定义过了
#include
#include "Delay.h"
#include "LCD1602.h"
#include "Timer0.h"

unsigned char Sec,Min,Hou;

void main()
{
	LCD_Init();
	Timer0_Init();

	LCD_ShowString(1,1,"Clock:");
	LCD_ShowString(2,1,"  :  :");

	while(1)
	{
        //LCD显示
		LCD_ShowNum(2,1,Hour,2);
		LCD_ShowNum(2,4,Min,2);
		LCD_ShowNum(2,7,Sec,2);
	}
}

void Timer0_Routine() interrupt 1
{
    static unsigned int T0Count;
	TL0 = 0x18; //重新赋值1us
	TH0 = 0xFC;
	T0Count++;
	if (T0Count>=1000) //1s
	{
	    T0Count=0;
		Sec++;  //每秒递增
		if(Sec>=60)
		{
			Sec=0;
			Min++;
			if(Min>=60)
			{
				Min=0;
				Hour++;
				if(Hour>=24)
				{
					Hour=0;
				}
			}
		}
	}
}
8. 串口
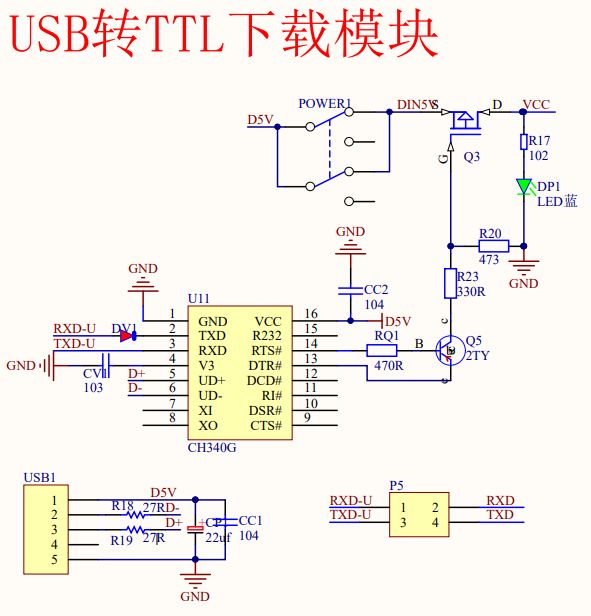
串口是一种应用十分广泛的通讯接口,成本低,容易使用,通讯线路简单,可以实现两个设备的互通性。
51单片机内部自带UART(通用异步收发器),可实现单片机的串口通信。串口接口是DB9接口
STC89C52有一个UART,STC89C52URAT有四种工作模式
原理
[外链图片转存失败,源站可能有防盗链机制,建议将图片保存下来直接上传(img-A8nbd6de-1670833987846)(https://yy.liveout.cn/article/Learn/cmicrocpu/22_12/%E4%B8%B2%E5%8F%A3%E5%AF%84%E5%AD%98%E5%99%A8.png)]
数据显示模式
HEX模式/十六进制模式/二进制模式:以原始数据的形式显示
文本模式/字符模式:以原始数据编码后的形式显示
8.1 串口向电脑发送数据
头文件
//UART.h
#ifndef __UART_H_
#define __UART_H_
void UART_Init(); //初始化
void UART_SendByte(unsigned char Byte);//只发送,不接收
#endif
函数
//UART.c
#include
//Function Definition
/**
  * @brief 串口初始化 [email protected]
  * @param  无
  * @retval 无
  */

void UART_Init()  //初始化 [email protected]
{
	SCON = 0x40; //0100 0000
	PCON |= 0x80;

	TMOD &= 0x0F;	//设置定时器1模式  0000 1111
	TMOD |= 0x20;	//设置定时器1模式  0010 0000
	TL1 = 0xF4;		//设定定时初值
	TH1 = 0xF4;		//设定定时器重装值
	ET1 = 0;		//禁止定时器1中断
	TR1 = 1;		//启动定时器1

}

//Function Definition
/**
  * @brief 串口发送一个字节数据
  * @param  Byte 要发送一个字节数字
  * @retval 无
  */

void UART_SendByte(unsigned char Byte) //只发送,不接收
{
	SBUF = Byte;
  while(TI==0); //发送成功跳出循环,TI变为1
	TI = 0;    //重置为0
}

//串口中断函数模板(用在下一个例子中)
//void UART_Routine() interrupt 4 //串口中断号为4
//{ //RI:接收中断请求标志位
//	if(RI==1) //RI=1向主机请求中断响
//	{
//		RI=0;//应中断后必须用软件复位,即RI=0
//	}
//}
//main.c
//每一秒发送一个字节
#include
#include "Delay.h"
#include "UART.h"

unsigned char Sec;

void main()
{
	UART_Init(); //初始化

	while(1)
	{
		UART_SendByte(Sec); //发送 16进制格式
		Sec++;
		Delay(1000);
	}
}
8.2 电脑通过串口控制LED
#include
#include "Delay.h"
#include "UART.h"

void main()
{
	UART_Init();

	while(1)
	{

	}
}

void UART_Routine() interrupt 4 //串口中断号为4
{ //RI:接收中断请求标志位
	if(RI==1) //RI=1向主机请求中断响
	{
		P2=~SBUF;
		UART_SendByte(SBUF);
		RI=0;//应中断后必须用软件复位,即RI=0
	}
}
