在C++上如何使用OpenCV头文件是什么_用OpenCV的dnn模块调用yolov3模型
前言
在实际应用场景,我们用darknet的GPU版本训练自己的数据,得到权值文件,然后我们可以调用训练的好的模型去实现自己的检测项目。一般情况下,我们可以使用opencv的dnn模块去调用yolov3。下面大致讲解一下如何是实现调用。
一、环境准备
1、编译好darknet的GPU版本。可参考我的文章https://zhuanlan.zhihu.com/p/134347176
2、安装好opencv3.4以上的版本,我使用的是opencv3.4.0(Windows)
3、安装好VS2015
二、编写调用程序
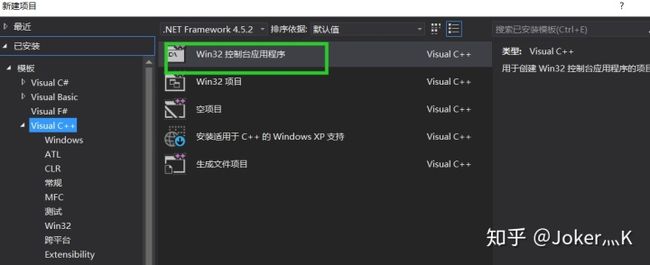
1、新建window控制台程序
2、在项目中选择release 64位,配置好opencv的头文件跟lib(自行百度)
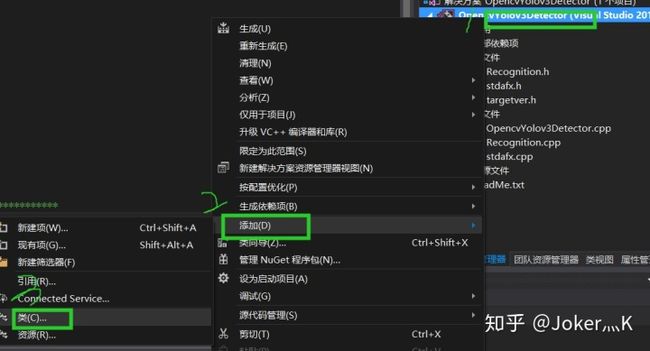
3、右键程序,添加类
4、得到一个类的头文件和源文件
5、在头文件中添加下面代码
#pragma once
#include
#include
#include
#include
#include
#include
#include
#include
//#include

using namespace std;
using namespace cv;
using namespace dnn;
using namespace cuda;

class Recognition
{
public:
	Recognition();
	~Recognition();
	Net InitYolov3();
	void postprocess(Mat& frame, const vector& out);
	std::vect getOutputsNames(const Net& net);
	void Recognition::runYolov3(Net& net, Mat& frame);
	void drawPred(int classId, float conf, int left, int top, int right, int bottom, Mat& frame);

private:
	vectorclass_names;// Class Name
	float confThreshold; // Confidence threshold
	float nmsThreshold;  //Non - maximum suppression threshold
	int inpWidth;        // Width of network's input image
	int inpHeight;       // Height of network's input image
};
6、在源文件中添加下面代码
#include "stdafx.h"
#include "Recognition.h"


Recognition::Recognition()
{
	confThreshold = 0.5;
	nmsThreshold = 0.4;
	inpWidth = 416;
	inpHeight = 416;
}


Recognition::~Recognition()
{
}

/************************************************************************
函数功能:进行Yolov3的各种配置工作
输入:无
输出:返回配置好的网络
************************************************************************/
Net Recognition::InitYolov3()
{
	//加载类名文件
	std::string class_names_string = "F:***_projectdarknet-masterbuilddarknetx64datacoco.names";
	std::ifstream class_names_file(class_names_string.c_str());
	if (class_names_file.is_open())
	{
		std::string name = "";
		while (std::getline(class_names_file, name))
		{
			class_names.push_back(name);
		}
	}
	else
	{
		std::cout << "don't open class_names_file!" << endl;
	}

	//给出模型的配置和权重文件
	cv::String modelConfiguration = "F:***_projectdarknet-masterbuilddarknetx64cfgyolov3.cfg";
	cv::String modelWeights = "F:***_projectdarknet-masterbuilddarknetx64yolov3.weights";

	// 装载网络
	cv::dnn::Net net = cv::dnn::readNetFromDarknet(modelConfiguration, modelWeights);//读取网络模型和参数,初始化网络
	std::cout << "Read Darknet..." << std::endl;
	net.setPreferableBackend(cv::dnn::DNN_BACKEND_OPENCV);
	net.setPreferableTarget(cv::dnn::DNN_TARGET_OPENCL_FP16);

	return net;
}

/************************************************************************
函数功能:使用非极大值抑制方法删除低置信度的边界框
输入:frame:网络的输入图像,out:网络输出层的输出图像
输出:无
************************************************************************/
void Recognition::postprocess(Mat& frame, const vector& out)
{
	std::vector confidences;
	std::vector boxes;
	std::vector classIds;

	for (int num = 0; num < out.size(); num++)
	{
		double value;
		Point Position;
		//得到每个输出的数据
		float *data = (float*data = (float *)out[num].data;

		for (int i = 0; i < out[num].rows; i++, data += out[num].cols)
		{
			//得到每个输出的所有类别的分数
			Mat sorces = out[num].row(i).colRange(5, out[num].cols);

			//获取最大得分的值和位置
			minMaxLoc(sorces, 0, &value, 0, &Position);
			if (value > confThreshold)
			{
				//data[0],data[1],data[2],data[3]都是相对于原图像的比例
				int center_x = (int)(data[0] * frame.cols);
				int center_y = (int)(data[1] * frame.rows);
				int width = (int)(data[2] * frame.cols);
				int height = (int)(data[3] * frame.rows);
				int box_x = center_x - width / 2;
				int box_y = center_y - height / 2;

				classIds.push_back(Position.x);
				confidences.push_back((float)value);
				boxes.push_back(Rect(box_x, box_y, width, height));
			}
		}
	}

	//执行非极大值抑制,以消除具有较低置信度的冗余重叠框
	std::vector perfect_indx;
	NMSBoxes(boxes, confidences, confThreshold, nmsThreshold, perfect_indx);
	for (int i = 0; i < perfect_indx.size(); i++)
	{
		int idx = perfect_indx[i];
		Rect box = boxes[idx];
		drawPred(idx, confidences[idx], box.x, box.y, box.x + box.width, box.y + box.height, frame);
	}

}

/************************************************************************
函数功能:得到输出层的名称
输入:需要遍历的网络Net
输出:返回输出层的名称
************************************************************************/
std::vector Recognition::getOutputsNames(const Net& net)
{
	static vector names;
	if (names.empty())
	{
		//得到输出层的索引号
		std::vector out_layer_indx = net.getUnconnectedOutLayers();

		//得到网络中所有层的名称
		std::vector all_layers_names = net.getLayerNames();

		//在名称中获取输出层的名称
		names.resize(out_layer_indx.size());
		for (int i = 0; i < out_layer_indx.size(); i++)
		{
			names[i] = all_layers_names[out_layer_indx[i] - 1];
		}
	}
	return names;
}

void Recognition::drawPred(int classId, float conf, int left, int top, int right, int bottom, Mat& frame)
{
	//Draw a rectangle displaying the bounding box
	rectangle(frame, Point(left, top), Point(right, bottom), Scalar(255, 178, 50), 3);

	//Get the label for the class name and its confidence
	string label = format("%.5f", conf);
	if (!class_names.empty())
	{
		CV_Assert(classId < (int)class_names.size());
		label = class_names[classId] + ":" + label;
	}
	//Display the label at the top of the bounding box
	int baseLine;
	Size labelSize = getTextSize(label, FONT_HERSHEY_SIMPLEX, 0.5, 1, &baseLine);
	top = max(top, labelSize.height);
	rectangle(frame, Point(left, top - round(1.5*labelSize.height)), Point(left + round(1.5*labelSize.width), top + baseLine), Scalar(255, 255, 255), FILLED);
	putText(frame, label, Point(left, top), FONT_HERSHEY_SIMPLEX, 0.75, Scalar(0, 0, 0), 1);
}

/************************************************************************
函数功能:yolov3执行的过程
输入:yolov3的网络net,原始的图像frame
输出:无
************************************************************************/
void Recognition::runYolov3(Net& net, Mat& frame)
{
	// 从一个帧创建一个4D blob
	cv::Mat blob;

	double start = getTickCount();

	// 1/255:将图像像素值缩放到0到1的目标范围
	// Scalar(0, 0, 0):我们不在此处执行任何均值减法,因此将[0,0,0]传递给函数的mean参数
	blob = cv::dnn::blobFromImage(frame, 1 / 255.0, cvSize(inpWidth, inpHeight), cv::Scalar(0, 0, 0), true, false);

	// 设置网络的输入
	net.setInput(blob);

	// 运行向前传递以获得输出层的输出
	std::vector outs;
	net.forward(outs, getOutputsNames(net));//forward需要知道它的结束层

											// 以较低的置信度移除边界框
	postprocess(frame, outs);//端到端,输入和输出

	std::cout << "succeed!!!" << std::endl;
        cv::Mat detectedFrame;
	frame.convertTo(detectedFrame, CV_8U);

	double end = getTickCount();

	double time = (end - start) / getTickFrequency() * 1000;

	char runtime[100];
	sprintf_s(runtime, "%.2f", time);    // 帧率保留两位小数
	std::string fpsString("Run Time:");
	fpsString = fpsString + runtime + "ms";;                   // 在"FPS:"后加入帧率数值字符串
											 //显示帧率
	putText(detectedFrame, // 图像矩阵
		fpsString,                  // string型文字内容
		cv::Point(5, 20),           // 文字坐标,以左下角为原点
		cv::FONT_HERSHEY_SIMPLEX,   // 字体类型
		0.5, // 字体大小
		cv::Scalar(0, 255, 0));       // 字体颜色
	// 显示detectedFrame
	cv::imshow("detectedFrame", detectedFrame);
	waitKey(0);
}
7、然后可以在main函数下调用这个类了,代码如下
#include "stdafx.h"
#include "Recognition.h"


int main()
{
	//读取图片用于检测
	Mat frame = imread("C:UsersTonyDesktoptesttest1.jfif");
	//初始化检测类
	Recognition* recognition = new Recognition();
	//初始化网络
	dnn::Net net = recognition->InitYolov3();
	//运行yolov3
	recognition->runYolov3(net,frame);
    return 0;
}
8、自行下载yolov3.weights文件测试,测试效果如下(500多ms,提示说如果有intel显卡速度会更快)
后面将调用darknet生成的dll,速度比opencv要更快,更能满足要求。
最后
如果觉得文章对您有帮助的话,别忘了给我个赞,谢谢!


