安装anaconda-框架-cuda-vscode笔记
title
- windows版
-
- anaconda下载安装
- 修改镜像源
- conda常用安装命令
- cuda安装
- 安装实战
- ubuntu18.04版
-
- 开始安装
- 修改镜像源
- conda常用安装命令
- 安装实战
- 关于vscode
windows版
anaconda下载安装
清华园里找anaconda。
安装教程一步一步来。
参考新建环境并安装tensorflow
修改镜像源
pip安装工具
补充:如果等不了境外下载速度,可以果断切换为清华园镜像。(真香)
就算pip更新
1、临时修改
在后边儿临时加:-i https://pypi.tuna.tsinghua.edu.cn/simple
2、永久修改 添加了配置文件
C:\Users\Administrator\AppData\Roaming\pip\pip.ini文件
pip install pip -U
pip config set global.index-url https://pypi.tuna.tsinghua.edu.cn/simple
conda安装工具
win10以下命令可以切换anaconda的镜像源。
conda config --add channels https://mirrors.tuna.tsinghua.edu.cn/anaconda/pkgs/free/

conda config --add channels https://mirrors.tuna.tsinghua.edu.cn/anaconda/pkgs/main/

conda config --add channels https://mirrors.tuna.tsinghua.edu.cn/anaconda/cloud/conda-forge/

conda config --add channels https://mirrors.tuna.tsinghua.edu.cn/anaconda/cloud/pytorch/

conda config --add channels https://mirrors.tuna.tsinghua.edu.cn/anaconda/pkgs/pro/

conda config --add channels https://mirrors.tuna.tsinghua.edu.cn/anaconda/cloud/msys2/

conda config --add channels https://mirrors.tuna.tsinghua.edu.cn/anaconda/cloud/bioconda/

conda config --add channels https://mirrors.tuna.tsinghua.edu.cn/anaconda/cloud/menpo/

//这一步挺关键,貌似每次打开命令行,都得重新来一遍
conda config --set show_channel_urls yes

其实就是配置了C:\Users\Administrator\.condarc这个文件
conda常用安装命令
conda info --envs
conda create -n name python=3.7		创建环境
conda remove -n name --all			卸载环境
cuda安装
参考文章
本人使用的版本:
Geforce 930M显卡
cuda_10.2.89_441.22_win10
cudnn-10.2-windows10-x64-v8.2.1.32
- 检查自己显卡适合的cuda版本,兼容性还是可以的。
英伟达-显卡链接 - 安装cuda
cuda为显卡提供深度学习相关的运算库。
英伟达cuda下载链接
cuda_10.2.89_441.22_win10.exe
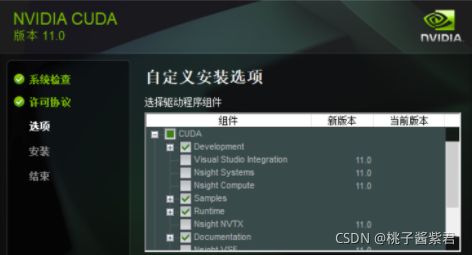
安装过程-自定义选项-好像只安装CUDA组件即可,本人看了另一篇文章,除了图中的Visual Studio integration组件其他都安装了。还有的文章安装完添加环境变量的,本人也没管,貌似新版本自动添加了,不管了,问题不大。

安装完成,在终端查看是否安装成功
nvcc -V或nvcc --version
- 安装cudnn
cudnn完善深度学习相关运算库,用于协助cuda。
英伟达cudnn下载链接
cudnn-10.2-windows10-x64-v8.2.1.32.zip
将解压后的bin文件夹、include文件夹、lib文件夹复制到CUDA的安装目录里面,达到“如虎添翼”之效果。 - 安装pytorch-gpu版本
推荐使用conda安装命令,最好前边把conda和pip的源都换成清华源,不然下载到猴年马月了。
pytorch官网

在自己的anaconda环境里安装命令,目前使用python3.6环境:
#去掉-c pytorch,否则还是使用国外源,下载龟速
conda install pytorch torchvision torchaudio cudatoolkit=10.2
接下来在编写程序时就能调用gpu啦。
安装实战
在新建环境下载tensorflow:
pip install tensorflow==2.0.0-alpha0 -i https://pypi.tuna.tsinghua.edu.cn/simple
另外,执行以下命令,下载pytorch
pytorch官网查看下载命令.
conda install pytorch torchvision torchaudio cpuonly //去掉-c pytorch 使用自己的镜像源
安装.whl轮子命令
//pip安装命令
pip install (software_name) -i https://pypi.tuna.tsinghua.edu.cn/simple
//conda给某个环境安装命令
conda install --name (env) (software_name) -y
其实conda和pip一样,都是一种下载工具。
如果遇到问题:使用TensorFlow时报错FutureWarning: Passing (type, 1) or ‘1type’ as a synonym of type is deprecated; in a future version of numpy…
报错原因:numpy1-17-0版本过高,使用numpy-1.16-0版本即可。
pip install numpy==1.16.0 -i https://pypi.tuna.tsinghua.edu.cn/simple
anaconda的作用:本来普通的装个python3.9啥的就是一个python环境,可以运行python环境,但是现在有了anaconda,直接就能管理多个python环境,一个base主环境,可以自己创建python3.6环境或者python3.7环境,所以很方便啦。
如果遇到什么问题,现搜吧。
ubuntu18.04版
开始安装
清华园下载:选择linux_x86_64版本
进入命令行版安装程序,基本都是回车+yes。
bash Anaconda3-2021.05-Linux-x86_64.sh

安装过程:
1 输入回车键确认安装;
2 阅读Anaconda最终用户许可协议,按下回车浏览完信息;
3 问我们是否接受该协议,只能接受了,输入yes;(Do you accept the license terms? [yes|no])
4 提示安装到以下位置,回车确认即可;(Anaconda3 will now be installed into this location:)
5 是否加入环境变量,通常是选择yes的;这个根据自己情况选择,如果经常用conda环境开发,建议选择yes(Do you wish the installer to initialize Anaconda3 in your /home/linuxidc/.bashrc ? [yes|no])

心得:
anaconda3安装在了~/anaconda3目录下
环境装到了~/.bashrc里,使用source .bashrc激活该环境变量
修改镜像源
- conda安装工具
//换源 也是最终配置到了~/.condarc文件
conda config --add channels https://mirrors.tuna.tsinghua.edu.cn/anaconda/pkgs/main/
conda config --add channels https://mirrors.tuna.tsinghua.edu.cn/anaconda/pkgs/free/
conda config --set show_channel_urls yes
- pip安装工具
//换源 就是配置到了~/.pip/pip.conf
//文件内容
[global]
index-url = https://pypi.tuna.tsinghua.edu.cn/simple
trusted-host = pypi.tuna.tsinghua.edu.cn
conda常用安装命令
//查询命令
conda list		查看安装了哪些包。
conda env list  或  conda info -e查看当前存在哪些虚拟环境
conda  -V		查询conda版本
conda -h		查询conda的命令使用
//创建命令 和windows一样
conda create -n your_env_name python=X.X			创建环境
conda remove -n your_env_name(虚拟环境名称) --all	删除环境
conda/source activate  your_env_name						切换环境
安装实战
安装tensorflow
conda create -n randlanet python=3.5
source activate randlanet
pip install -r helper_requirements.txt
sh compile_op.sh
关于vscode
vscode+tensorflow_cpu_gpu安装教程
基本上有一个环境的这么个概念,满足:
1、windows环境变量->anaconda->分支python环境。
2、vscode pythonpath->分支python环境对应的编译器(python环境目录)。
pylint问题:
pylint(import-error)解决办法1
pylint(import-error)解决办法2
最终调试的vscode setting.json代码:
1、python.exe选择
选择自己安装的那个环境下的python.exe即可。


2、run coder部分
"python.pythonPath": "D:\\0_install\\Anaconda3\\envs\\Tens\\python.exe",
    "code-runner.executorMap": {
		"python": "set PYTHONIOENCODING=utf8 &&  D:\\0_install\\Anaconda3\\envs\\Tens\\python.exe",
	},
//终端部分
"terminal.integrated.shell.windows": "C:\\WINDOWS\\System32\\cmd.exe",
3、代码规范部分设置
首选项 -> 设置,搜索关键字lint,使能或选择相关规范软件的配置。
可安装pylint、flake8等代码规范软件。

"D:\\0_install\\Anaconda3\\envs\\Tens\\Scripts\\pylint.exe\""
vscode相关配置:基本逃不脱以下两个地方
- 首选项 -> 设置
- ctrl+shift+p -> 打开设置(json)
通过以上问题,我得知,vscode的面板上任何插件的选项设置,设置完毕,基本都在setting.json文件中有代码体现(背景、run coder、pylint等)。
vscode常用插件:
1)、 C/C++,这个肯定是必须的。
2)、 C/C++ Snippets,即 C/C++重用代码块。
3)、 C/C++ Advanced Lint,即 C/C++静态检测 。
4)、 Code Runner,即代码运行。
5)、 Include AutoComplete,即自动头文件包含。
6)、 Rainbow Brackets,彩虹花括号,有助于阅读代码。
7)、 One Dark Pro, VSCode 的主题。
8)、 GBKtoUTF8,将 GBK 转换为 UTF8。
9)、 ARM,即支持 ARM 汇编语法高亮显示。
10)、 Chinese(Simplified),即中文环境。
11)、 vscode-icons, VSCode 图标插件,主要是资源管理器下各个文件夹的图标。
12)、 compareit,比较插件,可以用于比较两个文件的差异。
13)、 DeviceTree,设备树语法插件。
14)、 TabNine,一款 AI 自动补全插件,强烈推荐,谁用谁知道!