C/C++图像处理实验(二)——图像的二值化
简介
图像的二值化可以有效地分割图像主体和背景,提取自己感兴趣的部分。
图像二值化有多种方式和形式,最简单的是自己设定阈值,然后根据阈值将对应的像素点赋值为0或者255。有时候为了提高程序的鲁棒性,可以使用图像的平均灰度加上一个偏置作为阈值,又或者是用大津法(OSTU)求出“最佳阈值”后,再加上偏置量作为阈值。在二值化的形式上,可以低于阈值的像素设为黑,高于阈值的设为白,但是也可以根据实际需要反过来设定数值。
算法过程
以下过程默认低于阈值的像素设为黑,高于阈值的设为白。
固定阈值
固定阈值的算法较为简单:
f ( x , y ) = { 255 , f ( x , y ) ≥ t h r e s h o l d 0 , f ( x , y ) < t h r e s h o l d f(x,y) = \begin{cases} 255,\,\,f(x,y)\ge threshold\\ 0,\,\,f(x,y)< threshold\\ \end{cases} f(x,y)={255,f(x,y)≥threshold0,f(x,y)<threshold
//设定阈值的二值化,传入灰度图像数组,黑白图像数组和设定的阈值以及标志位。
//标志位为0时,小于阈值的位置给0,高于阈值的给255;为1时,低于阈值给255,高于阈值给0.
void thresholds(unsigned char img_gray[][Width], unsigned char img_bin[][Width], unsigned int height, unsigned int width, unsigned char threshold, char flag)
{
	//在嵌入式开发中可以根据实际需要保留其中一个分支即可
	if (flag == 0)
	{
		for (unsigned int i = 0; i < height; i++)
		{
			for (unsigned int j = 0; j < width; j++)
			{
				img_bin[i][j] = img_gray[i][j] >= threshold ? 255 : 0;
			}
		}
	}
	else if (flag == 1)
	{
		for (unsigned int i = 0; i < height; i++)
		{
			for (unsigned int j = 0; j < width; j++)
			{
				img_bin[i][j] = img_gray[i][j] < threshold ? 255 : 0;
			}
		}
	}
	else {
		return;
	}
}
当然也可以写得简洁一点:
void thresholds(unsigned char img_gray[][Width], unsigned char img_bin[][Width], unsigned int height, unsigned int width, unsigned char threshold, char flag)
{
	unsigned char temp = 255 * (1 - flag);

	for (unsigned int i = 0; i < height; i++)
	{
		for (unsigned int j = 0; j < width; j++)
		{
			img_bin[i][j] = img_gray[i][j] >= (threshold-flag) ? temp : (255-temp);
		}
	}
}
主函数部分调用
int main()
{
	Mat image_gray = imread("./test.png",0);
	unsigned char img_gray[Height][Width];
	unsigned char img_bin[Height][Width];
	Mat2array(image_gray, img_gray,Height,Width);
	thresholds(img_gray, img_bin,Height,Width, 130, 0);
	Mat img_test=array2Mat(img_bin,Height,Width);
	imshow("image_test", img_test);
	waitKey(0);
	return 0;
}
平均值阈值
算法与固定阈值类似,但是阈值需要计算图像的平均灰度得到。
//输入灰度图像,计算返回图像的平均灰度值。
unsigned char average(unsigned char img_gray[][Width], unsigned int height, unsigned int width)
{
	unsigned long total = 0;
	for (unsigned int i = 0; i < height; i++)
	{
		for (unsigned int j = 0; j < width; j++)
		{
			total += img_gray[i][j];
		}
	}
	unsigned char threshold = (unsigned char)(total / (height * width));
	return threshold;
}
主函数部分调用过程:
int main()
{
	Mat image_gray = imread("./test.png", 0);
	unsigned char img_gray[Height][Width];
	unsigned char img_bin[Height][Width];
	Mat2array(image_gray, img_gray, Height, Width);
	unsigned char threshold = average(img_gray,Height,Width);//计算出平均阈值
	thresholds(img_gray, img_bin, Height, Width, threshold, 0);
	Mat img_test = array2Mat(img_bin, Height, Width);
	imshow("image_test", img_test);
	waitKey(0);
	return 0;
}
大津法(OSTU)
大津法的目标是求取一个阈值T,使得前景部分和背景部分的方差 g g g最大,大津法将图像分为前景和背景,前景就想要设置为白色的区域的像素,背景即为设置为黑色的像素。记想要设置为前景的像素的数量占比为 ω 0 \omega_0 ω0,前景的平均灰度为 μ 0 \mu_0 μ0,背景的像素占比为 ω 1 \omega_1 ω1,背景的平均灰度位 μ 1 \mu_1 μ1,图像的平均灰度为 μ \mu μ,则有以下关系:
ω 0 + ω 1 = 1 μ 0 ∗ ω 0 + μ 1 ∗ ω 1 = μ ω 0 ∗ ( μ 0 − μ ) 2 + ω 1 ∗ ( μ 1 − μ ) 2 = g \begin{align} \omega_0+\omega_1=1\\ \mu_0*\omega_0+\mu_1*\omega_1=\mu\\ \omega_0*(\mu_0-\mu)^2+\omega_1*(\mu_1-\mu)^2=g \end{align} ω0+ω1=1μ0∗ω0+μ1∗ω1=μω0∗(μ0−μ)2+ω1∗(μ1−μ)2=g
上面第三个式子的复杂度较高,可以根据第一和第二的式子对其进行优化:
g = ω 0 ∗ ω 1 ∗ ( μ 0 − μ 1 ) 2 g=\omega_0*\omega_1*(\mu_0-\mu_1)^2 g=ω0∗ω1∗(μ0−μ1)2
所以算法步骤为:
- 计算图像的灰度直方图
- 设定阈值为t,从0开始遍历到255
- 根据不同的t得到对应的 ω 0 、 ω 1 、 μ 0 、 μ 1 \omega_0、\omega_1、\mu_0、\mu_1 ω0、ω1、μ0、μ1
- 计算对应的方差g,当g取值最大时,t即为所需的最佳阈值T
//返回最佳阈值
unsigned char OSTU(unsigned char img_gray[][Width],unsigned int height,unsigned int width)
{
	unsigned char best_threshold = 0;//图像最佳阈值
	unsigned int histogram[256] = { 0 };//统计图像像素值数量的数组,即直方图
	unsigned long sum_grey_value = 0;//像素灰度总值
	unsigned int total = height*width;//图像的总的像素数量
	unsigned char MinValue = 0, MaxValue = 255;//整幅图像的最小和最大灰度值
	Histogram(img_gray, height, width, histogram);//计算灰度直方图
	for (MinValue = 0; MinValue < 256 && histogram[MinValue] == 0; MinValue++);        //获取最小灰度的值
	for (MaxValue = 255; MaxValue > MinValue && histogram[MinValue] == 0; MaxValue--); //获取最大灰度的值
	float w0 = 0, w1 = 0, u0 = 0, u1 = 0, variance = 0, maxVariance = 0;
	unsigned long u0Sum = 0, u1Sum = 0, u0SumGrey = 0, u1SumGrey = 0;
	//目标像素占总图像比例w0,背景像素占总图像比例w1
	//目标平均灰度值u0,背景平均灰度值u1
	//类间方差 variance
	//最大类间方差 maxVariance
	// u0Sum , u1Sum 前后景的像素数量总数
	//u0SumGrey,u1SumGrey前后景的灰度总数
	for (int i = MinValue; i <= MaxValue; i++)
	{
		sum_grey_value += histogram[i] * i;
	}
	char count = 10;
	for (int i = MinValue; i <= MaxValue; i++)     // i作为阈值 阈值从1-255遍历
	{
		u0Sum += histogram[i];//背景像素点数
		u1Sum = total - u0Sum;//前景像素点数
		w0 = (float)u0Sum / total;
		w1 = 1-w0;
		u0SumGrey += histogram[i] * i;//背景灰度总值
		u1SumGrey = sum_grey_value - u0SumGrey;//前景灰度总值
		u0 = (float)u0SumGrey / u0Sum;
		u1 = (float)u1SumGrey / u1Sum;

		variance = w0 * w1 * (u1 - u0) * (u1 - u0);  //类间方差计算公式

		if (variance >= maxVariance)   //判断是否为最大类间方差,类间方差的变化应该类似于二次函数,使用当新的类间方差值连续减小10次时,即可提前结束循环
		{
			maxVariance = variance;
			best_threshold = i;
			count = 10;
		}
		else
		{
			count--;
		}
		if (count == 0)break;
	}
	return best_threshold;
}
主函数部分:
int main()
{
	Mat image_gray = imread("./test.png",0);
	unsigned char img_gray[Height][Width];
	unsigned char img_bin[Height][Width];
	Mat2array(image_gray, img_gray,Height,Width);
	unsigned threshold= OSTU(img_gray, Height, Width);
	thresholds(img_gray, img_bin,Height,Width ,threshold, 0);
	Mat img_test=array2Mat(img_bin,Height,Width);
	imshow("image_test", img_test);
	waitKey(0);
	return 0;
}
结果
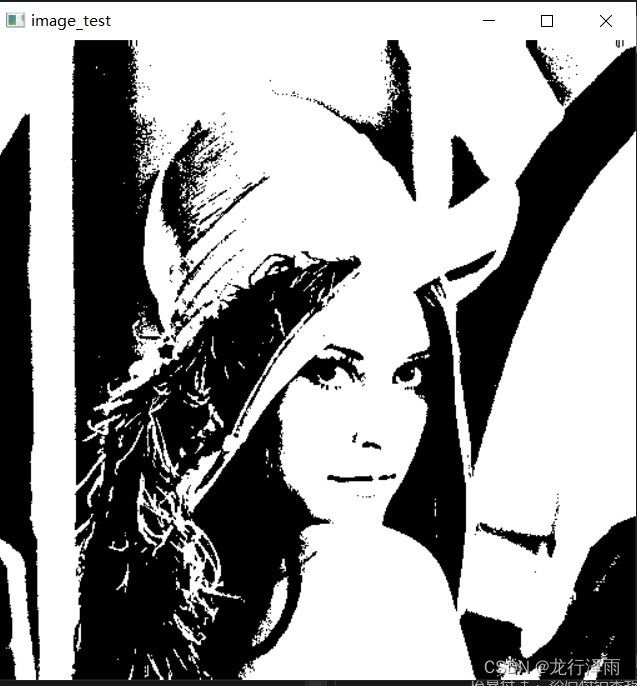
固定阈值为130的结果如图

平均值阈值为123,结果如图

大津法计算出来的阈值结果为116,结果如图
总结
以上三种二值化方法都是全局阈值的方法,虽然后面两种都具有一定的自适应性,但是在一些特定光照的情况下,想要分割出需要的背景还是不太理想,需要用到了局部阈值才能实现。对于大津法,其效果相对于其它两种方法是最好的,但是其在单片机上的使用一定要经过优化才能使用,相比于其它两种方法,对硬件性能要求较高。