干货总结!Dockerfile编写优秀实践
Dockerfile 优秀实践
1. 善用.dockerignore文件
Docker 是CS架构,这就意味着 Client 和 Server 可以在不同的主机上。在构建镜像的时候,Client 会把所有需要的文件打包发送给 Server,这些发送的文件叫做 build context
默认情况下,构建上下文中所有的文件都会被打包发送给 Docker deamon,但是我们可以使用 .dockerignore 来忽略 build context 中的某些路径和文件,从而避免发送不必要的数据内容,从而加快镜像的创建过程,特别是远程构建的时候
When you run a build command, the build client looks for a file named .dockerignore in the root directory of the context. If this file exists, the files and directories that match patterns in the files are removed from the build context before it’s sent to the builder.
如果你有多个 Dockerfile,你可以为每一个 Dockerfile 指定一个 ignore 文件。为了达到这样的目的,我们需要遵循特定的命名规范:" Place your ignore-file in the same directory as the Dockerfile, and prefix the ignore-file with the name of the Dockerfile":
.dockerignore 的忽略规则如下
- .dockerignore 中的每一行表示一条忽略规则
- # 开头的行会被视为注释,不会被处理
- “the root of the context is considered to be both the working and the root directory” 因此 .dockerignore 中
/foo/barandfoo/bar是等效的,都是以构建上下文的根路径开始 - 你可以使用
!来排除某些文件,即使他们匹配 .dockerignore 文件中的规则。 *:匹配任意数量的字符(包括零个)。?:匹配单个字符。**:匹配任意数量的目录(包括零个)。**/*.go会排除 build context 中所有 .go 结尾的文件!:用于排除特定文件或目录,即使它们被之前的模式匹配。
构建镜像后可以发现,/data 目录下只有 file.data,而 file.txt 被忽略了
2.镜像的多阶段构建
https://docs.docker.com/build/building/multi-stage/
构建docker镜像可以有下面两种方式:
- 将全部组件及其依赖库的编译、测试、打包等流程封装进一个docker镜像中。但是这种方式存在一些问题,比如Dockefile特别长,可维护性降低;镜像的层次多体积大,部署时间长等问题
- 将每个阶段分散到多个Dockerfile。一个Dockerfile负责将项目及其依赖库编译测试打包好后,然后将运行文件拷贝到运行环境中,这种方式需要我们编写多个Dockerfile以及一些自动化脚本才能将其两个阶段自动整合起来为了解决以上的两个问题,但是Docker17.5版本开始支持多镜像阶段构建,只需要编写一个Dockerfile即可解决上述问题。
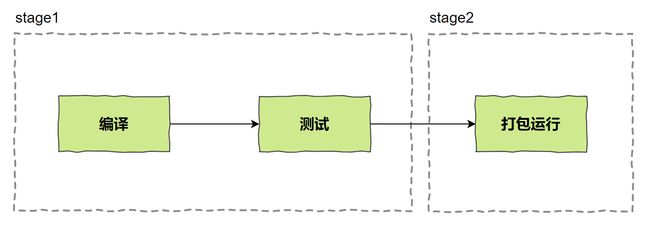
通过多步骤创建,可以将编译测试和运行等过程分开,保证最终生成的镜像只包括运行应用所需要的最小化环境。
Dockerfile 多阶段构建的规则如下:
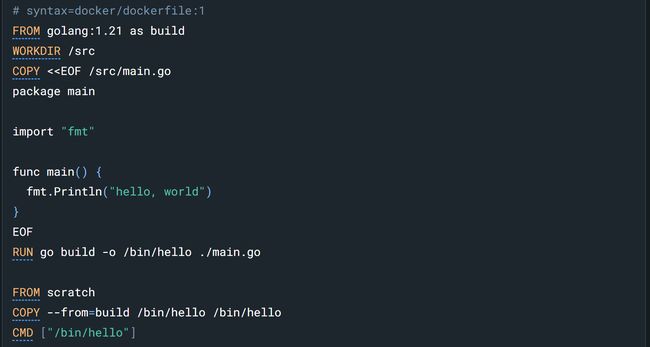
“With multi-stage builds, you use multiple FROM statements in your Dockerfile. Each FROM instruction can use a different base, and each of them begins a new stage of the build. You can selectively copy artifacts from one stage to another, leaving behind everything you don’t want in the final image.”
“When using multi-stage builds, you aren’t limited to copying from stages you created earlier in your Dockerfile. You can use the COPY --from instruction to copy from a separate image. The Docker client pulls the image if necessary and copies the artifact from there”
也就是说,每一个 FROM 都对应着一个 stage 的开始,通过使用 COPY --from 指令,就可以将之前 stage 中的文件拷贝到当前的 stage。
那么 --from 后面的内容是什么?换句话说,如何区分每一个 build stage?你可以用数字表示,第一个 FROM 对应的数字为 0,以此往后递增。但是你可以在 FROM 后面添加 AS 给各个阶段命名
完成多阶段构建后,最终镜像只会包含最后一个 stage 的内容,这样我们镜像的空间就可以保证最终生成的镜像只包括运行应用所需要的最小化环境。默认情况会停在最后一个 stage,当然你也可以停在指定的 build stage
例如使用下面的 build 指令中,最后构建阶段会停在名为 “build” 的构建阶段
下面是一个具体的实操,来体会多阶段构建的的优势:
我们的构建目标如下,编写一段 C 语言程序,然后编译成可执行文件:
单阶段构建:
Dockerfile如下所示:
最后的镜像大小如下所示:
多阶段构建:
可以看到占用的空间大大减少
在阶段2中使用体积更小的基础镜像,最终生成镜像的体积会更小
[问题]:
替换为更轻量的镜像 busybox 时遇到这样的问题:
libc, the standard C library, provides the C and POSIX APIs to Linux programs and is an intrinsic part of the Linux system. Most Linux distributions are based on glibc, the GNU C library. However, both Alpine Linux and BusyBox images are based on musl standard C library, which is generally incompatible with glibc.
Consequently, executables that are built on glibc-based distros such as Ubuntu, Debian or Arch Linux, won’t work out of the box on Alpine Linux or BusyBox.
参考解答
3.合理使用缓存
Dockerfile中每一行的指令都会创建一层 “image layer”,这些 layer 就像是 stack 一样, 后来 的“栈”堆在先来的栈“”上
在执行每条指令之前,docker 都会在 cache 中查找是否有可重用的 layer,如果有则会直接重用该层 layer,如果没有,那么之后的 layer 都需要 rebuild,不管之后操作是否相同, layer 的内容是否相同
合理使用cache,要尽量把内容不变,执行成本高的指令放在前面,这样可以尽量复用,如下面这个例子:
上面这个 Dockerfile 并不是高效的,如果本地文件发生修改,COPY . . 以及后面的指令都不能使用缓存,需要重新创建。
因为,我们可以将上面的 COPY 指令一分为二。首先拷贝包管理文件(package.json 和 yarn.lock),然后安装依赖。最后再将项目的源文件(经常修改的部分)拷贝进来,执行 build 命令
经过这样的修改后,只要我们的包管理文件没有发生修改,npm install 这一层的内容是可以使用缓存的,省去了执行 npm install 的时间
下面是一个实操案例,在容器中编写编译运行一段 C 语言代码:
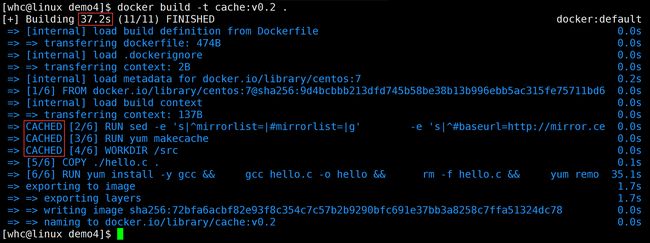
在没有缓存的情况下,我们构建用时 67.3 s
修改 hello.c 的内容后,再次构建。用时 30 多s也不少啊?这是因为我们修改 hello.c 后,COPY 指令以及之后的内容都不能使用缓存,需要重新执行,而之前的指令可以复用缓存,可以看到右边的耗时都是 0s
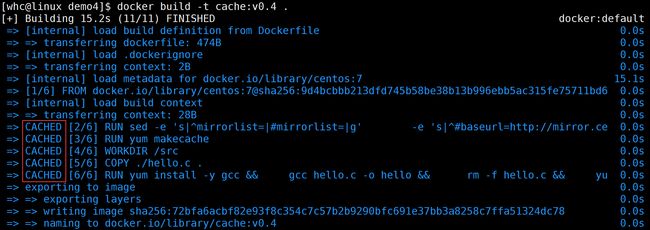
我们什么都不修改再次构建,在缓存的加持下速度会更快:
4.选择体积较小镜像
基础镜像尽量使用官方镜像,并选择体积较小镜像。容器的核心是应用,大的平台微服务可能几十上百个。选择过大的父镜像(如Ubuntu系统镜像)会造成最终生成应用镜像的臃肿,因此推荐选用瘦身过的应用镜像(如node:slim),或者较为小巧的系统镜像(如alpine、busybox或debian);
5.减少镜像层数
镜像层数越少意味着发生修改时,需要重建的 layers 层数越少,那么你的构建也会越快。如果希望所生成镜像的层数尽量少,可以遵循下面的建议:
- 尽量合并RUN、ADD和COPY指令。通常情况下,多个RUN指令可以合并为一条RUN指令,并共享同一份缓存;如
apt get update && apt install尽量写到一行 - 使用多级构建,从而每个 stage 中都只包含少量的指令
6.推荐使用 exec form
使用 exec form 的优势如下:
- 直接执行:exec form 直接执行命令,这意味着命令不会被 shell 解析,避免了 shell 解析可能带来的问题
- 信号传递:使用 exec form 时,Docker 能够正确地将信号(如 SIGTERM)传递给容器中的主进程(PID 1),这对于优雅地停止容器非常重要。在 shell form 中,shell 本身成为 PID 1,这可能导致信号传递不正确。
- 安全性:由于 exec form 不依赖于 shell,它减少了潜在的安全风险
- 清晰性:Exec form 使用 JSON 数组格式,使得命令和参数的传递更加清晰,易于理解和维护。
- 兼容性:Exec form 提供了更好的跨平台兼容性,尤其是在处理 Windows 和 Unix-like 系统时,因为不同系统可能有不同的 shell 和路径分隔符。


