Apache 神禹(shenyu)源码阅读(一)——Admin向Gateway的数据同步(Admin端)
源码版本:2.6.1
单机源码启动项目
启动教程:社区新人开发者启动及开发防踩坑指南
源码阅读
前言
开了个新坑,也是第一次阅读大型项目源码,写文章记录。
在写文章前,已经跑了 Divide 插件体验了一下(体验教程:Http快速开始)。
由于 shenyu 默认使用 H2 数据,但是我因为 IDEA 连接内存模式下的数据库有 BUG,连接不到,改用 MySQL(改用MySQL教程:Apache-Shenyu入门教程(demo实战及遇到的坑))。
认识 shenyu 架构以及本文的内容
shenyu 官方的一个架构图,红色圈部分是本文和下一篇文章研究的内容:

在查看 PluginChain 的过程中,想看 shenyu-admin(以下称 Admin)是如何向 Gateway 同步数据的。
同步数据我把它划分为三个部分:
- 一个是 Gateway 是如何连接上 Admin 的(通过 Websocket——shenyu 默认的同步方式)
- 一个是 Admin 通过 Websocket发送要同步的数据。
- 一个是 Gateway 从 Websocket 接收同步的数据进行同步。
本文研究第一个部分和第二个部分,下一篇研究第三个部分。
有博主(Apache ShenYu 源码阅读系列 - 基于 WebSocket 的数据同步)已经研究了这部分的内容,不过是21年的文章了,有些源码已经更新迭代过了,所以这篇文章就以最新的源码解读。
正文
1. 第一部分:Gateway 是如何连接上 Admin 的?
在 shenyu-bootstrap/src/main/resources/application.yml 中进行配置 websocket 属性。

对应的属性解释(来自官网https://shenyu.apache.org/zh/docs/user-guide/property-config/gateway-property-config):

如此 Admin(作为Server) 和 Gateway(作为Client)建立连接
2. 第二部分:Admin 如何通过 Websocket发送要同步的数据?
以创建 Selector 为例,解释在 Admin 创建的 Selector 是如何同步到 Gateway 的。
2.1 在 Divide 插件里创建一个新的 Selector
2.2 在新增 Selector 点击 Sure 后
请求会发到 shenyu-admin/src/main/java/org/apache/shenyu/admin/controller/SelectorController.java 的 #createSelector 方法中:
2.3 进入104 行的 #createOrUpdate,也就是 SelectorService 接口的一个默认实现:
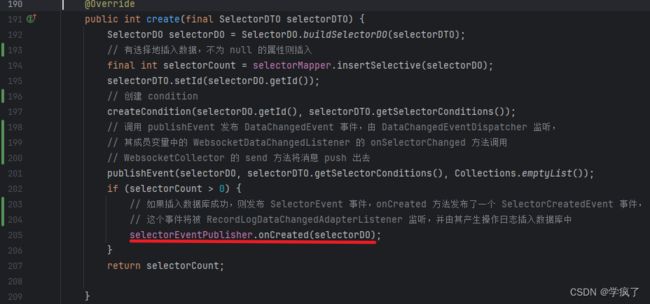
2.4 继续进入该接口的另一个方法 #create 中,来到 SelectorServiceImpl:
这里我加的第 198 行注释看不懂没关系,接下来会解释这些注释。
2.5 先是 194 行划红线部分:
2.5.1 Mybatis mapper
一个 Mybatis 的 mapper 配置,路径在 shenyu-admin/src/main/resources/mappers/selector-sqlmap.xml
selector-sqlmap.xml
<insert id="insertSelective" parameterType="org.apache.shenyu.admin.model.entity.SelectorDO">
        INSERT INTO selector
        <trim prefix="(" suffix=")" suffixOverrides=",">
                id,
            <if test="dateCreated != null">
                date_created,
            if>
            <if test="dateUpdated != null">
                date_updated,
            if>
            <if test="pluginId != null">
                plugin_id,
            if>
            <if test="name != null">
                name,
            if>
            <if test="matchMode != null">
                match_mode,
            if>
            <if test="type != null">
                type,
            if>
            <if test="sort != null">
                sort,
            if>
            <if test="enabled != null">
                enabled,
            if>
            <if test="loged != null">
                loged,
            if>
            <if test="continued != null">
                continued,
            if>
            <if test="matchRestful != null">
                match_restful,
            if>
            <if test="handle != null">
                handle,
            if>
        trim>
        <trim prefix="values (" suffix=")" suffixOverrides=",">
                #{id, jdbcType=VARCHAR},
            <if test="dateCreated != null">
                #{dateCreated, jdbcType=TIMESTAMP},
            if>
            <if test="dateUpdated != null">
                #{dateUpdated, jdbcType=TIMESTAMP},
            if>
            <if test="pluginId != null">
                #{pluginId, jdbcType=VARCHAR},
            if>
            <if test="name != null">
                #{name, jdbcType=VARCHAR},
            if>
            <if test="matchMode != null">
                #{matchMode, jdbcType=INTEGER},
            if>
            <if test="type != null">
                #{type, jdbcType=INTEGER},
            if>
            <if test="sort != null">
                #{sort, jdbcType=INTEGER},
            if>
            <if test="enabled != null">
                #{enabled, jdbcType=TINYINT},
            if>
            <if test="loged != null">
                #{loged, jdbcType=TINYINT},
            if>
            <if test="continued != null">
                #{continued, jdbcType=TINYINT},
            if>
            <if test="matchRestful != null">
                #{matchRestful, jdbcType=TINYINT},
            if>
            <if test="handle != null">
                #{handle, jdbcType=VARCHAR},
            if>
        trim>
    insert>
可以看到是哪个属性不为空就写入数据库。
2.6 进入 197 行的SelectorServiceImpl 的一个实例方法 #createCondition 方法
同样还是SelectorServiceImpl.java

这里 selectorConditionMapper 和上面的 selectorMapper 类似,都是将属性选择性地插入数据库。
2.7 201 行的 #publishEvent
2.7.1 进入该服务的 #publishEvent 后,方法如下:
/**
 * Implementation of the {@link org.apache.shenyu.admin.service.SelectorService}.
 * Maintain {@link SelectorDO} and {@link SelectorConditionDO} related data.
 */
@Service
public class SelectorServiceImpl implements SelectorService {
	// ...
	// Spring 框架的一个事件发布机制,事件发布者
	private final ApplicationEventPublisher eventPublisher;
	private final SelectorEventPublisher selectorEventPublisher;
	// ...
    private void publishEvent(final SelectorDO selectorDO, final List<SelectorConditionDTO> selectorConditions, final List<SelectorConditionDO> beforeSelectorCondition) {
        PluginDO pluginDO = pluginMapper.selectById(selectorDO.getPluginId());
        List<ConditionData> conditionDataList = ListUtil.map(selectorConditions, ConditionTransfer.INSTANCE::mapToSelectorDTO);
        List<ConditionData> beforeConditionDataList = ListUtil.map(beforeSelectorCondition, ConditionTransfer.INSTANCE::mapToSelectorDO);
        // build selector data.
        SelectorData selectorData = SelectorDO.transFrom(selectorDO, pluginDO.getName(), conditionDataList, beforeConditionDataList);
        // publish change event.
        // 将数据变动 DataChangedEvent 对象发布出去
        eventPublisher.publishEvent(new DataChangedEvent(ConfigGroupEnum.SELECTOR, DataEventTypeEnum.UPDATE,
                Collections.singletonList(selectorData)));
    }
}
小 tips:可以点击 publisher.publishEvent 旁边的带耳机的小图标,会跳转到监听这个事件的类中,如下图:
![]()
2.7.2 跳转到 DataChangedEventDispatcher,是这个分发器来监听 DatachangedEvent 的
DataChangedEventDispatcher.java
/**
 * Event forwarders, which forward the changed events to each ConfigEventListener.
 */
@Component
public class DataChangedEventDispatcher implements ApplicationListener<DataChangedEvent>, InitializingBean {
	// ...
    @Override
    @SuppressWarnings("unchecked")
    public void onApplicationEvent(final DataChangedEvent event) {
        for (DataChangedListener listener : listeners) {
            switch (event.getGroupKey()) {
				// ...
                case SELECTOR:
                    listener.onSelectorChanged((List<SelectorData>) event.getSource(), event.getEventType());
                    break;
				// ...
                default:
                    throw new IllegalStateException("Unexpected value: " + event.getGroupKey());
            }
        }
    }
}
2.7.3 追踪 listener.onSelectorChanged() 方法,找到一个实现类 WebsocketDataChangedListener。
WebsocketDataChangedListener.java
public class WebsocketDataChangedListener implements DataChangedListener {
	// ...
    @Override
    public void onSelectorChanged(final List<SelectorData> selectorDataList, final DataEventTypeEnum eventType) {
        WebsocketData<SelectorData> websocketData =
                new WebsocketData<>(ConfigGroupEnum.SELECTOR.name(), eventType.name(), selectorDataList);
        // 由套接字收集器发送要同步的数据
        WebsocketCollector.send(GsonUtils.getInstance().toJson(websocketData), eventType);
    }
2.7.4 继续追踪 WebsocketCollector#send 方法,
WebsocketCollector.java
@ServerEndpoint(value = "/websocket", configurator = WebsocketConfigurator.class)
public class WebsocketCollector {
    // ...
    public static void send(final String message, final DataEventTypeEnum type) {
        if (StringUtils.isBlank(message)) {
            return;
        }
        // 如果是 MYSELF,是全量数据,从 ThreadLocal 中拿到 session,主动发消息 push
        if (DataEventTypeEnum.MYSELF == type) {
            Session session = (Session) ThreadLocalUtils.get(SESSION_KEY);
            if (Objects.nonNull(session)) {
                sendMessageBySession(session, message);
            }
        } else {
            // 否则向所有 session 发要同步的数据
            SESSION_SET.forEach(session -> sendMessageBySession(session, message));
        }
    }
}
通过 Websocket 发送要同步的数据,这里和官方介绍的是用 Websocket 作为默认的同步方法一致。
2.8 205 行的 SelectorEventPublisher#onCreated方法
SelectorServiceImpl.java

如果插入 selectorDO 进数据库成功,则发布出去这个创建成功的消息
SelectorEventPublisher.java
@Component
public class SelectorEventPublisher implements AdminDataModelChangedEventPublisher<SelectorDO> {
    // ...
    private final ApplicationEventPublisher publisher;
    @Override
    public void onCreated(final SelectorDO selector) {
        // 发布“选择器创建事件”
        publish(new SelectorCreatedEvent(selector, SessionUtil.visitorName()));
    }
    @Override
    public void publish(final AdminDataModelChangedEvent event) {
    	// 由 Spring 框架发布 AdminDataModelChangedEvent 事件
        publisher.publishEvent(event);
    }
}
AdminDataModelChangedEvent 由 RecordLogDataChangedAdapterListener 监听
现在我才知道的小 tips:可以点击 publisher.publishEvent 旁边的带耳机的小图标,会跳转到监听这个事件的类中,如下图:

@Component
public class RecordLogDataChangedAdapterListener implements DataChangedListener, ApplicationListener<AdminDataModelChangedEvent> {

    private final OperationRecordLogMapper logMapper;
	// ...
    @Override
    // 产生 OperationRecordLog 日志,并插入数据库,标记 event 已消费。
    public void onApplicationEvent(final AdminDataModelChangedEvent event) {
        // 判断 event 是否已消费
        if (event.isConsumed()) {
            return;
        }
        final OperationRecordLog log = new OperationRecordLog();
        log.setColor(event.getType().getColor());
        log.setContext(event.buildContext());
        log.setOperationTime(event.getDate());
        log.setOperationType(event.getType().getTypeName());
        log.setOperator(event.getOperator());
        logMapper.insert(log);
        event.consumed();
    }
}


