JAVA多线程并发补充
AQS
是一个抽象父类
全称是 AbstractQueuedSynchronizer,是阻塞式锁和相关的同步器工具的框架。
- 用 state 属性来表示资源的状态(分独占模式和共享模式),子类需要定义如何维护这个状态,控制如何获取锁和释放锁
- getState - 获取 state 状态
- setState - 设置 state 状态
- compareAndSetState - cas 机制设置 state 状态确保原子性(不会不断重试,重试失败则进入阻塞)。
- 独占模式是只有一个线程能够访问资源,而共享模式可以允许多个线程访问资源
- 提供了基于 FIFO 的等待队列,类似于 Monitor 的 EntryList
- 条件变量来实现等待、唤醒机制,支持多个条件变量,类似于 Reentrantlock
子类主要实现这样一些方法(默认抛出 UnsupportedOperationException)
- tryAcquire
- tryRelease
- tryAcquireShared
- tryReleaseShared
- isHeldExclusively
基于AQS实现自定义同步器。
这里需要实现上述的五个方法。
final class MySync extends AbstractQueuedSynchronizer {
    @Override
    protected boolean tryAcquire(int acquires) {
    //获取锁方法,需要判断是否加锁,然后更换锁状态,然后设置锁的拥有线程
        if (acquires == 1){
            if (compareAndSetState(0, 1)) {
                setExclusiveOwnerThread(Thread.currentThread());
                return true;
            }
        }
        return false;
    }
    @Override
    protected boolean tryRelease(int acquires) {
    //是否释放锁?目前的状态是加锁了,释放锁(将锁的拥有线程置空),设置state为0
        if(acquires == 1) {
            if(getState() == 0) {
                throw new IllegalMonitorStateException();
            }
            setExclusiveOwnerThread(null);
            setState(0);
            return true;
        }
        return false;
    }
    protected Condition newCondition() {
        return new ConditionObject();
    }
    @Override
    protected boolean isHeldExclusively() {
        return getState() == 1;
    }
}
自定义锁
class MyLock implements Lock {

    static MySync sync = new MySync();

    @Override
    // 尝试,不成功,进入等待队列
    public void lock() {
        sync.acquire(1);
    }
    @Override
    // 尝试,不成功,进入等待队列,可打断
    public void lockInterruptibly() throws InterruptedException {
        sync.acquireInterruptibly(1);
    }
    @Override
    // 尝试一次,不成功返回,不进入队列
    public boolean tryLock() {
        return sync.tryAcquire(1);
    }
    @Override
    // 尝试,不成功,进入等待队列,有时限
    public boolean tryLock(long time, TimeUnit unit) throws InterruptedException {
        return sync.tryAcquireNanos(1, unit.toNanos(time));
    }
    @Override
    // 释放锁
    public void unlock() {
        sync.release(1);
    }
    @Override
    // 生成条件变量
    public Condition newCondition() {
        return sync.newCondition();
    }
}
使用自定义锁
@Slf4j
public class Test{

    public static void main(String[] args){
        MyLock lock = new MyLock();
        new Thread(() -> {
            lock.lock();
            try {
                log.debug("locking...");
                sleep(1);
            } catch (InterruptedException e) {
                e.printStackTrace();
            } finally {
                log.debug("unlocking...");
                lock.unlock();
            }
        },"t1").start();
        new Thread(() -> {
            lock.lock();
            try {
                log.debug("locking...");
            } finally {
                log.debug("unlocking...");
                lock.unlock();
            }
        },"t2").start();

    }
}
ReentrantLock原理

这里可以看出,ReentrantLock是实现了Lock接口,并且内部拥有一个Sync的抽象类,这个抽象类又有两个子类进行继承来实现公平锁和非公平锁。
加锁实现原理
成功流程
构造默认返回非公平锁
public ReentrantLock() {
 sync = new NonfairSync();
}
最终进入如下函数

当没有竞争时,就像上面我们自己实现的同步器一样,把state改为1,然后将owner设置为当先线程。

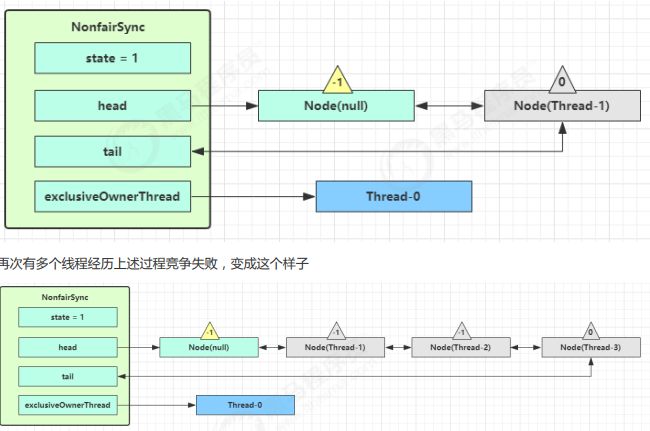
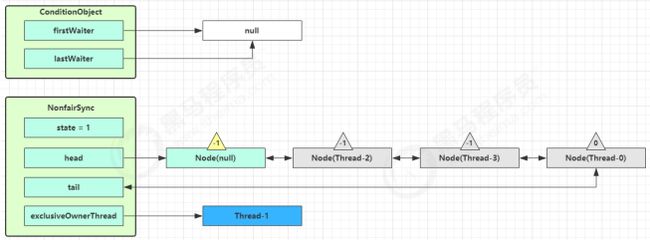
失败流程

- CAS 尝试将 state 由 0 改为 1,结果失败
- 再次进入 tryAcquire 逻辑,这时 state 仍然是1,结果仍然失败(第一次自旋)
- 接下来进入 addWaiter 逻辑,构造 Node 队列,这时T-1已经进入了acquireQueued但还未阻塞
图中黄色三角表示该 Node 的 waitStatus 状态,其中 0 为默认正常状态

当前线程进入 acquireQueued 逻辑
-
acquireQueued 会在一个死循环中不断尝试获得锁(自旋),失败后进入 park 阻塞。
-
如果自己是紧邻着 head(排第二位),那么再次 tryAcquire 尝试获取锁(继续自旋), state 仍为 1,失败
-
进入 shouldParkAfterFailedAcquire 逻辑,将前驱 node,即 head 的 waitStatus 改为 -1,这次返回 false

-
shouldParkAfterFailedAcquire 执行完回到 acquireQueued ,再次 tryAcquire 尝试获取锁,state 仍为 1,失败
-
当再次进入 shouldParkAfterFailedAcquire ,前驱 node 的 waitStatus 是 -1,返回true
-
进入 parkAndCheckInterrupt,阻塞。
前方解锁并且竞争成功流程
此时Thread-0 释放锁,进入 tryRelease 流程,如果成功
T-0设置 exclusiveOwnerThread 为 null,state = 0
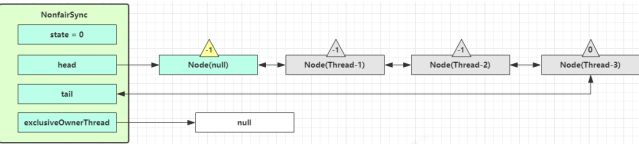
- 当前队列不为 null,并且 head 的 waitStatus = -1,进入 unparkSuccessor 流程
- 找到队列中离 head 最近的一个 Node(没取消的),unpark 恢复其运行,本例中即为 Thread-1
- 回到 Thread-1 的 acquireQueued 流程

如果加锁成功
- exclusiveOwnerThread 为 Thread-1,state = 1
- head 指向刚刚 Thread-1 所在的 Node,该 Node 清空 Thread
- 原本的 head 因为从链表断开,而可被垃圾回收
解锁后因非公平竞争失败
由于我们目前讨论的是非公平锁,所以可能出现如下情况。
如果不巧又被 Thread-4 占了先
- Thread-4 被设置为 exclusiveOwnerThread,state = 1
- Thread-1 再次进入 acquireQueued 流程,获取锁失败,重新进入 park 阻塞

锁重入原理
源码如下
可见当发现当前线程等于持锁线程时,让state通过一系列操作完成AQS的state++
同样释放时就完成AQS的state–
 final boolean nonfairTryAcquire(int acquires) {
            final Thread current = Thread.currentThread();
            int c = getState();
            if (c == 0) {
                if (compareAndSetState(0, acquires)) {
                    setExclusiveOwnerThread(current);
                    return true;
                }
            }
            else if (current == getExclusiveOwnerThread()) {
                int nextc = c + acquires;
                if (nextc < 0) // overflow
                    throw new Error("Maximum lock count exceeded");
                setState(nextc);
                return true;
            }
            return false;
        }

        @ReservedStackAccess
        protected final boolean tryRelease(int releases) {
            int c = getState() - releases;
            if (Thread.currentThread() != getExclusiveOwnerThread())
                throw new IllegalMonitorStateException();
            boolean free = false;
            if (c == 0) {
                free = true;
                setExclusiveOwnerThread(null);
            }
            setState(c);
            return free;
        }
可打断原理
在不可打断模式下,即使被打断,仍会驻留在 AQS 队列中,一直要等到获得锁后方能得知自己被打断了。
在可打断锁的情况下,被打断就会抛出一场,跳出AQS队列,不再获取锁。
可见实现还是利用的parkAndCheckInterrupt(),底层用的park实现打断,使用unpark实现唤醒。
/**
     * Acquires in exclusive uninterruptible mode for thread already in
     * queue. Used by condition wait methods as well as acquire.
     *
     * @param node the node
     * @param arg the acquire argument
     * @return {@code true} if interrupted while waiting
     */
    final boolean acquireQueued(final Node node, int arg) {
        boolean interrupted = false;
        try {
            for (;;) {
                final Node p = node.predecessor();
                if (p == head && tryAcquire(arg)) {
                    setHead(node);
                    p.next = null; // help GC
                    return interrupted;
                }
                if (shouldParkAfterFailedAcquire(p, node))
                    interrupted |= parkAndCheckInterrupt();
            }
        } catch (Throwable t) {
            cancelAcquire(node);
            if (interrupted)
                selfInterrupt();
            throw t;
        }
    }

    /**
     * Acquires in exclusive interruptible mode.
     * @param arg the acquire argument
     */
    private void doAcquireInterruptibly(int arg)
        throws InterruptedException {
        final Node node = addWaiter(Node.EXCLUSIVE);
        try {
            for (;;) {
                final Node p = node.predecessor();
                if (p == head && tryAcquire(arg)) {
                    setHead(node);
                    p.next = null; // help GC
                    return;
                }
                if (shouldParkAfterFailedAcquire(p, node) &&
                    parkAndCheckInterrupt())
                    throw new InterruptedException();
            }
        } catch (Throwable t) {
            cancelAcquire(node);
            throw t;
        }
    }
公平锁实现原理
与非公平锁主要区别在于 tryAcquire 方法的实现
反正就是查一下AQS队列里有线程就进队列而不是直接去竞争锁。
 static final class FairSync extends Sync {
        private static final long serialVersionUID = -3000897897090466540L;
        /**
         * Fair version of tryAcquire.  Don't grant access unless
         * recursive call or no waiters or is first.
         */
        @ReservedStackAccess
        protected final boolean tryAcquire(int acquires) {
            final Thread current = Thread.currentThread();
            int c = getState();
            if (c == 0) {
                if (!hasQueuedPredecessors() &&
                    compareAndSetState(0, acquires)) {
                    setExclusiveOwnerThread(current);
                    return true;
                }
            }
            else if (current == getExclusiveOwnerThread()) {
                int nextc = c + acquires;
                if (nextc < 0)
                    throw new Error("Maximum lock count exceeded");
                setState(nextc);
                return true;
            }
            return false;
        }
    }
 public final boolean hasQueuedPredecessors() {
        Node h, s;
        if ((h = head) != null) {
            if ((s = h.next) == null || s.waitStatus > 0) {
                s = null; // traverse in case of concurrent cancellation
                for (Node p = tail; p != h && p != null; p = p.prev) {
                    if (p.waitStatus <= 0)
                        s = p;
                }
            }
            if (s != null && s.thread != Thread.currentThread())
                return true;
        }
        return false;
    }
条件变量实现原理
条件变量的等待和唤醒必须在锁的范围内进行,当线程调用Condition的await()方法时,它会释放锁并进入等待状态,然后将自己添加到条件变量的等待队列中。当其他线程调用Condition的signal()或signalAll()方法时,等待队列中的线程会被唤醒,并且会按照先进先出的顺序将线程从等待队列中转移到AQS队列的末尾。
await流程
开始 Thread-0 持有锁,调用 await。
进入 ConditionObject 的 addConditionWaiter 流程创建新的 Node 状态为 -2 (Node.CONDITION),关联 Thread-0,加入等待队列尾部.
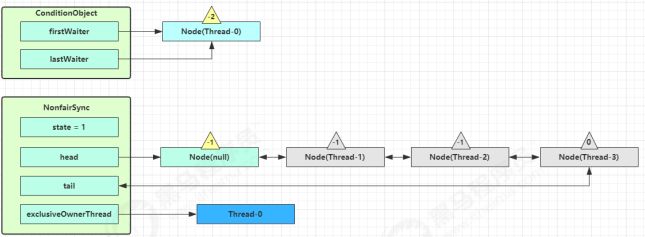
接下来进入 AQS 的 fullyRelease 流程,释放同步器上的锁.
fullyRelease主要是因为有可能线程重入锁了。
unpark AQS 队列中的下一个节点,竞争锁,假设没有其他竞争线程,那么 Thread-1 竞争成功,并且对Thread-0阻塞

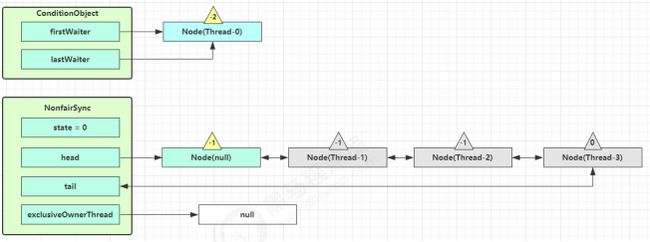
singal流程
假设 Thread-1 要来唤醒 Thread-0(Thread-0为队首)
进入 ConditionObject 的 doSignal 流程,取得等待队列中第一个 Node,即 Thread-0 所在 Node

执行 transferForSignal 流程,将该 Node 加入 AQS 队列尾部,将 Thread-0 的 waitStatus 改为 0,Thread-3 的waitStatus 改为 -1
然后Thread-1开始ralease
读写锁——ReentrantReadWriteLock
读写锁的使用。
读-读可并发
其实底层还是用的AQS,需要使用CAS
@Slf4j
public class Test{

    public static void main(String[] args){
        DataContainer dataContainer = new DataContainer();
        new Thread(() -> {
            dataContainer.read();
        }, "t1").start();
        new Thread(() -> {
            dataContainer.read();
        }, "t2").start();
    }
}
@Slf4j
class DataContainer {
    private Object data;
    private ReentrantReadWriteLock rw = new ReentrantReadWriteLock();
    private ReentrantReadWriteLock.ReadLock r = rw.readLock();
    private ReentrantReadWriteLock.WriteLock w = rw.writeLock();
    public Object read() {
        log.debug("获取读锁...");
        r.lock();
        try {
            log.debug("读取");
            sleep(1);
            return data;
        } finally {
            log.debug("释放读锁...");r.unlock();
        }
    }
    public void write() {
        log.debug("获取写锁...");
        w.lock();
        try {
            log.debug("写入");
            sleep(1);
        } finally {
            log.debug("释放写锁...");
            w.unlock();
        }
    }
}
读-写/写-写是互斥的。可以自己根据上面的代码把主函数里的线程代码改read和write自己测试。
注意事项:
1.读锁不支持条件变量
2.重入时升级不支持:不能有读锁的情况下去获取写锁,会导致获取写锁永久等待
3.重入时降级支持:持有写锁的情况下可以获取读锁
class CachedData {
    Object data;
    // 是否有效,如果失效,需要重新计算 data
    volatile boolean cacheValid;
    final ReentrantReadWriteLock rwl = new ReentrantReadWriteLock();
    void processCachedData() {
        rwl.readLock().lock();
        if (!cacheValid) {
            // 获取写锁前必须释放读锁
            rwl.readLock().unlock();
            rwl.writeLock().lock();
            try {
                // 判断是否有其它线程已经获取了写锁、更新了缓存, 避免重复更新
                if (!cacheValid) {
                    data = ...
                    cacheValid = true;
                }
                // 降级为读锁, 释放写锁, 这样能够让其它线程读取缓存
                rwl.readLock().lock();
            } finally {
                rwl.writeLock().unlock();
            }
        }
        // 自己用完数据, 释放读锁
        try {
            use(data);
        } finally {
            rwl.readLock().unlock();
        }
    }
}
Stamped——戳与锁
这个锁每一次就会返回一个戳。
这个锁的优化区别于Reentrantlockwriteread主要在于支持一个乐观读可以免去加锁免去CAS过程。
而乐观读是基于一个"验戳"的过程的
但是和Reentrantlockwriteread还是有很大的差别,他不持支条件变量和可重入。
读-读乐观读
@Slf4j
public class Test{

    public static void main(String[] args){
        DataContainerStamped dataContainer = new DataContainerStamped(1);
        new Thread(() -> {
            dataContainer.read(1);
        }, "t1").start();
        sleep(0.5);
        new Thread(() -> {
            dataContainer.read(0);
        }, "t2").start();
    }
}
读-写升级
@Slf4j
public class Test{

    public static void main(String[] args){
        DataContainerStamped dataContainer = new DataContainerStamped(1);
        new Thread(() -> {
            dataContainer.read(1);
        }, "t1").start();
        sleep(0.5);
        new Thread(() -> {
            dataContainer.write(100);
        }, "t2").start();

    }
}
@Slf4j
class DataContainerStamped {
    private int data;
    private final StampedLock lock = new StampedLock();
    public DataContainerStamped(int data) {
        this.data = data;
    }
    public int read(int readTime) {
        long stamp = lock.tryOptimisticRead();
        log.debug("optimistic read locking...{}", stamp);
        sleep(readTime);
        if (lock.validate(stamp)) {
            log.debug("read finish...{}, data:{}", stamp, data);
            return data;
        }
        // 锁升级 - 读锁
        log.debug("updating to read lock... {}", stamp);
        try {
            stamp = lock.readLock();
            log.debug("read lock {}", stamp);
            sleep(readTime);
            log.debug("read finish...{}, data:{}", stamp, data);
            return data;
        } finally {
            log.debug("read unlock {}", stamp);
            lock.unlockRead(stamp);
        }
    }
    public void write(int newData) {
        long stamp = lock.writeLock();
        log.debug("write lock {}", stamp);
        try {
            sleep(2);
            this.data = newData;
        } finally {
            log.debug("write unlock {}", stamp);
            lock.unlockWrite(stamp);
        }
    }
}
Semaphore——信号量机制限流
与操作系统的基本一样。
是通过虚拟一个资源来用于限制访问共享资源的线程上限。注意,这里并不是共享资源数量收到了限制
@Slf4j
public class Test{

    public static void main(String[] args){
        // 1. 创建 semaphore 对象
        Semaphore semaphore = new Semaphore(3);
        // 2. 10个线程同时运行
        for (int i = 0; i < 10; i++) {
            new Thread(() -> {
                // 3. 获取许可
                try {
                    semaphore.acquire();
                } catch (InterruptedException e) {
                    e.printStackTrace();
                }
                try {
                    log.debug("running...");
                    sleep(1);
                    log.debug("end...");
                } finally {
                    // 4. 释放许可
                    semaphore.release();
                }
            }).start();
        }
    }
}
Semaphore用于简单的限流
@Slf4j(topic = "c.Pool")
class Pool {
    // 1. 连接池大小
    private final int poolSize;
    // 2. 连接对象数组
    private Connection[] connections;
    // 3. 连接状态数组 0 表示空闲, 1 表示繁忙
    private AtomicIntegerArray states;
    private Semaphore semaphore;
    // 4. 构造方法初始化
    public Pool(int poolSize) {
        this.poolSize = poolSize;
        // 让许可数与资源数一致
        this.semaphore = new Semaphore(poolSize);
        this.connections = new Connection[poolSize];
        this.states = new AtomicIntegerArray(new int[poolSize]);
        for (int i = 0; i < poolSize; i++) {
            connections[i] = new MockConnection("连接" + (i+1));
        }
    }
    // 5. 建立连接——获取信号量
    public Connection borrow() {// t1, t2, t3
        // 获取许可
        try {
            semaphore.acquire(); // 没有许可的线程,在此等待
        } catch (InterruptedException e) {
            e.printStackTrace();
        }
        for (int i = 0; i < poolSize; i++) {
            // 获取空闲连接
            if(states.get(i) == 0) {
                if (states.compareAndSet(i, 0, 1)) {
                    log.debug("borrow {}", connections[i]);
                    return connections[i];
                }
            }
        }
        // 不会执行到这里
        return null;
    }
    // 6. 归还连接——释放信号量
    public void free(Connection conn) {
        for (int i = 0; i < poolSize; i++) {
            if (connections[i] == conn) {
                states.set(i, 0);
                log.debug("free {}", conn);
                semaphore.release();
                break;
            }
        }
    }
}
CountdownLatch——倒计时锁
这里的Countdown可不是真的去一秒一秒的数,而是通过手动的调用去加一减一。可以实现线程的一个有序化。
其中构造参数用来初始化等待计数值,await() 用来等待计数归零,countDown() 用来让计数减一。
这里再回去看一下fork/join。
对比fork/join,这种方式更加适合用于
@Slf4j
public class Test{

    public static void main(String[] args){
        CountDownLatch latch = new CountDownLatch(3);
        ExecutorService service = Executors.newFixedThreadPool(4);
        service.submit(() -> {
            log.debug("begin...");
            sleep(1);
            latch.countDown();
            log.debug("end...{}", latch.getCount());
        });
        service.submit(() -> {
            log.debug("begin...");
            sleep(1.5);
            latch.countDown();
            log.debug("end...{}", latch.getCount());
        });
        service.submit(() -> {
            log.debug("begin...");
            sleep(2);
            latch.countDown();
            log.debug("end...{}", latch.getCount());
        });
        service.submit(()->{
            try {
                log.debug("waiting...");
                latch.await();
                log.debug("wait end...");
            } catch (InterruptedException e) {
                e.printStackTrace();
            }
        });
    }
}
18:52:25.831 c.TestCountDownLatch [pool-1-thread-3] - begin…
18:52:25.831 c.TestCountDownLatch [pool-1-thread-1] - begin…
18:52:25.831 c.TestCountDownLatch [pool-1-thread-2] - begin…
18:52:25.831 c.TestCountDownLatch [pool-1-thread-4] - waiting…
18:52:26.835 c.TestCountDownLatch [pool-1-thread-1] - end…2
18:52:27.335 c.TestCountDownLatch [pool-1-thread-2] - end…1
18:52:27.835 c.TestCountDownLatch [pool-1-thread-3] - end…0
18:52:27.835 c.TestCountDownLatch [pool-1-thread-4] - wait end…
利用CountdownLatch完成等待多线程结束。
@Slf4j
public class Test{

    public static void main(String[] args){
        AtomicInteger num = new AtomicInteger(0);
        ExecutorService service = Executors.newFixedThreadPool(10, (r) -> {
            return new Thread(r, "t" + num.getAndIncrement());
        });
        CountDownLatch latch = new CountDownLatch(10);
        String[] all = new String[10];
        Random r = new Random();
        for (int j = 0; j < 10; j++) {
            int x = j;
            service.submit(() -> {
                for (int i = 0; i <= 100; i++) {
                    try {
                        Thread.sleep(r.nextInt(100));
                    } catch (InterruptedException e) {
                    }
                    all[x] = Thread.currentThread().getName() + "(" + (i + "%") + ")";
                    System.out.print("\r" + Arrays.toString(all));
                }
                latch.countDown();
            });
        }
        latch.await();
        System.out.println("\n游戏开始...");
        service.shutdown();
    }
}
CyclicBarrier——循环拦截
场景:如果现在我的一个业务需要执行完task1和task2才能继续运行,而且我这个业务需要做三次。那么怎么做呢。
我们当然可以继续用上面的countdownlatch来做,只要for循环三次就好了,反正我都会在主线程等着你两两同步后同行。
但这样每次我们都必须创建一个countdownlatch对象,因为countdownlatch是不能重新赋值的。
CyclicBarrier就可以避免这个问题。
CyclicBarrier的原理是初始化设置一个阈值,每次调用await方法会使得计数加一,只有当计数达到阈值时才会让目前因为调用await而陷入等待的线程继续执行,这时还会执行一个CyclicBarrier对象初始化设置的Runnable对象。
注意
CyclicBarrier要求我们必须让一轮业务的线程数和初始设置的阈值相同,否则就会让多出来的线程去执行下一轮的业务。
如下实现。
@Slf4j
public class Test{

    public static void main(String[] args){
        CyclicBarrier cb = new CyclicBarrier(2,()->{
            log.debug("task1 and task2 finished");

        }); // 个数为2时才会继续执行
        for(int i=0;i<2;i++){
            new Thread(()->{
                try {
                    cb.await(); // 当个数不足时,等待
                } catch (InterruptedException | BrokenBarrierException e) {
                    e.printStackTrace();
                }
            }).start();
            new Thread(()->{

                try { Thread.sleep(2000); } catch (InterruptedException e) { }
                try {
                    cb.await(); // 2 秒后,线程个数够2,继续运行
                } catch (InterruptedException | BrokenBarrierException e) {
                    e.printStackTrace();
                }
            }).start();
        }

    }
}
线程安全集合类
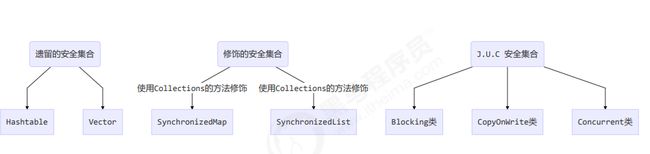
遗留集合类
对于遗留的集合类:出现时间较早,暴力的直接使用synchronized把所有方法都加以修饰,会造成JVM任何访问这个类对象的线程变为串行。
Hashtable:线程安全的map实现
Vector:线程安全的list实现
修饰的安全集合
- Collections.synchronizedCollection
- Collections.synchronizedList
- Collections.synchronizedMap
- Collections.synchronizedSet
- Collections.synchronizedNavigableMap
- Collections.synchronizedNavigableSet
- Collections.synchronizedSortedMap
- Collections.synchronizedSortedSet
接受一个非线程安全Collection类,然后使用构造方法获取一个新的线程安全对象,实际上就是把原本的非安全类通过装饰器模式来把所有的方法套在了sync里调用。
这种方式其实和第一种线程安全类基本一样,没有多少提升。
JUC
JUC下的线程安全集合类,可以发现它们有规律,里面包含三类关键词:Blocking、CopyOnWrite、Concurrent
- Blocking 大部分实现基于锁,并提供用来阻塞的方法
- CopyOnWrite 之类容器修改开销相对较重,对写操作采用了拷贝代替修改。
- Concurrent 类型的容器
- 内部很多操作使用 cas 优化,一般可以提供较高吞吐量
- 弱一致性
- 遍历时弱一致性,例如,当利用迭代器遍历时,如果容器发生修改,迭代器仍然可以继续进行遍历,这时内容是旧的
- 求大小弱一致性,size 操作未必是 100% 准确
- 读取弱一致性
遍历时如果发生了修改,对于非安全容器来讲,使用 fail-fast 机制也就是让遍历立刻失败,抛出
ConcurrentModificationException,不再继续遍历。
线程安全的集合对象被便利时,当其他线程对其修改,不会立即停止,教唆fail-safe机制
ConcurrentHashMap
Hashmap原理
HashMap基于哈希表。在HashMap中,K-V被存储在一个桶数组中。每个桶下标存一个链表或红黑树,其中每个节点都是一个键值对的Entry对象。
存放:调用put(key, value),首先调用hashCode()方法获取哈希码。然后,根据哈希码计算出该键值桶下标。为空,直接将键值对存储在该桶中;不为空,进行冲突处理。
冲突:是指不同的键具有相同桶下标。HashMap使用了链表和红黑树结合处理,当链表长度超过阈值链表会转换为红黑树。
查找:调用get(key),首先获取桶下标,然后在链表或红黑树中查找对应的键值对。找到了,返回值;没找到,返回null。
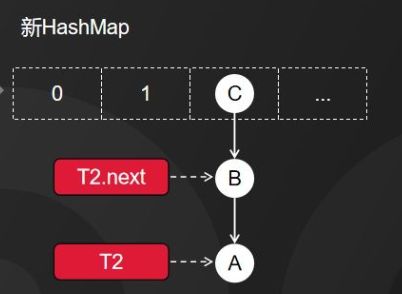
Hashmap的死链
JDK7种的hashmap采用头插法,很容易在多线程并发时因为两个线程同时访问map,然后扩容,扩容后节点顺序更改,发生死链。
这时开始的map

T2不知道为什么休眠了,但是这个时候因为节点有三个,触发了扩容。

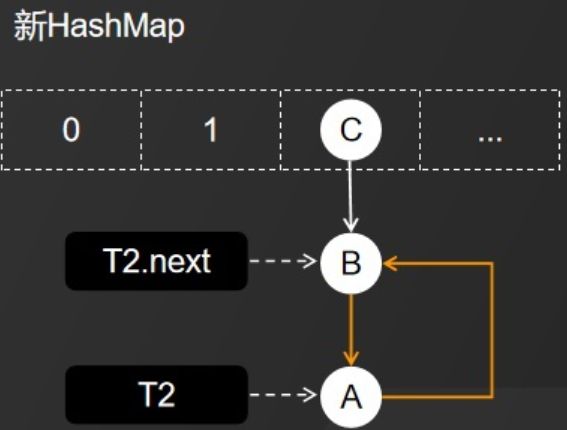
扩容后节点顺序的更改对于T2来说时不可见的。
T2死循环了——死链
ConcurrentHashMap使用
采用细粒度的锁,此对象每个方法都可以视为时线程安全(原子,可见,有序)的。
但是我们不能再不加任何空的前提下就再多线程并发的情况下去随便使用多个该类对象的方法。这样无法确保原子性。
所以通常我们会为了确保方法使用原子性将hashmap和各种原子类型一起使用。
如下时生成26个文件后用26个线程去对相应文件内容进行计数。
@Slf4j
public class Test{
    static final String ALPHA = "abcedfghijklmnopqrstuvwxyz";

    public static void main(String[] args){
        CountDownLatch latch = new CountDownLatch(1);
        int length = ALPHA.length();
        int count = 200;
        List<String> list = new ArrayList<>(length * count);
        for (int i = 0; i < length; i++) {
            char ch = ALPHA.charAt(i);
            for (int j = 0; j < count; j++) {
                list.add(String.valueOf(ch));
            }
        }
        Collections.shuffle(list);
        for (int i = 0; i < 26; i++) {
            try (PrintWriter out = new PrintWriter(
                    new OutputStreamWriter(
                            new FileOutputStream("../tmp/" + (i+1) + ".txt")))) {
                String collect = list.subList(i * count, (i + 1) * count).stream()
                        .collect(Collectors.joining("\n"));
                out.print(collect);
            } catch (IOException e) {
            }
        }

        //private static  void demo(Supplier> supplier, BiConsumer,List> consumer)
        demo(
                () -> new ConcurrentHashMap<String, LongAdder>(),
                (map, words) -> {
                    for (String word : words) {
                        // 注意不能使用 putIfAbsent,此方法返回的是上一次的 value,首次调用返回 null
                        map.computeIfAbsent(word, (key) -> new LongAdder()).increment();
                    }
                }
        );

    }
    private static <V> void demo(Supplier<Map<String,V>> supplier,
                                 BiConsumer<Map<String,V>,List<String>> consumer) {
        Map<String, V> counterMap = supplier.get();
        List<Thread> ts = new ArrayList<>();
        for (int i = 1; i <= 26; i++) {
            int idx = i;
            Thread thread = new Thread(() -> {
                List<String> words = readFromFile(idx);
                consumer.accept(counterMap, words);
            });
            ts.add(thread);
        }
        ts.forEach(t->t.start());
        ts.forEach(t-> {
            try {
                t.join();
            } catch (InterruptedException e) {
                e.printStackTrace();
            }
        });
        System.out.println(counterMap);
    }
    public static List<String> readFromFile(int i) {
        ArrayList<String> words = new ArrayList<>();
        try (BufferedReader in = new BufferedReader(new InputStreamReader(new FileInputStream("tmp/"
                + i +".txt")))) {
            while(true) {
                String word = in.readLine();
                if(word == null) {
                    break;
                }
                words.add(word);
            }
            return words;
        } catch (IOException e) {
            throw new RuntimeException(e);
        }
    }
}
构造函数源码
可以看出并没有真正创建一个链表,而是先计算大小,然后懒惰化构建。
几个注意点在注释中
//初始容量——map大小/负载因子——3/4是扩容的阈值/并发度
public ConcurrentHashMap(int initialCapacity, float loadFactor, int concurrencyLevel) {
        if (!(loadFactor > 0.0f) || initialCapacity < 0 || concurrencyLevel <= 0)
            throw new IllegalArgumentException();
            //初始容量
        if (initialCapacity < concurrencyLevel) // Use at least as many bins
            initialCapacity = concurrencyLevel; // as estimated threads

        long size = (long)(1.0 + (long)initialCapacity / loadFactor);
        // tableSizeFor 是保证计算的大小是 2^n, 即 16,32,64 ...
        int cap = (size >= (long)MAXIMUM_CAPACITY) ?
                MAXIMUM_CAPACITY : tableSizeFor((int)size);
        this.sizeCtl = cap;
    }
get方法
h:哈希码
spread:保证哈希码是一个正整数。
tabAt:根据哈希码取得桶下标,然后定位链表位置
eh<0:当头结点哈希代码为负数则表示正在扩容或者采用了红黑树,如果是红黑树则调用find去树中查找
 public V get(Object key) {
        Node<K,V>[] tab; Node<K,V> e, p; int n, eh; K ek;
        int h = spread(key.hashCode());
        if ((tab = table) != null && (n = tab.length) > 0 &&
            (e = tabAt(tab, (n - 1) & h)) != null) {
            // 头结点就是要找的key
            if ((eh = e.hash) == h) {
                if ((ek = e.key) == key || (ek != null && key.equals(ek)))
                    return e.val;
            }
            //树中查找,或扩容中
            else if (eh < 0)
                return (p = e.find(h, key)) != null ? p.val : null;
            //遍历链表,用equals比较
            while ((e = e.next) != null) {
                if (e.hash == h &&
                    ((ek = e.key) == key || (ek != null && key.equals(ek))))
                    return e.val;
            }
        }
        return null;
    }
无锁实现。
put
put方法综合实现了调用initTable使用CAS构建node数组等操作,感兴趣可以自己去看看他调用的各个源码
final V putVal(K key, V value, boolean onlyIfAbsent) {
        if (key == null || value == null) throw new NullPointerException();
        // 其中 spread 方法会综合高位低位, 具有更好的 hash 性
        int hash = spread(key.hashCode());
        int binCount = 0;
        for (Node<K,V>[] tab = table;;) {
            // f 是链表头节点
            // fh 是链表头结点的 hash
            // i 是链表在 table 中的下标
            Node<K,V> f; int n, i, fh;
            // 要创建 table
            if (tab == null || (n = tab.length) == 0)
                // 初始化 table 使用了 cas, 无需 synchronized 创建成功, 进入下一轮循环
                tab = initTable();
                // 要创建链表头节点
            else if ((f = tabAt(tab, i = (n - 1) & hash)) == null) {
                // 添加链表头使用了 cas, 无需 synchronized
                if (casTabAt(tab, i, null,
                        new Node<K,V>(hash, key, value, null)))
                    break;
            }
            // 帮忙扩容
            else if ((fh = f.hash) == MOVED)
                // 帮忙之后, 进入下一轮循环
                tab = helpTransfer(tab, f);
            else {
                V oldVal = null;
                // 锁住链表头节点
                synchronized (f) {
                    // 再次确认链表头节点没有被移动
                    if (tabAt(tab, i) == f) {
                        // 链表
                        if (fh >= 0) {
                            binCount = 1;
                            // 遍历链表
                            for (Node<K,V> e = f;; ++binCount) {
                                K ek;
// 找到相同的 key
                                if (e.hash == hash &&
                                        ((ek = e.key) == key ||
                                                (ek != null && key.equals(ek)))) {
                                    oldVal = e.val;
                                    // 更新
                                    if (!onlyIfAbsent)
                                        e.val = value;
                                    break;
                                }
                                Node<K,V> pred = e;
                                // 已经是最后的节点了, 新增 Node, 追加至链表尾
                                if ((e = e.next) == null) {
                                    pred.next = new Node<K,V>(hash, key,
                                            value, null);
                                    break;
                                }
                            }
                        }
                        // 红黑树
                        else if (f instanceof TreeBin) {
                            Node<K,V> p;
                            binCount = 2;
                            // putTreeVal 会看 key 是否已经在树中, 是, 则返回对应的 TreeNode
                            if ((p = ((TreeBin<K,V>)f).putTreeVal(hash, key,
                                    value)) != null) {
                                oldVal = p.val;
                                if (!onlyIfAbsent)
                                    p.val = value;
                            }
                        }
                    }
                    // 释放链表头节点的锁
                }

                if (binCount != 0) {
                    if (binCount >= TREEIFY_THRESHOLD)
                        // 如果链表长度 >= 树化阈值(8), 进行链表转为红黑树
                        treeifyBin(tab, i);
                    if (oldVal != null)
                        return oldVal;
                    break;
                }
            }
        }
        // 增加 size 计数
        addCount(1L, binCount);
        return null;
    }
 private final Node<K,V>[] initTable() {
        Node<K,V>[] tab; int sc;
        while ((tab = table) == null || tab.length == 0) {
            if ((sc = sizeCtl) < 0)
                Thread.yield();
                // 尝试将 sizeCtl 设置为 -1(表示初始化 table)
            else if (U.compareAndSwapInt(this, SIZECTL, sc, -1)) {
                // 获得锁, 创建 table, 这时其它线程会在 while() 循环中 yield 直至 table 创建
                try {
                    if ((tab = table) == null || tab.length == 0) {
                        int n = (sc > 0) ? sc : DEFAULT_CAPACITY;
                        Node<K,V>[] nt = (Node<K,V>[])new Node<?,?>[n];
                        table = tab = nt;
                        sc = n - (n >>> 2);
                    }
                } finally {
                    sizeCtl = sc;
                }
                break;
            }
        }
        return tab;
    }
LinkeBlockingQueue和ArrayBlockingQueue
ArrayBlockingQueue和LinkedBlockingQueue是Java中两种常用的阻塞队列实现。
ArrayBlockingQueue适用于固定大小的队列,它使用一个数组来存储元素。
由于数组的大小是固定的,因此在队列已满时,生产者线程会被阻塞,直到有空间可用。同样,在队列为空时,消费者线程会被阻塞,直到有元素可用。ArrayBlockingQueue适用于生产者和消费者速度相对均衡的场景。
ArrayBlockingQueue适用于固定大小的队列,适合生产者和消费者速度相对均衡的场景。
LinkedBlockingQueue则没有固定的大小限制,它使用链表来存储元素。
LinkedBlockingQueue可以根据需要动态地增加或减少容量。在队列已满时,生产者线程会被阻塞,直到有空间可用。同样,在队列为空时,消费者线程会被阻塞,直到有元素可用。LinkedBlockingQueue适用于生产者和消费者速度不均衡的场景。
LinkedBlockingQueue适用于没有固定大小限制的队列,适合生产者和消费者速度不均衡的场景。
源码实现
用两把锁,同一时刻,可以允许两个线程同时(一个生产者与一个消费者)执行。
推荐吃透后能自己根据这个写出生产消费者模式
    static final class Node<E> {
        E item;
        Node<E> prev;
        Node<E> next;
        Node(E x) {
            item = x;
        }
    }
    transient Node<E> first;
    transient Node<E> last;
    private transient int count;
    private final int capacity;
    final ReentrantLock lock = new ReentrantLock();
    private final Condition notEmpty = lock.newCondition();//消费者锁
    private final Condition notFull = lock.newCondition();//生产者锁
put方法
 public void putFirst(E e) throws InterruptedException {
        if (e == null) throw new NullPointerException();
        Node<E> node = new Node<E>(e);
        final ReentrantLock lock = this.lock;
        lock.lock();
        try {
            while (!linkFirst(node))
                notFull.await();
        } finally {
            lock.unlock();
        }
    }
private boolean linkFirst(Node<E> node) {
        // assert lock.isHeldByCurrentThread();
        if (count >= capacity)
            return false;
        Node<E> f = first;
        node.next = f;
        first = node;
        if (last == null)
            last = node;
        else
            f.prev = node;
        ++count;
        notEmpty.signal();
        return true;
    }
take方法
public E takeFirst() throws InterruptedException {
        final ReentrantLock lock = this.lock;
        lock.lock();
        try {
            E x;
            while ( (x = unlinkFirst()) == null)
                notEmpty.await();
            return x;
        } finally {
            lock.unlock();
        }
    }
private E unlinkFirst() {
        // assert lock.isHeldByCurrentThread();
        Node<E> f = first;
        if (f == null)
            return null;
        Node<E> n = f.next;
        E item = f.item;
        f.item = null;
        f.next = f; // help GC
        first = n;
        if (n == null)
            last = null;
        else
            n.prev = null;
        --count;
        notFull.signal();
        return item;
    }
CopyOnWriteArrayList
底层实现采用了 写入时拷贝 的思想,增删改操作会将底层数组拷贝一份,更改操作在新数组上执行,这时不影响其它线程的并发读,读写分离。
CopyOnWriteArrayList<Integer> list = new CopyOnWriteArrayList<>();
适合读多写少,对一致性要求低的场景。
如下是一致性弱的表现。
