Model-View-Controller Sample - 此範例以 MVC 架構實作了使用者登入和登出的功能。
Model-View-Controller 範例
作者:蔡煥麟
日期:Feb-4-2003
更新:Feb-4-2003
1.0 簡介
這份文件包含了三個 MVC 範例,第一個範例是基於上一篇文章〔JSP、Servlet 與 JavaBean 的組合應用〕的基本架構,第二和第三個範例則是逐漸改良的版本。基本上,如果你已經了解上一篇文章的程式架構,這三個範例應該都很容易了解,所以這裡只會針對增加或改良的部分加以說明。
2.0 範例一
2.1 簡介
此範例以 MVC 架構實作了使用者登入和登出的功能。
2.2 檔案目錄結構
    classes  存放編譯過的 java class

      |

      +--com

          |

          +--huanlin


    src  存放所有原始碼檔案,包括 .java, .jsp, web.xml...等

      |

      +--Make.bat               用來編譯所有的 java 程式

      +--ControllerServlet.java 作為控制中心的 servlet

      +--UserInfoBean           用來儲存使用者資訊的 JavaBean

      +--Login.jsp              登入畫面

      +--Welcome.jsp            登入成功後的歡迎畫面
2.3 程式說明
在解讀這個範例程式時,最重要的,也是首先應該了解的,就是作為流程控制中心的 ControllerServlet 類別,它改寫了 HttpServlet 類別的 service() 方法,接收前端瀏覽器傳來的請求,處理之後傳回適當的 HTML 或 JSP 網頁。其過程如下:
- 取得前端 HTML 表單設定的 'action' 參數值。
- 判斷目前這個 session 的使用者是否已經登入,若否,則先進行身分驗證;若已登入,則根據 'action' 參數值判斷應將使用者導向到哪個網頁。
參考下列程式碼:
public class ControllerServlet extends HttpServlet {

    public void service(HttpServletRequest request, HttpServletResponse response)

            throws ServletException, IOException {


        // 下面兩行讓中文字能正確顯示

        response.setContentType("text/html; charset=big5");

        request.setCharacterEncoding("big5");


        String action = request.getParameter("action"); // 取得目前使用者要執行的動作


        // 若使用者身分尚未驗證,且目前的"動作"不是要進行驗證,就切到登入畫面

        if (!isAuthenticated(request) && !("authenticate".equals(action))) {

            doLogin(request, response);

            return;

        }

        if ("authenticate".equals(action)) {

            doAuthenticate(request, response);  // 執行身分驗證

        }

        else if ("logout".equals(action)) {

            doLogout(request, response);        // 執行登出

        }

        else {

            response.sendError(HttpServletResponse.SC_NOT_IMPLEMENTED);

        }

    }


    // 轉往指定的網址

    private void gotoPage(String targetURL, HttpServletRequest request,

            HttpServletResponse response)

            throws IOException, ServletException {

        RequestDispatcher rd;

        rd = getServletContext().getRequestDispatcher("/" + targetURL);

        rd.forward(request, response);

    }


    // 傳回目前的使用者是否已經通過身分驗證(是否已登入)

    // 只要檢查 userInfo 物件是否存在就能得知是否已登入

    private boolean isAuthenticated(HttpServletRequest request) {

        boolean result = false;

        HttpSession session = request.getSession();

        if (session.getAttribute("userInfo") != null)

            result = true;

        return result;

    }


    // 轉往登入畫面

    private void doLogin(HttpServletRequest request, HttpServletResponse response)

            throws IOException, ServletException {

        gotoPage("Login.jsp", request, response);

    }


    // 登出

    private void doLogout(HttpServletRequest request, HttpServletResponse response)

            throws IOException, ServletException {

        HttpSession session = request.getSession();

        session.removeAttribute("userInfo");   // 把身分驗證旗號清掉

        session.invalidate(); // 清除 session 內所有 attributes 與物件的繫結關係

        doLogin(request, response);             // 再轉往登入畫面

    }


    // 執行身分驗證

    private void doAuthenticate(HttpServletRequest request, HttpServletResponse response)

            throws IOException, ServletException {

        String userName = request.getParameter("username");

        String password = request.getParameter("password");

        String targetURL;


        // 若身分驗證無誤,就建立 userInfo 物件,並指定一個 attribute 與之繫結

        if ("123".equals(password)) {

            HttpSession session = request.getSession();


            UserInfoBean bean = new UserInfoBean();

            bean.setUserName(userName);

            bean.setPassword(password);


            session.setAttribute("userInfo", bean);

            targetURL = "/Welcome.jsp";

        }

        else {  // 驗證失敗

            targetURL = "/LoginError.jsp";

        }


        gotoPage(targetURL, request, response);

    }

}
提示:
- 注意 if ("123".equals(password)) 和 if (password.equals("123") 兩種寫法在防錯能力上的差異。
- 使用 RequestDispatcher.forward() 轉送網頁時,網址前面要加斜線 '/'。
- 前端的 'action' 參數定義,請參考 Login.jsp 和 Welcome.jsp。
2.4 編譯
執行 make.bat。
2.5 佈署與執行(for Tomcat)
- 在 Tomcat 的 webapps 目錄下建一個名為 mvc1 的目錄。
- 複製 web.xml 至 mvc1\WEB-INF\ 目錄下。
- 將所有 .jsp 檔案複製到 mvc1\ 目錄下。
- 將整個 classes 目錄複製到 mvc1\WEB-INF\ 目錄下。
- 重新啟動 Tomcat(只有第一次佈署時需要),在瀏覽器的網址列輸入 "http://127.0.0.1:8080/mvc1/main"。
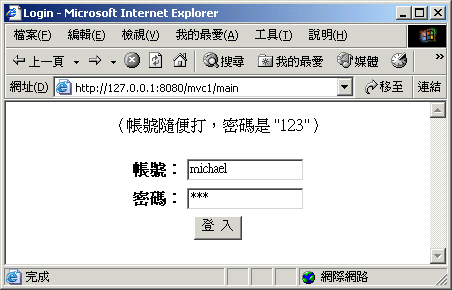
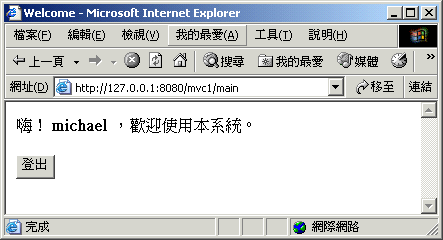
參考以下執行畫面:
3.0 範例二
3.1 簡介
此版本改良自 MVC1,改變如下:
- 以 Ant 來簡化編譯和佈署。
- 原始碼的目錄結構區分得更清楚。
- 將 ControllerServlet 類別中,處理 action 參數與相對應的動作抽離成一個框架,將固定不變的留下來,經常會變動的部分移出去。也就是把 action 定義成抽象類別,實際的具像類別由個別的類別單獨實作,並且將 action 參數與相對應的 action 具像類別定義在一個外部的屬性檔裡面。這個屬性檔就是 action.properties。
3.2 檔案目錄結構
    cfg  存放應用程式組態檔


    classes  存放編譯過的 java class

      |

      +--com

          |

          +--huanlin

               |

               +--action

               +--servlet

               +--utility

               +--valuebean


    jsp  存放 .jsp 檔案

      |

      +--Login.jsp              登入畫面

      +--LoginError.jsp         登入失敗畫面

      +--Welcome.jsp            登入成功後的歡迎畫面


    src  存放 java 原始碼檔案

      |

      +--action.properties  定義 action 與其對應的類別

      +--com

          |

          +--huanlin

               |

               +--action  處理 HTTP request 的 Action 具像類別

                    |

                    +--AuthenticationAction.java 驗證使用者身分

                    +--EmployeeAction.java       員工資料維護作業

                    +--LogoutAction.java         登出


               +--servlet

                    |

                    +--ControllerServlet.java    作為控制中心的 servlet


               +--utility

                    |

                    +--Action   Action 物件的抽象類別


               +--valuebean

                    |

                    +-- UserInfoBean    用來儲存使用者資訊的 JavaBean
Action 族系的類別階層
    java.lang.Object

      |

      +--com.huanlin.utility.Action

           |

           +--com.huanlin.action.AuthenticationAction

           +--com.huanlin.action.EmployeeAction

           +--com.huanlin.action.LogoutAction
其他類別
    java.lang.Object

      |

      +--com.huanlin.servlet.ControllerServlet

      +--com.huanlin.valuebean.EmployeeBean

      +--com.huanlin.valuebean.UeerInfoBean
3.3 程式說明
ControllerServlet 類別中,已經不像範例一裡面,使用許多 if 敘述來判斷要執行哪個 action。這次使用了物件導向的多型技術,將 action 的執行動作定義在一個抽象類別 Action 裡面,所有實際要執行的動作都必須繼承自 Action 類別。同時,我們也使用了「以類別名稱建立物件個體」的程式技巧,讓我們可以將 action 參數與其對應的 Action 類別定義在一個外部檔案,程式執行時才讀入,並且根據類別名稱(字串)來建立物件。過程如下:
- Servlet 初始化時,亦即 init() 方法,先從 action.properties 檔案中讀入參數與動作類別的對應表,並將此對應表儲存在一個名為 'actions' 的 hashtable 裡面。
- Servlet 收到 request 時,亦即 service() 方法,先判斷使用者是否已經登入,若否,則先進行身分驗證;若已登入,則根據 'action' 參數值,到 hashtable 裡面取得對應的類別名稱,再由類別名稱動態建立物件個體。Action 物件建立好之後,呼叫 execute() 方法。
/*

 * 檔案:ControllerServlet.java

 */

package com.huanlin.servlet;

import java.io.*;

import javax.servlet.*;

import javax.servlet.http.*;

import java.util.*;

import com.huanlin.valuebean.*;

import com.huanlin.utility.*;


public class ControllerServlet extends HttpServlet {

    // WEB-INF\classes 目錄下需有字串資源檔案: action.properties

    private static ResourceBundle actionRB = ResourceBundle.getBundle("action");

    private static Hashtable actions = new Hashtable();


    public void init(ServletConfig config) throws ServletException {

        super.init(config);

        initCommandMapping();

    }


    // 將字串資源的 name=value 對應值存入 hash table

    private void initCommandMapping() {

        Enumeration enum = actionRB.getKeys();

        while (enum.hasMoreElements()) {

            String s = (String) enum.nextElement();

            actions.put(s, actionRB.getObject(s));

        }

    }


    public void service(HttpServletRequest request, HttpServletResponse response)

            throws ServletException, IOException {


        // 下面兩行讓中文字能正確顯示

        response.setContentType("text/html; charset=big5");

        request.setCharacterEncoding("big5");


        String actionName = request.getParameter("action"); // 取得目前使用者要執行的動作


        // 若使用者身分尚未驗證,且目前的"動作"不是要進行驗證,就切到登入畫面

        if (!isAuthenticated(request) && !("authenticate".equals(actionName))) {

            doLogin(request, response);

            return;

        }


        String className = (String) actions.get(actionName);

        if (className == null) {

            doError(request, response);

            return;

        }


        // 動態建立 action 物件。

        try {

            Class classObject = Class.forName(className);

            Action action = (Action) classObject.newInstance();

            String targetURL = action.execute(this, request, response);

            if (targetURL != null)

                gotoPage(targetURL, request, response);

        }

        catch (Exception e) {

            throw new ServletException(e);

        }

    }


    // 其餘省略...

}
提示:
- 注意 ResourceBundle 類別的用法,以及 action.properties 檔案存放的位置。
- 看一下 action.properties 檔案的內容,了解 action 和類別的對應關係如何定義。
- 查閱 Hashtable 類別的用法。
- 查閱 Java API 關於 Class.forName() 和 Class.newInstance() 的說明。
- 看一下 action.java 中如何定義 Action 抽象類別,以及其他繼承的類別如何實作。
3.4 編譯、佈署、與執行(for Tomcat)
此範例使用 Ant 來協助應用程式的編譯和佈署,因此你必須先安裝 Ant,安裝步驟可以參考 5.0 一節的說明。
安裝好之後,只要在此應用程式的目錄下輸入下列 DOS 命令即可:
ant
Ant 會讀取 build.xml 檔案的內容來執行命令,我們已經是先將所有檔案的編譯和佈署命令都寫在 build.xml 檔案裡面,所以編譯和佈署都是全自動化的。
執行時在瀏覽器的網址列輸入:"http://127.0.0.1:8080/mvc2/main" 即可。執行畫面與範例一雷同。
4.0 範例三
4.1 簡介
此版本改良自 MVC2,改變如下:
- 加入資料庫的存取(MSSQL 2000)。
- 增加 DbHelper 類別,用來建立資料庫的連結。
- 修改 Action 介面,增加 ActionBase 基礎類別。
- 增加 AppConstants 類別,用來存取定義於外部檔案的應用程式參數,此範例是將資料庫連線參數寫在外部檔案 'app.properties' 裡面。
4.2 檔案目錄結構
    cfg  存放應用程式組態檔


    classes  存放編譯過的 java class

      |

      +--com

          |

          +--huanlin

               |

               +--action

               +--servlet

               +--utility

               +--valuebean


    jsp  存放 .jsp 檔案

      |

      +--Login.jsp              登入畫面

      +--LoginError.jsp         登入失敗畫面

      +--Welcome.jsp            登入成功後的歡迎畫面


    src  存放 java 原始碼檔案

      |

      +--com

          |

          +--huanlin

               |

               +--action  Action 具像類別

                    |

                    +--AuthenticationAction 驗證使用者身分

                    +--EmployeeAction       員工資料維護作業

                    +--LogoutAction         登出


               +--servlet

                    |

                    +--ControllerServlet  作為控制中心的 servlet


               +--utility

                    |

                    +--Action        用來處理 HTTP request 的 Action 物件的介面

                    +--ActionBase    Action 基礎類別

                    +--AppConstants  用來存取應用程式常數的類別

                    +--DbHelper      此類別包含用來協助處理資料庫的方法


               +--valuebean

                    |

                    +-- EmployeeBean  代表一名員工

                    +-- UserInfoBean  儲存使用者資訊
Action 族系的類別階層
    java.lang.Object

      |

      +--com.huanlin.utility.ActionBase

           |

           +--com.huanlin.action.AuthenticationAction

           +--com.huanlin.action.EmployeeAction

           +--com.huanlin.action.LogoutAction
其他類別
    java.lang.Object

      |

      +--com.huanlin.servlet.ControllerServlet

      +--com.huanlin.utility.AppConstants

      +--com.huanlin.utility.DbHelper

      +--com.huanlin.valuebean.EmployeeBean

      +--com.huanlin.valuebean.UeerInfoBean
4.3 程式說明
這個範例跟前一個版本主要的差異在於加入了處理資料庫的能力,因此 Action 抽象類別也由原先的一個方法,增加為四個方法,並且改成以 interface 來定義,如下:
/*

 * 檔案:Action.java

 * 說明:定義用來處理 servlet request 的 action 介面

 */

package com.huanlin.utility;

import java.io.*;

import java.sql.*;

import javax.servlet.*;

import javax.servlet.http.*;


public interface Action {


    /**

     * Set local database connection

     */

    public void setConnection(Connection con);


    /**

     * Execute business logic.

     * The field 'dbCon' should be set before calling this method.

     * The method should return true if field 'view' is set.

     */

    public boolean execute(HttpServlet servlet,

            HttpServletRequest request, HttpServletResponse response)

            throws ServletException, IOException;


    /**

     * Return the page name (and path) to display the view

     */

    public String getView();


    /**

     * Return a JavaBean containing the model (data)

     */

    public Object getModel();

}
其中
- setConnection() 是用來指定資料庫連線物件,換句話說,外界(即 ControllerServlet)必須先建立好資料庫連線物件,並且在執行時傳入。
- execute() 執行這個 action 所需的處理。傳回值改為布林型態,False 表示執行失敗,True 表示執行成功。
- getView() 會傳回一個網址。ControllerServlet 可使用此方法得知要轉往哪個頁面。
- getModel() 回傳回一個資料物件。ControllerServlet 可使用此方法取得資料物件,並傳遞給 JSP 程式。
從介面的各個名稱可以看出,這是個名副其實的 MVC 架構。為了簡化實作類別,我們再定義一個 ActionBase 基礎類別,此類別實作了 Action 介面,並且把常用的方法實作出來,這樣後代在繼承時就不用寫重複的程式碼了。
ControllerServlet 類別必須在初始化時就建立好資料庫連線,並且在呼叫每個 action 物件的 execute() 方法之前將資料庫連線物件傳遞給它。ControllerServlet 的原始碼如下:
/*

檔案:ControllerServlet.java

說明:作為網頁應用程式的流程控制中心

*/

package com.huanlin.servlet;

import java.io.*;

import java.sql.*;

import javax.servlet.*;

import javax.servlet.http.*;

import java.util.*;

import com.huanlin.valuebean.*;

import com.huanlin.utility.*;


public class ControllerServlet extends HttpServlet {

    /**

     *  Shared database connection

     */

    private Connection dbCon = null;


    // WEB-INF\classes 目錄下需有字串資源檔案: action.properties

    private static ResourceBundle actionRB = ResourceBundle.getBundle("action");

    private static Hashtable actions = new Hashtable();


    public void init(ServletConfig config) throws ServletException {

        super.init(config);


        // Setup file path property for AppConstants class.

        System.setProperty("prop.file.dir",

            getServletContext().getRealPath("") + "\\WEB-INF\\");


        try {

            dbCon = DbHelper.getConnection();

        }

        catch (ClassNotFoundException e) {

            // todo: write to log

            System.out.println("無效的資料庫驅動程式!\n" + e);

        }

        catch (SQLException e) {

            // todo: write to log

            System.out.println("無法載入資料庫驅動程式!\n" + e);

        }


        initCommandMapping();

    }


    /**

    * Clean up shared resources

    */

    public void destroy()

    {

        try {

            dbCon.close();

        }

        catch (java.sql.SQLException e) {

            // todo: write error message to log

        }

    }


    public void service(HttpServletRequest request, HttpServletResponse response)

            throws ServletException, IOException {


        // 下面兩行讓中文字能正確顯示

        response.setContentType("text/html; charset=big5");

        request.setCharacterEncoding("big5");


        String actionName = request.getParameter("action"); // 取得目前使用者要執行的動作


        // 若使用者身分尚未驗證,且目前的"動作"不是要進行驗證,就切到登入畫面

        if (!isAuthenticated(request) && !("authenticate".equals(actionName))) {

            doLogin(request, response);

            return;

        }


        String className = (String) actions.get(actionName);

        if (className == null) {

            doError(request, response);

            return;

        }


        // Process the action

        try {

            // 動態建立 action 物件。

            Class classObject = Class.forName(className);

            Action action = (Action) classObject.newInstance();


            // Pass the database connection to the action object

            action.setConnection(dbCon);


            if (action.execute(this, request, response)) {


                // 取得欲轉送的頁面 (view)

                String targetURL = action.getView();


                // 取得資料物件 (model)並存入 request 物件

                request.setAttribute("model", action.getModel());


                if ((targetURL != null) && (targetURL != "")) {

                    gotoPage(targetURL, request, response);

                }

            }

        }

        catch (Exception e) {

            throw new ServletException(e);

        }

    }


    // 其餘省略...

}
在 init() 方法中,使用了 DBHelper 類別來建立資料庫連線,而 DbHelper 則借助 AppConstants 類別將連線參數從外部檔案 app.properties 讀入,這部分請自行閱讀原始碼以了解相關細節。如果你不想要了解實作細節,DbHelper 和 AppConstants 也可以直接拿來重複使用,只要你知道 app.properties 在佈署時應放在哪裡,以及資料庫連線參數如何定義就行了。
4.4 編譯、佈署、與執行(for Tomcat)
跟範例二一樣使用 Ant 編譯,在此應用程式的目錄下輸入下列 DOS 命令即可完成編譯和佈署:
ant
執行時在瀏覽器的網址列輸入:"http://127.0.0.1:8080/mvc3/main" 即可。
5.0 附錄:Ant 安裝指南
5.1 Ant 簡介
Ant 是 Apache 開放原始碼專案的其中一項,它是個 Java 應用程式的輔助建立工具。透過 Ant,我們可以將日常的編譯及佈署 Java 應用程式的動作全部自動化,其功能類似 make,但是更強大,而且具備跨平台的優點。
5.2 取得 Ant
到 http://ant.apache.org/bindownload.cgi 下載最新版本的 Ant。如果你不需要重新編譯 Ant,只要下載 binary distribution 就好了,source code 可以不用下載。
5.3 安裝 Ant (for Windows)
你的系統必須已經安裝好 JDK,才能安裝 Ant。Windows 平台的安裝步驟如下:
- 為 Ant 建立一個目錄,將下載下來的 Ant 壓縮檔解開至這個目錄,假設是 'C:\Ant\'。
- 新增一個系統環境變數 'ANT_HOME',其值為 'C:\Ant'。
- 將 '%ANT_HOME%\bin' 加入 PATH 環境變數中。

