【068】ListView & ArrayAdapter
●·● 目录:
A1 ………… ListView 类
ListAdapter 接口
ArrayAdapter 类
☀ 举例一 ☀
SimpleAdapter 类
List 接口
ArrayList 类
Map 接口
HashMap 类
☀ 举例二 ☀
SimpleCursorAdapter 类
A2 ………… ExpandableListView 类
SimpleExpandableListAdapter 类
☀ 举例三 ☀
☀ 举例四 ☀
A3 ………… ArrayAdapter 类在下面不同控件中的使用
AutoCompleteTextView
ListView
Spinner
---------------------------------------------------------------------------------------------------------
╔════════╗
╠════╣ 第A1个 ╠══════════════════════════════════════════════════╣
╚════════╝
●·● ListView 类:
1. A view that shows items in a vertically scrolling list.
2. ListView Constructors:
- ListView(Context context):
- android:id="@+id/android:list" ListActivity中使用.

3. ListView XML Attributes:
- android:drawSelectorOnTop:选中的时候是否覆盖选中项, 一般选择 false.
- android:scrollbars:滚动条显示方式.
4. ListView Methods:
- setAdapter(ListAdapter adapter):将数据加到 ListView 内部.
- isItemChecked(int position):是否选中.
- setChoiceMode(int choiceMode):
CHOICE_MODE_NONE:无.
CHOICE_MODE_SINGLE:单选.
CHOICE_MODE_MULTIPLE:复选. - getItemAtPosition(int position):返回值:Object.
- getItemIdAtPosition(int position):返回值:long.
- getFirstVisiblePosition():返回值:int.
- getLastVisiblePosition():返回值:int.
- setOnClickListener(View.OnClickListener l):
- setOnItemClickListener(AdapterView.OnItemClickListener listener):
- setOnItemLongClickListener(AdapterView.OnItemLongClickListener listener):
- setOnItemSelectedListener(AdapterView.OnItemSelectedListener listener):
- setSelection(int position):
通过 ListActivity 中的 onListItemClick 方法可以重写 list item 被点击时的事件.
●·● ListAdapter 接口:Extended Adapter that is the bridge between a ListView and the data that backs the list.
来源:android.widget.ListAdapter
●·● ArrayAdapter 类:A concrete BaseAdapter that is backed by an array of arbitrary objects.
来源:android.widget.ArrayAdapter
1> 构造函数:
- ArrayAdapter(Context context, int textViewResourceId, List<T> objects):
android.R.layout.simple_expandable_list_item_1:系统自带的列表样式. - ArrayAdapter(Context context, int resource, int textViewResourceId, List<T> objects):
2> Methods:
- setDropDownViewResource(int res):设置下拉列表中每一项的样式.
android.R.layout.simple_spinner_item:很普通的狭窄列表.
android.R.layout.simple_spinner_dropdown_item:宽的有单选按钮的列表(2.2). - createFromResource(Context context, int textArrayResId, int textViewResId):返回值:ArrayAdapter<CharSequence>.
在 strings.xml 中定义字符串数组, 实现下拉菜单功能.
第二个参数引用相应的数组.
第三个参数引用 spinner 显示的样式. <<<举例>>>
效果:

第一步:布局文件,内容就是两个按钮,第一个按钮实现显示 ListView.
第二步:在主 Activity 的第一个按钮中只需写入切换到另一个 Activity 的代码即可.
第三步:写这个"另一个 Activity".

public class lv extends Activity{

    private ListView listView;

    @Override

    protected void onCreate(Bundle savedInstanceState) {

        // TODO Auto-generated method stub

        super.onCreate(savedInstanceState);


        listView = new ListView(this);        //新建 ListView 实例

        listView.setAdapter(new ArrayAdapter<String>(this,

                android.R.layout.simple_expandable_list_item_1,getData()));    //添加数据, 第二个是系统自带的

        setContentView(listView);    //将此 listView 加入到当前 Activity 中

    }


    private List<String> getData(){    //数据源

        List<String> data = new ArrayList<String>();

        for(int i = 1;i<=20;i++)

            data.add("Hello----Hello---- " + i);

        return data;

    }

}
●·● SimpleAdapter 类:An easy adapter to map static data to views defined in an XML file.
来源:android.widget.SimpleAdapter
1> 构造函数:
- SimpleAdapter(Context context, List<? extends Map<String, ?>> data, int resource, String[] from, int[] to):
第一个参数:context.
第二个参数:数据内容. private List<Map<String, Object>> getData(){}
第三个参数:布局文件. 每一项显示的内容.
第四个参数:从第二个参数的 Map 的键获取. 通过键来获取值.
第五个参数:与第四个参数相对应的控件 id, 会将第四个参数的内容显示在第五个参数所对应的控件上.
●·● List 接口:A List is a collection which maintains an ordering for its elements.
●·● ArrayList 类:ArrayList is an implementation of List, backed by an array.
- add(E object):将指定的 object 加入到 ArrayList 中.
- add(int index, E object):将指定的 object 加入到 ArrayList 的指定索引处.
- clear():清除对象中的所有元素.
- get(int index):获取列表中指定位置的元素.
- remove(Object object):删除列表中指定的 object.
- remove(int index):删除列表中指定索引的 object.
- size():返回对象中的元素的个数.
- set(int index, E object):替换指定索引的 object.
●·● Map 接口:A Map is a data structure consisting of a set of keys and values in which each key is mapped to a single value.
●·● HashMap 类:HashMap is an implementation of Map.
- put(K key, V value):将值和对应的键加入到对象中.
- remove(Object key):从对象中删除指定的键.
- size():返回对象中的元素的个数.
- get(Object key):返回指定键所对应的值.
- clear():清除对象中的所有元素.
效果:
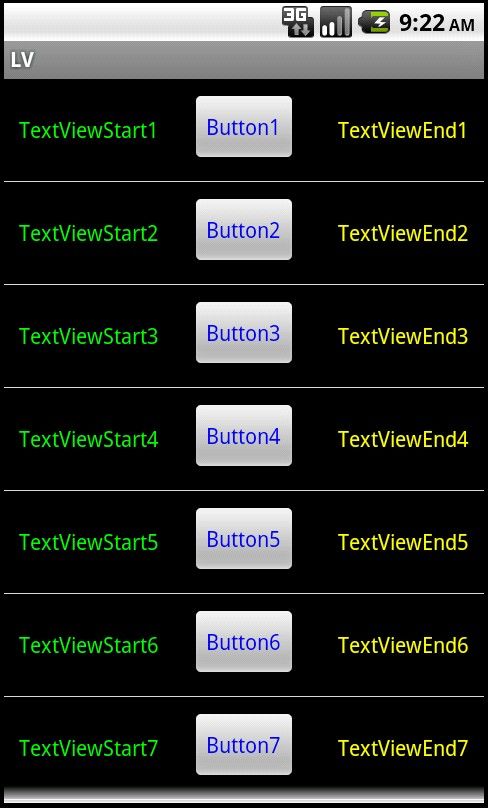
第一步:布局文件,内容就是两个按钮,第二个按钮实现显示上图的 ListView.
第二步:ListView 的布局文件,此文件的内部是指 ListView 的每一个要素的布局排列,因此一般是从左往右排的,代码如下.
布局文件
<RelativeLayout xmlns:android="http://schemas.android.com/apk/res/android"

    android:background="#000000"

    android:padding="10dip"

    android:layout_width="fill_parent"

    android:layout_height="fill_parent" >


    <TextView

        android:layout_width="wrap_content"

        android:layout_height="wrap_content"

        android:id="@+id/one"

        android:layout_centerVertical="true"

        android:textColor="#00FF00"

        />


    <Button

        android:layout_width="wrap_content"

        android:layout_height="wrap_content"

        android:id="@+id/two"

        android:layout_centerInParent="true"

        android:textColor="#0000FF"

        />


    <TextView

        android:layout_width="wrap_content"

        android:layout_height="wrap_content"

        android:id="@+id/three"

        android:layout_alignParentRight="true"

        android:layout_centerVertical="true"

        android:textColor="#FFFF00"

        />


</RelativeLayout>
第三步:在主 Activity 的第二个按钮中只需写入切换到另一个 Activity 的代码即可.
第四步:写这个"另一个 Activity", 此 activity 继承于 ListActivity. 注意最后要在 AndroidManifest.xml 中注册.
public class lv2 extends ListActivity{

    @Override

    protected void onCreate(Bundle savedInstanceState) {

        // TODO Auto-generated method stub

        super.onCreate(savedInstanceState);

        SimpleAdapter adapter = new SimpleAdapter(this, getData(), R.layout.user,    //Activity, 数据内容, 布局文件

                new String[]{"one","two","three"}, new int[]{R.id.one, R.id.two, R.id.three});  //后面的控件对应前面字符串在 map 中的值作为 text

        setListAdapter(adapter);

    }


    private List<Map<String, Object>> getData(){

        List<Map<String, Object>> list = new ArrayList<Map<String,Object>>();  //以 Map 为元素的 List

        Map<String, Object> map;


        for (int i = 0; i < 10; i++) {

            map = new HashMap<String, Object>();    //为 map 赋值

            map.put("one", "TextViewStart" + (i+1));

            map.put("two", "Button" + (i+1));

            map.put("three", "TextViewEnd" + (i+1));

            list.add(map);                //为 list 赋值

        }

        return list;

    }

}
通过 onListItemClick 方法可以实现对每一条数据的点击实现.
※ 参考:Android常见控件之SimpleAdapter和List
※ 参考:android ListView详解
※ 参考:Android ListView的使用
※ 参考:android中ListView点击和ListView的item里面的button或ImageView不能同时生效的解决


文件下载:http://l5.yunpan.cn/lk/61o4ahkivc
预览:

1. 将数据库数据插入到 ListView 中的 adapter.
2. 构造函数:
- public SimpleCursorAdapter (Context context, int layout, Cursor c, String[] from, int[] to, int flags):
第二个参数:存放 listview, 以及 to 的 textview 等.
第三个参数:数据库中查询结果返回的 cursor.
第四个参数:数据库中的列名, 将要显示的内容.
第五个参数:用来显示第四个参数内容的控件, 可以是 textview 等.
第六个参数:CursorAdapter.FLAG_REGISTER_CONTENT_OBSERVER
---------------------------------------------------------------------------------------------------------
╔════════╗
╠════╣ 第A2个 ╠══════════════════════════════════════════════════╣
╚════════╝
●·● ExpandableListView 类:
1. 可分组的 ListView.
●·● SimpleExpandableListAdapter 类:
1> 构造函数:
SimpleExpandableListAdapter(Context context, List<? extends Map<String, ?>> groupData, int groupLayout, String[] groupFrom, int[] groupTo,
List<? extends List<? extends Map<String, ?>>> childData, int childLayout, String[] childFrom, int[] childTo):
第一个参数:context.
第二个参数:group(一级目录) 数据内容. List<Map<String, String>>
第三个参数:group(一级目录) 布局文件. 一级目录的内容.
第四个参数:group(一级目录) 键.
第五个参数:group(一级目录) 对应控件.
第六个参数:child(二级目录) 数据内容. List<List<Map<String, String>>>
第七个参数:child(二级目录) 布局文件. 二级目录内容.
第八个参数:child(二级目录) 键.
第九个参数:child(二级目录) 对应控件.
※ 参考:Android版手风琴(ExpandableListView) (里面有"举例三"的源代码)
效果:
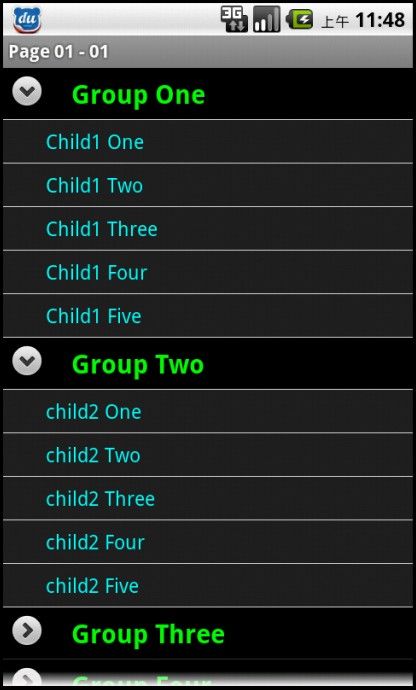
group.xml
<RelativeLayout xmlns:android="http://schemas.android.com/apk/res/android"

    android:background="#000000"

    android:paddingLeft="3dip"

    android:paddingTop="6dip"

    android:paddingBottom="6dip"

    android:paddingRight="3dip"

    android:layout_width="fill_parent"

    android:layout_height="fill_parent" >


    <TextView

        android:layout_width="wrap_content"

        android:layout_height="wrap_content"

        android:layout_marginLeft="50sp"

        android:id="@+id/groupItem"

        android:textColor="#00FF00"

        android:singleLine="true"

        android:textSize="20sp"

        android:textStyle="bold"

        android:layout_centerVertical="true"

        />


</RelativeLayout>
child.xml
<RelativeLayout xmlns:android="http://schemas.android.com/apk/res/android"

    android:background="#222222"

    android:paddingLeft="3dip"

    android:paddingTop="6dip"

    android:paddingBottom="6dip"

    android:paddingRight="3dip"

    android:layout_width="fill_parent"

    android:layout_height="fill_parent" >


    <TextView

        android:layout_width="wrap_content"

        android:layout_height="wrap_content"

        android:id="@+id/childItem"

        android:layout_marginLeft="30sp"

        android:textColor="#00FFFF"

        android:singleLine="true"

        android:textSize="15sp"

        android:layout_centerVertical="true"

        />


</RelativeLayout>
public class listAc extends ExpandableListActivity{  //继承与ExpandableListActivity

    @Override

    protected void onCreate(Bundle savedInstanceState) {

        // TODO Auto-generated method stub

        super.onCreate(savedInstanceState);


        List<Map<String, String>> groups = new ArrayList<Map<String,String>>();  //一级目录数据 "group"

        Map<String, String> mapGroups = new HashMap<String, String>();

        mapGroups.put("group", "Group One");

        groups.add(mapGroups);

        mapGroups = new HashMap<String, String>();

        mapGroups.put("group", "Group Two");

        groups.add(mapGroups);


        List<Map<String, String>> child1 = new ArrayList<Map<String,String>>();  //一级目录第一个选项的内容部分 "child"

        Map<String, String> child1Data = new HashMap<String, String>();

        child1Data.put("child", "Child1 One");

        child1.add(child1Data);

        child1Data = new HashMap<String, String>();

        child1Data.put("child", "Child1 Two");

        child1.add(child1Data);


        List<Map<String, String>> child2 = new ArrayList<Map<String,String>>();  //一级目录第二个选项的内容部分 "child"

        Map<String, String> child2Data = new HashMap<String, String>();

        child2Data.put("child", "child2 One");

        child2.add(child2Data);

        child2Data = new HashMap<String, String>();

        child2Data.put("child", "child2 Two");

        child2.add(child2Data);


        List<List<Map<String, String>>> children = new ArrayList<List<Map<String, String>>>();  //二级目录数据 "child"

        children.add(child1);

        children.add(child2);


        SimpleExpandableListAdapter adapter = new SimpleExpandableListAdapter(

                listAc.this,                       //1. context

                groups,                           //2. 一级目录数据

                R.layout.group,                   //3. 一级布局

                new String[]{"group"},             //4. 一级key

                new int[]{R.id.groupItem},         //5. 一级控件

                children,                           //6. 二级目录数据

                R.layout.child,                     //7. 二级布局

                new String[]{"child"},             //8. 二级key

                new int[]{R.id.childItem});            //9. 二级控件


        setListAdapter(adapter);

    }

}
效果:
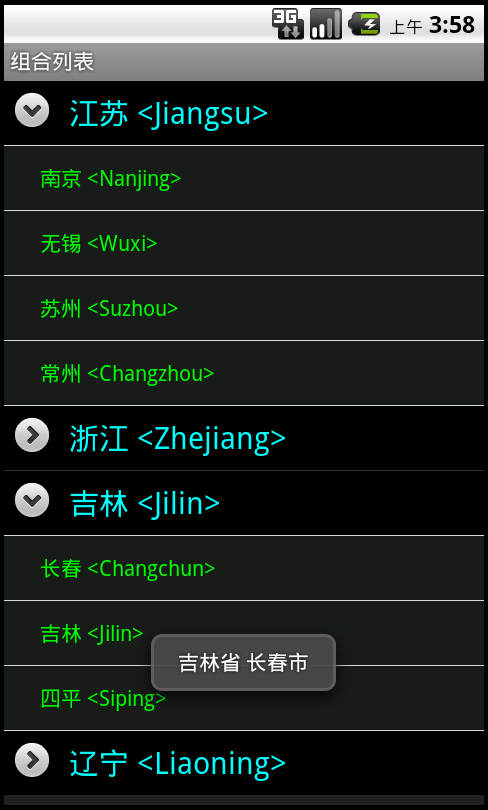
第一步:在 main.xml 中加入一个 ExpandableListView.
第二步:重写一个 MyExpandableListAdapter 类, 此类继承自 BaseExpandableListAdapter
    public class MyExpandableListAdapter extends BaseExpandableListAdapter{

        public String[] groups = {"江苏 <Jiangsu>", "浙江 <Zhejiang>","吉林 <Jilin>","辽宁 <Liaoning>"};  //一级目录内容


        public String[][] children = {

                {"南京 <Nanjing>","无锡 <Wuxi>","苏州 <Suzhou>","常州 <Changzhou>"},    //二级目录内容

                {"杭州","绍兴","宁波"},

                {"长春 <Changchun>","吉林 <Jilin>","四平 <Siping>"},

                {"沈阳","大连","抚顺","丹东"}};


        public Object getChild(int groupPosition, int childPosition) {  //获取子条目

            // TODO Auto-generated method stub

            return children[groupPosition][childPosition];

        }


        public long getChildId(int groupPosition, int childPosition) {  //获取子条目 id

            // TODO Auto-generated method stub

            return childPosition;

        }


        public int getChildrenCount(int groupPosition) {  //获取子条目个数

            // TODO Auto-generated method stub

            return children[groupPosition].length;

        }


        public TextView getGenericView() {

            AbsListView.LayoutParams lp = new AbsListView.LayoutParams(  //定义一个建立 TextView 的方法

                    ViewGroup.LayoutParams.MATCH_PARENT, 64);

            TextView textView = new TextView(MainActivity.this);

            textView.setLayoutParams(lp);

            textView.setGravity(Gravity.CENTER_VERTICAL | Gravity.LEFT);

            textView.setPadding(36, 0, 0, 0);

            return textView;

        }


        public View getChildView(int groupPosition, int childPosition,  //获取子条目控件

                boolean isLastChild, View convertView, ViewGroup parent) {

            // TODO Auto-generated method stub

            TextView textView = getGenericView();

            textView.setText(getChild(groupPosition, childPosition).toString());

            textView.setBackgroundColor(Color.rgb(30, 30, 30));

            textView.setTextColor(Color.rgb(0, 255, 0));

            return textView;

        }


        public Object getGroup(int groupPosition) {    //获取父条目

            // TODO Auto-generated method stub

            return groups[groupPosition];

        }


        public int getGroupCount() {        //获取父条目个数

            // TODO Auto-generated method stub

            return groups.length;

        }


        public long getGroupId(int groupPosition) {  //获取父条目 id

            // TODO Auto-generated method stub

            return groupPosition;

        }


        public View getGroupView(int groupPosition, boolean isExpanded,  //获取父条目控件

                View convertView, ViewGroup parent) {

            // TODO Auto-generated method stub

            TextView textView = getGenericView();

            textView.setText(getGroup(groupPosition).toString());

            textView.setPadding(65, 0, 0, 0);

            textView.setTextSize(20);

            textView.setBackgroundColor(Color.BLACK);

            textView.setTextColor(Color.CYAN);

            return textView;

        }


        public boolean isChildSelectable(int groupPosition, int childPosition) {  //子条目是否可选

            // TODO Auto-generated method stub

            return true;

        }


        public boolean hasStableIds() {        //是否有固定的 id

            // TODO Auto-generated method stub

            return true;

        }

    }
第三步:在主函数中调用:
public class MainActivity extends Activity {

    private ExpandableListAdapter adapter;

    @Override

    public void onCreate(Bundle savedInstanceState) {

        super.onCreate(savedInstanceState);

        setContentView(R.layout.activity_main);
        adapter = new MyExpandableListAdapter();  //新建 adapter

        ExpandableListView expandableListView = (ExpandableListView)findViewById(R.id.expandableListView1);

        expandableListView.setAdapter(adapter);  //将 adapter 赋值给 expandableListView
        expandableListView.setOnChildClickListener(new OnChildClickListener() {  //写子条目的点击事件

            public boolean onChildClick(ExpandableListView parent, View v,

                    int groupPosition, int childPosition, long id) {

                // TODO Auto-generated method stub

                if (true) {

                    String group = adapter.getGroup(groupPosition).toString().substring(0,2);

                    String child = adapter.getChild(groupPosition, childPosition).toString().substring(0,2);

                    Toast.makeText(MainActivity.this, group + "省 " + child + "市", Toast.LENGTH_SHORT).show();

                }

                return false;

            }

        });

    }}
源文件下载:<<<ExpandableLV.zip>>>
---------------------------------------------------------------------------------------------------------
╔════════╗
╠════╣ 第A3个 ╠══════════════════════════════════════════════════╣
╚════════╝
●·● ArrayAdapter 类在以下控件中的使用:
这几个控件的特点就是需要一串字符串.
public class BasicViews3Activity extends Activity {

    public final String TAG = "Orientation";

    String[] presidents = {

            "Dwight D. Eisenhower",

            "John F. Kennedy",

            "Lyndon B. Johnson",

            "Richard Nixon",

            "Gerald Ford",

            "Jimmy Carter",

            "Ronald Reagan",

            "George H. W. Bush",

            "Bill Clinton",

            "George W. Bush",

            "Barack Obama"

        };


    /** Called when the activity is first created. */

    @Override

    public void onCreate(Bundle savedInstanceState) {

        super.onCreate(savedInstanceState);

        setContentView(R.layout.main);


        ArrayAdapter<String> adapter = new ArrayAdapter<String>(this,

            android.R.layout.simple_dropdown_item_1line, presidents);


        AutoCompleteTextView textView = (AutoCompleteTextView)

            findViewById(R.id.txtCountries);


        textView.setThreshold(1);

        textView.setAdapter(adapter);


        textView.setOnItemClickListener(new AdapterView.OnItemClickListener() {

            public void onItemClick(AdapterView<?> parent, View view,

                    int position, long id) {

                // TODO Auto-generated method stub

                Log.i(TAG, "position -- " + position);

                Log.i(TAG, "id -- " + id);

                Log.i(TAG, "view -- " + ((TextView)view).getText().toString());

            }

        });

    }

}
<resources>

    <string name="hello">Hello World, BasicViews5Activity!</string>

    <string name="app_name">BasicViews5</string>

    <string-array name="presidents_array">

        <item>Dwight D. Eisenhower</item>

        <item>John F. Kennedy</item>

        <item>Lyndon B. Johnson</item>

        <item>Richard Nixon</item>

        <item>Gerald Ford</item>

        <item>Jimmy Carter</item>

        <item>Ronald Reagan</item>

        <item>George H. W. Bush</item>

        <item>Bill Clinton</item>

        <item>George W. Bush</item>

        <item>Barack Obama</item>

    </string-array>

</resources>
public class BasicViews5Activity extends ListActivity  {


    String[] presidents;


    /** Called when the activity is first created. */

    @Override

    public void onCreate(Bundle savedInstanceState) {

        super.onCreate(savedInstanceState);


        setContentView(R.layout.main);

        ListView lstView = getListView();


        //lstView.setChoiceMode(ListView.CHOICE_MODE_NONE);

        lstView.setChoiceMode(ListView.CHOICE_MODE_SINGLE);

        //lstView.setChoiceMode(ListView.CHOICE_MODE_MULTIPLE);

        lstView.setTextFilterEnabled(true);


        presidents =

                getResources().getStringArray(R.array.presidents_array);


        setListAdapter(new ArrayAdapter<String>(this,

            android.R.layout.simple_list_item_checked, presidents));

    }


    public void onListItemClick(

    ListView parent, View v, int position, long id)

    {

        Toast.makeText(this,

            "You have selected " + presidents[position],

            Toast.LENGTH_SHORT).show();

    }

}
public class BasicViews6Activity extends Activity {

    String[] presidents;


    /** Called when the activity is first created. */

    @Override

    public void onCreate(Bundle savedInstanceState) {

        super.onCreate(savedInstanceState);

        setContentView(R.layout.main);


        presidents =

                getResources().getStringArray(R.array.presidents_array);

        Spinner s1 = (Spinner) findViewById(R.id.spinner1);


        /*

        ArrayAdapter<String> adapter = new ArrayAdapter<String>(this,

                android.R.layout.simple_spinner_item, presidents);

        */

        ArrayAdapter<String> adapter = new ArrayAdapter<String>(this,

                android.R.layout.simple_list_item_single_choice, presidents);


        s1.setAdapter(adapter);

        s1.setOnItemSelectedListener(new OnItemSelectedListener()

        {

            public void onItemSelected(AdapterView<?> arg0,

            View arg1, int arg2, long arg3)

            {

                int index = arg0.getSelectedItemPosition();

                Toast.makeText(getBaseContext(),

                        "You have selected item : " + presidents[index],

                        Toast.LENGTH_SHORT).show();

            }


            public void onNothingSelected(AdapterView<?> arg0) { }

        });

    }

}