初识MVVM(一)
说明:关于什么是MVVM,园子中已经有很多文章做过介绍,自己对MVVM也有了初步的认识,算是一知半解吧。概念看起来总是有那么点抽象,简单的办法就是通过动手实践来进一步理解。
从网上弄了几个案例,相信有人看过,在此只为了自己加深对MVVM的认识。
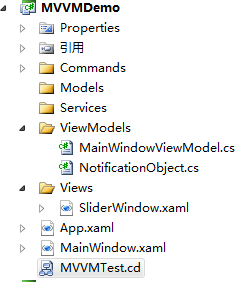
1.目录结构,MVVM的目录结构大致如下:
2.类图及实现过程
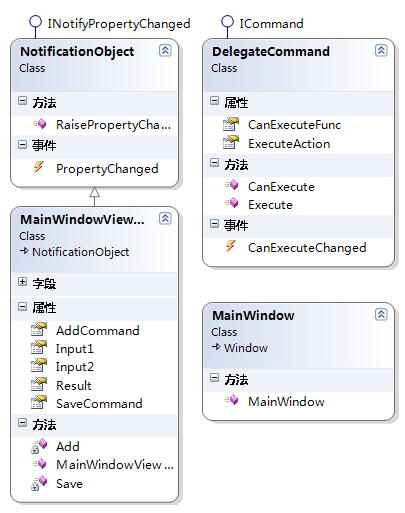
简单的实现过程大致如下,首先就是手动实现两个接口:INotifyPropertyChanged,ICommand.
2.1 INotifyPropertyChanged 接口的实现
 1 //1.继承INotifyPropertyChanged,要引用该命名空间

 2 using System.ComponentModel;

 3

 4 namespace MVVMDemo.ViewModels

 5 {

 6     class NotificationObject:INotifyPropertyChanged

 7     {

 8         //(intface INotifyPropertyChanged,向客户端发出某些属性已更改的通知)

 9         //2.实现接口INotifyPropertyChanged

10

11         public event PropertyChangedEventHandler PropertyChanged;

12

13         public void RaisePropertyChanged(string propertyName)

14         {

15             if (this.PropertyChanged!=null)

16             {

17                 this.PropertyChanged.Invoke(this,new PropertyChangedEventArgs(propertyName));

18             }

19         }

20     }

21 }
2.2 实现ICommand接口
 1   class DelegateCommand:ICommand

 2     {

 3         //ICommand 两个方法 CanExecute 和Execute,一个事件CanExecuteChanged

 4

 5         public bool CanExecute(object parameter)

 6         {

 7             //throw new NotImplementedException();

 8             if (this.CanExecuteFunc==null)

 9             {

10                 return true;

11             }

12           return   this.CanExecuteFunc(parameter);

13         }

14

15         public event EventHandler CanExecuteChanged;

16

17         //Execute

18         public void Execute(object parameter)

19         {

20            // throw new NotImplementedException();

21             if (this.ExecuteAction==null)

22             {

23                 return;

24             }

25             this.ExecuteAction(parameter);

26         }

27

28         public Action<object> ExecuteAction { get; set; }

29         public Func<object, bool> CanExecuteFunc { get; set; }

30     }
2.3 ViewModel的实现
ViewModel中主要实现业务逻辑。本例要实现两数的加法运算:
在这个步骤中首先要完成数据属性的定义,例如:
        private double input1;


        public double Input1

        {

            get { return input1; }

            set

            {

                input1 = value;

                this.RaisePropertyChanged("Input1");

            }

        }
如果数据属性的数量比较多,那么输入总是要花费较多的时间,这里有个小技巧,就是使用快捷的输入方法,但是VS自身提供的代码段是有限的,幸运的是我们可以通过:工具>
代码段管理器>添加来添加自定义的代码段。
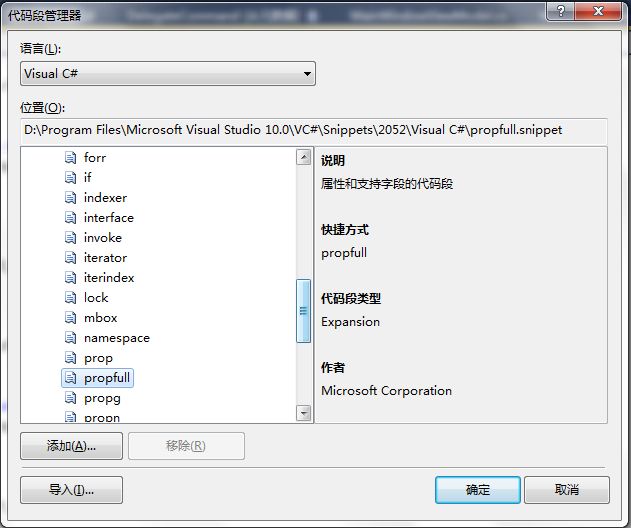
具体的方法是在安装路径下找到系统内置的代码段来修改,自定义自己需要的代码段。
 1 <CodeSnippets xmlns="http://schemas.microsoft.com/VisualStudio/2005/CodeSnippet">

 2     <CodeSnippet Format="1.0.0">

 3         <Header>

 4             <Title>propfull</Title>

 5             <Shortcut>propfull</Shortcut>

 6             <Description>属性和支持字段的代码段</Description>

 7             <Author>Microsoft Corporation</Author>

 8             <SnippetTypes>

 9                 <SnippetType>Expansion</SnippetType>

10             </SnippetTypes>

11         </Header>

12         <Snippet>

13             <Declarations>

14                 <Literal>

15                     <ID>type</ID>

16                     <ToolTip>属性类型</ToolTip>

17                     <Default>int</Default>

18                 </Literal>

19                 <Literal>

20                     <ID>property</ID>

21                     <ToolTip>属性名</ToolTip>

22                     <Default>MyProperty</Default>

23                 </Literal>

24                 <Literal>

25                     <ID>field</ID>

26                     <ToolTip>支持此属性的变量</ToolTip>

27                     <Default>myVar</Default>

28                 </Literal>

29             </Declarations>

30             <Code Language="csharp">

31                 <![CDATA[private $type$ $field$;

32

33     public $type$ $property$

34     {

35         get { return $field$;}

36         set { $field$ = value;}

37     }

38     $end$]]>

39             </Code>

40         </Snippet>

41     </CodeSnippet>

42 </CodeSnippets>
主要修改Title,Shortcut和Code节点中的内容。例如:将上面的Code节点的内容改为如下
            <Code Language="csharp">

            <![CDATA[private $type$ $field$;


    public $type$ $property$

    {

        get { return $field$;}

        set

        {

            $field$ = value;

            this.RaisePropertyChanged("$property$");

        }

    }

    $end$]]>

            </Code>
通过输入ShortCut节点中的名称,双击Tab键就可以快速输入代码。
2)命令属性的实现
    public DelegateCommand AddCommand { get; set; }

        public DelegateCommand SaveCommand { get; set; }


        private void Add(object parameter)

        {

            this.Result = this.Input1 + this.Input2;


        }


        private void Save(object parameter)

        {

            SaveFileDialog dlg = new SaveFileDialog();

            dlg.ShowDialog();


        }
3)在构造函数中实例化委托
1  //构造函数

2         public MainWindowViewModel()

3         {

4             this.AddCommand = new DelegateCommand();

5             this.AddCommand.ExecuteAction = new Action<object>(this.Add);

6

7             this.SaveCommand = new DelegateCommand();

8             this.SaveCommand.ExecuteAction = new Action<object>(this.Save);

9         }
2.4绑定View
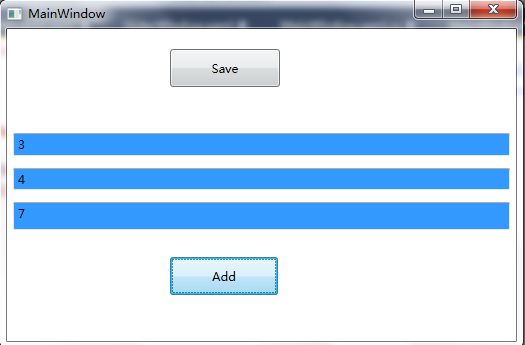
1  <Button Content="Save" Height="38" HorizontalAlignment="Left" Margin="163,20,0,0" x:Name="btnSave" VerticalAlignment="Top" Width="110" Command="{Binding SaveCommand}" />

2         <TextBox Background="{StaticResource {x:Static SystemColors.HighlightBrushKey}}" Grid.Row="1" Margin="6" Text="{Binding Input1}" />

3         <TextBox Background="{StaticResource {x:Static SystemColors.HighlightBrushKey}}" Grid.Row="2" Margin="6" Text="{Binding Input2}" />

4         <TextBox Background="{StaticResource {x:Static SystemColors.HighlightBrushKey}}" Grid.Row="3" Margin="6" Text="{Binding Result}" />

5         <Button Content="Add" Height="38" HorizontalAlignment="Left" Margin="163,21,0,0" x:Name="btnAdd" VerticalAlignment="Top" Width="108" Grid.Row="4" Command="{Binding AddCommand}" />
在后台代码中,只需做类似如下的操作:
1 public partial class MainWindow : Window

2     {

3         public MainWindow()

4         {

5             InitializeComponent();

6

7             this.DataContext = new MainWindowViewModel();

8         }

9     }
即使我们将TextBox控件改为使用Slider,我们只需重新对Slider的进行重新绑定。如下:
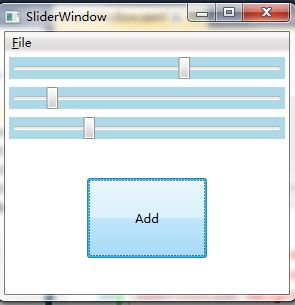
 <Slider x:Name="slider1" Grid.Row="0" Background="LightBlue" Minimum="-100" Maximum="100" Margin="4"

                    Value="{Binding Input1}" />

                <Slider x:Name="slider2" Grid.Row="1" Background="LightBlue" Minimum="-100" Maximum="100" Margin="4"

                    Value="{Binding Input2}" />

                <Slider x:Name="slider3" Grid.Row="2" Background="LightBlue" Minimum="-100" Maximum="100" Margin="4"

                    Value="{Binding Result}" />

                <Button x:Name="addButton" Grid.Row="3" Content="Add" Width="120" Height="80" Command="{Binding AddCommand}"/>
说明:其实,没有必要自己手动实现两个接口,Prism为你完成了这两件事,你需要做的就是添加引用集并引用相应的命名空间。