Spring Cloud微服务项目聚合Swagger文档
在微服务架构中,每个服务通常都有自己独立的 API 文档。为了方便管理和查看所有服务的接口文档,我们需要将这些文档进行聚合。Spring Cloud 与 Swagger 的结合可以帮助我们实现这一目标。本文将介绍如何在 Spring Cloud 微服务项目中聚合 Swagger 文档,以便于集中查看和管理。
1.前置条件
在开始本文之前,博主希望你已经完成微服务项目的搭建:
微服务项目搭建请参考: Spring Cloud微服务项目搭建
1.在子模块添加 Knife4j 依赖
因为博主是 Spring Boot 3.x 版本的缘故,所以用的是 Knife4j
    com.github.xiaoymin
    knife4j-openapi3-jakarta-spring-boot-starter
    4.4.0
2.为子模块添加配置项
在 application.yml 或 application.properties 文件中添加以下配置:
# application.yml 文件

springdoc:
  swagger-ui:
    path: /swagger-ui.html
    tags-sorter: alpha
    operations-sorter: alpha
  api-docs:
    path: /v3/api-docs
  group-configs:
    - group: 'system-service'
      paths-to-match: '/**'
      packages-to-scan: system.controller  # controller层路径

knife4j:
  enable: false
  setting:
    language: zh_cn
# application.properties 文件
springdoc.swagger-ui.path=/swagger-ui.html
springdoc.swagger-ui.tags-sorter=alpha
springdoc.swagger-ui.operations-sorter=alpha
springdoc.api-docs.path=/v3/api-docs
springdoc.group-configs[0].group=system-service
springdoc.group-configs[0].paths-to-match=/**
springdoc.group-configs[0].packages-to-scan=system.controller # controller层路径
knife4j.enable=false
knife4j.setting.language=zh_cn3.在子模块创建 Knife4j 配置类
创建 SwaggerConfig 配置类,进行接口文档的一些个性化配置:
@Configuration
public class SwaggerConfig {

    @Bean
    public OpenAPI springShopOpenApi() {
        return new OpenAPI()
                // 接口文档标题
                .info(new Info().title("User Service API")
                        // 接口文档简介
                        .description("User Service API Documentation")
                        // 接口文档版本
                        .version("V1.0.0")
                        // 开发者联系方式
                        .contact(new Contact().name("LuoLi")
                                .email("[email protected]")));

    }

}
4.在Controller层编写接口
@RestController
@RequestMapping("/api/auth/user")
@Tag(name = "用户管理")
public class UserController {
private final UserService userService;
@Autowired
public UserController(UserService userService) {
this.userService = userService;
}
@GetMapping("/getInvitationCode")
@Operation(summary = "获取邀请码")
public String getInvitationCode(@RequestHeader("Authorization") String token) {
String jwt = token.substring(14);
return userService.getInvitationCode(jwt);
}
@DeleteMapping("/delete/{userId}")
@Operation(summary = "删除【用户/管理员】", parameters = {
@Parameter(
name = "Authorization",
description = "TOKEN",
in = ParameterIn.HEADER,
required = true,
schema = @Schema(type = "string")
)
})
public int deleteUser(@PathVariable("userId") String userId) {
return userService.deleteUser(userId);
}
@PutMapping("/update")
@Operation(summary = "修改【用户/管理员】信息", parameters = {
@Parameter(
name = "Authorization",
description = "TOKEN",
in = ParameterIn.HEADER,
required = true,
schema = @Schema(type = "string")
)
})
public int updateUser(@RequestBody UserInfoModel model) {
return userService.updateUserInfo(model);
}
@GetMapping("/selectUserInfoByEmail")
@Operation(summary = "根据邮箱查询用户信息", parameters = {
@Parameter(
name = "Authorization",
description = "TOKEN",
in = ParameterIn.HEADER,
required = true,
schema = @Schema(type = "string")
)
})
public List selectUserInfoByEmail(@RequestParam String email) {
return userService.getUserInfo(email);
}
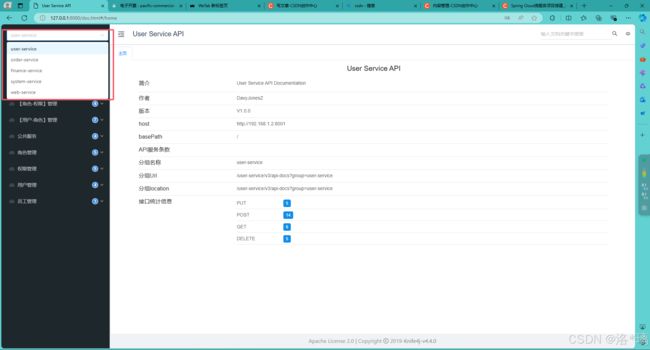
} 5.查看接口文档
Knife4j 文档的地址通常为:http://${host}:${port}/doc.html
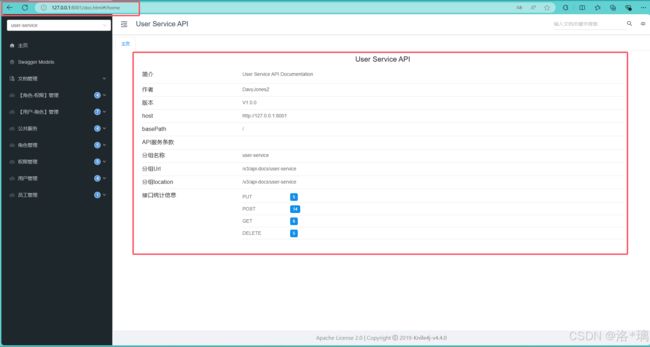 6.在网关服务聚合 Knife4j 文档
6.1.在网关服务引入 Knife4j 依赖
   com.github.xiaoymin
   knife4j-gateway-spring-boot-starter
   4.4.0
注意:这里 Gateway 服务的 Knife4j 依赖与先前 user 服务的 Knife4j 不是同一个依赖
6.2.为网关服务添加配置项
在 application.yml 或 application.properties 文件中添加以下配置:
knife4j:
  gateway:
    enabled: true
    strategy: manual
    discover:
      enabled: true
      version: openapi3
      excluded-services:
        - gateway-service
    routes:
      - name: user-service
        service-name: user-service
        context-path: /
        url: /user-service/v3/api-docs?group=user-service
        order: 1

      - name: order-service
        service-name: order-service
        context-path: /
        url: /order-service/v3/api-docs?group=order-service
        order: 2

      - name: finance-service
        service-name: finance-service
        context-path: /
        url: /finance-service/v3/api-docs?group=finance-service
        order: 3
博主这里建议让 Gateway 自动去配置 Knife4j 服务路径:
spring:
  application:
    name: gateway-service
  cloud:
    nacos:
      config:
        import-check:
          enabled: false
      server-addr: 127.0.0.1
      discovery:
        namespace: root
        username: root
        password: root
    gateway:
      discovery:
        locator:
          enabled: true
      routes:
        - id: user-service
          uri: lb://auth-service
          predicates:
            - Path=/api/**

        - id: order-service
          uri: lb://auth-service
          predicates:
            - Path=/api/**

        - id: finance-service
          uri: lb://auth-service
          predicates:
            - Path=/api/**
7.启动网关服务
在我们启动网关服务后,所有的请求都向网关服务端口发送了