SpringCloud之一注册中心(Eureka)
一、Eureka概述
Eureka是Netflix公司开源的一个服务注册与发现的中间组件。
在微服务架构系统之中,我们经常提三个角色:注册中心 (Register)、服务提供者(Provider)、服务消费者(Consumer)。
1.注册中心:服务提供者可以将服务发布到注册中心,服务消费者从注册中心获取可以进行访问的服务列表;注册中心支持集群部署,集群中的机器,数据会进行同步复制更新(replicate),保证注册中心数据最终一致性。
2.服务提供者: 即下游相关的平台或者是提供服务的应用,对于自己的应用服务(Application Service),做下面的操作:
  1.服务注册:将自己的服务接口方法以及服务发布的地址等,注册到Eureka Server注册中心中;
  2.服务更新:对已经发布到注册中心的服务通知进行更新操作;
  3.服务删除:通过相关操作(如停止应用操作)通知注册中心,将应用服务从注册中心删除(移除);
  4.服务发布者通过Eureka这个注册中心,每30秒发送一次心跳更新注册中心的数据;
服务消费者: 在应用启动的时候,根据自己订阅的服务,会去注册中心(Eureka Server)拉取所有的服务清单列表,会缓存到应用本地缓存。
二、创建注册中心
下面就使用spring-cloud-starter-netflix-eureka来创建一个服务注册中心
1.创建一个spring boot项目,添加以下依赖:
主要是引入下面这个:
      org.springframework.cloud
      spring-cloud-starter-netflix-eureka-server
有的项目引入的是:
            org.springframework.cloud
            spring-cloud-netflix-eureka-server
pom.xml原始内容:
        Hoxton.SR6


            org.springframework.boot
            spring-boot-starter-web


            org.springframework.cloud
            spring-cloud-starter-netflix-eureka-server


                org.springframework.cloud
                spring-cloud-dependencies
                ${spring-cloud.version}
                pom
                import
注:Spring boot版本要和spring-cloud版本相对应
注:spring-cloud-starter-eureka-server 是在1.5版本中使用的,在2.0版本中废弃,建议使用spring-cloud-starter-netflix-eureka-server
2.配置application.properties
# eureka服务端口号
server.port=8000
# eureka的服务名称
spring.application.name=eureka-server
# 表示是否将自己注册到Eureka Server,默认为true。由于当前这个应用就是Eureka Server,故而设为false。
eureka.client.registerWithEureka=false
# 表示是否从Eureka Server获取注册信息,默认为true。因为这是一个单点的Eureka Server,不需要同步其他的Eureka Server节点的数据,故而设为false。
eureka.client.fetchRegistry=false
# eureka的地址信息
# 从Greenwich.SR1开始,推荐使用spring.cloud.service-url.defaultZone配置来代替eureka.client.service-url.defaultZone。
# eureka.client.serviceUrl.defaultZone=http://localhost:${server.port}/eureka/
eureka.client.service-url.defaultZone=http://localhost:${server.port}/eureka/
3.在启动类上添加@EnableEurekaServer注解,就可以将该项目作为SpringCloud中的注册中心了。
@SpringBootApplication
@EnableEurekaServer
public class SpringCloudDemoApplication {

    public static void main(String[] args) {
        SpringApplication.run(SpringCloudDemoApplication.class, args);
    }

}
4.启动注册中心
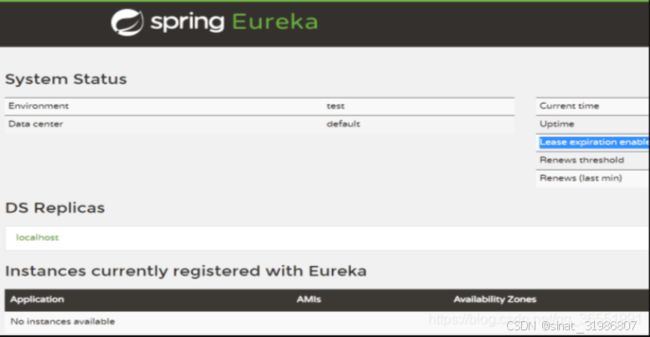
启动项目,这里设置了端口号为8000(根据自己的端口号来访问),访问http://localhost:8000,看到下面的页面,说明注册中心搭建完成:

Eureka注册中心UI界面参数:
Environment: 环境,默认为test,该参数在实际使用过程中,可以不用更改
Data center: 数据中心,使用的是默认的是 “default”
Current time:当前的系统时间
Uptime:已经运行了多少时间
Lease expiration enabled:是否启用租约过期 ,自我保护机制关闭时,该值默认是true, 自我保护机制开启之后为false。
Renews threshold: 每分钟最少续约数,Eureka Server 期望每分钟收到客户端实例续约的总数。
Renews (last min): 最后一分钟的续约数量(不含当前,1分钟更新一次),Eureka Server 最后 1 分钟收到客户端实例续约的总数。
DS Replicas(注册到Eureka的实例信息)
Instances currently registered with Eureka:表示当前在Eureka注册的实例,因为现在还没有实例注册到eureka,所以显示为No instances available(没有可用的实例)
Instances currently registered with Eureka下的选项:
- Application:实例名称,即spring.application.name或者eureka.instance.appname配置的名称,同时配置时,eureka.instance.appname优先级更高。
如果没有配置eureka.instance.appname,则使用spring.application.name的值,如果连spring.application.name都没有配置,则取unknown。 - AMIs:n/a (1),字符串n/a+实例的数量
- Availability Zones:实例的数量
- Status:实例的状态加id,up为正常。id为eureka.instance.instance-id设置的值,如果没有设置eureka.instance.instance-id,那么显示的值将是一个由Eureka自动生成的编号
实例的状态分为UP、DOWN、STARTING、OUT_OF_SERVICE、UNKNOWN.
- UP: 服务正常运行,特殊情况当进入自我保护模式,所有的服务依然是UP状态,所以需要做好熔断重试等容错机制应对灾难性网络出错情况
- OUT_OF_SERVICE : 不再提供服务,其他的Eureka Client将调用不到该服务,一般有人为的调用接口设置的,如:强制下线。
- UNKNOWN: 未知状态
- STARTING : 表示服务正在启动中
- DOWN: 表示服务已经宕机,无法继续提供服务
自我保护模式
当微服务客户端启动后,会把自身信息注册到Eureka注册中心,以供其他微服务进行调用。一般情况下,当某个服务不可用时(一段时间内没有检测到心跳或者连接超时等),那么Eureka注册中心就会将该服务从可用服务列表中剔除,但是在微服务架构中,因为服务数量众多,可能存在跨机房或者跨区域的情况,因此当某个服务心跳探测失败并不能完全说明其无法正常提供服务而将其剔除,并且服务一旦剔除后,再重新注册将会重新进行负载均衡等等一系列的操作,考虑到性能问题,eureka会将不可用的服务暂时断开,并期望能够在接下来一段时间内接收到心跳信号,而不是直接剔除,同时,新来的请求将不会分发给暂停服务的实例,这就是eureka的保护机制,它保护了因网络等问题造成的短暂的服务不可用的实例,避免频繁注册服务对整个系统造成影响。
我们在单机测试的时候很容易满足心跳失败比例在 15 分钟之内低于 85%,这个时候就会触发 Eureka 的保护机制,所以单机状态下不建议开启。们可以使用eureka.server.enable-self-preservation=false来关闭保护机制,这样可以确保注册中心中不可用的实例被及时的剔除(不推荐)。
5.eureka-server启动后,开始服务注册(将user-service服务注册到EurekaServer)
(1)在user-service(服务提供者)项目引入spring-cloud-starter-netflix-eureka-client依赖
      org.springframework.cloud
      spring-cloud-starter-netflix-eureka-client
(2)在原有application.properties添加如下配置:
# eureka服务的地址信息
eureka.client.serviceUrl.defaultZone=http://localhost:8000/eureka/
# 该配置非必须,状态页面的URL,即在eureka UI界面点击某个服务的状态跳转的链接,相对路径,默认使用 HTTP 访问,如需使用 HTTPS则要使用绝对路径配置,缺省:/info,下面配置的是user-service项目swagger-ui页面
eureka.instance.status-page-url-path = http://localhost:${server.port}/userservice/swagger-ui.html
启动user-service项目,可以在eureka UI界面看到服务已经注册
6.将order-service注册到注册中心
order-service(服务消费者)注册到注册中心的方法同上。
服务消费者通常使用Feign调用服务提供者提供的服务,使用Feign的步骤如下:
(1)引入依赖:
    org.springframework.cloud
    spring-cloud-starter-openfeign
(2)在order-service的启动类添加注解开启Feign功能:
@MapperScan("cn.itcast.order.mapper")
@SpringBootApplication
@EnableFeignClients
public class OrderApplication {
    public static void main(String[] args) {
        SpringApplication.run(OrderApplication.class, args);
    }
}
(3)编写Feign客户端:
/**
 * feign实现远程调用声明的bean
 */
@FeignClient("user-service")
public interface UserClient {
    @GetMapping("/user/{id}")
    User findById(@PathVariable("id") Long id);
}
主要是基于SpringMVC的注解来声明远程调用信息,比如:
服务名称:user-service
请求方式:GET
请求路径:/user/{id}
请求参数:Long id
返回值类型:User
(4)则OrderService或OrderServiceImpl中方法改写为:
@Service
public class OrderService {

    @Autowired
    private OrderMapper orderMapper;

    @Autowired
    private UserClient userClient;

    public Order queryOrderById(Long orderId) {
        //1.查询订单
        Order order = orderMapper.findById(orderId);
        //2.用Feign远程调用
        User user = userClient.findById(order.getUserId());
        //3.封装user到Order
        order.setUser(user);
        //4.返回
        return order;
    }
}
@FeignClient注解参数说明
- name/value:指定FeignClient的名称(调用的服务的名称),如果项目使用了Ribbon,name属性会作为微服务的名称,用于服务发现
- contextId:用于指定为当前 Feign 客户端创建的 ApplicationContext 的唯一标识。当一个微服务中存在多个FeignClient接口调用同一个服务提供者时,就需要使用到contextId属性。这种情况常常出现在一个微服务需要调用另一个微服务提供的多个不同接口时。通过给每个FeignClient指定唯一的contextId,可以确保它们在运行时能够正确地识别和区分彼此,避免出现冲突和混淆。
- url: url一般用于调试,可以手动指定@FeignClient调用的地址
- decode404:当发生http 404错误时,如果该字段位true,会调用decoder进行解码,否则抛出FeignException
- configuration: Feign配置类,可以自定义Feign的Encoder、Decoder、LogLevel、Contract
- fallback: 定义容错的处理类,当调用远程接口失败或超时时,会调用对应接口的容错逻辑,fallback指定的类必须实现@FeignClient标记的接口
- fallbackFactory: 工厂类,用于生成fallback类示例,通过这个属性我们可以实现每个接口通用的容错逻辑,减少重复的代码
- path: 定义当前FeignClient的统一前缀,定义之后FeignClien的@RequestMapping中就不用写前缀了
上面的UserClient也可改为
/**
 * feign实现远程调用声明的bean
 */
@FeignClient(name ="user-service",path="/user",contextId = "userService1")
public interface UserClient {
    @GetMapping("/{id}")
    User findById(@PathVariable("id") Long id);
此时通过order-service调用user-service就实现了远程调用,因为Feifn内部自带Ribbon,因此也同时实现了负载均衡。