Mac 安装Hadoop教程(HomeBrew安装)
1. 引言
本教程旨在介绍在Mac 电脑上安装Hadoop,便于编程开发人员对大数据技术的熟悉和掌握。
2.前提条件
2.1 安装JDK
想要在你的Mac电脑上安装Hadoop,你必须首先安装JDK。具体安装步骤这里就不详细描述了。你可参考Mac 安装JDK8。
2.2 配置ssh环境
在Mac下配置ssh环境,防止后面启动hadoop时出现Connection refused 连接被拒绝的错误。
ssh localhost
执行上面命令后,终端如果出现如下问题:
ssh: connect to host localhost port 22: Connection refused
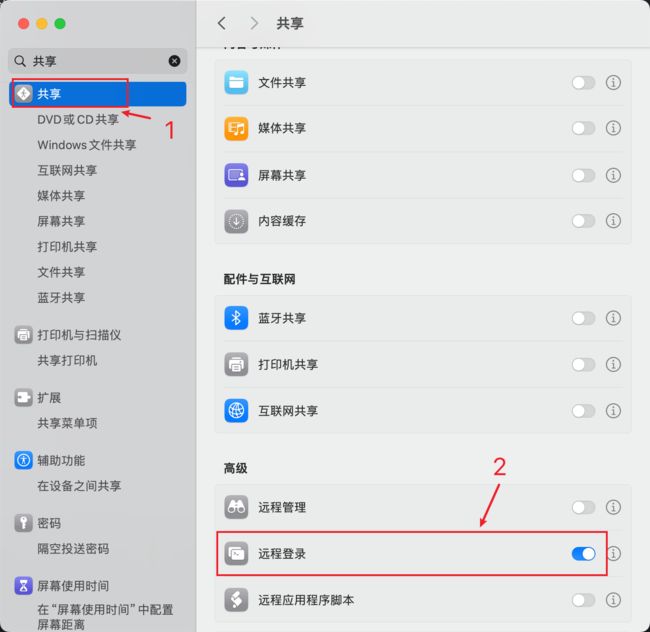
表示当前用户没权限,更改设置如下:

再次输入ssh localhost会提示输入密码,这个时候要重新配置一下ssh免密登录。
(1) 进入ssh的目录:
cd ~/.ssh
(2) 将id_rsa.pub中的内容拷贝到 authorized_keys中:
cat id_rsa.pub >> authorized_keys
3.安装与配置Hadoop
3.1 使用brew 安装 Hadoop
brew install hadoop
3.2 查看是否安装成功
hadoop version
3.3 修改Hadoop 配置文件
3.3.1 进入Hadoop的目录
cd /opt/homebrew/Cellar/hadoop/3.4.0/libexec/etc/hadoop
3.3.2 修改core-site.xml
# 以文件方式打开配置文件
open -e core-site.xml
在core-site.xml文件的标签内添加如下内容:
<configuration>
  <property>
    <name>fs.defaultFS</name>
    <value>hdfs://localhost:8020</value>
  </property>

  <property>
    <name>hadoop.tmp.dir</name>
    <value>file:/opt/homebrew/Cellar/hadoop/tmp</value>
  </property>
</configuration>
创建tmp文件夹,用来指定hadoop运行时产生文件的存放目录
mkdir /opt/homebrew/Cellar/hadoop/tmp
3.3.3 修改hdfs-site.xml
open -e hdfs-site.xml
在hdfs-site.xml文件的标签内添加如下内容:
<configuration>
   <property>
      <name>dfs.replication</name>
      <value>1</value>
    </property>

    <property>
       <name>dfs.permissions</name>
       <value>false</value>
     </property>

    <property>
       <name>dfs.namenode.name.dir</name>
        <value>file:/opt/homebrew/Cellar/hadoop/tmp/dfs/name</value>
    </property>

     <property>
        <name>dfs.datanode.data.dir</name>
        <value>file:/opt/homebrew/Cellar/hadoop/tmp/dfs/data</value>
     </property>
</configuration>
创建dfs、name、data文件夹(存放数据)
mkdir /opt/homebrew/Cellar/hadoop/tmp/dfs
mkdir /opt/homebrew/Cellar/hadoop/tmp/dfs/name
mkdir /opt/homebrew/Cellar/hadoop/tmp/dfs/data
3.3.4 修改mapred-site.xml
open -e mapred-site.xml
<configuration>
   <property>
      <name>mapreduce.framework.name</name>
       <value>yarn</value>
    </property>
  <property>
     <name>mapred.job.tracker</name>
     <value>localhost:9010</value>
  </property>

  <property>
     <name>yarn.app.mapreduce.am.env</name>
     <value>HADOOP_MAPRED_HOME=/opt/homebrew/Cellar/hadoop/3.4.0/libexec</value>
  </property>
  <property>
     <name>mapreduce.map.env</name>
     <value>HADOOP_MAPRED_HOME=/opt/homebrew/Cellar/hadoop/3.4.0/libexec</value>
  </property>
  <property>
     <name>mapreduce.reduce.env</name>
     <value>HADOOP_MAPRED_HOME=/opt/homebrew/Cellar/hadoop/3.4.0/libexec</value>
 </property>
</configuration>
3.3.5 修改yarn-site.xml
open -e yarn-site.xml
<configuration>

<!-- Site specific YARN configuration properties -->
  <property>
    <name>yarn.nodemanager.aux-services</name>
    <value>mapreduce_shuffle</value>
  </property>

  <property>
    <name>yarn.resourcemanager.address</name>
    <value>localhost:9000</value>
   </property>

  <property>
    <name>yarn.scheduler.capacity.maximum-am-resource-percent</name>
    <value>100</value>
  </property>
</configuration>
3.4 修改hadoop下/etc/hadoop/hadoop-env.sh 文件
cd /opt/homebrew/Cellar/hadoop/3.4.0/libexec/etc/hadoop
open -e hadoop-env.sh
只需要在该文件第52行后面添加如下配置:
cd /opt/homebrew/Cellar/hadoop/3.4.0/libexec/etc
export HADOOP_OPTS="-Djava.library.path=${HADOOP_HOME}/lib/native"
3.5 启动Hadoop并验证
cd /opt/homebrew/Cellar/hadoop/3.4.0/libexec/sbin
# 启动hadoop
./start-dfs.sh
# 暂停hadoop
./stop-dfs.sh
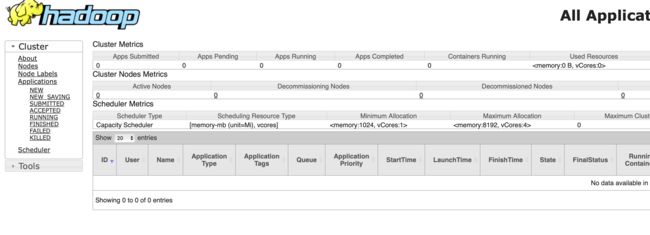
4. 浏览器中打开如下链接
http://localhost:8088/cluster


