HarmonyOS鸿蒙实战( Beta6.0)渲染视频画面帧实践-OpenGL
场景描述
在直播场景中,会有礼物、魔法等表情临时出现在画面,需要获取视频画面帧进行纹理更新后再渲染
通过OpenGL渲染视频画面帧。
⦁ 在ArkTS侧调用createAVPlayer()创建AVPlayer实例,初始化进入idle状态。设置业务需要的监听事件,设置资源:设置属性url,AVPlayer进入initialized状态。
⦁ 设置窗口:获取并设置属性SurfaceID,该surfaceId是native侧nativeImage的surfaceID,调用play方法开始播放。
⦁ 添加XComponent组件,在native侧通过OH_NativeXComponent_RegisterCallback注册XComponent回调。
⦁ 在napi 接口init的时候在Xcomponent的OnSurfaceCreatedCB回调中初始化渲染线程,通过OH_NativeImage_Create创建nativeImage。
⦁ 通过OH_NativeImage_GetSurfaceId获取surfaceID并传递到arkts侧。
⦁ 通过OH_NativeImage_SetOnFrameAvailableListener设置帧可用回调,通过NativeVsync接收系统信号,控制渲染。
⦁ 通过OH_NativeImage_UpdateSurfaceImage获取最新帧更新相关联的OpenGL ES纹理,通过eglSwapBuffers将纹理渲染上屏。
核心代码
创建nativeImage,获取nativeImage的id,设置帧可用回调。
bool RenderThread::CreateNativeImage()
{
  nativeImage_ = OH_NativeImage_Create(-1, GL_TEXTURE_EXTERNAL_OES);
  if (nativeImage_ == nullptr) {
    OH_LOG_Print(LOG_APP, LOG_ERROR, LOG_PRINT_DOMAIN, "RenderThread", "OH_NativeImage_Create failed.");
    return false;
  }
  int ret = 0;
  {
    std::lock_guard lock(nativeImageSurfaceIdMutex_);
    ret = OH_NativeImage_GetSurfaceId(nativeImage_, &nativeImageSurfaceId_);
  }
  if (ret != 0) {
    OH_LOG_Print(LOG_APP, LOG_ERROR, LOG_PRINT_DOMAIN, "RenderThread",
      "OH_NativeImage_GetSurfaceId failed, ret is %{public}d.", ret);
    return false;
  }
  nativeImageFrameAvailableListener_.context = this;
  nativeImageFrameAvailableListener_.onFrameAvailable = &RenderThread::OnNativeImageFrameAvailable;
  ret = OH_NativeImage_SetOnFrameAvailableListener(nativeImage_, nativeImageFrameAvailableListener_);
  if (ret != 0) {
    OH_LOG_Print(LOG_APP, LOG_ERROR, LOG_PRINT_DOMAIN, "RenderThread",
      "OH_NativeImage_SetOnFrameAvailableListener failed, ret is %{public}d.", ret);
    return false;
  }
  return true;
}
void RenderThread::OnNativeImageFrameAvailable(void *data)
{
  OH_LOG_Print(LOG_APP, LOG_DEBUG, LOG_PRINT_DOMAIN, "RenderThread", "OnNativeImageFrameAvailable.");
  auto renderThread = reinterpret_cast(data);
  if (renderThread == nullptr) {
    return;
  }
  renderThread->availableFrameCnt_++;
  renderThread->wakeUpCond_.notify_one();
}
NativeVsync接收系统发送的Vsync信号,控制渲染节奏。
bool RenderThread::InitNativeVsync()
{
  nativeVsync_ = OH_NativeVSync_Create(DEMO_NAME, strlen(DEMO_NAME));
  if (nativeVsync_ == nullptr) {
    OH_LOG_Print(LOG_APP, LOG_ERROR, LOG_PRINT_DOMAIN, "RenderThread", "Create NativeVSync failed.");
    return false;
  }
  (void)OH_NativeVSync_RequestFrame(nativeVsync_, &RenderThread::OnVsync, this);
  return true;
}
void RenderThread::OnVsync(long long timestamp, void *data)
{
  OH_LOG_Print(LOG_APP, LOG_DEBUG, LOG_PRINT_DOMAIN, "RenderThread", "OnVsync %{public}llu.", timestamp);
  auto renderThread = reinterpret_cast(data);
  if (renderThread == nullptr) {
    return;
  }
  renderThread->vSyncCnt_++;
  renderThread->wakeUpCond_.notify_one();
}
在渲染线程中更新画面帧数据到OpenGL纹理,并做对应的opengl处理后,通过SwapBuffers()方法上屏。
void RenderThread::DrawImage()
{
  if(nativeImageTexId_ == 9999) {
    glGenTextures(1, &nativeImageTexId_);
    glBindTexture(GL_TEXTURE_EXTERNAL_OES, nativeImageTexId_);
    // set the texture wrapping parameters
    glTexParameteri(GL_TEXTURE_EXTERNAL_OES, GL_TEXTURE_WRAP_S, GL_REPEAT);
    glTexParameteri(GL_TEXTURE_EXTERNAL_OES, GL_TEXTURE_WRAP_T, GL_REPEAT);
    // set texture filtering parameters
    glTexParameteri(GL_TEXTURE_EXTERNAL_OES, GL_TEXTURE_MIN_FILTER, GL_LINEAR);
    glTexParameteri(GL_TEXTURE_EXTERNAL_OES, GL_TEXTURE_MAG_FILTER, GL_LINEAR);
  }
  OH_LOG_Print(LOG_APP, LOG_DEBUG, LOG_PRINT_DOMAIN, "RenderThread", "DrawImage.");
  if (eglSurface_ == EGL_NO_SURFACE) {
    OH_LOG_Print(LOG_APP, LOG_WARN, LOG_PRINT_DOMAIN, "RenderThread", "eglSurface_ is EGL_NO_SURFACE");
    return;
  }
  OH_NativeImage_AttachContext(nativeImage_, nativeImageTexId_);
  renderContext_->MakeCurrent(eglSurface_);
  int32_t ret = OH_NativeImage_UpdateSurfaceImage(nativeImage_);
  if (ret != 0) {
    OH_LOG_Print(LOG_APP, LOG_ERROR, LOG_PRINT_DOMAIN, "RenderThread",
      "OH_NativeImage_UpdateSurfaceImage failed, ret: %{public}d, texId: %{public}d",
      ret, nativeImageTexId_);
    return;
  }
  OH_LOG_Print(LOG_APP, LOG_DEBUG, LOG_PRINT_DOMAIN, "RenderThread", "OH_NativeImage_UpdateSurfaceImage succeed.");
  float matrix[16];
  ret = OH_NativeImage_GetTransformMatrix(nativeImage_, matrix);
  if (ret != 0) {
    OH_LOG_Print(LOG_APP, LOG_ERROR, LOG_PRINT_DOMAIN, "RenderThread",
      "OH_NativeImage_GetTransformMatrix failed, ret: %{public}d", ret);
    return;
  }
  glClearColor(1.0f, 1.0f, 1.0f, 1.0f);
  glClear(GL_COLOR_BUFFER_BIT);
  shaderProgram_->Use();
  shaderProgram_->SetInt("texture", 0);
  glActiveTexture(GL_TEXTURE0);
  glBindTexture(GL_TEXTURE_EXTERNAL_OES, nativeImageTexId_);
  shaderProgram_->SetMatrix4v("matTransform", matrix, 16, false);
  glBindVertexArray(vertexArrayObject_);
  glEnable(GL_DEPTH_TEST);
  glDrawElements(GL_TRIANGLES, 6, GL_UNSIGNED_INT, Detail::indices);
  renderContext_->SwapBuffers(eglSurface_);
}
最后
小编在之前的鸿蒙系统扫盲中,有很多朋友给我留言,不同的角度的问了一些问题,我明显感觉到一点,那就是许多人参与鸿蒙开发,但是又不知道从哪里下手,因为资料太多,太杂,教授的人也多,无从选择。有很多小伙伴不知道学习哪些鸿蒙开发技术?不知道需要重点掌握哪些鸿蒙应用开发知识点?而且学习时频繁踩坑,最终浪费大量时间。所以有一份实用的鸿蒙(HarmonyOS NEXT)文档用来跟着学习是非常有必要的。
为了确保高效学习,建议规划清晰的学习路线
GitCode - 全球开发者的开源社区,开源代码托管平台 希望这一份鸿蒙学习文档能够给大家带来帮助~
鸿蒙(HarmonyOS NEXT)最新学习路线
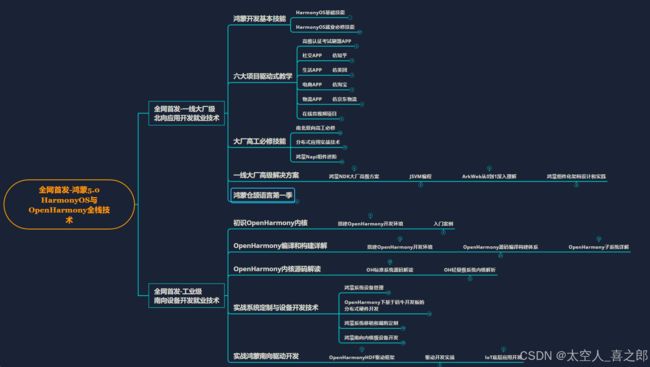
该路线图包含基础技能、就业必备技能、多媒体技术、六大电商APP、进阶高级技能、实战就业级设备开发,不仅补充了华为官网未涉及的解决方案
路线图适合人群:
IT开发人员:想要拓展职业边界
零基础小白:鸿蒙爱好者,希望从0到1学习,增加一项技能。
技术提升/进阶跳槽:发展瓶颈期,提升职场竞争力,快速掌握鸿蒙技术
2.学习视频+学习PDF文档
HarmonyOS Next 最新全套视频教程 (鸿蒙语法ArkTS、TypeScript、ArkUI教程……)

纯血版鸿蒙全套学习文档(面试、文档、全套视频等)
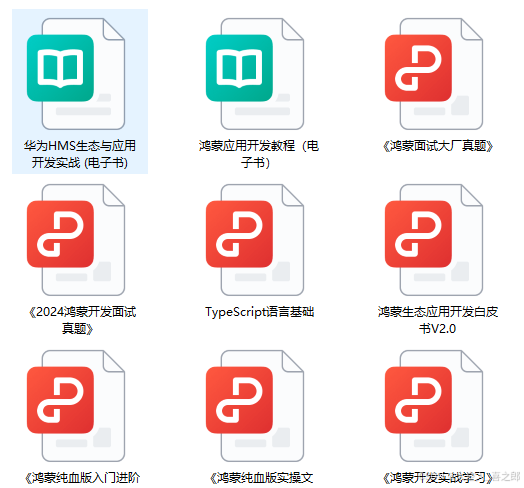
鸿蒙APP开发必备
总结
【纯血版鸿蒙全套最新学习文档】
总的来说,华为鸿蒙不再兼容安卓,对程序员来说是一个挑战,也是一个机会。只有积极应对变化,不断学习和提升自己,才能在这个变革的时代中立于不败之地。