Andorid- 反序列化,采用pull解析 xml 文件
MainActivity.java
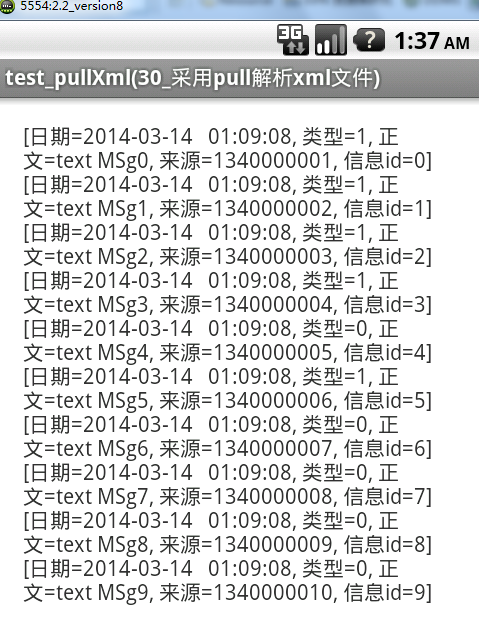
主入口,通过获得 XML文件 ,然后将解析后的文件标签以及文本内容拼接到 StringBuffer中,最后显示在TextView上
 1 package com.example.test_pullxml;

 2

 3 import java.util.List;

 4

 5 import com.test.MsgInfo.MsgInfo;

 6 import com.test.Msgservice.Msgservice;

 7

 8 import android.os.Bundle;

 9 import android.app.Activity;

10 import android.widget.TextView;

11 import android.widget.Toast;

12

13 /**

14  * @author daomul

15  *

16  */

17 public class MainActivity extends Activity {

18

19     TextView tv_showTextView=null;

20

21     @Override

22     protected void onCreate(Bundle savedInstanceState) {

23         super.onCreate(savedInstanceState);

24         setContentView(R.layout.activity_main);

25

26         tv_showTextView = (TextView) this.findViewById(R.id.tv_show);

27

28         try {

29

30             List<MsgInfo> infos = Msgservice.getMsgInfos(MainActivity.class.getClassLoader()

31                     .getResourceAsStream("test.xml"));  //获得当前src 目录下的文件

32

33             StringBuffer sBuffer = new StringBuffer();

34             for (MsgInfo info : infos) {    //将文件的内容 循环拼接到Stringbuffer中

35                 String str = info.toString();

36                 sBuffer.append(str);

37                 sBuffer.append("\n");

38             }

39

40             tv_showTextView.setText(sBuffer);//显示在textview上

41             Toast.makeText(this, "解析成功", Toast.LENGTH_LONG).show();

42

43         } catch (Exception e) {

44             // TODO Auto-generated catch block

45             e.printStackTrace();

46             Toast.makeText(this, "解析失败", Toast.LENGTH_LONG).show();

47         }

48     }

49

50 }
Msgservice.java
通过新建一个解析器,然后初始化解析器,然后开始解析XML文件,通过特殊的解析器标签判定解析的时机和位置,
每结束一次列表的解析,就将它添加,循环添加。
 1 package com.test.Msgservice;

 2

 3 import java.io.InputStream;

 4 import java.util.ArrayList;

 5 import java.util.List;

 6

 7 import org.xmlpull.v1.XmlPullParser;

 8 import android.util.Xml;

 9

10 import com.test.MsgInfo.MsgInfo;

11

12 public class Msgservice {

13

14     /**

15      * 利用解析器解析XML文件

16      * @param is

17      * @return

18      * @throws Exception

19      *

20      * XmlPullParser是解析器  xPsraer是解析的到得XML

21      */

22     public static List<MsgInfo> getMsgInfos(InputStream is) throws Exception{

23

24         XmlPullParser xParser = Xml.newPullParser();//解析得到的xml

25

26         //初始化解析器

27         xParser.setInput(is,"utf-8");

28

29         List<MsgInfo>  msgInfos = null;

30         MsgInfo msgInfo = null;

31         int type = xParser.getEventType();  //解析出来的XML标签类

32

33         while (type != XmlPullParser.END_DOCUMENT) {

34

35             switch (type) {

36             case XmlPullParser.START_TAG:

37                 if ("msgs".equals(xParser.getName())) { // 解析到 全局开始的标签

38                     msgInfos = new ArrayList<MsgInfo>();// 新建一个 列表数组

39

40

41                 }else if ("msg".equals(xParser.getName())) {

42                     msgInfo = new MsgInfo();            // 新建一个需要重复取出的列表

43                     String mId = xParser.getAttributeValue(0);// 获得标签的属性值 ,只有一个属性 :0

44                     msgInfo.setId(Integer.parseInt(mId));    //将属性添加到列表的ID中

45

46

47                 }else if ("body".equals(xParser.getName())) {

48                     String mBodyStr = xParser.nextText();   //直接添加到列表中

49                     msgInfo.setBody(mBodyStr);              //将子标签的值添加到列表的body中

50

51

52                 }else if ("address".equals(xParser.getName())) {

53                     String maddressStr = xParser.nextText();   //直接添加到列表中

54                     msgInfo.setAddress(maddressStr);              //将子标签的值添加到列表的address中

55

56

57                 }else if ("type".equals(xParser.getName())) {

58                     String mtypeStr = xParser.nextText();       //直接添加到列表中

59                     msgInfo.setType(Integer.parseInt(mtypeStr));   //将子标签的值添加到列表的type中

60

61

62                 }else if ("date".equals(xParser.getName())) {

63                     String mdateStr = xParser.nextText();       //直接添加到列表中

64                     msgInfo.setDate(mdateStr);   //将子标签的值添加到列表的date中

65

66

67                 }

68                 break;

69             case XmlPullParser.END_TAG:

70                 if ("msg".equals(xParser.getName())) {

71                     // it is end_tag that end a list ,that over a msg list

72                     msgInfos.add(msgInfo);  // add a list goto the lists

73                     msgInfo = null;      // 制空list

74                 }

75                 break;

76

77             default:

78                 break;

79             }

80             type = xParser.next();

81

82         }

83         return msgInfos;  //get the lists back to return

84

85     }

86 }
MsgInfo.java
model层,封装构造方法和属性函数,不过值得注意的是,这里对比前面一篇的XML序列化 有 少许改动,特别是date 字段的类型的改变
 1 package com.test.MsgInfo;

 2

 3 /**

 4  * @author daomul

 5  * 短信信息

 6  */

 7

 8 public class MsgInfo {

 9

10     private String date;

11     private int type;

12     private String body;

13     private String address;

14     private int id;

15

16     //无参构造方法

17     public MsgInfo() {

18

19     }

20

21     //有参构造方法 Generate Constructor use fields...

22     public MsgInfo(String date, int type, String body, String address,int id) {

23         super();

24         this.date = date;

25         this.type = type;

26         this.body = body;

27         this.address = address;

28         this.id = id;

29     }

30

31     @Override

32     public String toString() {

33         return "[日期=" + date + ", 类型=" + type + ", 正文=" + body

34                 + ", 来源=" + address + ", 信息id=" + id + "]";

35     }

36

37     //setter and getter

38     public int getId() {

39         return id;

40     }

41

42     public void setId(int id) {

43         this.id = id;

44     }

45

46     public String getDate() {

47         return date;

48     }

49     public void setDate(String date) {

50         this.date = date;

51     }

52     public int getType() {

53         return type;

54     }

55     public void setType(int type) {

56         this.type = type;

57     }

58     public String getBody() {

59         return body;

60     }

61     public void setBody(String body) {

62         this.body = body;

63     }

64     public String getAddress() {

65         return address;

66     }

67     public void setAddress(String address) {

68         this.address = address;

69     }

70

71

72

73 }
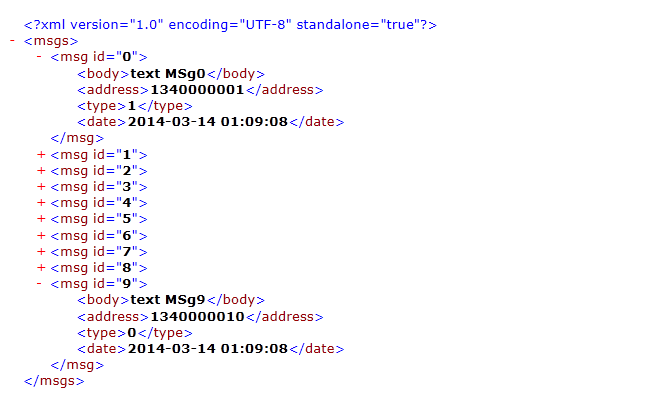
XML 文件打开的预览图:
结果界面显示: