<>5.1 Decorating tables using table and cell events 读书笔记
前言
在第二节和第四节中我们使用iText内部使用的对象和方法来构建一个文档。使用Chunk类时我们可以设置其背景色和下划线,使用PdfPTable类时我们可以设置边框和背景色,但如果这些都还不够呢?如果你像为Chunk类创建一个椭圆的背景,为PdfPCell类创建圆角那要如何处理。这一节就是要介绍Chunk,Paragraph,Chapter,Section,PdfPTable和PdfPCell类的自定义功能。
在前面的章节中当内容不能完全填充一页时,iText会自动创建新的一页,但我们可能希望在每一页上自动添加一些元数据:页眉,页脚或者水印。这些都可以通过page event事件完成。以上所说的内容在第五节都会被覆盖,但首先我们还是从第四节介绍的表格继续,并学习如何创建表格和单元格的事件。
Decorating tables using table and cell events
第四节中介绍PdfPTable和PdfPCell的时候有两个api没有提到:PdfPTable.TableEvent和PdfPCell.CellEvent。前一个属性接受的接口IPdfPTableEvent,后一个属性接受的是接口IPdfPCellEvent。通过这两个接口我们可以为表格和单元格创建自定义布局:表格或者单元格自定义的背景色或者边框。
Implementing the IPdfPTableEvent interface
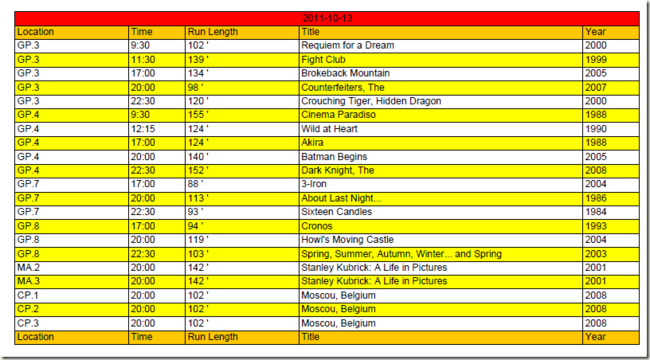
现在web上表格在相邻行之间用不同的背景色区分,如果我们希望pdf文档也有这种效果,就如下图一样:
上图的效果我们可以通过表格的默认单元格背景色的设置来实现:偶数的行有黄色的背景,奇数的行没有背景色。这样也可以带到效果,但有一些副作用:如果你仔细观察上图的话你会发现表格中除了head和footer之外一页可以容纳27行,那么在第二页的第一行就是28行为偶数行,因此会有黄色的背景。但我们是希望每一页的第一行没有背景色。在这种情况下,我们可以使用IPdfPCellEvent接口。具体的代码如下:
listing 5.1 AlternatingBackground.cs
public void TableLayout(PdfPTable table, float[][] widths, float[] heights, int headerRows, int rowStart, PdfContentByte[] canvases)
{
    int columns;
    Rectangle rect;
    int footer = widths.Length - table.FooterRows;
    int header = table.HeaderRows - table.FooterRows + 1;
    for (int row = header; row < footer; row += 2)
    {
        columns = widths[row].Length - 1;
        rect = new Rectangle(widths[row][0], heights[row], widths[row][columns], heights[row + 1]);
        rect.BackgroundColor = BaseColor.YELLOW;
        rect.Border = Rectangle.NO_BORDER;
        canvases[PdfPTable.BACKGROUNDCANVAS].Rectangle(rect);
    }
}
现在我们说下TableLayout方法的参数:
- table---要添加事件的PdfPTable对象,在调用TableLayout方法之前表格已经打印好了,因此要当其为只读的。
- widths---float值的二维数组。一个有m行和n列的表格会产生m * ( n+1)维度的数组。对于第r行来说,第一个单元格左边框的x坐标为widths[r][0],最后一个单元格右边框的x坐标为widths[r][n+1],不过这里假设的单元格的rowspan属性都为1。如果有些单元格的rowspan属性大于1会导致数组的个数减少,在以上列子中第一行就只有一个单元格,所以widths[0]只有两个值:widths[0][0]为左边框的x坐标,widths[0][1]为右边框的x坐标。
- heights---float值的一维数组,在上图中一共有30行,那么heights中有31个值:heights[0]为第一行上边框的y坐标,heights[30]为第三十行下边框的一坐标。
- headerRows---和调用table.HeaderRows属性返回相同的结果,其中还包括footer列。
- rowStart---如果是通过Document.Add方法那么此值为0,如果通过WriteSelectedRows方法那么和WriterSelectedRow方法相关参数的值一致。
- canvas---PdfContentByte对象的数组,一共有四个:PdfPtable.BASECANVAS,PdfPtable.BACKGROUNDCANVAS,PdfPtable.LINECANVAS和PdfPtable.TEXTCANVAS。这些在前面已经有介绍。
在listing 5.1中,我们从header列开始每次递增2列开始循环,然后通过widths和heights数组定义一个覆盖整行的矩形,最后在BASECANVAS上为此矩形画一个黄色的背景,选择base canvas是因为不希望覆盖单元格的背景色。为了让这个事件有效果我们需要设置TableEvent属性,就如下代码所示:
listing 5.2 AlternatingBackground.cs ( continued)
List<DateTime> days = PojoFactory.GetDays(conn);
IPdfPTableEvent pdfEvent = new AlternatingBackground();
foreach (DateTime day in days)
{
    PdfPTable table = GetTable(conn, day);
    table.TableEvent = pdfEvent;
    document.Add(table);
    document.NewPage();
}
Implementing the PdfPCellEvent interface
在表格事件的效果图中我们为每个电影设置了电影播放时长的列,假设你希望添加一些比文本更加炫目和明显的效果,就如下图所示:
在上图中的第三列中,总的长度代表240mins,对一部2个小时的电影那么我们就在单元格中画一半的矩形背景。不同的时间还以不同的背景色区别:少于90mins的电影有绿色背景,超过120mins为深红色背景,在90min和120mins之间则有一个橙色背景。以上的效果可以通过CellLayout方法实现:
listing 5.3 RunLengthEvent.cs (continued)
public void CellLayout(PdfPCell cell, Rectangle position, PdfContentByte[] canvases)
{
    PdfContentByte cb = canvases[PdfPTable.BACKGROUNDCANVAS];
    cb.SaveState();
    if (duration < 90)
    {
        cb.SetRGBColorFill(0x7c, 0xFC, 0x00);
    }
    else if (duration > 120)
    {
        cb.SetRGBColorFill(0x8B, 0x00, 0x00);
    }
    else
    {
        cb.SetRGBColorFill(0xFF, 0xA5, 0x00);
    }

    cb.Rectangle(position.Left, position.Bottom, position.Width * duration / 240, position.Height);
    cb.Fill();
    cb.RestoreState();
}
以上代码中的CellLayout方法比TableLayout方法简单很多,只有以下三个参数:
- cell---要添加事件的PdfPCell对象,和表格事件一样,也是只读。
- positon---单元格的边界Rectangle对象。
- canvas---PdfContentByte对象数组。
现在的数据中没有电影【指环王】的信息,如果将指环王三部曲也包含进来,那么其背景色就会超出单元格的边框,因为指环王第三部的长度是250min,超过了我们设置的240mins。
listing 5.4 RunLengthEvent.cs (continued)
runLength = new PdfPCell(table.DefaultCell);
runLength.Phrase = new Phrase(string.Format("{0} '", movie.Duration));
runLength.CellEvent = new RunLength(movie.Duration);

if (screening.IsPress)
{
    runLength.CellEvent = press;
}
table.AddCell(runLength);
以上代码中我们通过PdfPCell的拷贝构造函数构建了一个新的单元格,这个单元格和表格的默认单元格有相同的特性。然后使用Phrase属性在文本模式下添加内容,这和ColumnText.SetText方法一样。在将单元格添加到表格之前我们为其设置了事件PressEvent,这个事件是在单元格中添加文本"PRESS PREVIEW"。事件是累积的,后续添加的PressEvent不会覆盖先前添加的RunLength事件,以下为PressEvent事件代码:
listing 5.5 RunLengthEvent.cs (continued)
class PressPreview : IPdfPCellEvent
{
    public BaseFont bf;

    public PressPreview()
    {
        bf = BaseFont.CreateFont();
    }

    public void CellLayout(PdfPCell cell, Rectangle position, PdfContentByte[] canvases)
    {
        PdfContentByte cb = canvases[PdfPTable.TEXTCANVAS];
        cb.BeginText();
        cb.SetFontAndSize(bf, 12);
        cb.ShowTextAligned(Element.ALIGN_RIGHT, "PRESS PREVIEW", position.Right - 3, position.Bottom + 4.5f, 0);
        cb.EndText();
    }
}
大部分的表格事件都可以使用更加简单的单元格事件来实现,但单元格事件并不能完全代替所有表格事件。一般情况下我们会将两者结合以发挥更为强大的效果。
Combining table and cell events
下图是html中table标签cellspacing属性的迷你pdf版,有很多方法来实现。我们需要为整个表格画一个外部的边框,但我们可以选择事件来绘制单元格的边框。
MIMICKING HTML CELL SPACING
我们可以通过TableLayout方法中的widths和heights来为每个单元格画边框,也可以通过单元格事件来绘制。以下是将表格事件和单元格事件结合的代码:
listing 5.6 PressPreviews.cs
public void CellLayout(PdfPCell cell, Rectangle position, PdfContentByte[] canvases)
{
    float x1 = position.Left + 2;
    float x2 = position.Right - 2;
    float y1 = position.Top - 2;
    float y2 = position.Bottom + 2;
    PdfContentByte canvas = canvases[PdfPTable.LINECANVAS];
    canvas.Rectangle(x1, y1, x2 - x1, y2 - y1);
    canvas.Stroke();
    canvas.ResetRGBColorStroke();

}

public void TableLayout(PdfPTable table, float[][] widths, float[] heights, int headerRows, int rowStart, PdfContentByte[] canvases)
{
    float[] width=widths[0];
    float x1 = width[0];
    float x2 = width[width.Length - 1];
    float y1 = heights[0];
    float y2 = heights[heights.Length - 1];
    PdfContentByte cb = canvases[PdfPTable.LINECANVAS];
    cb.Rectangle(x1, y1, x2 - x1, y2 - y1);
    cb.Stroke();
    cb.ResetRGBColorStroke();
}
最后使用的时候这样设置即可:
table.DefaultCell.CellEvent = new PressPreviews();
以上代码中我们发现可以为表格的默认单元格设置单元格事件,这样所有的表格(在以上代码中)都会有影响。
目前为止我们使用的表格事件和单元格事件的PdfPTable对象都是通过Document.Add方法添加的,但此功能在WriterSelectedRow方法调用时也有效。
TABLE AND CELL EVENTS AND WRITESELECTEDROWS()
好了,这里我们直接上效果图:
要达到以上的效果,使用了一个表格事件和三个单元格事件,表格事件代码如下:
public void TableLayout(PdfPTable table, float[][] widths, float[] heights, int headerRows, int rowStart, PdfContentByte[] canvases)
{
    PdfContentByte background = canvases[PdfPTable.BASECANVAS];
    background.SaveState();
    background.SetCMYKColorFill(0x00, 0x00, 0xFF, 0x0F);
    background.RoundRectangle(widths[0][0], heights[heights.Length - 1] - 2,
        widths[0][1] - widths[0][0] + 6, heights[0] - heights[heights.Length - 1] - 4, 4);
    background.Fill();
    background.RestoreState();
}
此代码的是将整个table的背景设置为一个圆角矩形,然后其颜色为黄色。
单元格事件代码如下:
class CellBackground : IPdfPCellEvent
{
    public void CellLayout(PdfPCell cell, Rectangle position, PdfContentByte[] canvases)
    {
        PdfContentByte cb = canvases[PdfPTable.BACKGROUNDCANVAS];
        cb.RoundRectangle(position.Left + 1.5f, position.Bottom + 1.5f, position.Width - 3, position.Height - 3, 4);
        cb.SetCMYKColorFill(0x00, 0x00, 0x00, 0x00);
        cb.Fill();
    }
}
以上代码是将单元格的背景也设置为圆角矩形,但内部的填充颜色为白色。
还有一个单元格事件如下:
class RoundRectangle : IPdfPCellEvent
{
    protected int[] color;

    public RoundRectangle(int[] color)
    {
        this.color = color;
    }

    public void CellLayout(PdfPCell cell, Rectangle position, PdfContentByte[] canvases)
    {
        PdfContentByte cb = canvases[PdfPTable.LINECANVAS];
        cb.RoundRectangle(position.Left + 1.5f, position.Bottom + 1.5f, position.Width - 3, position.Height - 3, 4);
        cb.SetLineWidth(1.5f);
        cb.SetCMYKColorStrokeF(color[0], color[1], color[2], color[3]);
        cb.Stroke();
    }
}
以上代码也是将单元格的背景设置为圆角矩形,但其边框颜色是由传入的参数color控制,具体到代码中一个为白色的边框,一个为绿色的边框。事件配置好完之后就要在对其进行有效性设置,具体代码如下:
table.TableEvent = tableBackground;
table.TotalWidth = 504;
// add the name of the month
table.DefaultCell.Border = PdfPCell.NO_BORDER;
table.DefaultCell.CellEvent = whiteRectangle;
public new PdfPCell GetDayCell(Calendar calendar, DateTime dt)
{
    PdfPCell cell = new PdfPCell();
    // set the event to draw the background
    cell.CellEvent = cellBackground;
    // set the event to draw a special border
    if (IsSunday(calendar, dt) || IsSepcialDay(calendar, dt))
    {
        cell.CellEvent = roundRectangle;
    }
    …
    return cell;

}
表格事件直接就对表格其作用,对于单元格来说:默认的单元格都有一个画白色边框的事件,对于具体日期的单元格就还会有一个白色背景的事件,特殊的日期如周末还有一个绿色边框的事件。
总结
表格和单元格的事件就介绍到这里,一般我们会将表格和单元格事件组合起来使用。对于其他的high-level对象也有一个类似的设计,其全部绑定在IPdfPageEvent接口中,通过此接口我们可以为Chunk,Paragraph,Chapter或者Section对象加上自定义的功能,这些功能会在下一节中说明,最后是代码下载。
同步
此文章已同步到目录索引:iText in Action 2nd 读书笔记。


