ASP.NET Core Identity框架介绍与使用
1 ASP.NET Core Identity框架
Identity (标识)框架:采用的是基于角色的访问控制策略(Role-Based-Controll-Access),内置了对用户、角色等表的管理以及相关的接口,支持外部登录、2FA等。
Identity框架使用EFcore对数据库进行操作(默认使用的SqlServer的数据库),这也意味值标识框架几乎支持所有的数据库。
Identity 框架是AspNetCore中内置的一个帮开发人员简化用户角色等处理的一个框架。 这是因为框架底层已经根据权限设计设计了相应的表并提供了权限设计的相关接口,引入Identity框架后,调用框架提供的API就可以完成我们的业务逻辑。
2 AspNetCore中配置Identity
导入nuget包
    <PackageReference Include="Microsoft.AspNetCore.Identity.EntityFrameworkCore" Version="3.1.32" />
    <PackageReference Include="Microsoft.EntityFrameworkCore.SqlServer" Version="5.0.17" />
    <PackageReference Include="Microsoft.EntityFrameworkCore.Tools" Version="5.0.17"/>
前提使用的是AspNetCore3.1,依赖的nugetMicrosoft.AspNetCore.Identity.EntityFrameworkCore版本为3.1.32。值得注意的是Microsoft.AspNetCore.Identity.EntityFrameworkCore同时整合了EntityFramworkCore和Identity,默认使用的是 S q l S e r v e r \textcolor{red}{SqlServer} SqlServer的数据库。这里演示同样适用SQLServer的数据库作为演示
Microsoft.EntityFrameworkCore.SqlServer 5.0.17 sqlserver的数据库驱动
Microsoft.EntityFrameworkCore.Tools 5.0.17 数据库迁移命令工具包 (Add-Migration xxx Update-Database)
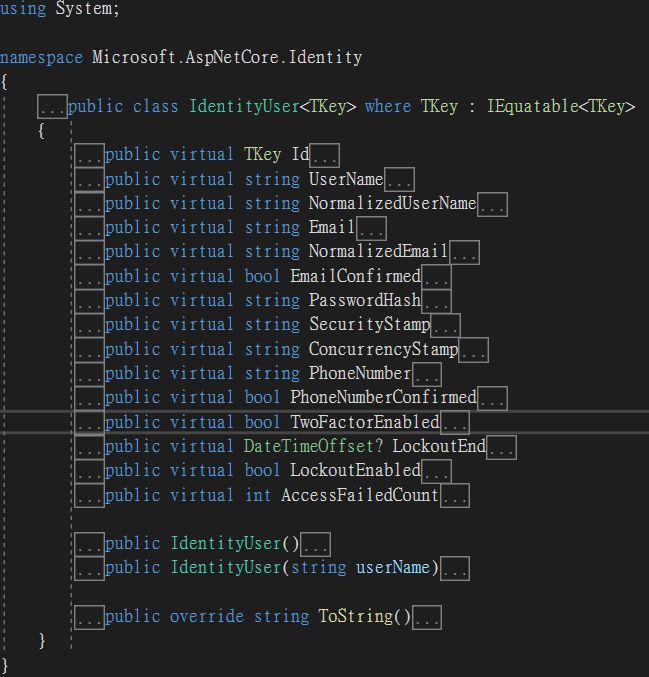
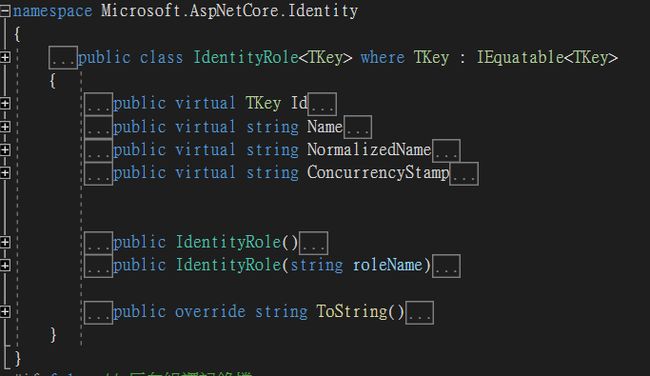
在Identity框架中有两个非常中的类 。其中 Tkey代表了主键的类型
-
用户 I d e n t i t y U s e r < T k e y > \textcolor{red}{ IdentityUser
} IdentityUser<Tkey> 定义了用户id,用户名,手机号,密码hash值等属性
-
角色 I d e n t i t y R o l e < T k e y > \textcolor{red}{ IdentityRole
} IdentityRole<Tkey>
我们可以用上述类信息,但同时也可以在上述的基础上定义用户或者是角色的其他信息。只需要集成上述两个基类即可。
    public class MyUser:IdentityUser<long>
    {
    }
    public class MyRole:IdentityRole<long>
    {
    }
创建基础自IdentityDBContext的类,这是一个泛型类,有三个泛型参数,用户类型、角色类型、主键类型 。这三个泛型定义不可省略,可以通过这个DB上下文类来操作数据库。
public class IdentityDemoDBContext:IdentityDbContext<MyUser,MyRole,long>
    {

        public IdentityDemoDBContext(DbContextOptions<IdentityDemoDBContext> options) : base(options)
        {
        }


        protected override void OnModelCreating(ModelBuilder builder)
        {
            builder.ApplyConfigurationsFromAssembly(this.GetType().Assembly);
            base.OnModelCreating(builder);
        }
    }
定义上述类后,需要在IOC容器中注入Identity的服务
 #region Identity框架配置
            //引入与Identity框架正式使用到的DBContext
            services.AddDbContext<IdentityDemoDBContext>
           (options =>
               options.UseSqlServer(Configuration.GetConnectionString("SqlServer"))
            ) ;


            //Identity用户配置
            //注入的应该是AddIdentityCore,而不是AddIdentity,因为前者是使用前后端分离的项目,后者默认提供了权限操作的界面,更适用于MVC的项目
            services.AddIdentityCore<MyUser>(options=> {
                //密码规则
                options.Password.RequireDigit = false;//密码中不必含有数字
                options.Password.RequireLowercase = false;//密码中不必要小写字母
                options.Password.RequireNonAlphanumeric = false;//密码中不必含有特殊字符
                options.Password.RequireUppercase = false;//密码中不必含有大写字母
                options.Password.RequiredLength = 12;//密码长度要求最少为12位数据

                //密码重设规则
                options.Tokens.PasswordResetTokenProvider = TokenOptions.DefaultEmailProvider;
                //邮箱激活规则
                options.Tokens.EmailConfirmationTokenProvider = TokenOptions.DefaultEmailProvider;


                options.User.RequireUniqueEmail=true;//必须使用唯一邮箱

                options.Lockout.MaxFailedAccessAttempts = 3;//3次错误登录将会被锁定,默认数值是5次
                options.Lockout.DefaultLockoutTimeSpan = TimeSpan.FromSeconds(10);//达到锁定标准时,将会锁定10分钟,默认锁定时间是5分钟
            });

            services.AddDataProtection();

            //EFCore 和Identity提供的IdentityDbContext 提供关联,这步非常关键。
            var idbuilder = new IdentityBuilder(typeof(MyUser), typeof(MyRole), services);
            idbuilder.AddEntityFrameworkStores<IdentityDemoDBContext>()
                .AddDefaultTokenProviders()
                .AddRoleManager<RoleManager<MyRole>>()
                .AddUserManager<UserManager<MyUser>>();

            #endregion
尽管我们可以操作DbContext上下文,不过Identity 框架还提供了 RoleManager、UserManage类来简化数据库的操作。因此上述服务中还注入了RoleManager。UserManager的服务
经过上述配置后,使用迁移命令 A d d − M i g r a t i o n / U p d a t e − d a t a b a s e ,同步到实际数据库中,将会生成以下表信息 \textcolor{red}{经过上述配置后,使用迁移命令Add-Migration/Update-database ,同步到实际数据库中,将会生成以下表信息} 经过上述配置后,使用迁移命令Add−Migration/Update−database,同步到实际数据库中,将会生成以下表信息
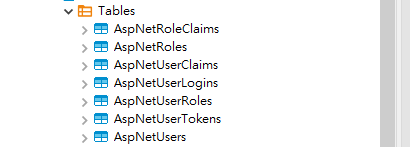
上述表将有Identity框架管理,不需要开发人员直接的去访问这些表
3 AspNetCore中使用Identity框架
[Route("/api/[controller]/[action]")]
public class UserController:ControllerBase
{
private readonly UserManager<MyUser> userManager;
private readonly RoleManager<MyRole> roleManager;
public UserController(UserManager<MyUser> userManager, RoleManager<MyRole> roleManager) {
this.userManager = userManager;
this.roleManager = roleManager;
}
///