Vue.js 实现一二级规格结构
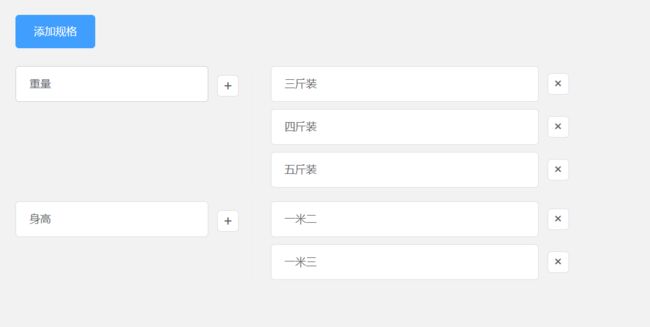
一、实现效果
二、核心功能实现
1. 数据模型设计
const treeData = ref([])
let specId = 0  // 用于生成唯一ID
数据结构示例:
[
  {
    id: 'spec-1',
    label: '颜色',
    type: 'spec',
    children: [
      { id: 'item-1', label: '红色', type: 'item' },
      { id: 'item-2', label: '蓝色', type: 'item' }
    ]
  }
]
2. 添加规格功能
const addSpec = () => {
  const spec = {
    id: `spec-${specId++}`,
    label: '',
    type: 'spec',
    children: []
  }
  treeData.value.push(spec)
}
3. 添加子规格项
const addSpecItem = (spec) => {
  const item = {
    id: `item-${specId++}`,
    label: '',
    type: 'item'
  }
  spec.children.push(item)
}
4. 删除功能
const removeSpec = (item, specIndex, itemIndex) => {
  treeData.value[specIndex].children.splice(itemIndex, 1)
}
三、响应式数据管理
1. 数据绑定
2. 列表渲染
四、样式设计技巧
1. 主容器布局
.spec-main {
  display: flex;
  min-height: 40px;
}
2. 固定左侧宽度
.spec-name {
  width: 250px;
  min-width: 250px;
  position: sticky;
  left: 0;
}
3. 右侧可滚动区域
.spec-items-container {
  flex: 1;
  border-left: 1px solid #eee;
  padding-left: 20px;
  overflow: hidden;
}
4. 自定义按钮样式
.add-item-btn {
  width: 24px;
  height: 24px;
  border: 1px solid #dcdfe6;
  border-radius: 4px;
  transition: all 0.3s;
}

.add-item-btn:hover {
  color: #409eff;
  border-color: #c6e2ff;
  background-color: #ecf5ff;
}
五、数据监控与调试
1. 深度监听数据变化
watch(treeData, (newValue) => {
  console.log("当前规格数据:", JSON.parse(JSON.stringify(newValue)))
}, { deep: true })
2. 输入事件监控
六、完整代码
添加规格