MyBatis学习总结
MyBatis分页如何实现
分页分为
逻辑分页:查询出所有的数据缓存到内存里面,在从内存中筛选出需要的数据进行分页
物理分页:直接用数据库语法进行分页limit
mybatis提供四种方法分页:
- 直接在sql语句中分页,传递分页参数
select _column,_column from _table [where Clause] [limit N][offset M]
select * : 返回所有记录
limit N : 返回 N 条记录
offset M : 跳过 M 条记录, 默认 M=0, 单独使用似乎不起作用
limit N,M = limit M offset N , 从第 N+1 条记录开始, 返回 M 条记录 - MyBatis提供了RowBounds对象实现逻辑分页
 @Test
    public void getUserByRowBounds(){
        SqlSession sqlSession = MybatisUtil.getSqlSession();
        UserMapper mapper = sqlSession.getMapper(UserMapper.class);

        //RowBounds实现
        RowBounds rowBounds = new RowBounds(1,2);

        //通过java代码层面实现分页
        List<Map> userList = sqlSession.selectList("com.jin.mapper.UserMapper.getUserByRowBounds", null, rowBounds);
        for (Map map1 : userList) {
            System.out.println(map1);
        }

        sqlSession.close();
    }
但是:RowBounds是将所有符合条件的数据全都查询到内存中,然后在内存中对数据进行分页,数据量非常大时,造成内存OOM。
3.MyBatis拦截器interceptor实现分页,截获所执行方法的sql语句与参数,动态拼接sql分页语句
利用拦截器实现Mybatis分页的一个思路就是拦截StatementHandler接口的prepare方法,然后在拦截器方法中把Sql语句改成对应的分页查询Sql语句,之后再调用StatementHandler对象的prepare方法,即调用invocation.proceed()
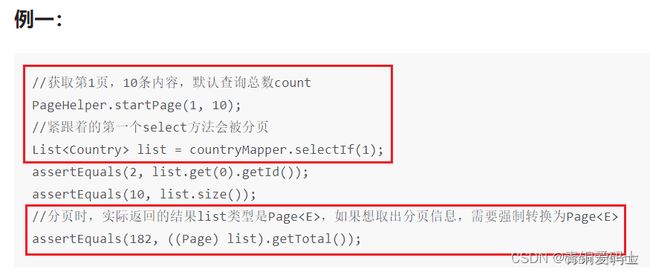
4.分页插件
例如pagehelper,物理分页,实际原理就是修改最后的执行sql,增加相应的分页内容,是基于拦截器实现的。
MyBatis二级缓存
- 功能 - 提高查询效率
- 工作流程-一级缓存-缺点-二级缓存
- 实现原理
MyBatis包含一个非常强大的查询缓存特性,它可以非常方便地配置和定制。缓存可以极大的提升查询效率。默认定义了两级缓存,分别是一级缓存和二级缓存。
默认情况下,只有一级缓存(SqlSession级别的缓存,也称为本地缓存)开启。二级缓存需要手动开启和配置,他是基于namespace级别的缓存。为了提高扩展性,MyBatis定义了缓存接口Cache,我们可以通过实现Cache接口来自定义二级缓存。
一级缓存(本地缓存)
sqlSession级别的缓存,一级缓存一直是开启的,它实质上就是sqlSession级别的一个Map。
一级缓存失效:
sqlSession不同。
sqlSession相同,查询条件不同(当前一级缓存中还没有这个数据)。
sqlSession相同,两次查询之间执行了增删改操作(这次增删改可能对当前数据有影响),实际上,这个是因为每个增删改查都有标签flushCache,增删改默认为flushCache=“true”,即执行完后就清除一级缓存和二级缓存。
sqlSession相同,手动清除了一级缓存(缓存清空,session.clearCache(),注意,该方法只清除当前session的一级缓存)。
二级缓存(全局缓存)
namespace级别的缓存,一个namespace对应一个二级缓存。
工作机制
一个会话查询一条数据,这个数据就会被放在当前会话的一级缓存中。
如果会话关闭或提交,一级缓存中的数据会被保存到二级缓存中,新的会话查询信息,就可以参照二级缓存中的内容。
注意:不同的namespace查出的数据会放在自己对应的缓存(map)中。
效果:数据会从二级缓存中取出。查出的数据都会被默认先放在一级缓存中,只有会话提交或者关闭以后,一级缓存中的数据才会转移到二级缓存中。
先查询二级缓存,再查询一级缓存,最后查询数据库。
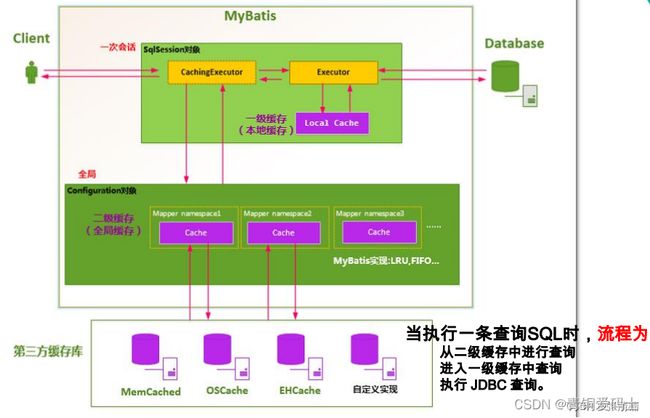
原理:sqlSession的executor持有一个Local cache对象,当用户发起查询,会根据执行语句到缓存查找,如果命中,直接返回,否则查询数据库再写入缓存。二级缓存则是executor的基础上做了一个装饰CachingExecutor装饰器,查询时先通过CachingExecutor查询二级缓存。
{}和\${}的区别
mybatis会对这两个符号解析,实现动态sql。
#{}匹配的是一个占位符,相当于JDBC中的一个?,会对一些敏感的字符进行过滤,编译过后会对传递的值加上双引号,因此可以防止SQL注入问题。
\${}匹配的是真实传递的值,传递过后,会与sql语句进行字符串拼接。${}会与其他sql进行字符串拼接,不能预防sql注入问题。
#{}的应用场景是为给SQL语句的where字句传递条件值,${}的应用场景是为了传递一些需要参与SQL语句语法生成的值。
mybatis代理模式
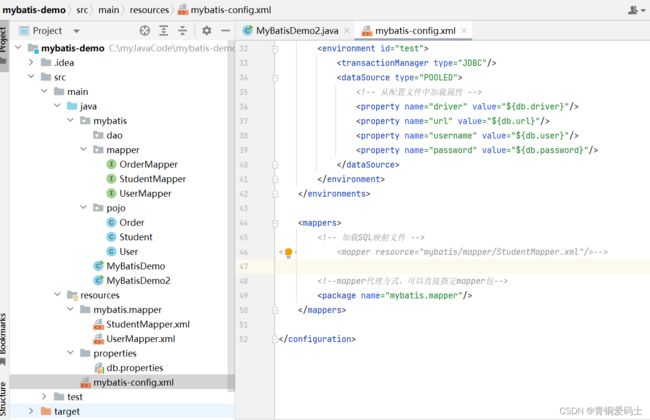
mapper接口和mapper配置文件的目录要对应。
//mybatis代理开发
public class MyBatisDemo2 {
    public static void main(String[] args) throws IOException {
        //1. 加载mybatis的核心配置文件,获取SqlSessionFactory
        String resource = "mybatis-config.xml";
        InputStream inputStream = Resources.getResourceAsStream(resource);
        SqlSessionFactory sqlSessionFactory= new SqlSessionFactoryBuilder().build(inputStream);

        //2.获取SqlSession对象,用来执行sql
        SqlSession sqlSession = sqlSessionFactory.openSession();

        //3.执行sql namespace+id
        //List students = sqlSession.selectList("test.findAll");
        //3.1 获取StudentMapper接口的代理对象
        StudentMapper studentMapper = sqlSession.getMapper(StudentMapper.class);
        studentMapper.findAll();
        //System.out.println(students);
        //mybatis提供了mapper接口代理的开发方式,不需要再编写dao类,只需要编写一个mapper接口,一个mapper的接口和一个mapper.xml相对应,
        // 只需要调用SqlSession对象上的getMapper(),传入mapper接口的class信息,即可获得一个mapper代理对象,
        // 直接调用mapper接口中的方法,即相当于调用mapper.xml中的各个SQL标签,此时就不需要指定SQL标签的id字符串了,
        // mapper接口中的一个方法,就对应了mapper.xml中的一个SQL标签
        //4.释放资源
        sqlSession.close();
    }
mybatis动态数据源配置
Spring内置了一个AbstractRoutingDataSource,它可以把多个数据源配置成一个Map,然后,根据不同的key返回不同的数据源。因AbstractRoutingDataSource也是一个DataSource接口。应用程序可以先设置好key, 访问数据库的代码就可以从AbstractRoutingDataSource拿到对应的一个真实的数据源,从而访问指定的数据库。
源码中有一个核心的方法 setTargetDataSources(Map
public abstract class AbstractRoutingDataSource extends AbstractDataSource implements InitializingBean {
    @Nullable
    private Map<Object, Object> targetDataSources;
    @Nullable
    private Object defaultTargetDataSource;
    private boolean lenientFallback = true;
    private DataSourceLookup dataSourceLookup = new JndiDataSourceLookup();
	// 存放的数据对象的Map集合类
    @Nullable
    private Map<Object, DataSource> resolvedDataSources;
    @Nullable
    private DataSource resolvedDefaultDataSource;

    public AbstractRoutingDataSource() {
    }
    // 初始化设置数据源
    public void setTargetDataSources(Map<Object, Object> targetDataSources) {
        this.targetDataSources = targetDataSources;
    }
	// ...
    protected DataSource determineTargetDataSource() {
        Assert.notNull(this.resolvedDataSources, "DataSource router not initialized");
		// 决策当前选择的数据源的Key
        Object lookupKey = this.determineCurrentLookupKey();
		// 当前选择的数据源
        DataSource dataSource = (DataSource)this.resolvedDataSources.get(lookupKey);
        if (dataSource == null && (this.lenientFallback || lookupKey == null)) {
            dataSource = this.resolvedDefaultDataSource;
        }

        if (dataSource == null) {
            throw new IllegalStateException("Cannot determine target DataSource for lookup key [" + lookupKey + "]");
        } else {
            return dataSource;
        }
    }
	// 数据源Key的实现方法,由子类去实现
    @Nullable
    protected abstract Object determineCurrentLookupKey();
}
DynamicDataSource.java
package mybatis.config;

import org.springframework.jdbc.datasource.lookup.AbstractRoutingDataSource;

import javax.sql.DataSource;
import java.util.Map;

/**
 * 实现动态数据源的核心代码
 */
public class DynamicDataSource extends AbstractRoutingDataSource {
    private static final ThreadLocal<String> contextHolder = new ThreadLocal<>();

    public DynamicDataSource(DataSource defaultTargetDataSource, Map<Object, Object> targetDataSources) {
        super.setDefaultTargetDataSource(defaultTargetDataSource);
        super.setTargetDataSources(targetDataSources);
        super.afterPropertiesSet();
    }

    //可以单独封装成一个类去切换数据源
    //多线程下,ThreadLocal存储key最合适
    public static void setDataSource(String dataSource) {
        contextHolder.set(dataSource);
    }

    public static String getDataSource() {
        return contextHolder.get();
    }

    public static void clearDataSource() {
        contextHolder.remove();
    }

    //选择数据源
    @Override
    protected Object determineCurrentLookupKey() {
        return getDataSource();
    }
}
DynamicDataSourceConfig.java
package mybatis.config;

import com.alibaba.druid.spring.boot.autoconfigure.DruidDataSourceBuilder;
import org.springframework.boot.context.properties.ConfigurationProperties;
import org.springframework.context.annotation.Bean;
import org.springframework.context.annotation.Configuration;
import org.springframework.context.annotation.Primary;
import org.springframework.stereotype.Component;

import javax.sql.DataSource;
import java.util.HashMap;
import java.util.Map;

@Configuration
@Component
public class DynamicDataSourceConfig {

    @Bean
    @ConfigurationProperties("spring.datasource.druid.master")
    public DataSource masterDataSource(){
        return DruidDataSourceBuilder.create().build();
    }

    @Bean
    @ConfigurationProperties("spring.datasource.druid.slave")
    public DataSource slaveDataSource(){
        return DruidDataSourceBuilder.create().build();
    }

    @Bean
    @Primary
    public DynamicDataSource dataSource(DataSource masterDataSource, DataSource slaveDataSource) {
        Map<Object, Object> targetDataSources = new HashMap<>();
        targetDataSources.put("master", masterDataSource);
        targetDataSources.put("slave", slaveDataSource);
        return new DynamicDataSource(masterDataSource, targetDataSources);
    }
}
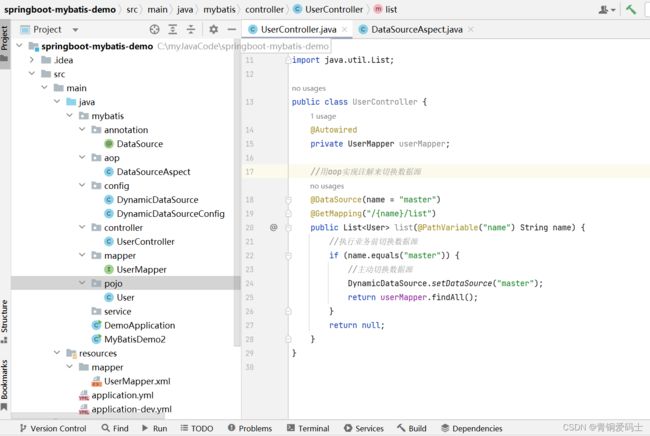
DataSourceAspect.java
package mybatis.aop;

import mybatis.annotation.DataSource;
import mybatis.config.DynamicDataSource;
import org.aspectj.lang.ProceedingJoinPoint;
import org.aspectj.lang.annotation.Around;
import org.aspectj.lang.annotation.Aspect;
import org.aspectj.lang.annotation.Pointcut;
import org.aspectj.lang.reflect.MethodSignature;
import org.springframework.stereotype.Component;
import java.lang.reflect.Method;
/**
 * 切面类切换数据源
 */
@Aspect
@Component
public class DataSourceAspect {
    @Pointcut("@annotation(com.dynamicdatasource.demo.Config.DataSource)")
    public void dataSourcePointCut() {

    }

    //通过注解的值设置数据源
    @Around("dataSourcePointCut()")
    public Object around(ProceedingJoinPoint point) throws Throwable {
        MethodSignature signature = (MethodSignature) point.getSignature();
        Method method = signature.getMethod();

        DataSource dataSource = method.getAnnotation(DataSource.class);
        if(dataSource == null){
            DynamicDataSource.setDataSource("master");
        }else {
            DynamicDataSource.setDataSource(dataSource.name());
        }

        try {
            return point.proceed();
        } finally {
            DynamicDataSource.clearDataSource();
        }
    }
}
druid配置
spring:
  datasource:
    type: com.alibaba.druid.pool.DruidDataSource
    druid:
      master: # 主数据源
        driverClassName: com.mysql.jdbc.Driver
        username: root
        password: root
        url: jdbc:mysql://localhost:3306/mydb1?serverTimezone=GMT%2B8&useUnicode=true&characterEncoding=utf8
      slave: # 从数据源
        driverClassName: com.mysql.jdbc.Driver
        username: root
        password: root
        url: jdbc:mysql://localhost:3306/mydb2?serverTimezone=GMT%2B8&useUnicode=true&characterEncoding=utf8