ShaderToy学习笔记 04.绘制多个3D对象
1. 绘制多个3D对象
1.1. 思路
- position 距离第一个球体的距离 d1
- position 距离第二个球体的距离 d2
- d=min(d1,d2),只要d<=0,就表示需要绘制球体
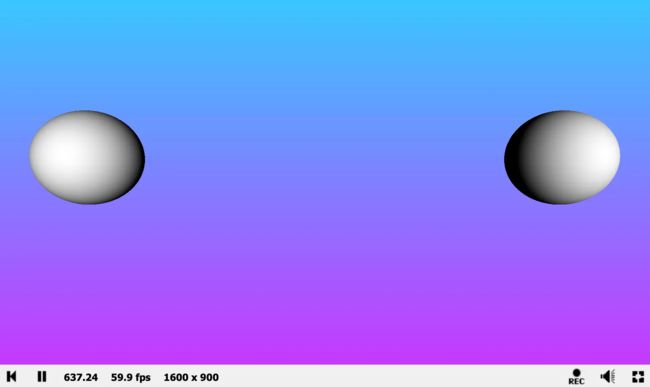
1.2. 核心代码
float sdSphere(vec3 p, float r,vec3 offset)
{
    return length(p-offset)-r;
}

float sdScene(vec3 p)
{

    float d=sdSphere(p,1.0,vec3(-5,0.5,0));
    d=min(d,sdSphere(p,1.0,vec3(5,0.5,0)));
    return d;
}
1.3. 完整代码
#define PIXW (1./iResolution.y)

const int MAX_STEPS = 100;
const float START_DIST = 0.001;
const float MAX_DIST = 100.0;
const float EPSILON = 0.0001;


float sdSphere(vec3 p, float r,vec3 offset)
{
    return length(p-offset)-r;
}
vec3 getBackgroundColor(vec2 uv)
{
//uv.y [-1,1]
//y: [0,1]
    float y=(uv.y+1.)/2.;
    return mix(vec3(1,0,1),vec3(0,1,1),y);
}
float sdScene(vec3 p)
{

    float d=sdSphere(p,1.0,vec3(-5,0.5,0));
    d=min(d,sdSphere(p,1.0,vec3(5,0.5,0)));
    return d;
}
//法线计算
vec3 calcNormal(vec3 p) {
    vec2 e = vec2(1.0, -1.0) * 0.0005; // epsilon
    float r = 1.; // radius of sphere
    return normalize(
      e.xyy * sdScene(p + e.xyy) +
      e.yyx * sdScene(p + e.yyx) +
      e.yxy * sdScene(p + e.yxy) +
      e.xxx * sdScene(p + e.xxx));
}

float rayMarch(vec3 ro, vec3 rd,float start,float end)
{
    float d=start;
    float r=1.0;

    for(int i=0;i<MAX_STEPS;i++)
    {
        vec3 p=ro+rd*d;

        float d1=sdScene(p);
        if(d1<EPSILON)
        {
            return d;
        }
        d+=d1;
        if(d>end)
        {
            return end;
        }
    }
    return end;
}


void mainImage( out vec4 fragColor, in vec2 fragCoord )
{
     // Normalized pixel coordinates (from -1 to 1)
     vec2 uv = (2.0*fragCoord-iResolution.xy)/iResolution.xx;


     float r=0.3;
     vec3 c=getBackgroundColor(uv);
     vec3 ro = vec3(0, 0, 7); // ray origin that represents camera position
     vec3 rd = normalize(vec3(uv, -1)); // ray direction

     float d=rayMarch(ro,rd,START_DIST,MAX_DIST);


     if(d<MAX_DIST)
     {
        //平行光源的漫反射计算
        vec3 p=ro+rd*d;
        vec3 n=calcNormal(p);

        vec3 light_direction=normalize(vec3(1,0,5));
        vec3 light_color=vec3(1,1,1);

        float diffuse=max(0.0,dot(n,light_direction));
        c=light_color*diffuse;
     }
    // Output to screen
     fragColor = vec4(vec3(c),1.0);
}
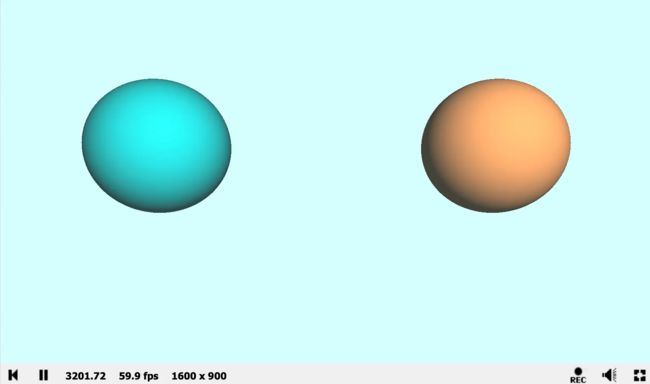
1.4. 每个球体不同的颜色
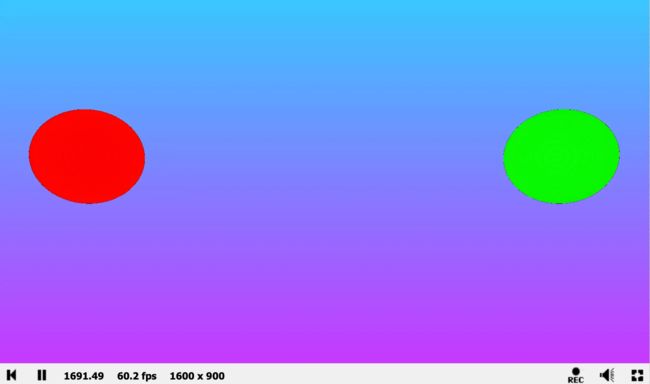
如果运行结果是类似下图 ,该结果不尽人意,光照效果不明显,看起来不像一个球体,而是像一个圆形。请检查 rayMarch 函数,看看是否返回了正确的距离值。
1.4.1. 思路
- 以前的SDF返回值是距离,现在返回值是距离和颜色,这样每个球体的颜色就不一样了
- 可以用vec4来表示距离和颜色,vec4(x,y,z,w) x表示距离,y,z,w表示颜色(r,g,b) 或者 x,y,z表示颜色(r,g,b),w表示距离 。但这种方式不直观,也不容易理解和扩展
- 用结构体来表示距离和颜色,结构体中包含距离和颜色
1.4.2. 结构体定义
struct SDFResult
{
    float d;
    vec3 color;
};
1.4.3. SDF函数返回值
SDFResult sdSphere(vec3 p, float r,vec3 offset,vec3 color)
{
    return SDFResult(length(p-offset)-r,color);
}


SDFResult minWithColor(SDFResult a,SDFResult b)
{
    if (a.d<b.d)
    {
        return a;
    }
    return b;
}
SDFResult sdScene(vec3 p)
{

    SDFResult result1=sdSphere(p,1.0,vec3(-2.5,0.5,-2),vec3(0.,0.8,0.8));
    SDFResult result2=sdSphere(p,1.0,vec3(2.5,0.5,-2),vec3(1.,0.58,0.29));

    SDFResult result=minWithColor(result1,result2);
    return result;
}
1.4.4. 完整代码
#define PIXW (1./iResolution.y)

const int MAX_STEPS = 100;
const float START_DIST = 0.001;
const float MAX_DIST = 100.0;
const float EPSILON = 0.0001;

struct SDFResult
{
    float d;
    vec3 color;
};

vec3 getBackgroundColor(vec2 uv)
{
//uv.y [-1,1]
//y: [0,1]
    float y=(uv.y+1.)/2.;
    return mix(vec3(1,0,1),vec3(0,1,1),y);
}

SDFResult sdSphere(vec3 p, float r,vec3 offset,vec3 color)
{
    return SDFResult(length(p-offset)-r,color);
}


SDFResult minWithColor(SDFResult a,SDFResult b)
{
    if (a.d<b.d)
    {
        return a;
    }
    return b;
}
SDFResult sdScene(vec3 p)
{

    SDFResult result1=sdSphere(p,1.0,vec3(-2.5,0.5,-2),vec3(0.,0.8,0.8));
    SDFResult result2=sdSphere(p,1.0,vec3(2.5,0.5,-2),vec3(1.,0.58,0.29));

    SDFResult result=minWithColor(result1,result2);
    return result;
}
//法线计算
vec3 calcNormal(vec3 p) {
    vec2 e = vec2(1.0, -1.0) * 0.0005; // epsilon
    float r = 1.; // radius of sphere
    return normalize(
      e.xyy * sdScene(p + e.xyy).d +
      e.yyx * sdScene(p + e.yyx).d +
      e.yxy * sdScene(p + e.yxy).d +
      e.xxx * sdScene(p + e.xxx).d);
}

SDFResult rayMarch(vec3 ro, vec3 rd,float start,float end)
{
    float d=start;
    float r=1.0;
    SDFResult result;
    for(int i=0;i<MAX_STEPS;i++)
    {
        vec3 p=ro+rd*d;

        result=sdScene(p);
        d+=result.d;
        if(result.d<EPSILON || d>end) break;

    }
    result.d=d;
    return result;
}


void mainImage( out vec4 fragColor, in vec2 fragCoord )
{
     // Normalized pixel coordinates (from -1 to 1)
     vec2 uv = (2.0*fragCoord-iResolution.xy)/iResolution.xx;


     float r=0.3;

     vec3 backgroundColor = vec3(0.835, 1, 1);
     //vec3 c=getBackgroundColor(uv);
     vec3 c=backgroundColor;
     vec3 ro = vec3(0, 0, 3); // ray origin that represents camera position
     vec3 rd = normalize(vec3(uv, -1)); // ray direction

     SDFResult result=rayMarch(ro,rd,START_DIST,MAX_DIST);


     float d=result.d;

     if(d<MAX_DIST)
     {
        //平行光源的漫反射计算
        vec3 p=ro+rd*d;
        vec3 n=calcNormal(p);

        vec3 lightPosition=vec3(2,2,7);
        //vec3 light_direction=normalize(vec3(1,0,5));
        vec3 light_direction=normalize(lightPosition-p);
        vec3 light_color=vec3(1,1,1);

        float diffuse=max(0.0,dot(n,light_direction));
        diffuse=clamp(diffuse,0.1,1.0);
        c=light_color*diffuse*result.color+backgroundColor*0.2;

     }
    // Output to screen
     fragColor = vec4(vec3(c),1.0);
}