【OpenCV】OpenCV2.4.6 与Visiual Studio 2008,Python2.7.5配置和图像载入显示
自从OpenCV2.2开始,OpenCV 库便分成几个模块并位于lib文件中,本节介绍从OpenCV2.4.6与VS2008 、Python2.7.5如何配置环境,如何外部文件载 入图像、在窗口中显示图像。
配置环境
Installing OpenCV2.4.6 for Visual Studio 2008
Step 1: Download OpenCV2.4.6.exe from http://sourceforge.net/projects/opencvlibrary/files/opencv-win/2.4.6/. Run OpenCV-2.4.6-win-superpack.exe and copy the generated folder OpenCV2.4.6 to D drive
Step 2: Open Microsoft Visual Studio 2008 and click Tools->Options
Select Projects and Solutions and then VC++ Directories. Select Include files in Show directories for: drop down menu. Add the following paths.
D:\Program Files\OpenCV2.4.6\VS2008\include
Select Library files in Show directories for: drop down menu. Add the following path.
D:\Program Files\OpenCV2.4.6\VS2008\lib\Debug
D:\Program Files\OpenCV2.4.6\VS2008\lib\Release
Now we have added include and library file paths and this need to be done only for the first time.
Step 3: Create an new project in Visual Studio 2008
Click Project->Properties. Select Configuration Properties -> Linker -> Input. Make sure you select Debug in 'Configuration:' drop down menu and then add the following to the Additional Dependencies.
opencv_features2d246d.lib opencv_highgui246d.lib opencv_core246d.lib opencv_imgproc246d.lib opencv_ml246d.lib opencv_objdetect246d.lib opencv_video246d.lib opencv_contrib246d.lib opencv_calib3d246d.lib
Now select Release in 'Configuration:' drop down menu and then add the following to the Additional Dependencies and click OK
opencv_features2d246.lib opencv_highgui246.lib opencv_core246.lib opencv_imgproc246.lib opencv_ml246.lib opencv_objdetect246.lib opencv_video246.lib opencv_contrib246.lib opencv_calib3d246.lib
Step 4:
Add D:\Program Files\OpenCV2.4.6\bin to the environment path as shown in screenshot below. You may need to restart the system after setting this.
Installing OpenCV2.4.6 for Python 2.7.5
i have always struggled when trying to set up OpenCV for Python before. So I decide to write this post to help myself in the future and share with you =). My setup is for OpenCV 2.2 but I think you can apply for any version of OpenCV.
Step 1: Download and install Python 2.7.5 from http://www.python.org/getit/releases/2.7.5/. You need to install the 32bit version of Python.
Step 2: Download and install OpenCV 2.4.6 from http://sourceforge.net/projects/opencvlibrary/files/. Note that this version only supports Python 2.7.5 (not 3.x).
Step 3: Download and install NumPy 1.6.1 and SciPy 0.9.0 from: (you need to choose the files which support Python 2.7)
- http://sourceforge.net/projects/numpy/files/NumPy/1.6.1/
- http://sourceforge.net/projects/scipy/files/scipy/0.9.0/
Step 4:Setup Windows Path in Environment Variables
- Add “D:/Python2.7.5;D:/OpenCV2.4.6/bin” to PATH variable (You need to change the directory to where you install Python and OpenCV).
- Create PYTHONPATH variable and put “D:/OpenCV2.4.6/Python2.7.5/Lib/site-packages” as value.
图像载入和显示
我们第一件事是就是如何声明一个表示图像的变量,在OpenCV 2.XX中,这个变量将是cv:Mat类型.
cv:Mat img;
接着是,一个简单的读取函数将进行寻文件读取,解码以及内存的分配。
img = cv:imread("../../../waves.jpg");
首先在显示图像之前时,需定义一个图像显示的窗口,接着指定需要显示的图像。
cv::namedWindow("Original Window");	// define the window
cv::imshow("Original Window",img);	//show img in the window
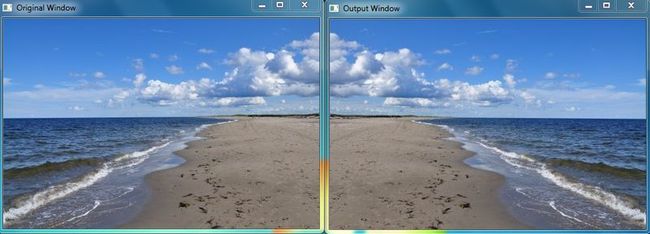
现在如果我们需要对图像进行一些处理,如flip函数,然而,我们也可以创建另外一个矩阵来保存输出结果:
cv::Mat result;
cv::flip(img,result,1);	// positive for horizontal;
                        // 0 for vertical;
                        // negative for both
结果显示在另一个窗口中:
cv::namedWindow("Output Window");
cv::imshow("Output Window",result);
由于这个管制台窗口。它会在main函数的结尾处终结,因此我们添加额外highgui 函数使得程序退出胶不停等待用户的按键入:
cv::waitKey(0);
现在,给相关完整C++版代码和Python版代码.
完整代码
C++版
//
// display_image.cpp : Defines the entry point for the console application.
//

#include "stdafx.h"
#include "opencv2/opencv.hpp"

int _tmain(int argc, _TCHAR* argv[])
{
	cv::Mat img = cv::imread("../../../waves.jpg");

	cv::Mat result;
	cv::flip(img,result,1);	// positive for horizontal;
                                // 0 for vertical;
                                // negative for both

	cv::namedWindow("Original Window");	// define the window
	cv::namedWindow("Output Window");

	cv::imshow("Original Window",img);	//show img in the window
	cv::imshow("Output Window",result);

	cv::waitKey(0);
	cv::destroyAllWindows();

	return 0;
}
Python版
''' filename : display_image.py
Benefits : Learn to load image and display it in window'''

import cv2

img = cv2.imread("../waves.jpg")
Result =cv2.flip(img,1)

cv2.namedWindow('Original Window')
cv2.imshow('Original Window',img)   #Show Original image in the window
cv2.namedWindow('Output Window')
cv2.imshow('Output Window',Result)

cv2.waitKey(0)
cv2.destroyAllWindows() #Destroy all windows
本人测试C++版和Python版 图像输出结果一样,并未什么细微显示差别。
图像输出结果
未完,待续........
======================================================


