Junit使用详解
http://junit.org/上详细介绍了Junit。JUnit is a simple framework to write repeatable tests. It is an instance of the xUnit architecture for unit testing frameworks.(Junit是一个可用于编写可复用测试集的简单框架,是xUnit的一个子集,而xUnit是一个基于测试驱动开发的测试框架(例如面向python的PythonUnit、面向C++的CppUnit和面向Java的单元测试框架Junit)),Junit的源代码托管在了github上https://github.com/junit-team/junit。java doc地址:http://junit.org/javadoc/latest/index.html

这个页面提供了快速上手的示例https://github.com/junit-team/junit/wiki/Getting-started。
Junit使用断言机制将程序的运行结果和我们预期的结果进行比对。
快速上手
由于Eclipse中集成了Junit4,所以我们不需要单独下载jar包。
首先,建立一个被用于测试的类:
 1 package org.gpf.util;
 2 /**
 3  * 被测试的类
 4  * 包含+、-、*、/的4个方法
 5  */
 6 public class Calculate {
 7
 8     public int add(int num1,int num2){
 9         return num1 + num2;
10     }
11
12     public int sub(int num1,int num2){
13         return num1 - num2;
14     }
15
16     public int mul(int num1,int num2){
17         return num1 * num2;
18     }
19
20     public int div(int num1,int num2){
21         return num1 / num2;
22     }
23 }
然后,导入Junit4的jar包。在项目中单击右键--->BuildPath--->Add Libraries--->Juint.
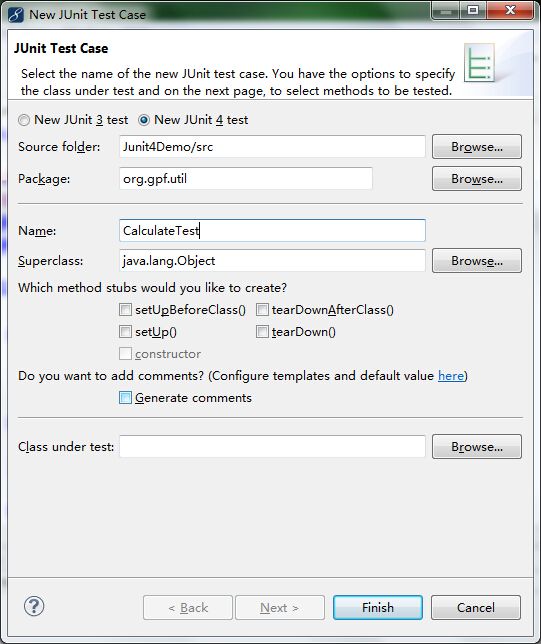
接下来,在当前包中新建一个测试用例。在被测试类所在的包中右键--->新建--->Juint Test Case。如下图所示
Eclipse会自动为我们生成模板:
 1 package org.gpf.util;
 2
 3 import static org.junit.Assert.*;
 4
 5 import org.junit.Test;
 6
 7 public class CalculateTest {
 8
 9     @Test
10     public void test() {
11         fail("Not yet implemented");
12     }
13
14 }
接下来仿照以上的模板,测试自己的方法:
 1 package org.gpf.util;
 2
 3 import static org.junit.Assert.*;
 4
 5 import org.junit.Test;
 6
 7 public class CalculateTest {
 8
 9     @Test
10     public void testAdd(){
11         assertEquals(9, new Calculate().add(3, 6));    // 断言3+6 = 9
12     }
13 }
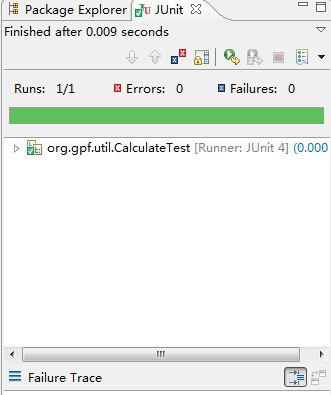
最后,运行测试用例(Run As Junit Test)
Junit使用详解
在以上的简单上手的示例中将程序的源代码和测试代码放在同一目录下,这样就比较混乱。一个最佳实践就是在项目下新建一个test源代码目录,在test目录下新建新建测试用例,当产品测试完成上线之后删除test目录即可。
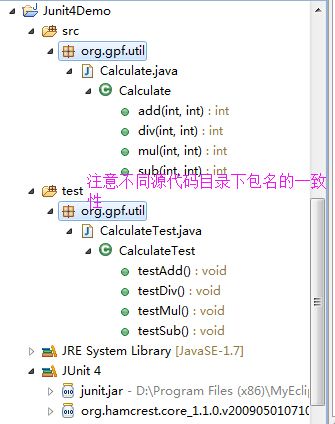
 1 package org.gpf.util;
 2
 3 import static org.junit.Assert.*;
 4
 5 import org.junit.Test;
 6
 7 public class CalculateTest {
 8
 9     @Test
10     public void testAdd(){
11         assertEquals(9, new Calculate().add(3, 6));    // 断言3+6 = 9
12     }
13
14     @Test
15     public void testSub(){
16         assertEquals(0, new Calculate().sub(3, 6));// 断言3-6 =0
17     }
18
19     @Test
20     public void testMul(){
21         assertEquals(18, new Calculate().mul(3, 6));// 断言3*6 = 18
22     }
23
24     @Test
25     public void testDiv(){
26         assertEquals(9, new Calculate().div(3, 6));    // 断言3/6 = 9
27     }
28 }
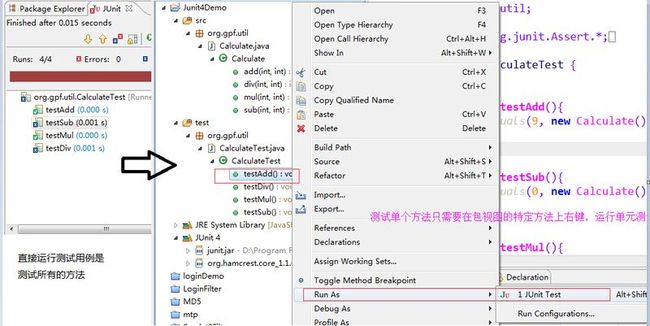
在Eclipse中右键Run As Junit Test,将会测试所有的方法。如果只需要测试特定的方法只需要在包视图中选定特定的方法,运行Junit测试即可。
总结:
- 测试方法必须使用@Test注解;
- 测试方法必须使用public void进行修饰,不能带任何的参数;
- 新建源代码目录来存放我们的测试代码;
- 测试类的包应该和被测试类保持一致;
- 测试单元中的每个方法必须可以独立测试,测试方法见不能存在任何的依赖;
- 测试类推荐使用Test最为类名的后缀;
- 测试方法推荐使用test作为方法名的前缀。
测试失败的2种情况
“测试用例不是用来证明你是对的,而是用来证明你没有错。”——测试用例用来表达预期结果,但对于逻辑错误却无能为力。
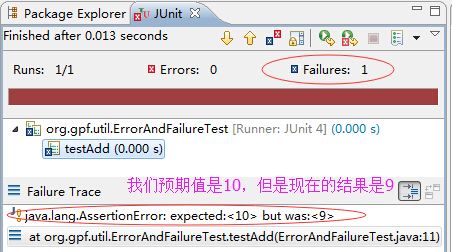
新建一个测试用例,命名为ErrorAndFailureTest,测试add方法:
1 public class ErrorAndFailureTest {
2
3     @Test
4     public void testAdd(){
5         assertEquals(10, new Calculate().add(3, 6));    // 断言3+6 = 10
6     }
7
8 }
运行此测试用例:
现在注释掉testAdd测试方法,加入testDiv测试方法,在testDiv方法中我们断言3/0=9.
1 public class ErrorAndFailureTest {
2
3     @Test
4     public void testDiv(){
5         assertEquals(9, new Calculate().div(3, 0));    // 断言3/0 = 9
6     }
7 }
运行此测试用例,

小结:
- Failure一般是由单元测试使用的断言方法判断失败所引起的,表名测试点发现了问题,就是说程序的输出结果和我们预期的不一样。
- Error是由代码异常引起的,它可以产生于测试代码本身的错误,也可以是被测试代码中的一个隐藏的bug;
- 测试用例不是用来证明你是对的,而是用来证明你没有错。
Junit的运行流程
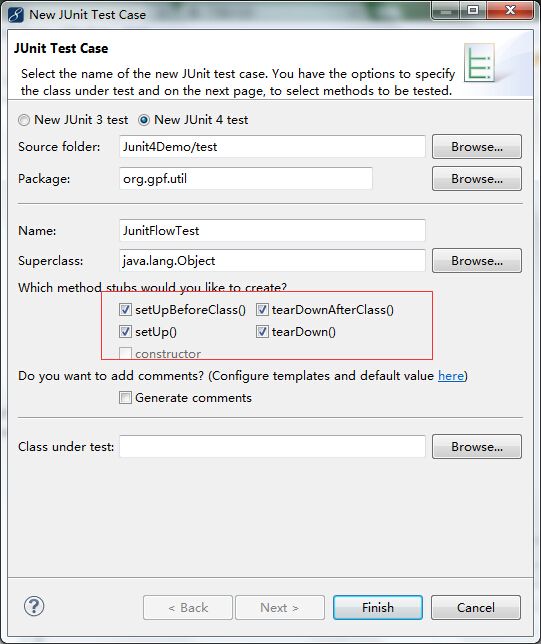
打开开发工具,新建一个Junit Test Case,选中4个方法:
我们在它自动生成的4个方法中各打印一句话,同时加入两个我们自己的测试方法:
 1 package org.gpf.util;
 2
 3 import org.junit.After;
 4 import org.junit.AfterClass;
 5 import org.junit.Before;
 6 import org.junit.BeforeClass;
 7 import org.junit.Test;
 8
 9 public class JunitFlowTest {
10
11     @BeforeClass
12     public static void setUpBeforeClass() throws Exception {
13         System.out.println("这是BeforeClass---静态方法");
14     }
15
16     @AfterClass
17     public static void tearDownAfterClass() throws Exception {
18         System.out.println("这是AfterClass---静态方法");
19     }
20
21     @Before
22     public void setUp() throws Exception {
23         System.out.println("这是Before");
24     }
25
26     @After
27     public void tearDown() throws Exception {
28         System.out.println("这是After");
29     }
30
31     @Test
32     public void test1(){
33         System.out.println("这是test1");
34     }
35
36     @Test
37     public void test2(){
38         System.out.println("这是test2");
39     }
40 }

小结
- @BeforeClass修饰的方法会在所有的方法被调用前执行,而且该方法是静态的,所以当测试类被加载后会接着运行它,在内存中只存在一份实例。比较适合加载一些配置文件。
- @AfterClass所修饰的方法通常用来对资源的清理。例如:关闭DB连接。
- @Before和@After会在每个测试方法的前后各执行一次。
- @BeforeClass和@AfterClass是固定代码,一定会被执行到。
Junit的常用注解
| 注解 | 说明 |
| @Test | 将一个普通的方法修饰成为测试方法。(expected=XX.class,用于预期捕获某种异常,使其通过测试;timeout=毫秒,用于对方法的运行时间进行限定,防止死循环和进行性能测试) |
| @BeforeClass | 在所有的方法运行前被执行,static修饰 |
| @afterClass | 在所有的方法运行后被执行,static修饰 |
| @Before | 每个测试方法运行前执行 |
| @After | 每个测试方法运行后执行 |
| @Ignore | 所修饰的方法会被测试运行器忽略 |
| @RunWith | 可以更改测试运行器,自定义自己的运行器需要继承org.junit.runner.Runner抽象类。但是一般情况下使用默认的测试运行器即可 |
1 public class AnnotationTest {
2
3     @Test(expected=ArithmeticException.class)
4     public void testDiv(){
5         assertEquals(9, new Calculate().div(3, 0));    // 断言3/0 = 9
6     }
7
8 }
在以上的程序中我们断言3/0 = 9,运行Junit本身应该是红色,但是运行以上程序,发现Junit的状态条变成了绿色,测试竟然通过了!
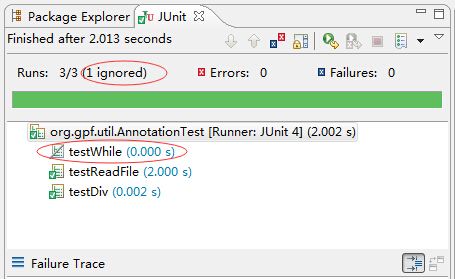
 1 /**
 2  * 防止出现死循环
 3  */
 4 @Test(timeout=3000)
 5 public void testWhile(){
 6     while (true) {
 7         System.out.println("此段代码永远运行!");
 8     }
 9 }
10
11 /**
12  * 性能测试:读取文件的操作必须在3s内完成
13  */
14 @Test(timeout=3000)
15 public void testReadFile(){
16     try {
17         Thread.sleep(2000);    // 模拟读文件需要2s
18     } catch (InterruptedException e) {
19         e.printStackTrace();
20     }
21 }
加入@Ignore注解的方法会被测试运行器忽略:
 1 public class AnnotationTest {
 2
 3     @Test(expected=ArithmeticException.class)
 4     public void testDiv(){
 5         assertEquals(9, new Calculate().div(3, 0));    // 断言3/0 = 9
 6     }
 7
 8     /**
 9      * 防止出现死循环,加上@Ignore后会被测试运行器忽略
10      */
11     @Ignore("该方法被测试忽略")
12     @Test(timeout=3000)
13     public void testWhile(){
14         while (true) {
15             System.out.println("此段代码永远运行!");
16         }
17     }
18
19     /**
20      * 性能测试:读取文件的操作必须在2s内完成
21      */
22     @Test(timeout=3000)
23     public void testReadFile(){
24         try {
25             Thread.sleep(2000);    // 模拟读文件需要2s
26         } catch (InterruptedException e) {
27             e.printStackTrace();
28         }
29     }
30 }
Junit深入使用
测试套件的使用
使用测试套件可以将多个测试类集成到一个测试套件中,这样需要验证系统功能的时候只需要执行一次测试套件即可。需要将多个测试类集成到一个测试套件中只需要在测试所在的包上右键--->New--->Junit--->JunitTestCase即可。
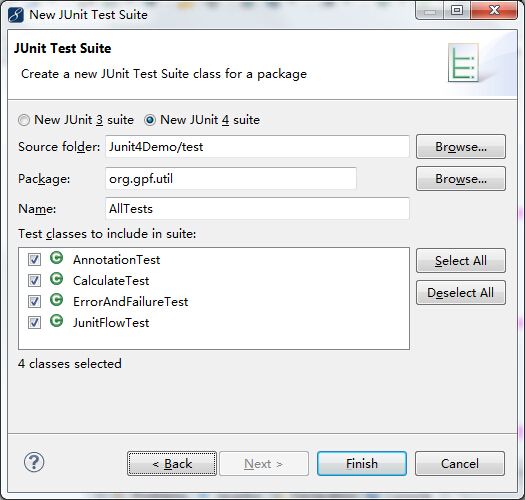
 1 package org.gpf.util;
 2
 3 import org.junit.runner.RunWith;
 4 import org.junit.runners.Suite;
 5 import org.junit.runners.Suite.SuiteClasses;
 6
 7 @RunWith(Suite.class)
 8 @SuiteClasses({ AnnotationTest.class, CalculateTest.class,
 9         ErrorAndFailureTest.class, JunitFlowTest.class })
10 public class AllTests {
11
12 }
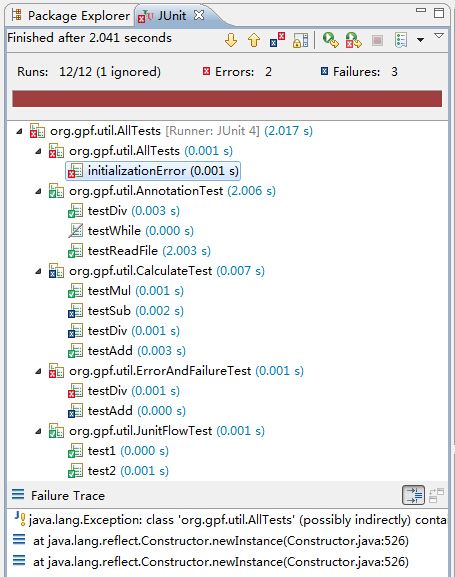
测试套件中可以包含其他的测试套件,直接像包含测试类那样在@SuiteClasses中加入测试套件的类名即可。
编写一个测试套件的步骤:
- 写一个作为测试套件的入口类,这个类中不包含其他的方法;
- 更改测试运行器(@RunWith())为Suite.class;
- 将测试类作为数组传递到@SuiteClasses({})中。
Junit参数化设置
对于相同的测试方法,例如加法操作,如果我们要进行多组数据的加法操作,就需要写多个测试加法的方法。代码结构都是相同的,不同的仅仅是测试的数据和预期值。Junit4可以通过参数化配置提高代码的可重用度。
 1 import static org.junit.Assert.*;
 2
 3 import java.util.Arrays;
 4 import java.util.Collection;
 5
 6 import org.junit.Test;
 7 import org.junit.runner.RunWith;
 8 import org.junit.runners.Parameterized;
 9 import org.junit.runners.Parameterized.Parameters;
10
11 @RunWith(Parameterized.class)
12 public class ParameterTest {
13
14     int expected = 0;
15     int input1 = 0;
16     int input2 = 0;
17
18     @Parameters
19     public static Collection<Object[]> t(){
20
21         return Arrays.asList(new Object[][]{
22                 {3,1,2},
23                 {4,2,2},
24                 {9,3,3}
25         });
26     }
27
28     /**
29      * 提供一个构造方法,初始化预期值和2个输入数据
30      * @param expected 预期值
31      * @param input1 输入参数1
32      * @param input2 输入参数2
33      */
34     public ParameterTest(int expected,int input1,int input2) {
35         this.expected = expected;
36         this.input1 = input1;
37         this.input2 = input2;
38     }
39
40     @Test
41     public void addTest(){
42         assertEquals(expected, new Calculate().add(input1, input2));    // 该测试方法将对3组测试用例进行测试
43     }
44 }

配置参数化测试的步骤:
- 更改默认的测试运行器为@RunWith(Parameterized.class);
- 声明变量来存放预期值和输入参数;
- 声明一个返回值为Collection的公共静态方法,并使用@Parameters注解修饰;
- 为测试类声明一个带有参数的公共构造方法,在构造方法中为声明变量赋值。
使用Junit整合Spring和Hibernate
待续。。。。。