grunt 使用比较
http://www.cnblogs.com/yexiaochai/p/3603389.html
最全的uglify使用DEMO
http://www.cnblogs.com/artwl/p/3449303.html
grunt-contrib-uglify
uglify是一个文件压缩插件,项目地址:https://github.com/gruntjs/grunt-contrib-uglify
本文将以一个DEMO来展示如何使用uglify插件。
DEMO环境
package.json:
{

  "name": "grunt-demo",

  "version": "0.1.0",

  "devDependencies": {

    "grunt": "~0.4.2",

    "grunt-contrib-jshint": "~0.6.0",

    "grunt-contrib-nodeunit": "~0.2.0",

    "grunt-contrib-uglify": "~0.2.2"

  }

}
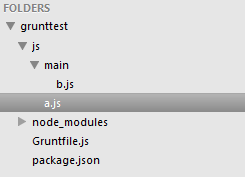
DEMO文件结构:

其中js文件夹就是用来测试的,Gruntfile.js稍后介绍,其中a.js内容如下:
(function() {

    //output hello grunt

    var helloGrunt = "Hello Grunt!(From a.js)";

    console.log(helloGrunt);

})();
b.js内容如下:
(function() {

    //output hello world

    var helloWorld = "Hello World!(From b.js)";

    console.log(helloWorld);

})();
下面我们来配置四个任务:
- 压缩a.js,不混淆变量名,保留注释,添加banner和footer
- 压缩b.js,输出压缩信息
- 按原文件结构压缩js文件夹内所有JS文件
- 合并压缩a.js和b.js
Gruntfile.js
现在直接通过Gruntfile.js来看看这四个任务的配置:
module.exports = function(grunt){


    // 项目配置

    grunt.initConfig({

        pkg: grunt.file.readJSON('package.json'),

        uglify: {

            options: {

                banner: '/*! <%= pkg.name %> <%= grunt.template.today("yyyy-mm-dd") %> */\n'//添加banner

            },

            builda: {//任务一:压缩a.js,不混淆变量名,保留注释,添加banner和footer

                options: {

                    mangle: false, //不混淆变量名

                    preserveComments: 'all', //不删除注释,还可以为 false(删除全部注释),some(保留@preserve @license @cc_on等注释)

                    footer:'\n/*! <%= pkg.name %> 最后修改于: <%= grunt.template.today("yyyy-mm-dd") %> */'//添加footer

                },

                files: {

                    'output/js/a.min.js': ['js/a.js']

                }

            },

            buildb:{//任务二:压缩b.js,输出压缩信息

                options: {

                    report: "min"//输出压缩率,可选的值有 false(不输出信息),gzip

                },

                files: {

                    'output/js/b.min.js': ['js/main/b.js']

                }

            },

            buildall: {//任务三:按原文件结构压缩js文件夹内所有JS文件

                files: [{

                    expand:true,

                    cwd:'js',//js目录下

                    src:'**/*.js',//所有js文件

                    dest: 'output/js'//输出到此目录下

                }]

            },

            release: {//任务四:合并压缩a.js和b.js

                files: {

                    'output/js/index.min.js': ['js/a.js', 'js/main/b.js']

                }

            }

        }

    });


    // 加载提供"uglify"任务的插件

    grunt.loadNpmTasks('grunt-contrib-uglify');


    // 默认任务

    grunt.registerTask('default', ['uglify:release']);

    grunt.registerTask('mina', ['uglify:builda']);

    grunt.registerTask('minb', ['uglify:buildb']);

    grunt.registerTask('minall', ['uglify:buildall']);

}
通过上面的代码,我们很容易就可以看到上面四个任务的配置方式。
运行结果
任务一:压缩a.js,不混淆变量名,保留注释,添加banner和footer
运行 grunt mina 命令,生成的a.min.js如下:
/*! grunt-demo 2013-11-29 */

!function(){//output hello grunt

var helloGrunt="Hello Grunt!(From a.js)";console.log(helloGrunt)}();

/*! grunt-demo 最后修改于: 2013-11-29 */
跟我们的目标一致。
任务二:压缩b.js,输出压缩信息
运行 grunt minb 命令,生成的b.min.js如下:
/*! grunt-demo 2013-11-29 */

!function(){var a="Hello World!(From b.js)";console.log(a)}();
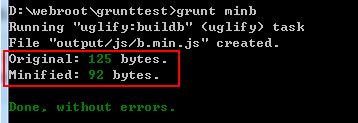
命令执行情况:

我们可以看到输出了压缩信息
任务三:按原文件结构压缩js文件夹内所有JS文件
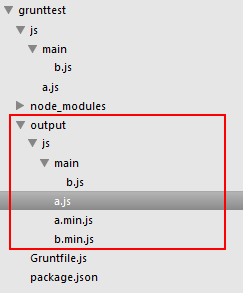
运行 grunt minall 命令,生成目录结构如下:

其中a.min.js和b.min.js是任务一和任务二生成的,压缩后的output/js/a.js内容如下:
/*! grunt-demo 2013-11-29 */

!function(){var a="Hello Grunt!(From a.js)";console.log(a)}();
output/js/main/b.js内容如下:
/*! grunt-demo 2013-11-29 */

!function(){var a="Hello World!(From b.js)";console.log(a)}();
任务四:合并压缩a.js和b.js
运行 grunt命令,生成的output/index.min.js内容如下:
/*! grunt-demo 2013-11-29 */

!function(){var a="Hello Grunt!(From a.js)";console.log(a)}(),function(){var a="Hello World!(From b.js)";console.log(a)}();