MMORPG programming in Silverlight Tutorial (4)Implement the sprite’s 2D animation (Part I)
By studying the first 3 chapters, we master how to create the object’s moving animation dynamically. In this chapter, I will introduce how to implement object’s own animation.
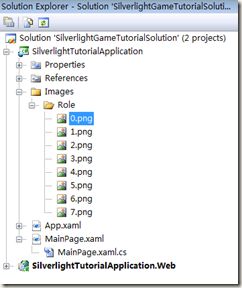
First of all, I need to replace the object with a living sprite. I prepare some pictures made up of a coherent running animation, as follows:
Alert, all these pictures above come from network, I only use them to show how to programming in Silverlight games. Please don’t use in business; otherwise, all have nothing to do with me.
All the 8 pictures should be the same dimension, 150*150. Because all the pictures’ background should be transparent, but Silverlight doesn’t support gif image format, we have to use png format instead. We named them from 0 to 7, this naming mechanism make us convenient to control animation.
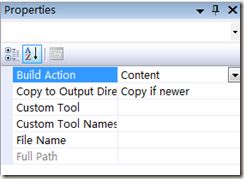
After preparing all the pictures, copy them into the project and set their Build Action to “Content”, and set their Copy to Output Directory to “Copy if newer”.
Now we can write some code to make the sprite running, as follows:
public partial class MainPage : UserControl

{

    private int count = 1;

    private Image sprite;


    public MainPage()

    {

        InitializeComponent();


        sprite = new Image()

        {

            Width = 150,

            Height = 150

        };


        Carrier.Children.Add(sprite);


        //init DispatcherTimer

        DispatcherTimer dispatcherTimer = new DispatcherTimer();

        dispatcherTimer.Tick += dispatcherTimer_Tick;

        dispatcherTimer.Interval = TimeSpan.FromMilliseconds(150);

        dispatcherTimer.Start();

    }


    void dispatcherTimer_Tick(object sender, EventArgs e)

    {

        sprite.Source = new BitmapImage(new Uri(@"/Images/Role/" + count + ".png", UriKind.Relative));


        count = count == 7 ? 0 : count + 1;

    }

}
In the code above, I declare a variable named count, to save the current frame showing which picture. Then I create an Image control named sprite and throw it in the Carrier as a child control. Up to now, the leader is coming.
In the sprite’s 2D animation, we always use DispatcherTimer to control the sprite’s action. We implement the picture switching in the function dispatcherTimer_Tick: change the picture index per 150ms, if the count equals to 7, it means the animation has arrived the last frame, it need to go to the first frame, so we set count=0; otherwise, count increase by 1. So the animation will be a circle.
OK, press Ctrl+F5, you will find the sprite can run now, although without no moving, We have achieved great success.
Summary: This chapter introduce how to implement object’s own animation.
Next chapter, I will introduce another method to implement the same animation effect as the one in this chapter. Please focus on it.
Chinese friend, you can also visit this Chinese blog if you feel difficult to read English, http://www.cnblogs.com/alamiye010/archive/2009/06/17/1505335.html, part of my article is base on it.
Demo download: http://silverlightrpg.codeplex.com/releases/view/40978


