Protocol协议及委托代理(Delegate)传值
前言:因为Object-C是不支持多继承的,所以很多时候都是用Protocol(协议)来代替。Protocol(协议)只能定义公用的一套接口,但不能提供具体的实现方法。也就是说,它只告诉你要做什么,但具体怎么做,它不关心。
当一个类要使用某一个Protocol(协议)时,都必须要遵守协议。比如有些必要实现的方法,你没有去实现,那么编译器就会报警告,来提醒你没有遵守××协议。注意,我这里说的是警告,而不是错误。对的,就算你不实现那些“必要实现”的方法,程序也是能运行的,只不过多了些警告。
我会在本文的结尾放上此Demo的下载地址,有需要的话可以去下载,谢谢。
Protocol(协议)的作用:
1. 定义一套公用的接口(Public)
-
@required:必须实现的方法
-
@optional:可选 实现的方法(可以全部都不实现)
2. 委托代理(Delegate)传值:
它本身是一个设计模式,它的意思是委托别人去做某事。
比如:两个类之间的传值,类A调用类B的方法,类B在执行过程中遇到问题通知类A,这时候我们需要用到代理(Delegate)。
又比如:控制器(Controller)与控制器(Controller)之间的传值,从C1跳转到C2,再从C2返回到C1时需要通知C1更新UI或者是做其它的事情,这时候我们就用到了代理(Delegate)传值。
一、定义一套公用的接口(Public)
首先新建一个协议文件:
填上协议文件名及文件类型(选择Protocol):
ProtocolDelegate.h代码(协议不会生成.m文件):
 1 #import @protocol ProtocolDelegate // 必须实现的方法
 2 @required
 3 - (void)error;
 4
 5 // 可选实现的方法
 6 @optional
 7 - (void)other;
 8 - (void)other2;
 9 - (void)other3;
10
11 @end
在需要使用到协议的类,import它的头文件:
1 #import "ViewController.h"
2 #import "ProtocolDelegate.h"
我这里选择的是入口文件
记得要遵守协议:
@interface ViewController () @end
这时会报一个警告,因为定义的协议里有一个是必须实现的方法,而我们没有去实现:
实现了必须实现的方法后,编译器就不会报警告了:
至于其它的可选方法,你可以选择实现,也可以全都不实现。
二、委托代理(Delegate)传值
在Storyboard上,先搭好界面,如下图:
新建ControllerB:
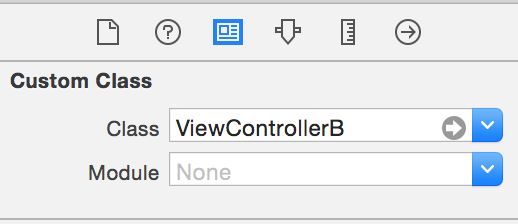
把B界面的类设置为ViewControllerB:
下面放出主要类文件代码,我在里面写了注释,大家应该能看懂。不懂也没有关系,我会在本文结尾放上Demo下载地址。
ViewController.m文件:
 1 #import "ViewController.h"
 2 #import "ProtocolDelegate.h"
 3 #import "ViewControllerB.h"
 4 @interface ViewController () @end
 5 @implementation ViewController
 6 - (void)prepareForSegue:(UIStoryboardSegue *)segue sender:(id)sender
 7 {
 8   ViewControllerB *vc = segue.destinationViewController;
 9   [vc setDelegate:self];
10 }
11 // 这里实现B控制器的协议方法
12 - (void)sendValue:(NSString *)value
13 {
14   UIAlertView *alertView = [[UIAlertView alloc] initWithTitle:@"成功" message:value delegate:nil cancelButtonTitle:@"确定" otherButtonTitles:nil, nil];
15   [alertView show];
16 }
17 - (void)error
18 {
19 }
20 @end
ViewControllerB.h文件:
 1 #import // 新建一个协议,协议的名字一般是由“类名+Delegate”
 2 @protocol ViewControllerBDelegate // 代理传值方法
 3 - (void)sendValue:(NSString *)value;
 4
 5 @end
 6
 7 @interface ViewControllerB : UIViewController
 8
 9 // 委托代理人,代理一般需使用弱引用(weak)
10 @property (weak, nonatomic) id delegate;
11
12 @end
ViewControllerB.m文件:
 1 #import "ViewControllerB.h"
 2 @interface ViewControllerB ()
 3 @property (strong, nonatomic) IBOutlet UITextField *textField;
 4 @end
 5 @implementation ViewControllerB
 6 - (IBAction)backAction:(id)sender
 7 {
 8   if ([_delegate respondsToSelector:@selector(sendValue:)]) { // 如果协议响应了sendValue:方法
 9     [_delegate sendValue:_textField.text]; // 通知执行协议方法
10   }
11   [self.navigationController popViewControllerAnimated:YES];
12 }
13 @end
完成效果截图:
小结:
当你需要定义一套公用的接口,实现方法可以是不同的时候,你可以使用Protocol协议。
当你需要进行类与类之间的传值时,你也可以基于Protocol协议,使用代理设计模式进行传值。
Demo测试通过环境:
-
开发工具:Xcode6.1
-
测试机型:模拟器
-
测试系统:IOS8.0
Demo下载地址: GCProtocol&Delegate


