LVS快速搭建教程
LVS配置教程
作者:oldjiang
一、前言
相信专程来读此文的读者对LVS必然有一定的了解,首先看图:
毋庸置疑,Load Balancer是负载调度器,由它将网络请求无缝隙调度到真实服务器,至于此集群使用的是哪一种IP负载均衡技术(LVS有三种负载均衡技术,分别是VS/NAT、VS/TUN和VS/DR),暂时不用理会。
观察此图,我们知道,LVS与其他基于应用层或基于IP层的负载均衡应用拥有类似的一点:一台及其以上的负载调度器和数台甚至成百上千台真实服务器。
用LVS来搭建负载均衡集群,理论上来说,只需要在负载调度器上安装LVS核心软件ipvs和ipvs的功能实现软件ipvsadm,而真实服务器无需额外安装软件。
当前,大部分Linux发行版本已经集成了ipvs,因此我们只需要安装它的实现软件ipvsadm即可。
在安装这个软件的时候,我们不需要考虑我们将使用哪一种IP负载均衡技术,直接安装即可。
二、安装ipvs
1、检查Load Balancer服务器是否已支持ipvs。
modprobe -l|grep ipvs
若有类似以下输出,则表示服务器已支持ipvs:
若服务器不支持ipvs,则需要手动下载ipvs并编译安装,相信你们的Linux版本都已支持ipvs,所以我不在此讨论如何在内核安装ipvs,有兴趣的朋友可以关注我的博客,在稍后时间内,我会放出ipvs的编译安装方法。
2、检查是否有必须的依赖包:Kernel-devel、gcc、openssl、openssl-devel、popt 。
rpm -q kernel-devel
rpm -q gcc
rpm -q openssl
rpm -q openssl-devel
rpm -q popt
若有类似以下输出,则表示服务器已安装这些依赖包:
若服务器输出”package ** is not installed”则表示该包未安装,在安装光盘找到该rpm文件,并上传至服务器安装,不会安装的读者请谷歌,网上有详细教程,我就不在此处献丑。
3、在Load Balancer服务器上安装ipvsadm。
访问官网下载ipvsadm软件:http://www.linuxvirtualserver.org
很多新人在下载ipvsadm时犯了个小错误,直接在官网上下载个最高版本的tar.gz包到服务器上进行安装,而忽略了官网的说明。
1)、下载ipvsadm之前,先使用以下命令查看当前Load Balancer服务器内核版本:
rpm -q kernel-devel
这是我的输出:
![]()
其中被我手动标注红色的数字就是我的服务器内核版本,根据这个版本号到官网上下载对应该内核版本的ipvsadm版本。
我的2.6.18对应的ipvsadm版本为1.24,下载ipvsadm-1.24.tar.gz文件,1.25和1.26需要2.6.28-rc3及其以上的内核版本,请根据你的内核版本下载相应的安装文件,后续的安装步骤一致,不用担心。你也可以选择下载rpm包进行安装,在此不做讨论。
2)、解压安装包。
tar -zxvf ipvsadm-1.24.tar.gz
3)、建立编译所需要的软链接。
ln -s /usr/src/kernels/2.6.18-164.el5-i686 /usr/src/linux
其中的“/usr/src/kernels/2.6.18-164.el5-i686”是你当前允许内核的所在的位置,“/usr/src/kernels”下可能有多个目录,请根据你的实际情况修改此命令。
4)、编译并安装ipvsadm。
进入ipvsadm-1.24所在目录,执行以下命令:
make && make install
若没有错误提示,则安装成功,使用ipvsadm命令验证:
三、集群部署
在此之前,我们未曾提过LVS提供的三种IP负载均衡技术运用,但是此时我们的负载调度器上的ipvs已经安装好了。接下来,就是要部署负载均衡环境的时候了,此时我们就需要考虑我们将使用哪一种方案来搭建我们的环境。
不过在实际的生产过程中,使用VS/NAT或者VS/TUN亦或VS/DR,肯定在我们部署网络环境的时候就考虑到了,只是我为了方便新手更好地理解LVS,才在此处提到这一点。
以下介绍三种调度方式的配置方法。
1、使用VS/NAT调度
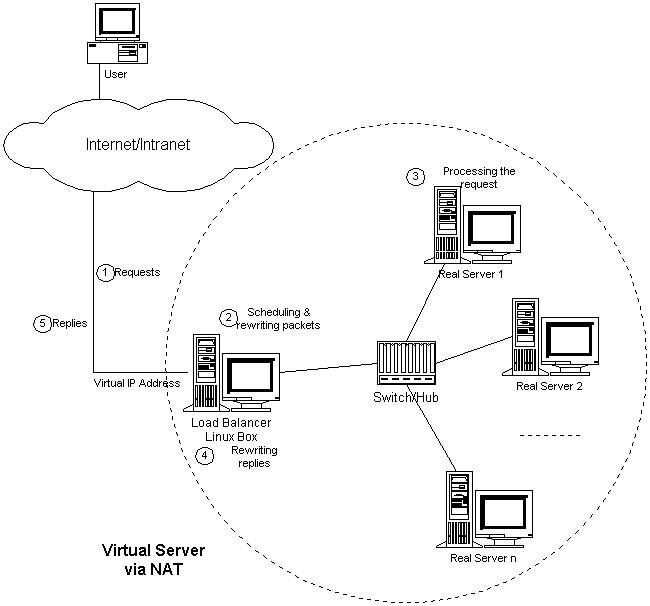
首先要考虑,在什么样的网络环境下,可以使用NAT方式来搭建负载集群,先来一张官方提供的VS/NAT体系结构图:
这幅图就是VS/NAT的体系结构,NAT本身是一种将私有地址转换为合法IP地址的一种技术,在VS/NAT结构中,整个集群系统只有一个对外的合法地址,这个IP在Load Balancer上对外可见,其他的真实服务器与这个调度器组成了一个对外不可见的内网,Internet上的用户访问集群必须通过集群提供的对外IP访问调度器,调度器再利用NAT技术,将真实服务器置于网络上。
形象点比喻,在VS/NAT模式下,调度器就相当于工作在第三层网络层的路由器(这个比喻可能不太恰当,但是便于理解),路由器有一个WAN口,WAN口提供一个在互联网上唯一的且合法的IP地址,同样路由器也有一个LAN口,与局域网中的所有真实服务器连接,真实服务器的网关地址指向路由器的LAN口地址。当用户访问路由器时,路由器会更改数据包包头的目标地址为某个真实服务器中的地址,然后交给该真实服务器处理,当真实服务器处理完毕后,会根据数据包包头的源地址将数据返回给用户,但是由于真实服务器使用的是路由器的IP做为网关,所以真实服务器返回的数据必将经过路由器,路由器在接收到数据包后,将数据包包头的源地址(由真实服务器发出的数据包源地址为真实服务器的内网IP)修改为WAN口地址,然后根据数据包的目标地址再发送给用户。这种数据传输模式也是VS/NAT的数据传输模式。
以上的理论知识很重要,如果没有把VS/NAT的体系结构和网络模式搞清楚,以下的配置步骤即使搞清楚了,也难以理解其如此配置的原因。
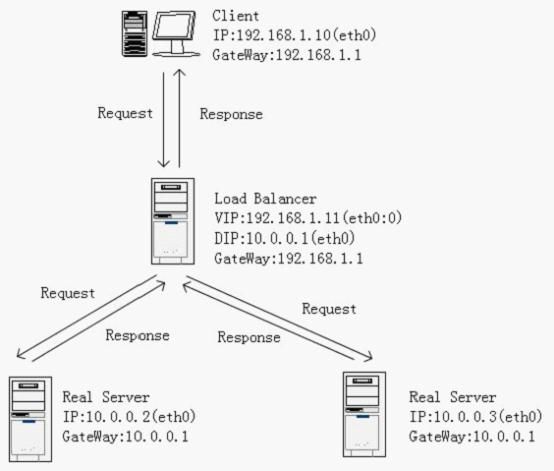
好了,根据以上描述的网络模型,画出我的拓扑图:
Load Balnacer和Client在模拟出的外网中,使用同一网段:192.168.1.0-255。Load Balancer与两台真实服务器在同一个局域网中,网段为:10.0.0.0-255。
我们可以使用VMware建立三个虚拟主机,全部装载Linux2.6以上的版本,三台虚拟主机以Bridged(桥接)的方式联网。其中一台虚拟主机用作Load Balancer,另外两台用作真实服务器。
1、在Load Balancer上运行以下脚本(由Joseph Mack提供):
#!/bin/sh
#------mini-HOWTO-setup-LVS-NAT-director----------

#set ip_forward ON for vs-nat director (1 on, 0 off).
cat /proc/sys/net/ipv4/ip_forward
echo "1" >/proc/sys/net/ipv4/ip_forward

#director is gw for realservers
#turn OFF icmp redirects (1 on, 0 off)
echo "0" >/proc/sys/net/ipv4/conf/all/send_redirects
cat       /proc/sys/net/ipv4/conf/all/send_redirects
echo "0" >/proc/sys/net/ipv4/conf/default/send_redirects
cat       /proc/sys/net/ipv4/conf/default/send_redirects
echo "0" >/proc/sys/net/ipv4/conf/eth0/send_redirects
cat       /proc/sys/net/ipv4/conf/eth0/send_redirects

#setup DIP
/sbin/ifconfig eth0 10.0.0.1 broadcast 10.0.0.255 netmask 255.255.255.0

#setup VIP
/sbin/ifconfig eth0:0 192.168.1.11 broadcast 192.168.1.255 netmask 255.255.255.0

#set default gateway
/sbin/route add default gw 192.168.1.1 netmask 0.0.0.0 metric 1

#clear ipvsadm tables
/sbin/ipvsadm -C

#install LVS services with ipvsadm
#add telnet to VIP with rr sheduling
/sbin/ipvsadm -A -t 192.168.1.11:80 -s rr

#first realserver
#forward telnet to realserver 10.0.0.2 using LVS-NAT (-m), with weight=1
/sbin/ipvsadm -a -t 192.168.1.11:80 -r 10.0.0.2:80 -m -w 1
#check that realserver is reachable from director
ping -c 1 10.0.0.2
#second realserver
#forward telnet to realserver 10.0.0.3 using LVS-NAT (-m), with weight=1
/sbin/ipvsadm -a -t 192.168.1.11:80 -r 10.0.0.3:80 -m -w 1
#checking if realserver is reachable from director
ping -c 1 10.0.0.3

#list ipvsadm table
/sbin/ipvsadm
#------mini-HOWTO-setup-LVS-NAT-director----------
2、在第一台Real Server上运行以下脚本:
#!/bin/sh
#---------mini-HOWTO-setup-LVS-NAT-realserver-------
#setup IP
/sbin/ifconfig eth0 10.0.0.2 broadcast 10.0.0.255 netmask 255.255.255.0
#installing default gw 10.0.0.1 for vs-nat'
/sbin/route add default gw 10.0.0.1
#show routing table
/bin/netstat -rn

#checking if DEFAULT_GW is reachable
ping -c 1 10.0.0.1

#looking for VIP on director from realserver
ping -c 1 10.0.0.3

#set_realserver_ip_forwarding to OFF (1 on, 0 off).
echo "0" >/proc/sys/net/ipv4/ip_forward
cat       /proc/sys/net/ipv4/ip_forward
#---------mini-HOWTO-setup-LVS-NAT-realserver-------
3、在第二台Real Server上运行以下脚本:
#!/bin/sh
#---------mini-HOWTO-setup-LVS-NAT-realserver-------
#setup IP
/sbin/ifconfig eth0 10.0.0.3 broadcast 10.0.0.255 netmask 255.255.255.0
#installing default gw 10.0.0.1 for vs-nat'
/sbin/route add default gw 10.0.0.1
#show routing table
/bin/netstat -rn

#checking if DEFAULT_GW is reachable
ping -c 1 10.0.0.1

#looking for VIP on director from realserver
ping -c 1 10.0.0.2

#set_realserver_ip_forwarding to OFF (1 on, 0 off).
echo "0" >/proc/sys/net/ipv4/ip_forward
cat       /proc/sys/net/ipv4/ip_forward
#---------mini-HOWTO-setup-LVS-NAT-realserver-------
运行方法如下:
1)、可以用类似lvs_server命名文件,保存至任意位置。
2)、给予该文件执行权限。
chmod +x lvs_server
3)、执行该脚本。
./lvs server
运行完成后,访问VIP(http://192.168.1.11),查看结果,第一个客户机显示:
第二个客户机显示:
注意事项:
1、VS/NAT的真实服务器可以使用任何机器,任何操作系统,支持大部分的网络服务(如:httpd、ftpd、telnetd等等),唯一的要求就是真实服务器必须支持TCP/IP,不过我们可以忽略这样要求。
2、在VS/NAT模式下,必须打开Load Balancer的ip_forward,关闭ICMP重定向。
3、所有的真实服务器网关地址必须指向到调度器的内网地址。
4、你的真实服务器上必须已部署好http服务器,并为缺省主页写入不同的内容以测试调度器调度结果。
5、客户机和真实服务器在两个不同的网络中,理论上也可以在一个网络中,需要做一些额外的设置。
2、使用VS/DR调度
首先,我们看一下,VS/DR在什么样的网络环境下使用,上图:
该图是官方提供的VS/DR体系结构图,在VS/DR模式下,Load Balancer和所有的Real Server在物理上有一个网卡通过不分断的局域网相连,调度器和真实服务器必须绑定同一VIP,该VIP在调度器上对外可见,而真实服务器上只需将VIP配置在Non-ARP网络设备上,它对外不可见,只是用于欺骗真实服务器用于处理目标地址为VIP的网络请求。真实服务器将请求处理后,直接返回给用户,不需要在通过调度器返回,所以在VS/DR模式下,真实服务器的网关地址不需要指向调度器。
该原理非常重要,只有理解VS/DR的工作原理,在配置的过程中才能了然于胸,我的叙述太过简略,若有不理解的地方,请到LVS官方网站查看。
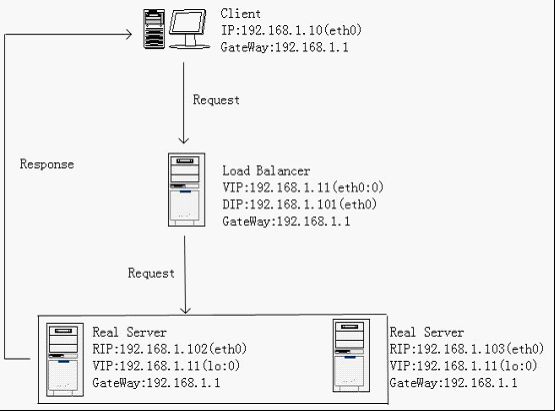
来一个简单的拓扑图:
为了简化模拟过程,所有的机器全部在一个网段下,客户机的IP是192.168.1.10,Load Balancer同样提供一个对外可见的VIP192.168.1.11,其DIP与真实服务器在一个不分段的局域网中,可以使用交换机或者集线器连接,网关全部指向192.168.1.1。当然,你的真实服务器也可以使用其他路由器提供的互联网服务,只需要把网关指向它即可。
1、在Load Balancer上运行以下脚本(由Joseph Mack提供):
#!/bin/bash
#---------------mini-rc.lvs_dr-director------------------------
#set ip_forward OFF for lvs-dr director (1 on, 0 off)
#(there is no forwarding in the conventional sense for LVS-DR)
cat       /proc/sys/net/ipv4/ip_forward
echo "0" >/proc/sys/net/ipv4/ip_forward

#director is not gw for realservers: leave icmp redirects on
echo 'setting icmp redirects (1 on, 0 off) '
echo "1" >/proc/sys/net/ipv4/conf/all/send_redirects
cat       /proc/sys/net/ipv4/conf/all/send_redirects
echo "1" >/proc/sys/net/ipv4/conf/default/send_redirects
cat       /proc/sys/net/ipv4/conf/default/send_redirects
echo "1" >/proc/sys/net/ipv4/conf/eth0/send_redirects
cat       /proc/sys/net/ipv4/conf/eth0/send_redirects

#setup DIP
/sbin/ifconfig eth0 192.168.1.101 broadcast 192.168.1.255 netmask 255.255.255.0

#add ethernet device and routing for VIP 192.168.1.11
/sbin/ifconfig eth0:0 192.168.1.11 broadcast 192.168.1.11 netmask 255.255.255.255
/sbin/route add -host 192.168.1.11 dev eth0:0
#listing ifconfig info for VIP 192.168.1.11
/sbin/ifconfig eth0:0

#check VIP 192.168.1.11 is reachable from self (director)
/bin/ping -c 1 192.168.1.11
#listing routing info for VIP 192.168.1.11
/bin/netstat -rn

#setup_ipvsadm_table
#clear ipvsadm table
/sbin/ipvsadm -C
#installing LVS services with ipvsadm
#add telnet to VIP with round robin scheduling
/sbin/ipvsadm -A -t 192.168.1.11:80 -s rr

#forward telnet to realserver using direct routing with weight 1
/sbin/ipvsadm -a -t 192.168.1.11:80 -r 192.168.1.102:80 -g -w 1
#check realserver reachable from director
ping -c 1 192.168.1.102

#forward telnet to realserver using direct routing with weight 1
/sbin/ipvsadm -a -t 192.168.1.11:80 -r 192.168.1.103:80 -g -w 1
#check realserver reachable from director
ping -c 1 192.168.1.103

#displaying ipvsadm settings
/sbin/ipvsadm

#not installing a default gw for LVS_TYPE vs-dr
#---------------mini-rc.lvs_dr-director------------------------
2、在第一台Real Server上运行以下脚本:
#!/bin/bash
#----------mini-rc.lvs_dr-realserver------------------
#setup IP
/sbin/ifconfig eth0 192.168.1.102 broadcast 192.168.1.255 netmask 255.255.255.0
#installing default gw 192.168.1.1 for vs-dr
/sbin/route add default gw 192.168.1.1
#showing routing table
/bin/netstat -rn
#checking if DEFAULT_GW 192.168.1.1 is reachable
ping -c 1 192.168.1.1

#set_realserver_ip_forwarding to OFF (1 on, 0 off).
echo "0" >/proc/sys/net/ipv4/ip_forward
cat       /proc/sys/net/ipv4/ip_forward

#looking for DIP 192.168.1.101
ping -c 1 192.168.1.101

#looking for VIP (will be on director)
ping -c 1 192.168.1.11

#install_realserver_vip
/sbin/ifconfig lo:0 192.168.1.11 broadcast 192.168.1.11 netmask 0xffffffff up
#ifconfig output
/sbin/ifconfig lo:0
#installing route for VIP 192.168.1.11 on device lo:0
/sbin/route add -host 192.168.1.11 dev lo:0
#listing routing info for VIP 192.168.1.11
/bin/netstat -rn

#hiding interface lo:0, will not arp
echo "1" >/proc/sys/net/ipv4/conf/all/hidden
cat       /proc/sys/net/ipv4/conf/all/hidden
echo "1" >/proc/sys/net/ipv4/conf/lo/hidden
cat       /proc/sys/net/ipv4/conf/lo/hidden

#----------mini-rc.lvs_dr-realserver------------------
2、在第二台Real Server上运行以下脚本:
#!/bin/bash
#----------mini-rc.lvs_dr-realserver------------------
#setup IP
/sbin/ifconfig eth0 192.168.1.103 broadcast 192.168.1.255 netmask 255.255.255.0
#installing default gw 192.168.1.1 for vs-dr
/sbin/route add default gw 192.168.1.1
#showing routing table
/bin/netstat -rn
#checking if DEFAULT_GW 192.168.1.1 is reachable
ping -c 1 192.168.1.1

#set_realserver_ip_forwarding to OFF (1 on, 0 off).
echo "0" >/proc/sys/net/ipv4/ip_forward
cat       /proc/sys/net/ipv4/ip_forward

#looking for DIP 192.168.1.101
ping -c 1 192.168.1.101

#looking for VIP (will be on director)
ping -c 1 192.168.1.11

#install_realserver_vip
/sbin/ifconfig lo:0 192.168.1.11 broadcast 192.168.1.11 netmask 0xffffffff up
#ifconfig output
/sbin/ifconfig lo:0
#installing route for VIP 192.168.1.11 on device lo:0
/sbin/route add -host 192.168.1.11 dev lo:0
#listing routing info for VIP 192.168.1.11
/bin/netstat -rn

#hiding interface lo:0, will not arp
echo "1" >/proc/sys/net/ipv4/conf/all/hidden
cat       /proc/sys/net/ipv4/conf/all/hidden
echo "1" >/proc/sys/net/ipv4/conf/lo/hidden
cat       /proc/sys/net/ipv4/conf/lo/hidden

#----------mini-rc.lvs_dr-realserver------------------
脚本执行方法请参考VS/NAT模式。
运行完成后,访问VIP(http://192.168.1.11),查看结果,第一个客户机显示:
第二个客户机显示:
![]()
注意事项:
1、基本上大部分搭载着unices和Microsoft OS的服务器都可以在VS/DR模式下作为真实服务器使用。
2、Load Balancer和所有的Real Server在物理上必须有一个网卡通过不分断的局域网相连。
3、调度器上的VIP地址对外可见;真实服务器必须将VIP绑定到Nor-ARP网卡上,它对外不可见,只是用于欺骗真实服务器用于处理目标地址为VIP的网络请求。
4、在VS/DR模式下,无需使用ip_forward功能,因此为了安全考虑,关闭了该功能。
5、真实服务器不再使用调度器作为网关,因此打开调度器的ICMP重定向。
4、你的真实服务器上必须已部署好http服务器,并为缺省主页写入不同的内容以测试调度器调度结果。
3、使用VS/TUN调度
VS/TUN在生成中很少使用,因其条件较为苛刻,但是其与另外两种模式相比较,也有其独特的优势之处,首先上图:
在这个体系结构中,调度器根据各个服务器的负载情况,动态地选择一台服务器,将请求报文封装在另一个IP报文中,再将封装后的IP报文转发给选出的服务器;服务器收到报文后,先将报文解封获得原来目标地址为VIP的报文,服务器发现VIP地址被配置在本地的IP隧道设备上,所以就处理这个请求,然后根据路由表将响应报文直接返回给客户。
因此,VS/TUN的设置与VS/DR有部分相似之处,VS/TUN的调度器和真实服务器也需要绑定一个VIP,不同的是VS/TUN模式下,VIP绑定的网卡与VS/DR不同,因为VS/TUN需要ip隧道支持。
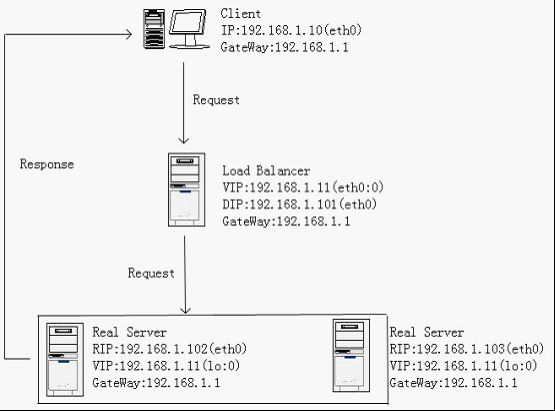
拓扑图与VS/DR一致:
模拟过程中,所有的机器全部在一个网段下,客户机的IP是192.168.1.10,Load Balancer同样提供一个对外可见的VIP192.168.1.11。
VS/TUN模式无需调度器和所有的真实服务器必须在一个不间断的局域网中,即使你的调度器在北京,但是你的真实服务器在美国、英国甚至条件允许的话,你的真是服务器在月球上,也是允许的。
在我的模拟中,为了简化了模拟环境,所有机器全部在一个网段,网关全部指向192.168.1.1。
1、在Load Balancer上运行以下脚本:
#!/bin/bash
#---------------mini-rc.lvs_dr-director------------------------
#set ip_forward OFF for lvs-dr director (1 on, 0 off)
#(there is no forwarding in the conventional sense for LVS-DR)
cat       /proc/sys/net/ipv4/ip_forward
echo "0" >/proc/sys/net/ipv4/ip_forward

#director is not gw for realservers: leave icmp redirects on
echo 'setting icmp redirects (1 on, 0 off) '
echo "1" >/proc/sys/net/ipv4/conf/all/send_redirects
cat       /proc/sys/net/ipv4/conf/all/send_redirects
echo "1" >/proc/sys/net/ipv4/conf/default/send_redirects
cat       /proc/sys/net/ipv4/conf/default/send_redirects
echo "1" >/proc/sys/net/ipv4/conf/eth0/send_redirects
cat       /proc/sys/net/ipv4/conf/eth0/send_redirects

#setup DIP
/sbin/ifconfig eth0 192.168.1.101 broadcast 192.168.1.255 netmask 255.255.255.0

#add ethernet device and routing for VIP 192.168.1.11
/sbin/ifconfig tunl0 192.168.1.11 broadcast 192.168.1.11 netmask 255.255.255.255
/sbin/route add -host 192.168.1.11 dev tunl0
#listing ifconfig info for VIP 192.168.1.11
/sbin/ifconfig tunl0

#check VIP 192.168.1.11 is reachable from self (director)
/bin/ping -c 1 192.168.1.11
#listing routing info for VIP 192.168.1.11
/bin/netstat -rn

#setup_ipvsadm_table
#clear ipvsadm table
/sbin/ipvsadm -C
#installing LVS services with ipvsadm
#add telnet to VIP with round robin scheduling
/sbin/ipvsadm -A -t 192.168.1.11:80 -s rr

#forward telnet to realserver using direct routing with weight 1
/sbin/ipvsadm -a -t 192.168.1.11:80 -r 192.168.1.102:80 -i -w 1
#check realserver reachable from director
ping -c 1 192.168.1.102

#forward telnet to realserver using direct routing with weight 1
/sbin/ipvsadm -a -t 192.168.1.11:80 -r 192.168.1.103:80 -i -w 1
#check realserver reachable from director
ping -c 1 192.168.1.103

#displaying ipvsadm settings
/sbin/ipvsadm

#not installing a default gw for LVS_TYPE vs-dr
#---------------mini-rc.lvs_dr-director------------------------
2、在第一台Real Server上运行以下脚本:
#!/bin/bash
#----------mini-rc.lvs_dr-realserver------------------
#setup IP
/sbin/ifconfig eth0 192.168.1.102 broadcast 192.168.1.255 netmask 255.255.255.0
#installing default gw 192.168.1.1 for vs-dr
/sbin/route add default gw 192.168.1.1
#showing routing table
/bin/netstat -rn
#checking if DEFAULT_GW 192.168.1.1 is reachable
ping -c 1 192.168.1.1

#set_realserver_ip_forwarding to OFF (1 on, 0 off).
echo "0" >/proc/sys/net/ipv4/ip_forward
cat       /proc/sys/net/ipv4/ip_forward

#looking for DIP 192.168.1.101
ping -c 1 192.168.1.101

#looking for VIP (will be on director)
ping -c 1 192.168.1.11

#install_realserver_vip
/sbin/ifconfig tunl0 192.168.1.11 broadcast 192.168.1.11 netmask 0xffffffff up
#ifconfig output
/sbin/ifconfig tunl0
#installing route for VIP 192.168.1.11 on device tunl0
/sbin/route add -host 192.168.1.11 dev tunl0
#listing routing info for VIP 192.168.1.11
/bin/netstat -rn

#hiding interface tunl0, will not arp
echo "1" >/proc/sys/net/ipv4/conf/all/hidden
cat       /proc/sys/net/ipv4/conf/all/hidden
echo "1" >/proc/sys/net/ipv4/conf/tunl0/hidden
cat       /proc/sys/net/ipv4/conf/tunl0/hidden

#----------mini-rc.lvs_dr-realserver------------------
3、在第二台Real Server上运行以下脚本:
#!/bin/bash
#----------mini-rc.lvs_dr-realserver------------------
#setup IP
/sbin/ifconfig eth0 192.168.1.103 broadcast 192.168.1.255 netmask 255.255.255.0
#installing default gw 192.168.1.1 for vs-dr
/sbin/route add default gw 192.168.1.1
#showing routing table
/bin/netstat -rn
#checking if DEFAULT_GW 192.168.1.1 is reachable
ping -c 1 192.168.1.1

#set_realserver_ip_forwarding to OFF (1 on, 0 off).
echo "0" >/proc/sys/net/ipv4/ip_forward
cat       /proc/sys/net/ipv4/ip_forward

#looking for DIP 192.168.1.101
ping -c 1 192.168.1.101

#looking for VIP (will be on director)
ping -c 1 192.168.1.11

#install_realserver_vip
/sbin/ifconfig tunl0 192.168.1.11 broadcast 192.168.1.11 netmask 0xffffffff up
#ifconfig output
/sbin/ifconfig tunl0
#installing route for VIP 192.168.1.11 on device tunl0
/sbin/route add -host 192.168.1.11 dev tunl0
#listing routing info for VIP 192.168.1.11
/bin/netstat -rn

#hiding interface tunl0, will not arp
echo "1" >/proc/sys/net/ipv4/conf/all/hidden
cat       /proc/sys/net/ipv4/conf/all/hidden
echo "1" >/proc/sys/net/ipv4/conf/tunl0/hidden
cat       /proc/sys/net/ipv4/conf/tunl0/hidden

#----------mini-rc.lvs_dr-realserver------------------
脚本执行方法请参考VS/NAT模式。
运行完成后,访问VIP(http://192.168.1.11),查看结果,第一个客户机显示:
第二个客户机显示:
![]()
注意事项:
1、 VS/TUN模式下的所有真实服务器必须使用Linux系统,因为迄今为止,只有Linux系统支持隧道技术。
2、 Load Balancer和Real Server的VIP必须绑定在tunl0网卡上,且关闭Real Server网卡tunl0的arp功能。
3、 你的真实服务器上必须已部署好http服务器,并为缺省主页写入不同的内容以测试调度器调度结果。


