axis2_1.6.2之构建web端和客户端
参考资料:
http://blog.csdn.net/apei830/article/details/5448897
axis2的官网
http://axis.apache.org/axis2/java/core/docs/pojoguide.html
1、先来构建web端,搭建服务平台
a、从这 http://axis.apache.org/axis2/java/core/download.cgi 下载 axis2-1.6.2-war.zip
然后将里面的 axis2-web文件夹复制到你新建的java web的WerRoot下面
将axis2\WEB-INF\lib包里面的jar复制到你的lib下
b、然后配置你的web.xml文件 加上AxisServlet配置 并且修改你项目的首页
<?xml version="1.0" encoding="UTF-8"?>
<web-app version="2.5"
	xmlns="http://java.sun.com/xml/ns/javaee"
	xmlns:xsi="http://www.w3.org/2001/XMLSchema-instance"
	xsi:schemaLocation="http://java.sun.com/xml/ns/javaee
	http://java.sun.com/xml/ns/javaee/web-app_2_5.xsd">
  <welcome-file-list>
    <welcome-file>/axis2-web/index.jsp</welcome-file>
  </welcome-file-list>

  <servlet>
  	<servlet-name>AxisServlet</servlet-name>
  	<servlet-class>org.apache.axis2.transport.http.AxisServlet</servlet-class>
  </servlet>

  <servlet-mapping>
  	<servlet-name>AxisServlet</servlet-name>
  	<url-pattern>/services/*</url-pattern>
  </servlet-mapping>

</web-app>
c、构建你对外发布的服务 这里测试用的 如下 包含对外两个方法
一个输入文本 返回文本
一个上传二进制文件 返回布尔值
package com.undergrowth.ws.test;

import java.io.File;
import java.io.FileInputStream;
import java.io.FileOutputStream;
import java.io.IOException;
import java.io.InputStream;

import javax.activation.DataHandler;

public class WSTest {

	public String sayHello(String name){
		return name+"\tHello World\t"+"WebServices Axis2";
	}

	public  boolean uploadWithDataHandle(DataHandler dHandler,String fileName){

		FileOutputStream fos=null;
		try {
			File file=new File("d:/upload_res/");
			if(!file.exists()) file.mkdir();
			fos=new FileOutputStream(new File(file,fileName));
			writeFileToOutput(fos,dHandler.getInputStream());
			System.out.println("上传成功!");
			fos.close();
		} catch (Exception e) {
			// TODO: handle exception
			e.printStackTrace();
			return false;
		}finally{
			if(fos!=null){
				try {
					fos.close();
				} catch (IOException e) {
					// TODO Auto-generated catch block
					e.printStackTrace();
				}
			}
		}

		return true;
	}

	private void writeFileToOutput(FileOutputStream fos, InputStream inputStream) throws IOException {
		// TODO Auto-generated method stub
		int n=0;
		byte[] data=new byte[1024*8];
		while((n=inputStream.read(data))!=-1){
			fos.write(data,0,n);
		}
	}

}
d、向AXIS2的框架描述你要提供的服务 即services.xml文件
<?xml version="1.0" encoding="UTF-8"?>
<serviceGroup>
       <service name="WSTest">
              <description>Web Service例子</description>
              <parameter name="ServiceClass">com.undergrowth.ws.test.WSTest</parameter>
              <messageReceivers>
                     <messageReceiver mep="http://www.w3.org/2004/08/wsdl/in-out" class="org.apache.axis2.rpc.receivers.RPCMessageReceiver" />
              </messageReceivers>
       </service>
</serviceGroup>
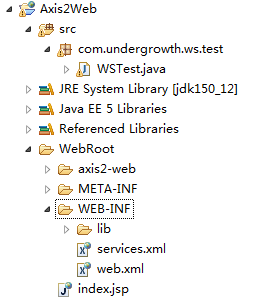
对于services.xml文件的位置 只用放在你项目的web-inf下面即可 当然还有很多种放置方式
对于services.xml的文件位置 我查看了AsixServlet源码 有如下这么一段 关于services.xml的放置位置的
当然中间经过很多转换 最终是在 WarBasedAxisConfigurator类下有这么一个方法
public void loadServices() {
		String repository = config.getInitParameter("axis2.repository.path");
		if (repository != null) {
			super.loadServices();
			log.debug((new StringBuilder()).append(
					"loaded services from path: ").append(repository)
					.toString());
			return;
		}
		String repository = config.getInitParameter("axis2.repository.url");
		if (repository != null) {
			loadServicesFromUrl(new URL(repository));
			log.debug((new StringBuilder())
					.append("loaded services from URL: ").append(repository)
					.toString());
			return;
		}
		loadServicesFromWebInf();
		if (config.getServletContext().getRealPath("") != null
				|| config.getServletContext().getRealPath("/") != null) {
			super.loadServices();
			log.debug("loaded services from webapp");
			return;
		}
		try {
			URL url = config.getServletContext().getResource("/WEB-INF/");
			if (url != null) {
				loadServicesFromUrl(url);
				log.debug("loaded services from /WEB-INF/ folder (URL)");
			}
		} catch (MalformedURLException e) {
			log.info(e.getMessage());
		}
		return;
	}
接下来有一个方法
private void loadServicesFromWebInf() {
		try {
			InputStream servicexml = config.getServletContext()
					.getResourceAsStream("/WEB-INF/services.xml");
			if (servicexml != null) {
				HashMap wsdlServices = new HashMap();
				ArchiveReader archiveReader = new ArchiveReader();
				String path = config.getServletContext()
						.getRealPath("/WEB-INF");
				if (path != null)
					archiveReader.processFilesInFolder(new File(path),
							wsdlServices);
				org.apache.axis2.description.AxisServiceGroup serviceGroup = DeploymentEngine
						.buildServiceGroup(servicexml, Thread.currentThread()
								.getContextClassLoader(), "annonServiceGroup",
								configContext, archiveReader, wsdlServices);
				axisConfig.addServiceGroup(serviceGroup);
			}
		} catch (AxisFault axisFault) {
			log.info(axisFault);
		} catch (FileNotFoundException e) {
			log.info(e);
		} catch (XMLStreamException e) {
			log.info(e);
		}
	}
看上面那个方法 就是从web-inf下面获取services.xml文件啊 然后调用
axisConfig.addServiceGroup(serviceGroup);
添加axisConfig.addServiceGroup 添加ajaxService
附 目录结构如下:

e、经过上面几步 发布项目 测试
http://localhost:8888/Axis2Web/
http://localhost:8888/Axis2Web/services/WSTest?wsdl
2、构建客户端 客户端也有很多中方式 这里采用 RPCServiceClient 进行调用
调用HelloWorld
package com.undergrowth.webservices;

import javax.xml.namespace.QName;

import org.apache.axis2.AxisFault;
import org.apache.axis2.addressing.EndpointReference;
import org.apache.axis2.rpc.client.RPCServiceClient;

public class RPCClientHelloWorld {

	/**
	 * @param args
	 */
	public static void main(String[] args) {
		// TODO Auto-generated method stub

		try {
			//1.创建webServices客户端
			RPCServiceClient rpClient=new RPCServiceClient();
			rpClient.getOptions().setTo(new EndpointReference("http://localhost:8888/Axis2Web/services/WSTest"));
			//2.设置调用参数
			QName opEntryQNama=new QName("http://test.ws.undergrowth.com","sayHello");
			//输入参数
			Object[] opEntryArgs=new Object[]{"google"};
			//返回参数
			Class[] returnClassArgs=new Class[]{String.class};
			//3,进行调用
			System.out.println(rpClient.invokeBlocking(opEntryQNama, opEntryArgs, returnClassArgs)[0]);
		} catch (AxisFault e) {
			// TODO Auto-generated catch block
			e.printStackTrace();
		}
	}

}
调用文件上传
package com.undergrowth.webservices;

import javax.activation.DataHandler;
import javax.activation.FileDataSource;
import javax.xml.namespace.QName;

import org.apache.axis2.AxisFault;
import org.apache.axis2.addressing.EndpointReference;
import org.apache.axis2.rpc.client.RPCServiceClient;

public class RPCClientUploadFile {

	/**
	 * @param args
	 */
	public static void main(String[] args) {
		// TODO Auto-generated method stub

		try {
			//1.创建webServices客户端
			RPCServiceClient rpClient=new RPCServiceClient();
			rpClient.getOptions().setTo(new EndpointReference("http://localhost:8888/Axis2Web/services/WSTest"));
			//2.设置调用参数
			QName opEntryQNama=new QName("http://test.ws.undergrowth.com","uploadWithDataHandle");
			//输入参数
			Object[] opEntryArgs=new Object[]{new DataHandler(new FileDataSource("/csg.jpg")),"csg.jpg"};
			//返回参数
			Class[] returnClassArgs=new Class[]{Boolean.class};
			//3,进行调用
			System.out.println("上传结果为:"+rpClient.invokeBlocking(opEntryQNama, opEntryArgs, returnClassArgs)[0]);
		} catch (AxisFault e) {
			// TODO Auto-generated catch block
			e.printStackTrace();
		}
	}

}
好了 记录学习的脚步