TQ210搭载Android4.0.3系统构建之BEEP从驱动到HAL到JNI到应用程序(驱动篇)
上篇LED的驱动程序编写采用混杂设备的方式,此篇Beep的驱动程序的编写采用platform设备驱动,并对platform的机制做个简单的分析。
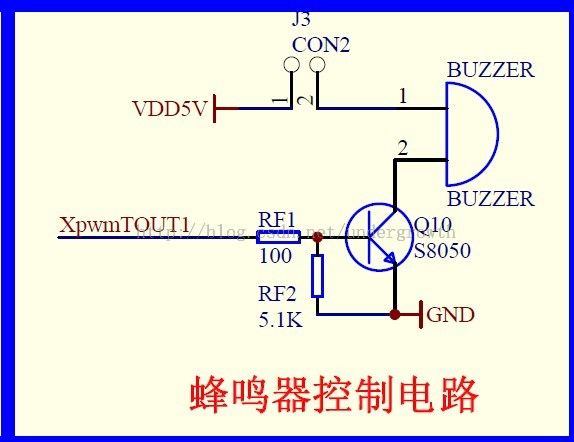
先看硬件电路图

通过一个NPN的三极管控制BUZZER,因为BUZZER是直流电压式驱动,需要三级管提供的放大电流才能发声, 所以只要三极管导通,给XpwmTOUT1高电平,BUZZER即可发声。
platform_device的编写
beep_under_device.c
#include <linux/module.h>
#include <linux/init.h>
#include <linux/printk.h>
#include <linux/platform_device.h>
#include <mach/gpio.h>


static struct resource ress[]=  //设备拥有的资源
{
	[0]={
		.start=S5PV210_GPD0(1),
		.end=S5PV210_GPD0(1),
		.flags=IORESOURCE_IO,
	}
};

static void beep_release(struct device *dev)
{

}

static struct platform_device platform_device_beep_under=  //platform设备
{
	.name="beep_under",  //platform_device 与platform_driver下的driver->name进行匹配
	.id=-1,
	.num_resources=ARRAY_SIZE(ress),
	.resource=ress,
	.dev={
		.release=beep_release,
		},
};

static int __init beep_init(void)  //模块加载初始化
{
	int ret=platform_device_register(&platform_device_beep_under);
	if(ret==0) printk(KERN_INFO "platform device beep _init success.\n");
	else printk(KERN_INFO "platform device beep _init failed.\n");
	return ret;
}

static void __exit beep_exit(void)  //模块卸载
{
	platform_device_unregister(&platform_device_beep_under);
	printk(KERN_INFO "platform device beep _exit success.\n");
}


module_init(beep_init);
module_exit(beep_exit);
MODULE_LICENSE("GPL");
platform_device的Makefile文件
obj-m	:=beep_under_device.o

KERNELDIR	:=~/java/Kernel_3.0.8_TQ210_for_Android_v1.0/
PWD			:=$(shell pwd)

build:kernel_module
kernel_module:
	make -C $(KERNELDIR) M=$(PWD) modules
clean:
	make -C $(KERNELDIR) M=$(PWD) clean
platform_driver的编写
beep_under_driver.c
#include <linux/init.h>
#include <linux/module.h>
#include <linux/fs.h>
#include <linux/printk.h>
#include <linux/platform_device.h>
#include <plat/gpio-cfg.h>
#include <mach/gpio.h>

#define DEVICE_NAME "beep_unders"  //设备文件名
#define BEEP_ON 1   //蜂鸣器发声
#define BEEP_OFF 0
int major;  //主设备号
unsigned long port_beep; //蜂鸣器端口

static struct class *cls;//用于建立class 给device_create使用,让udev自动建立设备文件节点


static int beep_open(struct inode *inode,struct file *file)  //蜂鸣器打开
{
	s3c_gpio_cfgpin(port_beep, S3C_GPIO_SFN(1)); //设置引脚为输出
	gpio_direction_output(port_beep, 0); //设置引脚输出为0
	printk(KERN_INFO "beep_open success.\n");
	return 0;
}

static long beep_ictl(struct file *file,unsigned int cmd, unsigned long arg)  //蜂鸣器控制函数
{
	switch(cmd)
		{
			case BEEP_ON:
				gpio_direction_output(port_beep, BEEP_ON); //设置引脚输出为1
				break;
			case BEEP_OFF:
				gpio_direction_output(port_beep, BEEP_OFF); //设置引脚为0
				break;

		}
	return 0;
}

struct file_operations fops=   //驱动的文件操作
{
	.owner=THIS_MODULE,
	.open=beep_open,
	.unlocked_ioctl=beep_ictl,
};


static int beep_probe(struct platform_device *pdev)  //蜂鸣器探针函数
{
	struct resource *res;  //存储pdev中的设备资源
	res=platform_get_resource(pdev,IORESOURCE_IO, 0); //获取到pdev中的资源
	if(res==NULL) { printk(KERN_INFO "can not get the resource.\n"); return -1;}
	port_beep=res->start;  //获取到控制beep的端口
	major=register_chrdev(0, DEVICE_NAME, &fops); //注册字符设备,分配主设备号,添加到chrdev数组中
	cls=class_create(THIS_MODULE, "beep_under_class");  //创建类cls
	device_create(cls, NULL, MKDEV(major,0), NULL, DEVICE_NAME);  //创建设备节点
	return 0;
}

static int beep_remove(struct platform_device *pdev)  //蜂鸣器删除函数
{
	device_destroy(cls, MKDEV(major,0));  //删除设备节点
	class_destroy(cls);   //删除类
	unregister_chrdev(major, DEVICE_NAME); //卸载字符设备
	return 0;
}

struct platform_driver platform_driver_beep_under=  //蜂鸣器平台驱动
{
	.probe=beep_probe,
	.remove=beep_remove,
	.driver={
		.name="beep_under",  //驱动名称
	},
};

static int __init beep_under_init(void)  //蜂鸣器初始化函数
{
	int ret=platform_driver_register(&platform_driver_beep_under);  //注册platform_driver
	if(ret==0) printk(KERN_INFO "beep_under_init success.\n");  //判断是否成功注册
	else printk(KERN_INFO "beep_under_init failed.\n");
	return ret;
}

static void __exit beep_under_exit(void)  //蜂鸣器卸载函数
{
	platform_driver_unregister(&platform_driver_beep_under); //卸载platform_driver
	printk(KERN_INFO "beep_under_exit success.\n");
}


module_init(beep_under_init);
module_exit(beep_under_exit);
MODULE_LICENSE("GPL");
platform_driver的Makefile编写
obj-m	:=beep_under_driver.o

KERNELDIR	:=~/java/Kernel_3.0.8_TQ210_for_Android_v1.0/
PWD			:=$(shell pwd)

build:kernel_module
kernel_module:
	make -C $(KERNELDIR) M=$(PWD) modules
clean:
	make -C $(KERNELDIR) M=$(PWD) clean
最后是测试文件的编写
beep_under_test.c
#include <fcntl.h>
#include <stdio.h>
#include <stdio.h>
#include <unistd.h>


#define DEVICE_NAME "/dev/beep_unders"
#define BEEP_ON 1
#define BEEP_OFF 0

int main(void)
{
       int fd;
	   fd=open(DEVICE_NAME,O_RDWR);
	   if(fd<0) { printf("can not open fd.\n"); }
	   ioctl(fd,BEEP_ON,1);
		sleep(2);
	    ioctl(fd,BEEP_OFF,1);
          close(fd);
 	return 0;
}
测试文件的编译文件Android.mk
LOCAL_PATH	:=$(call my-dir)
include $(CLEAR_VARS)
LOCAL_MODULE_TAGS	:=eng
LOCAL_SRC_FILES	:=beep_under_test.c
LOCAL_MODULE	:=beep_test
LOCAL_MODULE_PATH	:=$(LOCAL_PATH)
include $(BUILD_EXECUTABLE)
platform设备模型---个人理解
platform_device与platform_driver通过共同的name字段,即platform_device->name与platform_driver->driver->name字段,在platform_bus_type的努力下(也就是platform_bus_type的match函数),匹配在一起(实际上,追踪platform_driver_register的源代码就会发现,最终的匹配函数是在really_probe里面,有三条语句,
dev->driver = drv;
drv->probe(dev);
driver_bound(dev);
)。
上诉代码的第一条语句就是将驱动绑定在了dev上,第二条语句就是调用驱动drv的probe函数(其实也就是platform_driver的probe函数,也就是我们自己编写的probe函数,例如上面驱动代码里面的beep_probe,实现字符设备的创建与注册,设备文件的创建与注册),第三条语句就是将设备dev绑定在驱动drv上。
这里面还有一点我觉得还是有些疑问的,可能我的水平不够,
就是platform_device的name字段与device_create时 的设备name字段可以不相同,就是说platform_device与platform_driver相互绑定的name字段与我在/dev/下面所建的设备名可以不一样。正如上面缩写的,platform_device与platform_driver绑定的时候使用的是beep_under,而创建设备文件的时候,使用的确实beep_unders,但是是没问题的。
对于这个问题,我接着查看源码,发现device_create创建的时候是会向sysfs注册的,而platform_device_register是不会向sysfs注册,但是platform_device与/dev/beep_unders 这两个设备之间有什么关系呢?我还是没搞懂,或者说platform_device只是单纯的为platform_driver提供资源,而/dev/beep_unders是用来操作的。嗯,还是不懂了。