使用Silverlight 实现工作流流程定义
Silverlight 是一种跨浏览器、跨平台的 .NET Framework实现。具有如下优势:
- 提供一致的体验,而与在何处运行没有关系
- 它对视频和音频进行流处理。它将视频品质调整到适合各种环境:从移动设备到桌面浏览器以及 720p HDTV 视频模式
- 用户可以直接在浏览器中操作(拖动、旋转和缩放)的足够清晰的2D和3D图形
我们可以直接使用它在Web上来完成工作流流程的定义,直接绘制可拉伸,拖放的复杂图形,获得非常好的用户体验。而这在以前只能通过GDI+或者其他并不友好的方法实现。重要的是这一切实现的代码非常简洁。
你需要以下工具来实现:
<!--[if !supportLists]-->1. <!--[endif]-->Visual Studio 2008
<!--[if !supportLists]-->2. <!--[endif]-->VS2008SP1
<!--[if !supportLists]-->3. <!--[endif]-->Silverlight Tools
<!--[if !supportLists]-->4. <!--[endif]-->Expression Blend2
在完成绘图之前要对Silverlight的绘图平面有详细的了解。
Silverlight提供三个根布局对象来定义整个绘图面,这三个绘图的布局对象皆从Panel 元素的派生,可以实现许多复杂的布局。
| 定义一个区域,在此区域内,您可以使用相对于 Canvas 区域的坐标显式定位子元素。
|
|
| Grid
|
定义由行和列组成的灵活网格区域。
|
| StackPanel
|
将子元素排列成一行(可沿水平或垂直方向)。
|
 <
Grid
x:Name
="LayoutRoot"
Background
="#FF92A4AF"
ShowGridLines
="True"
>
<
Grid
x:Name
="LayoutRoot"
Background
="#FF92A4AF"
ShowGridLines
="True"
>
2
<
Grid.RowDefinitions
>
3
<
RowDefinition
Height
="40"
/>
4
<
RowDefinition
Height
="400"
/>
5
</
Grid.RowDefinitions
>
6
<
Grid.ColumnDefinitions
>
7
<
ColumnDefinition
Width
="600"
/>
8
</
Grid.ColumnDefinitions
>
9
<
StackPanel
Grid.Column
="0"
Grid.Row
="0"
Orientation
="Horizontal"
>
10
<
Button
Width
=" 60"
Height
=" 25"
Content
="移动"
Margin
="10"
Click
="Button_Click"
></
Button
>
11
<
Button
Width
=" 60"
Height
=" 25"
Content
="连线"
Margin
="10"
Click
="Button_Click_1"
></
Button
>
12
<
TextBlock
x:Name
="Status"
Foreground
="Black"
Text
="Status"
Margin
="10"
/>
13
</
StackPanel
>
14
<
Canvas
Height
="400"
Width
="600"
x:Name
="canver1"
Grid.Row
="1"
Grid.Column
="0"
Background
="#FF92A4AF"
>
15
</
Canvas
>
16
</
Grid
>
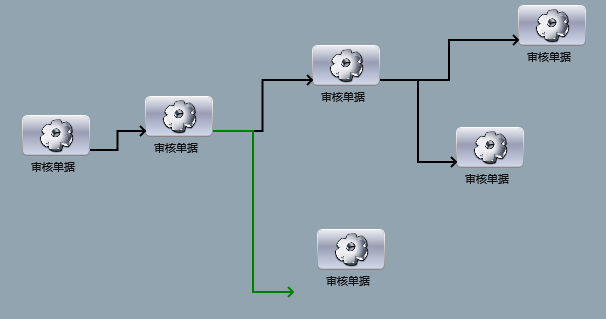
在这过程中主要涉及两个重要的对象
<!--[if !supportLists]-->1. <!--[endif]-->节点对象 定义工作流的每一个活动,可以显示一个活动的个性图标,名称等等信息,要可以自由拖动,拖动时相关坐标的活动间连线可以自动绘制。
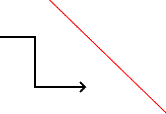
<!--[if !supportLists]-->2. <!--[endif]-->连线可以自由拉伸的有向折线,终点绘制箭头,绘制过程中实现动态效果,自动粘结节点对象。
< Border BorderThickness ="1,1,1,1"
Width ="68" Height ="41" x:Name ="fItem" CornerRadius ="5,5,5,5" >
< Border.BorderBrush >
< LinearGradientBrush EndPoint ="0.5,1" StartPoint ="0.5,0" SpreadMethod ="Pad" >
< GradientStop Color ="#FF8C8585" Offset ="1" />
< GradientStop Color ="#FFFFFFFF" Offset ="0" />
</ LinearGradientBrush >
</ Border.BorderBrush >
< Border.Background >
< LinearGradientBrush EndPoint ="0.5,1" StartPoint ="0.5,0" >
< GradientStop Color ="#FFEDEEF2" />
< GradientStop Color ="#FF545151" Offset ="1" />
< GradientStop Color ="#FF999EB6" Offset ="0.424" />
< GradientStop Color ="#FFD3D9EB" Offset ="0.99099999666213989" />
</ LinearGradientBrush >
</ Border.Background >
< Image Source ="../images/png-0011.png" Stretch ="Fill" Width ="35" Height ="35" x:Name ="img" ></ Image >
</ Border >
< TextBlock x:Name ="fItemName" Margin ="3" Text ="审核单据" Width ="50" Height ="20" Foreground ="#FF121111" ></ TextBlock >
</ StackPanel >
以下是节点移动时自动绘制的部分代码
{
double deltaV = mousePoint.Y - mousePosition.Y;
double deltaH = mousePoint.X - mousePosition.X;
double newTop = deltaV + ( double ) this .GetValue(Canvas.TopProperty);
double newLeft = deltaH + ( double ) this .GetValue(Canvas.LeftProperty);
this .SetValue(Canvas.TopProperty, newTop);
this .SetValue(Canvas.LeftProperty, newLeft);
foreach (PathLine l in list)
{
l.DrawPath();
}
}
使用Path对象来绘制连线,Silverlight几何图形提供了描绘由弧线、曲线和直线组成的多个复杂图形 如图:
在实现拖放功能中,分为三个步骤:
1.移动到目标上,选择要拖动的对象
1.按下鼠标,触发MouseLeftButtonDown事件。
2.移动鼠标,触发MouseMove事件,移动选择的对象。
3.放开鼠标,触发MouseLeftButtonUp事件,停止捕捉事件。
FlowItem EnterItem = null; void item_MouseEnter(object sender, MouseEventArgs e)

 {
{ EnterItem = (FlowItem)sender;
 } void item_MouseLeave(object sender, MouseEventArgs e) { EnterItem =null; } void MMouseMove(object sender, MouseEventArgs e) { Point point = e.GetPosition(this.canver1); String msg = "x:y = " + e.GetPosition(sender as FrameworkElement).ToString(); //msg += " from " + (e.OriginalSource as FrameworkElement).Name; Status.Text = msg; if (this.IsMove)
 { if (currentItem != null) { currentItem.Move(point, mousePosition);
 } } else { if (currentPath != null) { currentPath.EndP = point; //currentPath.DrawPath(); } } mousePosition = point; } void MMouseLeftButtonUp(object sender, MouseButtonEventArgs e) { if (this.IsMove) { this.canver1.ReleaseMouseCapture(); mousePosition.X = mousePosition.Y = 0; } else { if (this.currentPath == null) return; if (EnterItem==null) { currentPath.Remove(); } else { currentPath.EndItem = EnterItem; currentPath.DrawPath(); } } currentItem = null; EnterItem = null; currentPath = null; } void MMouseLeftButtonDown(object sender, MouseButtonEventArgs e) { if (EnterItem == null) return; if (this.IsMove) { mousePosition = e.GetPosition(this.canver1); this.currentItem = EnterItem; this.canver1.CaptureMouse(); } else { currentPath = new PathLine(this.canver1); currentPath.StateP = e.GetPosition(this.canver1); //currentPath.EndP = currentPath.StateP; currentPath.StateItem = (FlowItem)EnterItem; //EnterItem.CaptureMouse(); //EnterItem.Cursor = null; } }
源码:
http://files.cnblogs.com/zhouyongguo/SilverlightApplication1.rar