每周总结20130821——android控件的尺寸、http文件上传
Android控件的尺寸
android开发中,可以通过编写XML格式的布局文件来实现布局,也可以用纯代码进行布局,通常都是选择XML文件布局。在XML布局文件中,与控件的尺寸有关的属性有android:minHeight、android:minWidth、android:layout_weight、android:layout_width等。像layout_width、layout_height既可以指定具体的数值,也可以指定wrap_content、match_parent这样的值,而且有时候得到的与指定的可能不一致,那么控件的尺寸到底怎么确定?查阅Android文档,在类View中可以找到这么一段话:
The size of a view is expressed with a width and a height. A view actually possess two pairs of width and height values.
The first pair is known as measured width and measured height. These dimensions define how big a view wants to be within its parent (see Layout for more details.) The measured dimensions can be obtained by callinggetMeasuredWidth()andgetMeasuredHeight().
The second pair is simply known as width and height, or sometimes drawing width and drawing height. These dimensions define the actual size of the view on screen, at drawing time and after layout. These values may, but do not have to, be different from the measured width and height. The width and height can be obtained by callinggetWidth()andgetHeight().
也就是说,一个View实际有两个尺寸,一个是它想要的尺寸,一个是它实际上的尺寸。一个View的onDraw方法被调用前,会调用onMeasure (int widthMeasureSpec, int heightMeasureSpec)方法来得到一个想要的尺寸。如果没有指定尺寸相关的属性,也没有重写onMeasure方法,默认的尺寸是100x100.在onMeasure方法中,必须调用setMeasuredDimension(int, int)方法来设定测量好的宽高值。具体更详细的用法以及各个参数的含义可以查阅文档,这里给一个简单的重写示例:
@Override
protected void onMeasure(int widthMeasureSpec, int heightMeasureSpec) {
int wMode = MeasureSpec.getMode(widthMeasureSpec);
int hMode = MeasureSpec.getMode(heightMeasureSpec);
if (wMode == MeasureSpec.AT_MOST)
mWidth = MeasureSpec.getSize(widthMeasureSpec);
else
mWidth = 320;
if (hMode == MeasureSpec.AT_MOST)
mHeight = MeasureSpec.getSize(heightMeasureSpec);
else
mHeight = 240;
this.setMeasuredDimension(mWidth, mHeight);
}
至于为什么实际尺寸与测量的尺寸往往不一致,官方文档解释,在测量的时候,把控件间的padding也计算在内了,而实际尺寸是不会包含padding的。
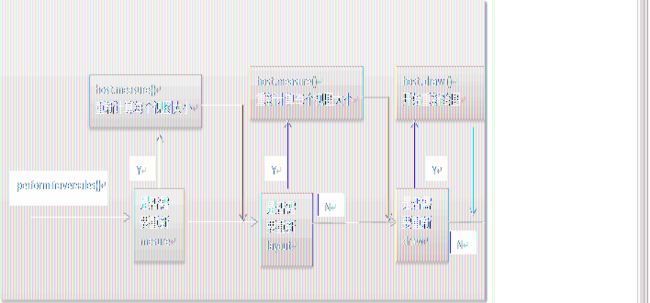
最后,贴一张网上扒来的图,这张图很好地揭示了控件的绘制过程:
参考文章:
[1]Android中View绘制流程以及invalidate()等相关方法分析
Http文件上传
在android开发中,需要将文件上传到服务器。传文件写个简单的socket当然也能搞定,但是让功能强大的服务器跑一个自己写的低端socket server岂不是笑话,乖乖使用现成的服务器程序吧。发现http协议支持文件上传,于是事情就简单多了,查了些资料,抄了份servlet代码又简单改了改,跑在了tomcat上:
import java.io.File;
import java.io.IOException;
import java.util.List;
import javax.servlet.ServletException;
import javax.servlet.annotation.WebServlet;
import javax.servlet.http.HttpServlet;
import javax.servlet.http.HttpServletRequest;
import javax.servlet.http.HttpServletResponse;
import org.apache.commons.fileupload.FileItem;
import org.apache.commons.fileupload.FileItemFactory;
import org.apache.commons.fileupload.disk.DiskFileItemFactory;
import org.apache.commons.fileupload.servlet.ServletFileUpload;
import com.xxx.config.PathConfig; //这个类里有一些静态的路径配置信息
/**
* Servlet implementation class FileUpload
*/
@WebServlet(description = "A servelt for uploading files", urlPatterns = {
"/FileUpload", "/upload" })
public class FileUpload extends HttpServlet {
private static final long serialVersionUID = 1L;
/**
* @see HttpServlet#HttpServlet()
*/
public FileUpload() {
super();
// TODO Auto-generated constructor stub
}
/**
* @see HttpServlet#doPost(HttpServletRequest request, HttpServletResponse
* response)
*/
protected void doPost(HttpServletRequest request,
HttpServletResponse response) throws ServletException, IOException {
// TODO Auto-generated method stub
boolean isMultipart = ServletFileUpload.isMultipartContent(request);
if (isMultipart) {
FileItemFactory factory = new DiskFileItemFactory();
ServletFileUpload upload = new ServletFileUpload(factory);
try {
List<FileItem> items = upload.parseRequest(request);
for (FileItem item : items) {
if (!item.isFormField()) {
item.write(new File(PathConfig.UPLOAD_PATH, //这是我设置的目录
item.getName().substring(
item.getName().lastIndexOf("\\") + 1)));
}
}
} catch (Exception e) {
// TODO Auto-generated catch block
e.printStackTrace();
}
}
}
}
这段代码里用到了apache的FileUpload包,然后它自身又需要commons-io.jar,具体下载地址可以在这里找到http://commons.apache.org/proper/commons-fileupload/.
servlet在tomcat上跑起来后,可以写个简单的html页面在本地上测试一下:
<html>
<body>
<h1>File API Demo</h1>
<p>
<!-- 用于文件上传的表单元素 -->
<form name="demoForm" id="demoForm" method="post" enctype="multipart/form-data"
action="http://localhost:8080/upload">
<p>Upload File: <input type="file" name="file" /></p>
<p><input type="submit" value="Submit" /></p>
</form>
</body>
</html>
至于android上的文件上传客户端……因为我按照参考文章里的第二个方案并没有成功,所以等我解决了神秘的错误再说吧:-)
参考文章:
[1]Android分别使用HTTP协议和TCP协议实现上传文件
