Android SDK:构建一个购物中心搜索的应用(二)-Points of Interest
本教程将探讨如何使用谷歌地图API来显示出信息点(POI),并使用手机提供的定位服务,来显示当前位置可搜索到的POI位置。这种情况下,我们应使用商场作为POI。
在本教程的第一部分,我们讨论了如何使用的MapView和实现位置监听器获得您的当前位置。在这一节中,我们将扩展上一节的内容,以显示你的当前位置和一些信息点(POI)的位置。我们将通过使用一个由Jeff Gifelt开发出来的外部的库。如果你还没有完成的上一节的教程,我强烈建议你先完成它。不过,如果你决定不,你也可以使用源文件为起点,开始本节的教程。
你应该注意到在上一节的教程中,我们已经介绍了如何获取你的当前位置。在这一节中,我们将直接编码位置佛罗里达大学(这仅仅是为了本教程,所以在这区域我们可以显示商场)。
由于我们将继续从上一节的教程开始,所以你应该打开该项目。
步骤1:显示位置信息
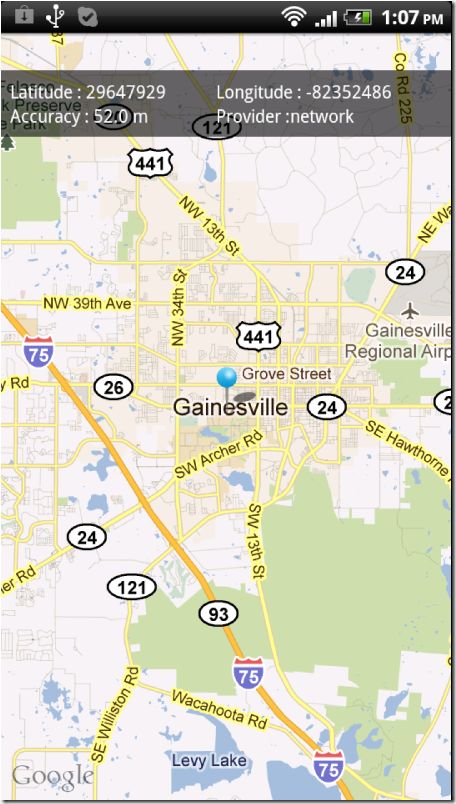
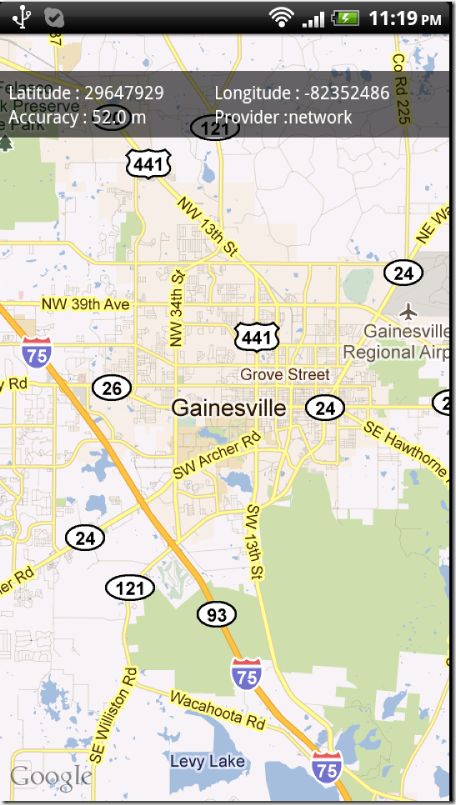
上一节最后一步,我们完成显示我们当前所在的位置,在此阶段让我们扩展显示了一些有关我们的当前位置的信息,如经度和纬度。
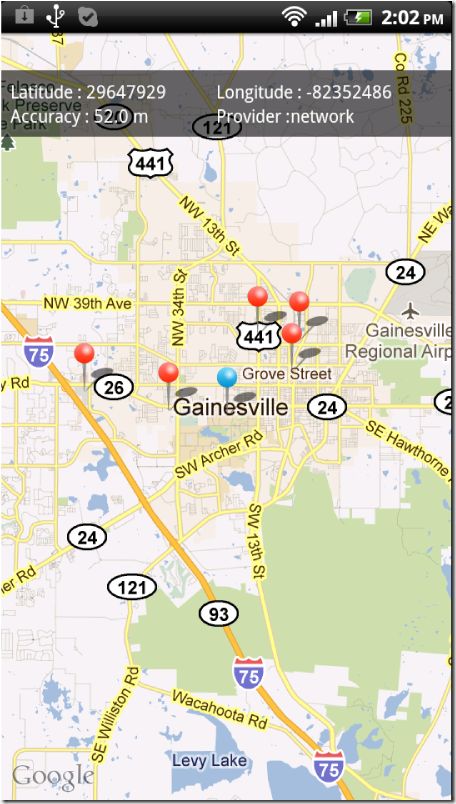
这个信息将被显示为半透明黑色背景的MapView顶部附近的白色文字。
打开的布局文件(main.xml),在位于 MallFinder > res > layout > main.xml
在MapView结束标记之后,FrameLayout结束标记之前,添加下面的代码:
<LinearLayout
    android:orientation="horizontal"
    android:layout_width="fill_parent"
    android:layout_height="wrap_content"
    android:id="@+id/infoLinearLayout"
    android:clickable="true"
    android:onClick="centerToCurrentLocation">
    <TableLayout
        android:layout_width="fill_parent"
        android:layout_height="wrap_content"
        android:layout_marginTop="30dp"
        android:background="#97000000"
        android:padding="7sp">
        <TableRow>
            <TextView
            android:layout_width="fill_parent"
            android:layout_height="wrap_content"
            android:layout_weight="1"
            android:text="@string/latitude"
            android:id="@+id/latitudeText"
            android:textColor="#FFFFFF">
            </TextView>
            <TextView
            android:layout_width="fill_parent"
            android:layout_height="wrap_content"
            android:layout_weight="1"
            android:text="@string/longitude"
            android:id="@+id/longitudeText"
            android:textColor="#FFFFFF">
            </TextView>
        </TableRow>
        <TableRow>
            <TextView
            android:layout_width="fill_parent"
            android:layout_height="wrap_content"
            android:layout_weight="1"
            android:text="@string/accuracy"
            android:id="@+id/accuracyText"
            android:textColor="#FFFFFF">
            </TextView>
            <TextView
            android:layout_width="fill_parent"
            android:layout_height="wrap_content"
            android:layout_weight="1"
            android:text="@string/provider"
            android:id="@+id/providerText"
            android:textColor="#FFFFFF">
            </TextView>
        </TableRow>
    </TableLayout>
</LinearLayout>
你可能已经注意到LinearLayout指定了onclick方法,这方法用于半透明的LinearLayout被选中时,让MapView中心围绕在用户的当前位置。如果用户决定滚动的MapView想迅速返回其当前位置,这是很有用的。
在上述文件中,引用的一些字符串(以android:text=”@string…”开头的),这些字符串还没有创建,让我们的现在创建。
打开位于MallFinder > res > values > strings.xml 的strings.xml文件,并添加以下几行代码。
<string name="latitude">Latitude : </string>
<string name="longitude">Longitude : </string>
<string name="accuracy">Accuracy : </string>
<string name="provider">Provider : </string>
现在我们已经更新了用户界面,让我们更新MallFinderActivity.java类代码来显示我们的位置坐标。
打开MallFinderActivity.java文件,并在getLastLocation方法中添加以下代码:
((TextView)findViewById(R.id.providerText)).setText("Provider :" + getBestProvider());
((TextView)findViewById(R.id.latitudeText)).setText("Latitude : " + String.valueOf((int)(location.getLatitude()*1E6)));
((TextView)findViewById(R.id.longitudeText)).setText("Longitude : " +  String.valueOf((int)(location.getLongitude()*1E6)));
((TextView)findViewById(R.id.accuracyText)).setText("Accuracy : " + String.valueOf(location.getAccuracy()) + " m");
public void centerToCurrentLocation(View view){
        animateToCurrentLocation();
}
注意:如果这是首次运行应用程序,经度、纬度和其他地方可能是空白的,直到你的手机可以定位到你的当前位置。这可能需要一些时间,取决于所使用的提供商。
步骤2:使用一个外部库
我们即将开始在我们的MapView上添加并显示出当前位置周边的各个信息点。为了这,我们将使用一个由Jeff Gifelt开发定义好的BalloonItemizedOverlay类,位于 https://github.com/jgilfelt/android-mapviewballoons。你应该注意到Android有其自身的ItemizedOverlay类,可以用来覆盖到一个MapView图形上;但我选择了这个BalloonItemizedOverlay类,是因为它提供了按下后弹出一个气球覆盖在图形上的功能,而ItemizedOverlay类默认是没有该功能的。这也给我们一个机会来看看如何设置并导入外部库项目到我们自己的项目中。
让我们开始下载文件 。打开Web浏览器输入https://github.com/jgilfelt/android-mapviewballoons/downloads,点击“Download as zip”按钮 。
下载后解压缩文件,并注意文件的位置。
在Eclipse中,点击“File > Import”。在新的窗口,选择“Existing Projects into Workspace”,然后单击下一步。
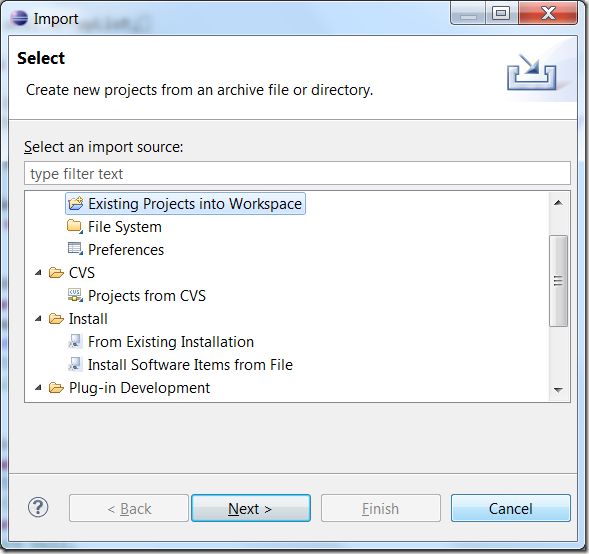
在“Select root directory field”项,浏览找到解压缩的BalloonItemizedOverlay文件夹。确保在项目区中有唯一的android-mapviewsballoon项目。然后你可以自由选择这两个项目(如果您想包括示例项目),选中复制项目到工作空间复选框。点击“完成”。
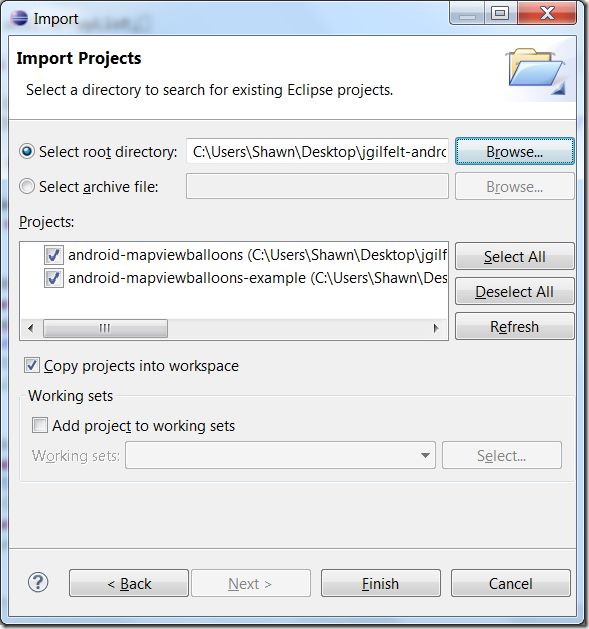
你现在应该看到在Package Explorer窗口中的android-mapviewballoons项目。
选中android-mapviewballoons项目右键,选择“属性”。弹出一个新窗口。在左边的列点击“Android”,右侧窗口确保“Is Library”复选框被选中。如果没有选中,请选中它并点击应用、确定。
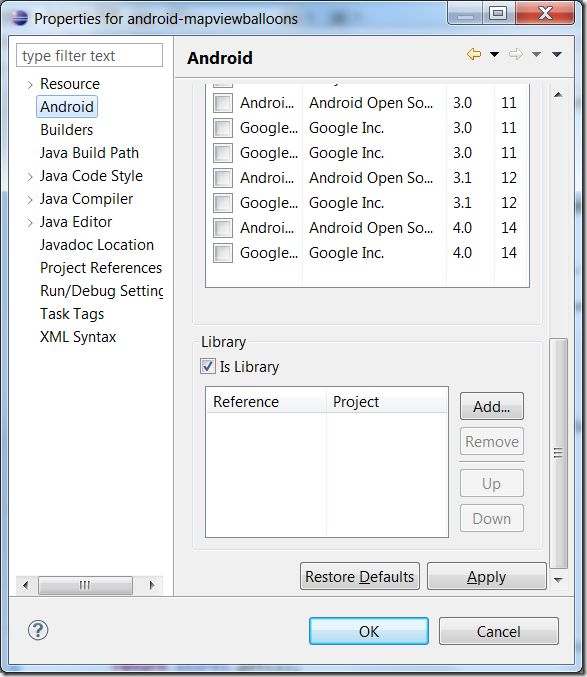
现在你可以在现有的和新建的项目使用这个库了。
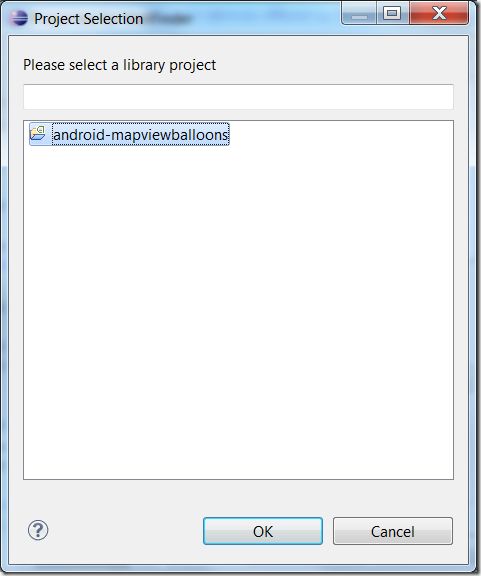
我们继续我们的MallFinder项目前,先导入这个库。首先,右键MallFinder项目,然后属性,并选择左侧栏“Android”,在右边窗口找到“Is Library”(跟前面步骤一样),但这个时候点击“添加”按钮,一个新的项目选择窗口会弹出。选择android-mapviewballoons,然后单击“确定”。
步骤3:创建遮罩类
我们现在要创建一个MallOverlay类,它继承BalloonItemizedOverlay类。在MallFinder > src > com.shawnbe.mallfinder,右键点击com.shawnbe.mallfinder。然后选择New> Class。命名类名“MallOverlay”,然后单击“完成”。
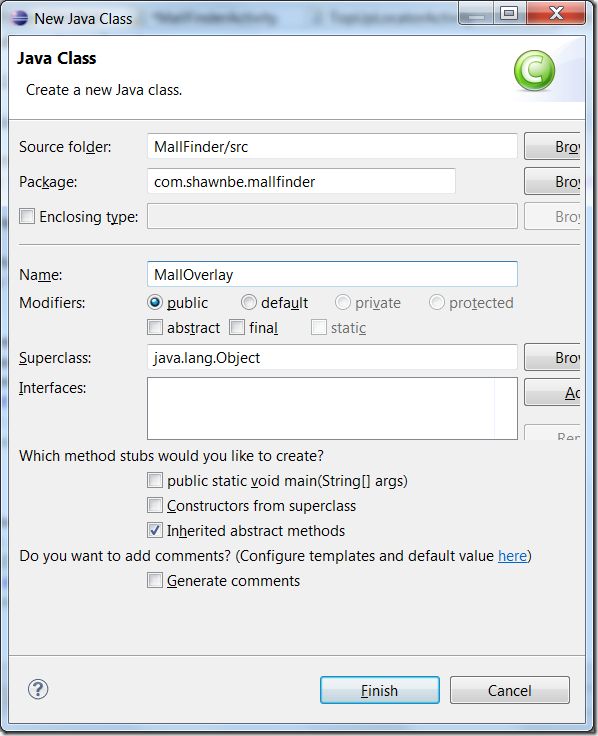
我们需要更新MallOverlay类继承BalloonItemizedOverlay。
public class MallOverlay extends BalloonItemizedOverlay<OverlayItem> {
我们还需要导入的几个项目。所以在MallOverlay.java类的顶部添加以下几行:
import android.graphics.drawable.Drawable;
import com.google.android.maps.MapView;
import com.google.android.maps.OverlayItem;
import com.readystatesoftware.mapviewballoons.BalloonItemizedOverlay;
下一步,我们将需要添加一个构造函数并实现BalloonItemizedOverlay类的一些方法:
注:Eclipse会在可能出错的情况下通知我们,让我们很容易地修正错误,并添加未实现的方法。
例如,在我们添加了构造函数或需要添加一些方法时,你会发现,在“MallOverlay”单词该行有红色下划线。
这表明有错误。当你的光标放在“MallOverlay”单词上,会出现一个信息对话框,让你知道你必须定义一个构造函数,并提供快速修复。
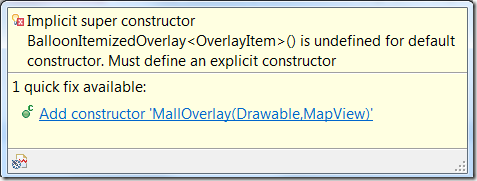
点击添加构造函数“MallOverlay(Drawable,MapView)”的链接,将会为你添加一个构造函数。
请注意单词“MallOverlay”仍然存在下划线。再次将光标悬停在上面,你会看到还有未实现的方法。点击“添加未实现方法”链接,将会为你创建两个方法。
这是非常重要的一个功能,让你知道是什么可能会导致代码中的错误。此功能可以为你节省大量的时间和精力,而不必键入每个方法。
MallOverlay类代码如下:
package com.shawnbe.mallfinder;

import android.graphics.drawable.Drawable;
import com.google.android.maps.MapView;
import com.google.android.maps.OverlayItem;
import com.readystatesoftware.mapviewballoons.BalloonItemizedOverlay;

public class MallOverlay extends BalloonItemizedOverlay<OverlayItem> {

    public MallOverlay(Drawable defaultMarker, MapView mapView) {
        super(defaultMarker, mapView);
        // TODO Auto-generated constructor stub
    }

    @Override
    protected OverlayItem createItem(int i) {
        // TODO Auto-generated method stub
        return null;
    }

    @Override
    public int size() {
        // TODO Auto-generated method stub
        return 0;
    }

}
现在我们要添加一些功能代码到上述方法里。声明这三个全局变量:
private Context mContext;
private ArrayList<OverlayItem> malls = new ArrayList<OverlayItem>();
private Location currentLocation;
更新和添加在MallOverlay类的方法,代码如下:
public MallOverlay(Drawable defaultMarker, MapView mapView) {
    super(boundCenter(defaultMarker),mapView);
    boundCenter(defaultMarker);
    mContext = mapView.getContext();
}

@Override
protected OverlayItem createItem(int i) {
    // TODO Auto-generated method stub
    return malls.get(i);
}

@Override
    public int size() {
    // TODO Auto-generated method stub
    return malls.size();
}

public void addOverlay(OverlayItem overlay) {
    malls.add(overlay);
    populate();
}

@Override
protected boolean onBalloonTap(int index, OverlayItem item) {
    Toast.makeText(mContext, "Overlay Item " + index + " tapped!",
            Toast.LENGTH_LONG).show();
    return true;
}
我们现在有了一个处理MapView的遮罩图层的类。
步骤4:显示当前位置
我们将使用两种大头针图形在地图上显示,蓝色的大头针显示我们当前的位置,而红色的大头针显示周围的商场。
![]()
![]()
下载这两个图片,并放在你的drawable文件夹里。由于我采用的是HDPI屏幕,所以我将图片放在Mallfinder > res > drawable-hdpi文件夹。你应该注意到,当开发应用程序时,因为你不知道用户的手机屏幕是什么分辨率的,所以你应该为三种分辨率的屏幕建立一个适当的图形。这将防止你的图形被拉伸和收缩,而不会使你的图形看起来和你预期的不一样。
下面我们将创建一个方法,让我们当前的位置呈现在图像上。
添加下面的方法MallFinderActivity类:
public void drawCurrPositionOverlay(){
    List<Overlay> overlays = mapView.getOverlays();
    overlays.remove(currPos);
    Drawable marker = getResources().getDrawable(R.drawable.me);
    currPos = new MallOverlay(marker,mapView);
    if(currentPoint!=null){
        OverlayItem overlayitem = new OverlayItem(currentPoint, "Me", "Here I am!");
        currPos.addOverlay(overlayitem);
        overlays.add(currPos);
        currPos.setCurrentLocation(currentLocation);
    }
}
此外,在onCreate方法中添加下面一行代码,放在getLastLocation方法和setCurrentLocation方法调用之后。
drawCurrPositionOverlay();
步骤5:添加显示购物中心标记
到目前为止,在我们的教程,我们已经向你展示如何获得你的当前位置和使用一个图形标记。然而,为了本教程的剩余部分,我们将直接编码你的当前位置于佛罗里达国际大学(FIU)。在我们的例子中,我将围绕在佛罗里达国际大学区域周边的购物中心显示出来,而不是每次启动应用程序的时候让你滚动到该地区。
让我们现在打开MallFinderActivity类,更新setCurrentLocation方法,如下:
public void setCurrentLocation(Location location){
     /* int currLatitude = (int) (location.getLatitude()*1E6);
        int currLongitude = (int) (location.getLongitude()*1E6);
        currentPoint = new GeoPoint(currLatitude,currLongitude); */

        /*========================================================================================
        /*The Above Code displays your correct current location, but for the sake of the demo
        I will be hard coding your current location to the University of Florida, to get your real
        current location, comment or delete the line of code below and uncomment the code above. */

        currentPoint = new GeoPoint(29647929,-82352486);
        currentLocation = new Location("");
        currentLocation.setLatitude(currentPoint.getLatitudeE6() / 1e6);
        currentLocation.setLongitude(currentPoint.getLongitudeE6() / 1e6);

        ((TextView)findViewById(R.id.latitudeText)).setText("Latitude : " + String.valueOf((int)(currentLocation.getLatitude()*1E6)));
        ((TextView)findViewById(R.id.longitudeText)).setText("Longitude : " +  String.valueOf((int)(currentLocation.getLongitude()*1E6)));
        ((TextView)findViewById(R.id.accuracyText)).setText("Accuracy : " + String.valueOf(location.getAccuracy()) + " m");
        drawCurrPositionOverlay();
    }
然后更新getLastLocation方法,如下:
public void getLastLocation(){
    String provider = getBestProvider();
    currentLocation = locationManager.getLastKnownLocation(provider);

    /*The next 4 lines are used to hardcode our location
     * If you wish to get your current location remember to
     * comment or remove them */

    currentPoint = new GeoPoint(29647929,-82352486);
    currentLocation = new Location("");
    currentLocation.setLatitude(currentPoint.getLatitudeE6() / 1e6);
    currentLocation.setLongitude(currentPoint.getLongitudeE6() / 1e6);

    if(currentLocation != null){
        setCurrentLocation(currentLocation);
    }
    else
    {
        Toast.makeText(this, "Location not yet acquired", Toast.LENGTH_LONG).show();
    }
    ((TextView)findViewById(R.id.providerText)).setText("Provider :" + getBestProvider());
}
将以下方法添加到MallFinderActivity类,直接编码一些购物区在佛罗里达国际大学附近。
public void drawMalls(){
    Drawable marker = getResources().getDrawable(R.drawable.malls);
    MallOverlay mallsPos = new MallOverlay(marker,mapView);
        GeoPoint[] mallCoords = new GeoPoint[6];

        //Load Some Random Coordinates in Miami, FL
        mallCoords[0] = new GeoPoint(29656582,-82411151);//The Oaks Mall
        mallCoords[1] = new GeoPoint(29649831,-82376347);//Creekside mall
        mallCoords[2] = new GeoPoint(29674146,-8238905);//Millhopper Shopping Center
        mallCoords[3] = new GeoPoint(29675078,-82322617);//Northside Shopping Center
        mallCoords[4] = new GeoPoint(29677017,-82339761);//Gainesville Mall
        mallCoords[5] = new GeoPoint(29663835,-82325599);//Gainesville Shopping Center

        List<Overlay> overlays = mapView.getOverlays();
    OverlayItem overlayItem = new OverlayItem(mallCoords[0], "The Oaks Mall", "6419 W Newberry Rd, Gainesville, FL 32605");
    mallsPos.addOverlay(overlayItem);
    overlayItem = new OverlayItem(mallCoords[1], "Creekside Mall", "3501 Southwest 2nd Avenue, Gainesville, FL");
    mallsPos.addOverlay(overlayItem);
    overlayItem = new OverlayItem(mallCoords[2], "Millhopper Shopping Center", "NW 43rd St & NW 16th Blvd. Gainesville, FL");
    mallsPos.addOverlay(overlayItem);
    overlayItem = new OverlayItem(mallCoords[3], "Northside Shopping Center", "Gainesville, FL");
    mallsPos.addOverlay(overlayItem);
    overlayItem = new OverlayItem(mallCoords[4], "Gainesville Mall", "2624 Northwest 13th Street Gainesville, FL 32609-2834");
    mallsPos.addOverlay(overlayItem);
    overlayItem = new OverlayItem(mallCoords[5], "Gainesville Shopping Center", "1344 N Main St Gainesville, Florida 32601");
    mallsPos.addOverlay(overlayItem);
    overlays.add(mallsPos);

    mallsPos.setCurrentLocation(currentLocation);
}
我们需要在页面加载时调用上面的方法。这样的话,在onCreate方法中,drawCurrPositionOverlay()方法后添加:
drawMalls();
运行应用程序,你的当前位置应该在佛罗里达国际大学,并且在该地区周围看到5个红色标记代表的购物中心:
步骤6:显示相关信息
目前,当你点击这些标志物之一,它将会给你一些商场的名称和地址等简要信息。而我们要添加更多一点的相关信息,比如:我们想显示出到该商场的距离。
打开位于MallFinder> com.shawnbe.mallfinder> MallOverlay.java的MallOverlay.java文件,并添加下面的方法。此方法接收一个GeoPoint参数并返回一个位置。为了使用由Android提供的distanceTo方法,我们需要提供两个位置作为位置对象,我们的方法会将一个GeoPoint转换为一个位置对象:
public Location convertGpToLoc(GeoPoint gp){
    Location convertedLocation = new Location("");
    convertedLocation.setLatitude(gp.getLatitudeE6() / 1e6);
    convertedLocation.setLongitude(gp.getLongitudeE6() / 1e6);
    return convertedLocation;
}
现在,我们需要更新onBalloonTap方法来计算我们的位置到标记点之间的距离,并用Toast显示出信息。
更新onBalloonTap方法如下:
@Override
protected boolean onBalloonTap(int index, OverlayItem item) {
    String tmp = malls.get(index).getTitle();
    GeoPoint mallPoint = malls.get(index).getPoint();
    Location tmpLoc = convertGpToLoc(mallPoint);
    double distance = ((currentLocation).distanceTo(tmpLoc))*(0.000621371192);
    DecimalFormat df = new DecimalFormat("#.##");
    tmp = tmp + " is " + String.valueOf(df.format(distance)) + " miles away.";
    Toast.makeText(mContext,tmp,Toast.LENGTH_LONG).show();
    return true;
}
现在,当你点击商城标记点,一些关于名称和地址的基本信息将显示在弹出气球框中。如果你点击气球框,Toast将会显示出该商城标记点与你的距离。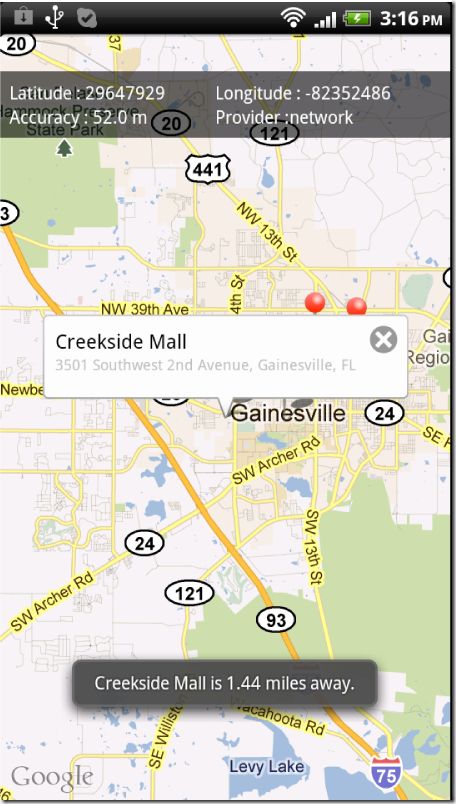
通过本教程,你已经学会如何使用MapView对象,注册一个API密钥,获取你的当前位置,指定你的首选标准供应商,使用外部库,动态显示一个位置在MapView上,添加各个信息点在地图上,甚至添加气球弹出窗口。我希望本教程信息,能为你提供创建自己的基于位置定位的应用程序所需的知识。如果有些地方不是很清楚,你也可以发送电子邮件给我[email protected],我会尽我所能帮你弄清楚,或者如果你有任何建议或意见,随时分享 !
