Network & sharing in VirtualBox - Full tutorial
This is the fourth article on VirtualBox management. Today, I'm going to teach you everything you need to know of VirtualBox networking and sharing.
I'm going to show you three different methods of configuring your virtual machines and three different ways of sharing data between the host machine and the virtual machine. After mastering this tutorial, you will know all there is to know about using VirtualBox with fun and confidence. Follow me.
Introduction
For more details, you should read the following articles. They will provide you with the necessary background to following today's material with ease and pleasure:
How to install VirtualBox Guest Additions - Tutorial
VirtualBox 3 is amazing!
VirtualBox 3 Compiz slideshow
DirectX in VirtualBox 3 - Pure joy is here
Likewise, you should read the first three installments of this series:
How to clone disks in VirtualBox - Tutorial
How to add hard disks in VirtualBox - Tutorial
How to expand/shrink disks in VirtualBox - Tutorial
Now, let us begin.
VirtualBox network options
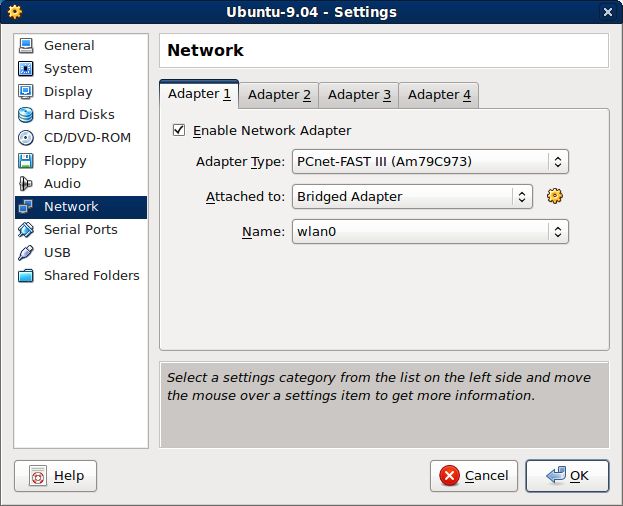
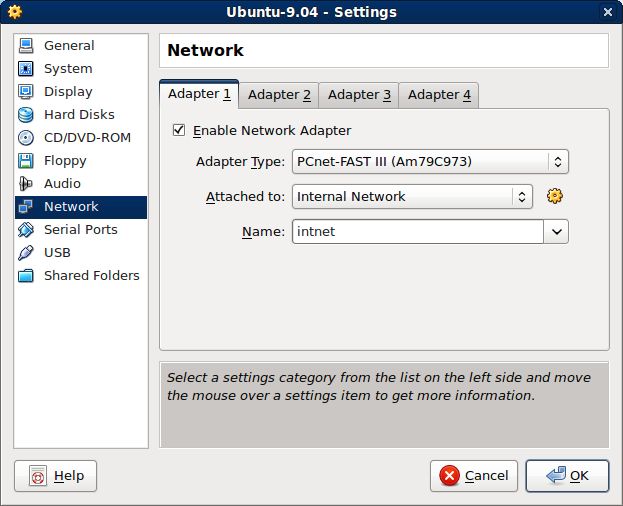
For any of your installed virtual machines, click on Settings > Network. Here the fun begins. This is the default view. Any virtual machine can have up to four network adapters. You can enable them selectively as you see fit. Most people will require just one.
Adapter Type defines the virtualized hardware that VirtualBox will expose to your virtual machine. If you have a problem with one of the Adapter types, you can try another. PCnet-FAST III is the default selection.
You also have PCnet-FAST II for older machines and three types of Intel PRO/1000 cards, including two Server versions, which should be useful for people running VirtualBox in a production environment. For home users, the choice is rather transparent.
The most interesting part is Attached to: section. This category defines how your network adapter will interface with existing physical hardware. Different setups will result in markedly different results.
Network types
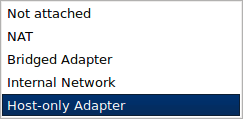
We have four options here: NAT (default), Bridged, Internal network, and Host Only. Of course, Not attached is also a type, but not one we can really use, per se.
Network Address Translation (NAT)
NAT means the virtual machines will have private IP addresses that are not routable from outside.
Example: Your host is 192.168.1.1. The VirtualBox NAT device will be marked as 10.0.2.1. Therefore, the virtual machines will be given any address in the 10.0.2.x range. Since there is nothing to route access to machines in the 10.0.2.x/24 subnet, they will be inaccessible from your host.
This setup is useful when you don't really care what IP addresses your guests have, each one to its own. However, it is not good if you require forwarding or if you need to expose services to the external world. Likewise, this setup is not good for sharing via network access.
Pluses: simplicity & seclusion.
Minuses: no route to virtual machines, no network sharing.
Bridged Adapter
Bridged Adapter means that any virtual machine running will try to obtain an IP address from the same source your currently active, default network address got its IP address. Hence the term bridged, as the two are connected.
If you have more than one active network device, you can choose which one you want to bridge with VirtualBox. In our case, we will use the Wireless adapter wlan0.
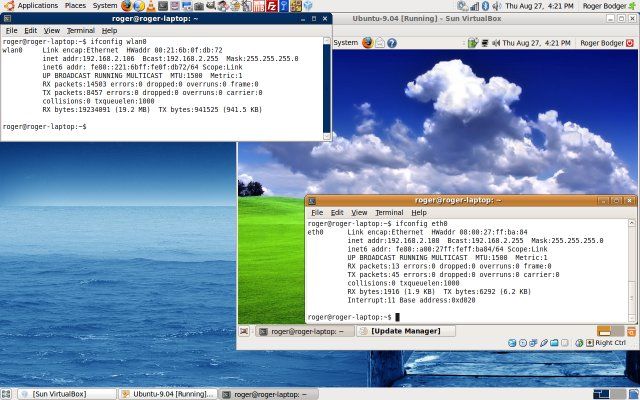
Example: Your host has leased an address of 192.168.1.100 from the router. The virtual machine leases an address of 192.168.1.103 from the router. The two machines now share the same network and all standard rules apply. For all practical purposes, the virtual machine is another IP address on your LAN.
More closely, the host:
And the guest:
This setup cannot work if your device (switch, router, ISP, etc) does not permit you to lease more than one IP address. Therefore, computers with direct Internet access may not be able to use Bridged networking.
Pluses: Allows flexible management of the network with port forwarding and services enabled. Allows network sharing in the classic way.
Minuses: Might not work with direct Internet access (requires router), more difficult to understand for new users, exposes machines to network with possible security implications.
Host-only Adapter
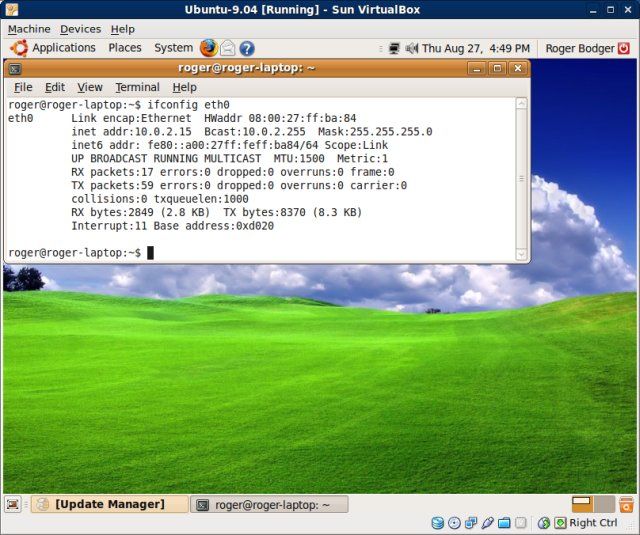
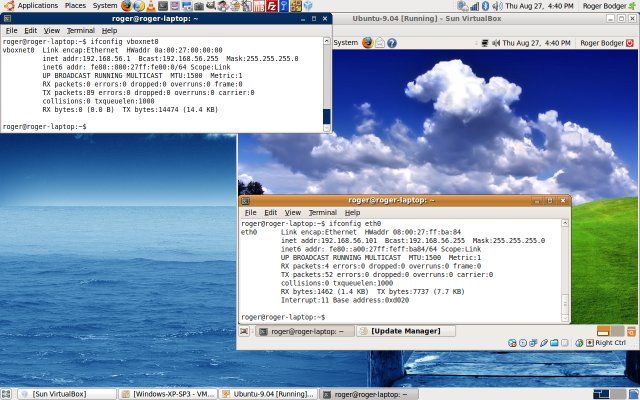
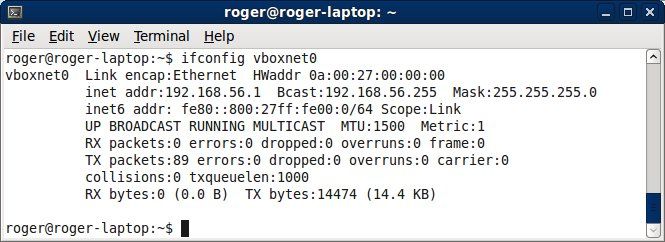
Host-only Adapter is very interesting. It's very similar to Bridged Adapter, except that is uses a dedicated network device, called vboxnet0, to lease IP addresses.
Your host machine is the de-facto VirtualBox router, with the IP address of 192.168.56.1. The adapter is not in use if there are no virtual machines running with Host-only setup. However, once they come up, this adapter serves IP addresses to the virtual machines, creating an internal LAN, within your own network.
Example: Your host has the IP address of 192.168.56.1. Your virtual machine has the IP address of 192.168.56.101.
More closely, host:
And the guest:
This is quite similar to what VMware Server does. VMware Server has its two virtual adapters called vmnet1 and vmnet8, which are used assign NAT and host-only IP addresses to guests. However, unlike the VirtualBox NAT adapter, VMware Server always bridges the default network device on your hosts and therefore you have direct network access to NAT-ed machines. You don't have this luxury on VirtualBox (yet).
But the addition of vboxnet0 in VirtualBox 3 has significantly simplified network usage in this phenomenal product. If you wish to recall the trouble I've had to deal with in earlier release of VirtualBox, do take a look at my VMGL tutorial. I had to manually configure everything. BTW, you can change the default IP address allocation, if you want.
Very importantly, please note that using the Host-only adapter does not mean your guests will have Internet access. In fact, they won't. vboxnet0 does not have a default gateway. To make vboxnet0 also serve queries outside the local network, you will have to configure it to use another adapter for that, enable forwarding and possible reconfigure your firewall rules. At the end, you will have achieved Bridged networking, so why bother?Host-only Adapter is useful for creating private networks, where machines need access to one another, but not necessarily outside this subnet.
Pluses: Useful for noisy software testing, penetration testing. Allows classic network sharing via IP address.
Minuses: As difficult to understand as Bridged networking for new users, no Internet access in the virtual machines. May introduce a security risk to other machines on the private network.
Internal network
Internal network is not very interesting, in my opinion. It's similar to Host-only + NAT, except the networking takes place inside the virtual network of guest machines, without any access for the host, plus there is no real NAT. What you get is a private LAN for your guests only, without any access to the external world.
Sharing in VirtualBox
Now that we understand networking options, let's try some sharing. There are two ways you can share your data in VirtualBox, either by direct network access, using IP addresses, or by using the Shared Folders feature.
Personally, I prefer the network solution, because this is how things work in the real world. You send requests to other machines via the network. If they have sharing services, like NFS or Samba listening and if you're properly authenticated, you'll be given the list of shares and allowed to exchange files with this server. Another way of sharing is by FTP or SSH, again, using the classic network channels.
Shared Folders is a feature where you create a folder on your host and then mount it inside your virtual machines. It works for all network setups and uses an internal VirtualBox sharing server to allow guest access to the shared data.
Sharing via network
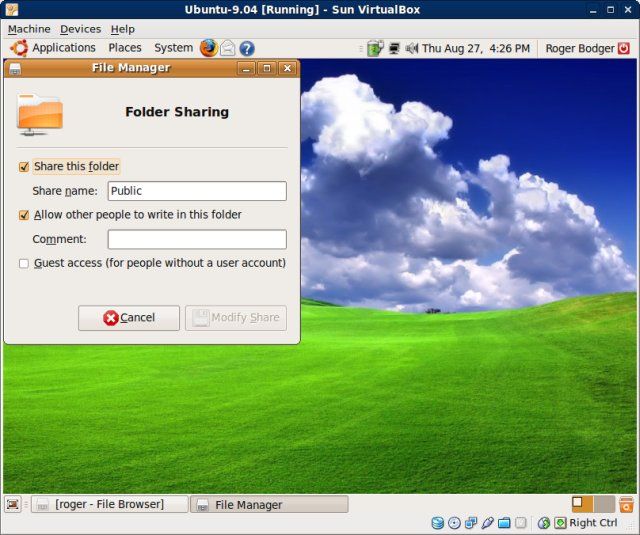
Earlier, we mentioned that sharing via network is only possible for Bridged and Host-only network. Let's see two examples. The first step is to allow sharing in the guest machine.
Then, you access the virtual machine via its IP address.
On Windows:
On Windows, use Start > Run > \\XXX.XXX.XXX.XXX and replace the triplets of Xs with the actual IP of the virtual machine.
On Linux:
Type smb://XXX.XXX.XXX.XXX in the address bar of the file manager. smb:// stands for the Samba network protocol. The triplets of Xs stand for the IP address of our guest machine.
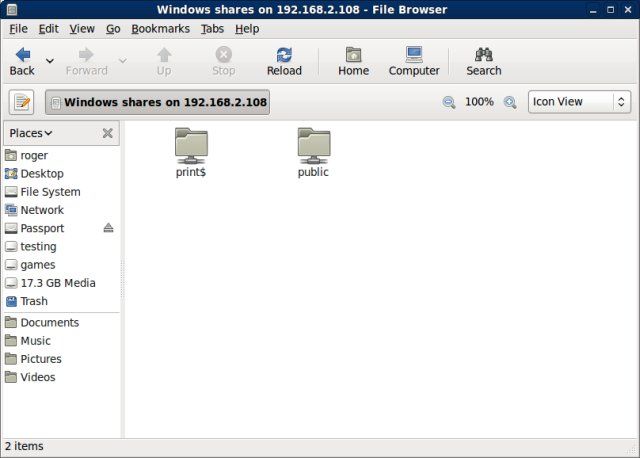
With Bridged networking, it looks like this:
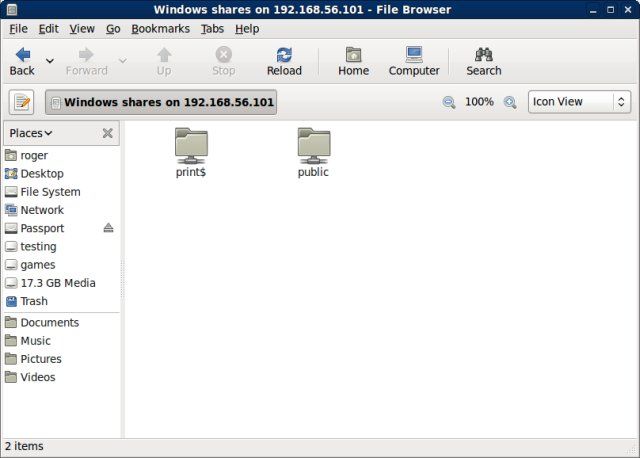
With Host-only, it looks like this:
Ignore the title Windows shares. Samba is usually used to share with Windows hosts. NFS is more typically used for Linux machines. Samba is preferred, because it works with both. For more about Samba sharing, please take a look at this tutorial.
Shared Folders
P.S. All of the above is identical for Windows and Linux guests, by the way. To this end, I decided to take the last set of screenshots demonstrating Shared Folders on a Windows machine.
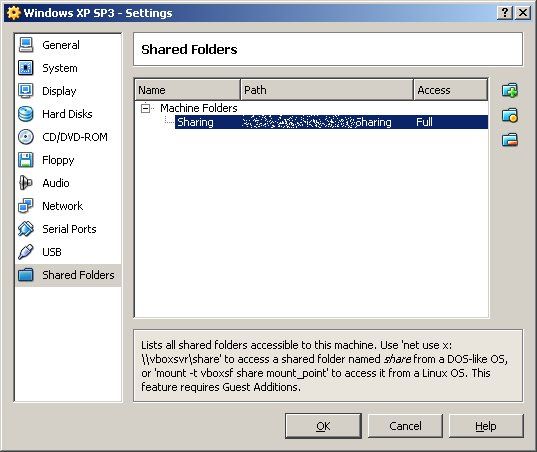
Now, Shared Folders are quite simple to setup. Your first step is to configure a folder on your host that you wish to share. For any virtual machine, open the Settings menu and go to Shared Folders.
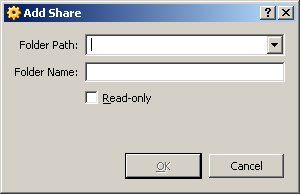
In the right pane, you will have a list of all shared folders on the machine. You can add and remove them as you see fit. The little icons to the right are used for that purpose.
Folder Path:
This is the actual, physical path that you wish to share. On Windows, the folder path will be something like C:\shared. On Linux, it will look something like /home/roger/shared.
Folder Name:
This is the name of the share that your guests will see. Please use names without spaces, something like Shared-folder or Banana. This name can be identical to the actual folder you're sharing, but it does not have to be. But please note, this is not a path! It's a symbolic name for virtual machines to use, as they do not see your physical hardware.
Once you've created the path, boot you virtual machine.
On Windows:
If your virtual machine is a Windows host, you can access the network share either via the command line or using the Tools > Map Network Drive option in the Explorer menu.
On the command line, you need to use the net use command.
net use <drive letter> \\vboxsvr\share-name
net use is the command for mounting network drives.
<drive letter> is the drive that will be assigned the share inside your virtual machine. It can be any free letter, like E:, G:, X:, etc.
\\vboxsvr\share-name is the path to the share. \\vboxsvr is the VirtualBox sharing server. share-name is the actual folder name from earlier. So if you called your share Rambo, then the path reads \\vboxsvr\Rambo.
The command then looks like:
net use h: \\vboxsvr\Rambo
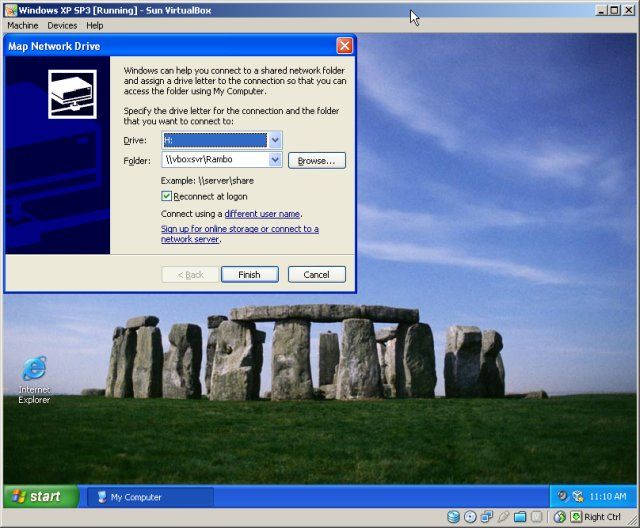
Via the Tools menu in the Explorer, it looks like this:
You can check Reconnect at logon, so you don't have to repeat this task every time you power on the virtual machine. Once you click Finish, you will have a new drive under your My Computer. Opening this new drive letter will take you into the Shared folder.
On Linux:
This is done by a simple command in a terminal windows:
mount -t vboxsf share mount_point
vboxsf is the pseudo-filesystem type used to mount the Shared Folder. It's an abstract translation layer for the virtual sharing service used by VirtualBox.
share is the name of the folder from earlier. Remember, the name and not the path! For example, if our share is called Banana then share = Banana.
mount_point is any directory in your Linux tree where you wish to mount the Shared folder to. For example, /home/roger/shares-go-here.
Thus, our command looks like:
mount -t vboxsf Banana /home/roger/shares-go-here
And then, everything that is inside the shared folder on your host will be visible inside the virtual machine by going to the above path.
To automate the task, you can add the mount option to the /etc/fstab menu. Again, for more details on how to do this, please refer to my Linux commands tutorial.
BTW, notice the help in the Settings menu, explaining how to achieve this!
And that's all.
Conclusion
Now, you know everything you need to know about VirtualBox network & sharing. Windows, Linux, bridged, host-only, NAT, sharing via network, sharing via Shared Folders, you name it, you have it all. I hope you have enjoyed this tutorial.
Stay tuned for more good stuff.
Cheers.


