zabbix 分布式部署
前面已经介绍了zabbix server-agent端部署 http://my.oschina.net/davehe/blog/288054
如果后期机器规模变大,机房增加,容易出现性能瓶颈的是数据库端的操作,为了减轻server端压力,可在分机房搭建proxy. 采用server-proxy-agent模式.使用proxy以后,相当于一部分压力会由Proxy的数据库承担,并且Proxy发送数据给zabbix server也是分批进行的,能够大大缓解zabbix server的压力.proxy相当于一个数据收集器,没有其他任何功能,它不会计算是否触发trigger,生成Event和发送报警.
部署架构:
zabbix 2.2.2 + nginx 1.6.2 + php-fpm 5.3.3 + mysql 5.6
zabbix-server: 172.16.221.2
zabbix-proxy: 172.16.221.1
zabbix-agent: 172.16.221.5
1. zabbix-server 部署(centos 6.5)
[email protected]:~# rpm -ivh http://repo.zabbix.com/zabbix/2.2/rhel/6/x86_64/zabbix-release-2.2-1.el6.noarch.rpm
[email protected]:~#yum install zabbix-server-mysql zabbix-web-mysql zabbix-get nginx php-fpm php-gd php-bcmath php-mbstring php-xml mysql-server MySQL-client
初始化数据库:
# mysql -uroot
mysql> create database zabbix character set utf8 collate utf8_bin;
mysql> grant all privileges on zabbix.* to zabbix@localhost identified by 'zabbix';
mysql> exit

# cd /usr/share/doc/zabbix-server-mysql-2.2.0/create
# mysql -uroot zabbix < schema.sql
# mysql -uroot zabbix < images.sql
# mysql -uroot zabbix < data.sql

[email protected]:zabbix# cat /etc/my.cnf
[mysqld]
innodb_buffer_pool_size = 512M
log-bin=/opt/mysql.bin/2212
datadir = /opt/mysql
port = 3306
server_id = 2212
socket = /var/lib/mysql/mysql.sock
sql_mode=NO_ENGINE_SUBSTITUTION,STRICT_TRANS_TABLES
编辑zabbix server 配置文件及启动:
[email protected]:zabbix# pwd
/etc/zabbix

[email protected]:zabbix# cat zabbix_server.conf
ListenPort=10051
SourceIP=172.16.221.2
LogFile=/tmp/zabbix_server.log
DBHost=172.16.221.2
DBName=zabbix
DBUser=zabbix
DBPassword=zabbix
DBPort=3306
AlertScriptsPath=/etc/zabbix/AlertScriptsPaths
ExternalScripts=/etc/zabbix/AlertScriptsPaths
Timeout=10

[email protected]:zabbix# /etc/init.d/zabbix-server start
编辑php配置:
[email protected]:zabbix# cat /etc/php.ini
max_execution_time = 300
memory_limit = 128M
post_max_size = 16M
upload_max_filesize = 2M
max_input_time = 300
date.timezone = Asia/Shanghai
...

[email protected]:zabbix# /etc/init.d/php-fpm start
配置nginx:
[email protected]:zabbix# cat /etc/nginx/conf.d/monitor-test.conf
server {
    listen       80;
    server_name  172.16.221.2;

    access_log  /var/log/nginx/log/zabbix.access.log  main;
    error_log   /var/log/nginx/log/zabbix.error.log;
    root   /opt/www/monitor/;
    index        index.php;

    location / {
#        root   /usr/share/nginx/html;
        index  index.php index.html index.htm;
    }

    error_page  404              /404.html;

    # redirect server error pages to the static page /50x.html
    #

    location ~ \.php$ {
#           root           html;
           fastcgi_pass   127.0.0.1:9000;
           fastcgi_index  index.php;
           fastcgi_param  SCRIPT_FILENAME  $document_root$fastcgi_script_name;
           include        fastcgi_params;
       }

    error_page   500 502 503 504  /50x.html;
    location = /50x.html {
        root   /usr/share/nginx/html;
    }

}

拷贝zabbix前段到nginx家目录
[email protected]:zabbix# cp -a /usr/share/zabbix/* /opt/www/monitor/zabbix/ [email protected]:zabbix# /etc/init.d/nginx start
进入http://172.16.221.2/zabbix 按图配置下一步就可以了.
2.zabbix-proxy 部署(同时也安装agent端 指向该主机监控)
[email protected]:zabbix#yum install zabbix-proxy-mysql zabbix-agent zabbix-get mysql-server MySQL-client
配置zabbix-proxy及agent
[email protected]:zabbix# cat zabbix_proxy.conf
ProxyMode=0
Server=172.16.221.2            #指向zabbix-server 主机
ServerPort=10051
Hostname=test-proxy001
ListenPort=10051
LogFile=/tmp/zabbix_proxy.log
LogFileSize=0
DebugLevel=3
DBHost=172.16.221.1            #本地proxy主机上的DB
DBName=zabbix
DBUser=zabbix
DBPassword=zabbix
DBSocket=/var/lib/mysql/mysql.sock
DBPort=3306
ListenIP=0.0.0.0

[email protected]:zabbix# /etc/init.d/zabbix-proxy start

[email protected]:zabbix# cat zabbix_agentd.conf
LogFile=/tmp/zabbix_agentd.log
EnableRemoteCommands=1
LogRemoteCommands=1
Server=172.16.221.1                              #指向proxy主机
ListenPort=10050
ListenIP=0.0.0.0
StartAgents=3
ServerActive=172.16.221.1
Hostname=test-proxy001
Include=/etc/zabbix/zabbix_agentd.d/
EnableRemoteCommands=1

[email protected]:zabbix# /etc/init.d/zabbix-agent start
初始化数据库:
# mysql -uroot
mysql> create database zabbix character set utf8 collate utf8_bin;
mysql> grant all privileges on zabbix.* to zabbix@localhost identified by 'zabbix';
mysql> exit

# cd /usr/share/doc/zabbix-server-mysql-2.2.0/create
# mysql -uroot zabbix -p < schema.sql    #注意Proxy 只导入schema.sql

[email protected]:zabbix# cat /etc/my.cnf
[mysqld]
innodb_buffer_pool_size = 512M
log-bin=/opt/mysql.bin/2211
datadir = /opt/mysql
port = 3306
server_id = 2212
socket = /var/lib/mysql/mysql.sock
sql_mode=NO_ENGINE_SUBSTITUTION,STRICT_TRANS_TABLES
3.zabbix-agent 部署
[email protected]:zabbix# yum install zabbix-agent

[email protected]:zabbix# cat zabbix_agentd.conf
LogFile=/tmp/zabbix_agentd.log
EnableRemoteCommands=1
LogRemoteCommands=1
Server=172.16.221.1
ListenPort=10050
ListenIP=0.0.0.0
StartAgents=3
Hostname=test-agent001
ServerActive=172.16.221.1
Include=/etc/zabbix/zabbix_agentd.d/
EnableRemoteCommands=1
[email protected]:zabbix# /etc/init.d/zabbix-agent start
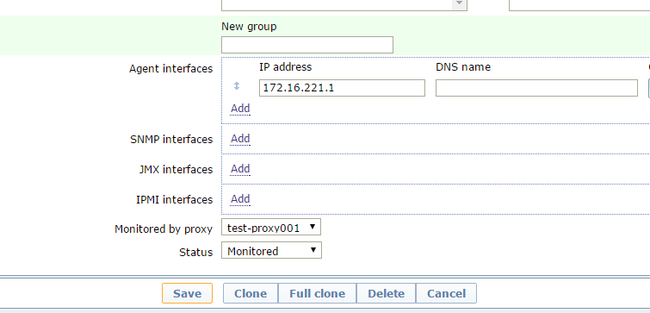
配置agent主机Host
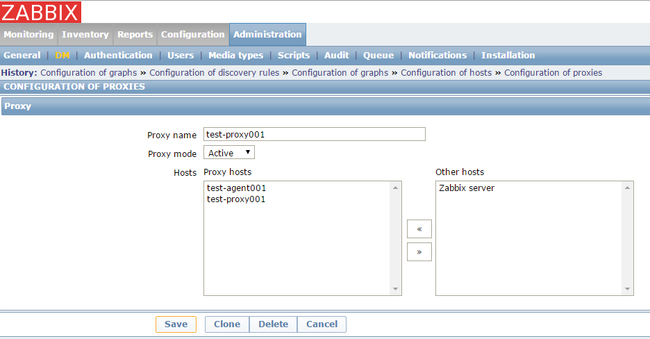
添加proxy 主机
如下已完成:


