How To Create a Rotating Wheel Control with UIKit
This is a post whew you will learn how to build custom Rotating Wheel Control with UIKit, written by iOS Tutorial Team member Cesare Rocchi, a UX designer and developer specializing in web and mobile applications.
There may be times you’ve downloaded a cool application with a new kind of user interface component, and you’ve wondered: how was it built?
One great example of this is the rotary wheel, used by ConvertBot and other applications as a way for users to select options from a menu.
This component is intuitive to use because it resembles many similar controls we use in real life to make choices. For example:
- A ship’s wheel allows the captain to choose the direction of travel.
- To set the volume of your stereo, you use a rotary knob.
- You might also remember that we used to call people using rotary dial telephones.
Such shared knowledge allows us to recognize the “possible uses” of a rotary wheel, even when it’s a virtual wheel.
Note: A perceived use of an object is also called an affordance, a concept used in such fields as psychology, design, and artificial intelligence.
In brief, a rotary wheel is meant to be spun. Just as with hardware wheels, touchscreen wheels can be configured in many ways. For example, we might include stop points (as in the rotary dial on a phone), ignore initial taps in a given zone, allow just one direction of rotation, etc.
As you may have deduced, this tutorial will show you how to build an intuitive rotating wheel interface. You’ll then be able to integrate this component into your iOS apps and let other people wonder how you built it ;]
Getting Started
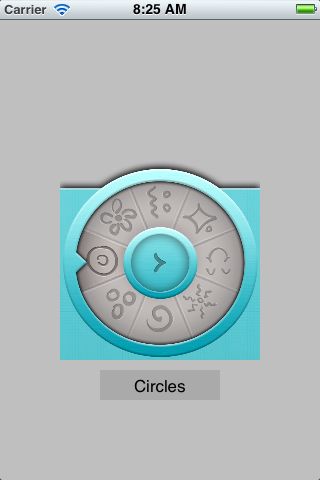
The rotary wheel you’re going to build will be split into selectable sectors, where each sector represents an item on a menu. Each sector will be an image of a shape, and an arrow will indicate the currently selected sector.
By the end of this tutorial, your wheel will look something like this:
Here’s how it will work from the user’s point of view:
The wheel will not have a stop point, so it can be spun in either direction for as long as you want. When the user raises their finger from the touchscreen, the component will detect the sector currently closest to the “beak” on the left side of the outer circle, and adjust the wheel so the sector is centered on the beak. The selected sector will have a slightly darker background.
Although this wheel looks easy to use and there aren’t too many lines of code involved, there is a lot at stake in this tutorial. You’ll need to be acquainted with:
- Building a custom component.
- Detecting taps and calculating tap points.
- The basics of trigonometry.
- Transforming a drag gesture into a rotation.
- Using affine transformations in QuartzCore.
This tutorial will touch on all of these topics on the way to constructing a rotating wheel control.
Creating the Control Class
The first step is creating a project and the basic class for your component.
For the purposes of this project, a Single View application is more than enough. Start up Xcode and create a new project with the iOS\Application\Single View Application template.
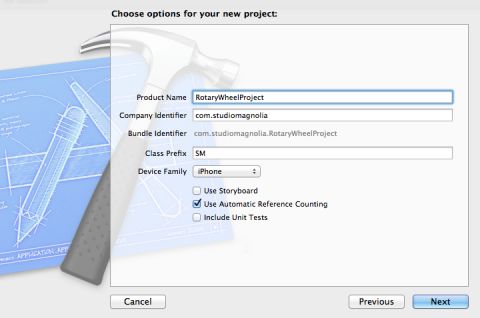
In the next step of the wizard, do the following:
- Give the project the name “RotaryWheelProject”
- Set the class prefix to “SM”
- Select iPhone as the device family (but the component will work on the iPad as well)
- Disable storyboards
- Leave Automatic Reference Counting enabled
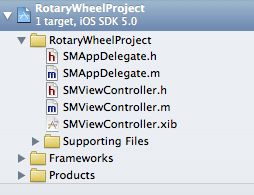
You should end up with a bare bones project, which includes a delegate and an empty view controller as in the following picture:
Now you’re at a crossroads. To create your new component, you can extend either of two classes: UIView or UIControl.
UIControl inherits from UIView, and from an object-oriented perspective, it is better to extend the most specific class. The only difference is in the methods you have to override to obtain the intended behavior. In this tutorial, you will extend UIControl, but I will provide additional instructions in case you choose to extend UIView.
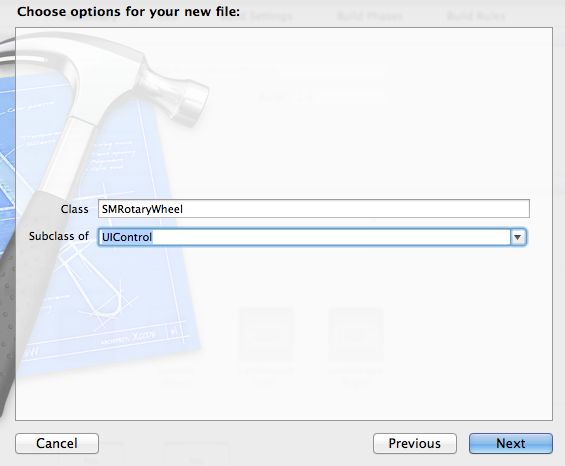
Now that this decision has been made, create a new file with the iOS\Cocoa Touch\Objective-C class template. Name the class SMRotaryWheel, and make it a subclass of UIControl.
Before we edit the SMRotaryWheel class, we are going to add another new file first. This new file defines a protocol to be used by the SMRotaryWheel Class.
Once again create a new file, but this time with the iOS\Cocoa Touch\Objective-C protocol template. Name the protocol SMRotaryProtocol.
The protocol definition is fairly simple – replace the contents of SMRotaryProtocol.h with the following:
#import <Foundation/Foundation.h> @protocol SMRotaryProtocol <NSObject> - (void) wheelDidChangeValue:(NSString *)newValue; @end |
That is the method that will be called called whenever the user lifts their finger from the screen. It indicates a new selection has been made from the menu. You’ll see how to use it in a bit.
Now switch to SMRotaryWheel.h and import the protocol below the existing import statement.
#import "SMRotaryProtocol.h" |
Then, add the following properties above the @end line:
@property (weak) id <SMRotaryProtocol> delegate; @property (nonatomic, strong) UIView *container; @property int numberOfSections; |
These properties keep track of the delegate to notify when the user selects a section, the container view that the rotary wheel will be inside, and the number of sections in the rotary view.
Below properties, add the following method:
- (id) initWithFrame:(CGRect)frame andDelegate:(id)del withSections:(int)sectionsNumber; |
The above method will be called from the view controller to initialize the component.
Now switch to SMRotaryWheel.m and replace its contents with the following:
#import "SMRotaryWheel.h" @interface SMRotaryWheel() - (void)drawWheel; @end @implementation SMRotaryWheel @synthesize delegate, container, numberOfSections; - (id) initWithFrame:(CGRect)frame andDelegate:(id)del withSections:(int)sectionsNumber { // 1 - Call super init if ((self = [super initWithFrame:frame])) { // 2 - Set properties self.numberOfSections = sectionsNumber; self.delegate = del; // 3 - Draw wheel [self drawWheel]; } return self; } - (void) drawWheel { } @end |
Here you’ve added a private method called drawWheel, synthesized the three properties and defined initWithFrame:andDelegate:withSections: where the parameters are saved in the properties and the drawWheel method is called to draw the wheel.
Note you haven’t implemented the functionality for drawing the wheel yet, but you’ll get to that soon :]
For now, it’s time to compile and run! Unfortunately you’ll just get a blank screen at this point, but it’s good to verify the absence of compilation errors at every stage of your coding.
Laying out the Wheel
Now that we’ve got a basic control class set up, we can start to visually arrange the elements of the wheel so that they appear in a circle.
To position the elements of the wheel, you will leverage the power of CALayers. This power not only enables the creation of cool effects, it also allows you to manipulate geometrical properties like rotation. If you aren’t acquainted with CALayers, check out our Introduction to CALayers tutorial.
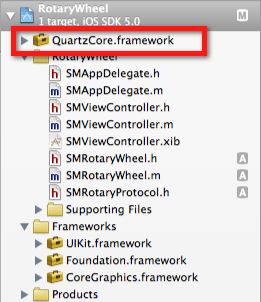
To use layers, you need to import the QuartzCore framework. To do this, select the project in the left sidebar and then select Target and then the Build Phases tab on the right pane. Expand the “Link Binary with Libraries” section and then click on the + sign and look for QuartzCore to add it.
After you complete this step, the framework should appear somewhere in your project tree similar to the following image:
Now for the initial implementation of the layout. Initially, each sector will be an instance of UILabel. Later on you’ll switch to a UIImageView with a custom image.
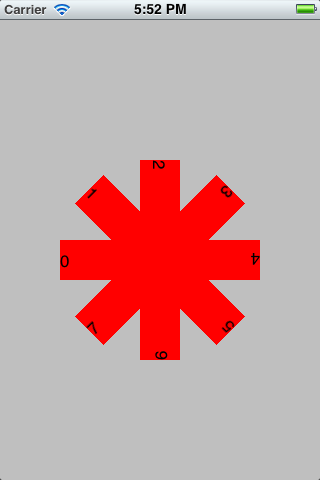
For now, you’ll use a simple red background so the borders of the label are visible, and you’ll fill each label with a number. The effect you want to achieve is similar to the unfolding of a deck of cards into a circle. In this case, you want the cards perfectly distributed along a full circle, so you need a way to apply a rotation to each label.
Here’s the intended result:
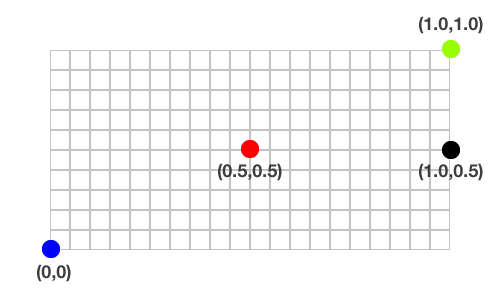
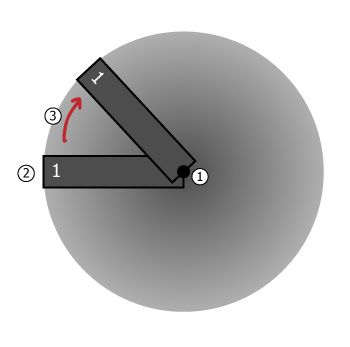
The rotation of a CALayer is applied according to the anchorPoint property, which is an instance of CGPoint ranging from (0,0) to (1,1). The anchorPoint is the pivot point for the layer. The following image identifies some values for the anchorPoint:
By default, the anchorPoint is set to (0.5,0.5) – that is the center of the layer’s frame, but you can change this to whatever you want.
In this tutorial, we want to rotate a each label around the center of the circle. To do this, we just follow these steps for each label:
- Set the anchor point to the right center (1.0, 0.5).
- Position the label so that the right center matches up to the center of the circle.
- Apply a transform to rotate the label the appropriate amount!
So let’s get going with drawing our wheel! But first, you must add an import for QuartzCore to the top ofSMRotaryWheel.m:
#import <QuartzCore/QuartzCore.h> |
Then, replace the empty drawWheel method from our initial implementation with the following code:
- (void) drawWheel { // 1 container = [[UIView alloc] initWithFrame:self.frame]; // 2 CGFloat angleSize = 2*M_PI/numberOfSections; // 3 for (int i = 0; i < numberOfSections; i++) { // 4 UILabel *im = [[UILabel alloc] initWithFrame:CGRectMake(0, 0, 100, 40)]; im.backgroundColor = [UIColor redColor]; im.text = [NSString stringWithFormat:@"%i", i]; im.layer.anchorPoint = CGPointMake(1.0f, 0.5f); // 5 im.layer.position = CGPointMake(container.bounds.size.width/2.0, container.bounds.size.height/2.0); im.transform = CGAffineTransformMakeRotation(angleSize * i); im.tag = i; // 6 [container addSubview:im]; } // 7 container.userInteractionEnabled = NO; [self addSubview:container]; } |
Let’s go over how this works bit by bit.
- Here we create a view that we’ll put everything else inside.
- There are 2 * PI radians in a circle (more on this later), so we divide the number of radians by the number of sections we wish to display in our control. This gives us an amount we have to rotate between sections, which we’ll use later.
- For each section, we create a label and set the anchor point to the middle right, as explained earlier.
- We set the anchor point to the middle right, so now when we set the position it moves the middle right of the label to that point. So here we set the position of the label (the middle right) to the center of the container view. To rotate the label, we can simply set the transform of the label to a rotation transform. Don’t worry, you don’t need to know math to do this – you can use the built in CGAffineTransformMakeRotation method! We just multiply the amount to rotate per section by the number of sections so far.
- Adds the label to the container view we created earlier.
- Adds the container to the main control.
To make sure the application will display something, we need to add an instance of the wheel class to SMViewController. Add the following import statement to to the top of SMViewController.m:
#import "SMRotaryWheel.h" |
Next, override viewDidLoad as follows by replacing the existing method code:
- (void)viewDidLoad { // 1 - Call super method [super viewDidLoad]; // 2 - Set up rotary wheel SMRotaryWheel *wheel = [[SMRotaryWheel alloc] initWithFrame:CGRectMake(0, 0, 200, 200) andDelegate:self withSections:8]; // 3 - Add wheel to view [self.view addSubview:wheel]; } |
If you run the application now, you will see the red rosette as per the image above. You know you’re on the right track!
Now it’s time to dig into some theory about circles, angles, pi, degrees and radians. Armed with this understanding, you’ll be able to correctly rotate the container of sectors according to the movements made by the user when touching (and dragging) the component.
A Digression Into Trigonometry
We all learned in school how to measure angles in degrees, and we all know that there are 360 degrees in a circle. But scientists, engineers and programming language creators use a unit called radians.
You might remember that the code above for drawWheel uses the expression 2*M_PI in section #2 to calculate the size of the circle and split it into sectors. That’s because 360 degrees correspond exactly to 2*M_PI. Using this formula, we can deduce that 1 radian equals 180/pi and that 1 degree equals pi/180 radians.
That gives us the formula for conversion between degrees and radians! But let’s show the relationship visually.
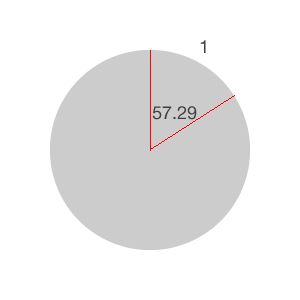
The image above shows the “length” of one radian, which corresponds roughly to an angle of 57.29 degrees. We say approximately because pi is an infinite decimal number.
Here’s another way to explain it. If you took the segment of the circle’s perimeter between the red lines in the picture above, and you straightened it into a line, that line would have the same length as the radius of the circle.
In other words, if the arc length cut by an angle (whose vertex is at the center of the circle) is equal to the radius, then the measure of that angle is 1 radian. Pretty cool, eh?
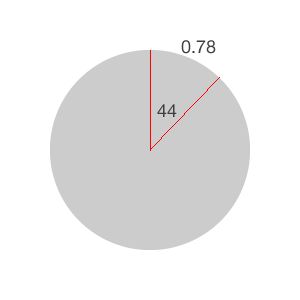
An important observation is that, regardless of the length of the radius, in a full circle there are always 2*pi radians. This will be very helpful when you will apply the rotation transform to your rotating wheel. You’ll be “cutting the pie” into eight equal pieces, so each piece will be approximately 0.78 radians, calculated as 2*pi/8.
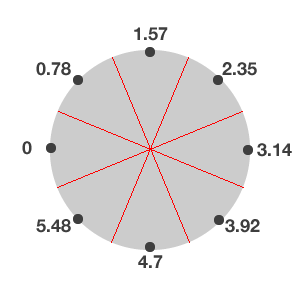
You’ll begin populating the circle from the left, going clockwise, so your zero is on the left. The figure below shows the values of degrees and radians in your current scenario, made of eight sectors.
The black dots represent the midpoints of each sector in radians. As you saw above in the drawWheelmethod, to change the rotation of an element you create an affine transform (of type rotation) and set it as a property of the container. Something like this:
CGAffineTransform t = CGAffineTransformRotate(container.transform, newValueInRadians); container.transform = t; |
Unfortunately, the newValueInRadians is not the point you want to rotate to – it’s the number of radians to be added/subtracted from the current value. You can’t say “rotate to x radians.” You have to calculate the difference between the current value and x, and then add/subtract it as needed.
For example, you can set up a timer to periodically rotate the wheel. Let’s do that by first adding the method definition to SMRotaryWheel.h below the initWithFrame definition:
-(void)rotate; |
Then, add the following code immediately after section #3 (but before the closing curly brace after section #3) in initWithFrame in SMRotaryWheel.m :
// 4 - Timer for rotating wheel [NSTimer scheduledTimerWithTimeInterval:2.0 target:self selector:@selector(rotate) userInfo:nil repeats:YES]; |
Finally, add the rotate method to the end of SMRotaryWheel.m (but before the closing @end):
- (void) rotate { CGAffineTransform t = CGAffineTransformRotate(container.transform, -0.78); container.transform = t; } |
We chose -0.78 here because it’s a hard-coded value for the amount of radians necessary to rotate one segment given that we have 8 segments, as discussed above.
Build and run. You’ll see the wheel completing a rotation every two seconds. This is more or less what you’ll be doing in the final application, though you’ll have to hook it up with user touches. And that brings us to the tricky part.
Adding Rotation
If you were to put into words what you need done via code, it would sound pretty easy:
- When the user taps, store the “current value” of radians.
- Each time the user drags their finger, calculate the new radian value and set it as an affine transformation.
- When the user lifts their finger, calculate the current sector and adjust the rotation to center the wheel.
But as they say, the devil is in the details.
To calculate the angle by which the wheel has to be rotated, you need to transform Cartesian coordinates to polar ones. What does that mean?
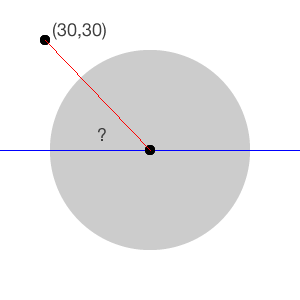
When you detect a tap on a component, you can find out its x and y Cartesian coordinates according to a “reference point,” which is usually the upper-left corner of the component. In this scenario, you’re in a “circled” world, where the pole is the center of the container. For example, say the user taps on the point (30, 30) of the wheel as in the following image:
What is the angle between the tapped point and the x-axis of the center (blue line)? You need to know this value to calculate the angle “drawn” by the user when dragging their finger on the wheel. That will be the rotation value applied to the container.
I’ll save you some hair-pulling and struggling with equations. The way to calculate the angle for the above is using the arctangent function, the inverse of the tangent. And guess what? The function returns a radian value – exactly what you needed!.
But here comes another devilish little detail – the range of the arctangent function is from -pi to pi. If you remember, as mentioned above, your range is from 0 to 2pi. It’s not something that cannot be handled, but do remember to take this into account in your future calculations. Otherwise, the on-screen display could end up looking weird.
Enough theory, let’s see some code! In SMRotaryWheel.h, add a new property as follows:
@property CGAffineTransform startTransform; |
This is needed to save the transform when the user taps on the component. To save the angle when the user touches the component, we add a static variable of type float to the top of SMRotaryWheel.m, just above the @implementation line, as follows:
static float deltaAngle; |
You should also synthesize the startTransform property added previously as follows:
@synthesize startTransform; |
Now, we have to detect user touches. When a user taps on a UIComponent instance, the touch is handled via the beginTrackingWithTouch:touch withEvent:event method. So let’s override that method by adding the following code to the end of SMRotaryWheel.m just below rotate:
Note: In case you’ve chosen to extend UIView instead of UIControl, the method to override is touchesBegan:touches withEvent:event.
- (BOOL)beginTrackingWithTouch:(UITouch *)touch withEvent:(UIEvent *)event { // 1 - Get touch position CGPoint touchPoint = [touch locationInView:self]; // 2 - Calculate distance from center float dx = touchPoint.x - container.center.x; float dy = touchPoint.y - container.center.y; // 3 - Calculate arctangent value deltaAngle = atan2(dy,dx); // 4 - Save current transform startTransform = container.transform; return YES; } |
The first thing you do is to find the Cartesian coordinates of the touch point on the wheel. Then you calculate the different between the touch point and the center of the container. Finally, you get the arctangent value and save the current transform so that you have an initial reference point when the user starts dragging the wheel.
You return YES from the method because the wheel is also meant to respond when a touch is dragged, as you will see in a minute. Now that you’ve saved the angle when the interaction begins, the next step is to calculate the rotation angle according to how the user dragged their finger.
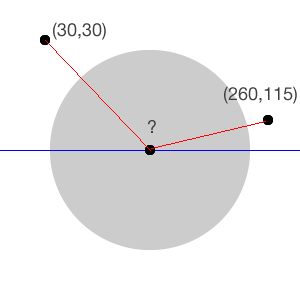
For example, let’s suppose the user touched the component at (50,50) and dragged their finger to (260, 115).
You have to calculate the radians for the end point and subtract that value from the delta saved when the user first touched the component. The result is the number of radians to be passed to the affine transform. This has to be done for each drag event thrown by the component. The event to be overridden here is
continueTrackingWithTouch withEvent: – add it below beginTrackingWithTouch:
Note: If you subclass UIView, the method to override is touchesMoved:withEvent:.
As you’ll notice, the radian calculation is pretty similar to what we did in beginTrackingWithTouch. Notice as well that the code specifies -angleDifference to compensate for the fact that values might be in the negative quadrant.
Finally, don’t forget to comment out section #4 of initWithFrame: so that the wheel doesn’t automatically rotate any longer.
Now compile and run. See? You’re getting there! You have the first working prototype of a rotating wheel, which is working pretty good!
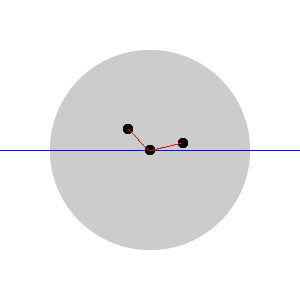
There are a few oddities though. For example, if the user taps a point very close to the center of the wheel, the application still works, but the rotation might be “jumpy.” This is due to the fact that the angle drawn is “mashed,” as in the following picture.
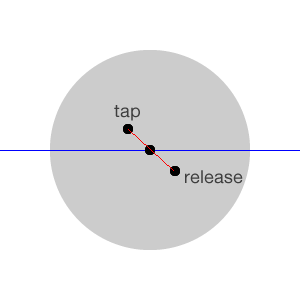
Things get even more jumpy if the path drawn by the finger crosses the center, as follows.
You can verify such a behavior in the current implementation. While the code still works and the results are right, the interaction experience can be improved.
To solve this issue, resort to the same solution used in hardware wheels, like the good old rotary dial, which makes it difficult to use the wheel from too close to the center. Your goal is to ignore taps too close to the center of the wheel, by preventing the dispatch of any event when such taps occur.
To achieve this result, there is no need to calculate the arctangent – Pythagoras’ theorem is enough. But you need a helper function, calculateDistanceFromCenter, for which you add the definition at the top ofSMRotaryWheel.m, right after the drawWheel definition.
@interface SMRotaryWheel() ... - (float) calculateDistanceFromCenter:(CGPoint)point; |
Then, add the implementation after continueTrackingWithTouch:
- (float) calculateDistanceFromCenter:(CGPoint)point { CGPoint center = CGPointMake(self.bounds.size.width/2, self.bounds.size.height/2); float dx = point.x - center.x; float dy = point.y - center.y; return sqrt(dx*dx + dy*dy); } |
This just measures how far the tap point is from the center. Now add the following right after section #1 in beginTrackingWithTouch:withEvent::
// 1.1 - Get the distance from the center float dist = [self calculateDistanceFromCenter:touchPoint]; // 1.2 - Filter out touches too close to the center if (dist < 40 || dist > 100) { // forcing a tap to be on the ferrule NSLog(@"ignoring tap (%f,%f)", touchPoint.x, touchPoint.y); return NO; } } |
This way, when taps are too close to the center, the touches are simply ignored because you return a NO, indicating that the component is not handling that touch.
Note: If you have chosen to extend UIView, you have to implement this behavior in touchesMoved:withEvent.
You might tune the two values in the first line of section #1.2 (40 and 100) according to the dimensions of your wheel to define the allowed tap area, similar to what’s shown in the following image (in blue):
You might want to perform the same check also in continueTrackingWithTouch:withEvent. Check out the project source code for more information.
Now comes the hard part. What you’re going to implement in the next section is a “come-to-rest” effect. That is, when the user lifts their finger from the screen, the wheel will “center” on the midpoint of the current sector.
Building the Sectors
To have the wheel come to rest centred on the current sector, you first need to split the wheel into sectors. We’ll do the following when the user lifts their finger:
- Calculate the current value in radians
- Find out the sector based on the calculated value
- Animate the radians to the midpoint of that sector
For example, if the selected sector is zero and the user drags the wheel only slightly up or down, you want the rotation to animate back to the centre of sector zero. Since this could get a little tricky, let’s go over the steps in detail.
But first, let’s get a better understanding of the world of the container.
Add the following at the top of continueTrackingWithTouch:withEvent in SMRotaryWheel.m:
CGFloat radians = atan2f(container.transform.b, container.transform.a); NSLog(@"rad is %f", radians); |
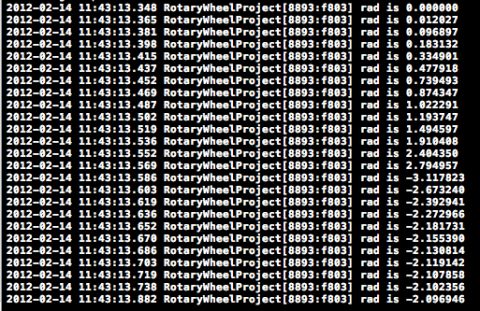
This logs the rotation of the container each time the user drags their finger. You’ll notice that if the wheel is dragged clockwise, there are positive values until the rotation is greater than pi radians (180 degrees) or, if you prefer, when the sector labeled “0” is in the quadrant below the center horizontal. When you go beyond 180 degrees, you’ll see negative values, as in the following screenshot.
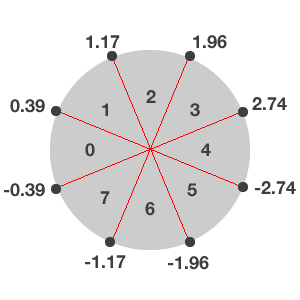
This is what you have to account for when calculating the sector boundaries: their min, mid and max values. The selected sector will always be the one in the leftmost position – the initial position of the 0 sector. So in building the sectors, you’re addressing the following question: when the value of radians is x, which sector is identified by the placeholder?
To answer this question, you need to reason backwards. The following image shows a wheel with eight sectors.
The values around the circumference of the circle represent the min and max radian values for each sector. For example, whenever the value of the container’s radians is between -0.39 and 0.39, the rotation should be set to the midpoint of sector 0.
Again, you have to take into account the quadrant (positive or negative) to correctly add/subtract the difference of the angle. In this particular case, you have to deal with the fact that both sectors 0 and 4 spans two quadrants. In the case of sector 0, the center point is 0 radians and so it’s fairly straightforward. However, for sector 4, the centre could be either pi or -pi since the center point straddles the dividing line between the negative and positive quadrants. So things can get a little bit confusing here.
You can see in the following image that if there were an odd number of sectors, the value for the centre point would be a bit simpler.
In order to be flexible (and comprehensive), this tutorial will account for both an even and odd number of sectors, and provide separate procedures to build them. But first, we have to define a new class to represent each sector so that we can store min, mid and max values for each sector.
Create a new file with the iOS\Cocoa Touch\Objective-C class template. Name the class SMSector, and make it a subclass of NSObject. Now switch to SMSector.h and replace its contents with the following:
@interface SMSector : NSObject @property float minValue; @property float maxValue; @property float midValue; @property int sector; @end |
And then switch to SMSector.m and replace its contents with the following implementation code:
#import "SMSector.h" @implementation SMSector @synthesize minValue, maxValue, midValue, sector; - (NSString *) description { return [NSString stringWithFormat:@"%i | %f, %f, %f", self.sector, self.minValue, self.midValue, self.maxValue]; } @end |
In SMRotaryWheel.h import the SMSector header:
#import "SMSector.h" |
Then, add a new property, named sectors:
@property (nonatomic, strong) NSMutableArray *sectors; |
Now switch to SMRotaryWheel.m and add two new helper method definitions to build the sectors (just below the existing definition for calculateDistanceFromCenter:):
@interface SMRotaryWheel() ... - (void) buildSectorsEven; - (void) buildSectorsOdd; @end |
Then, synthesize the new property:
@synthesize sectors; |
Next, at the end of drawWheel, add the following code so that the sectors are initialized when you create a new wheel.
// 8 - Initialize sectors sectors = [NSMutableArray arrayWithCapacity:numberOfSections]; if (numberOfSections % 2 == 0) { [self buildSectorsEven]; } else { [self buildSectorsOdd]; } |
Let’s start with the simple case – when there are an odd number of sectors. Add the following method implementation to the bottom of SMRotaryWheel.m (before the @end):
- (void) buildSectorsOdd { // 1 - Define sector length CGFloat fanWidth = M_PI*2/numberOfSections; // 2 - Set initial midpoint CGFloat mid = 0; // 3 - Iterate through all sectors for (int i = 0; i < numberOfSections; i++) { SMSector *sector = [[SMSector alloc] init]; // 4 - Set sector values sector.midValue = mid; sector.minValue = mid - (fanWidth/2); sector.maxValue = mid + (fanWidth/2); sector.sector = i; mid -= fanWidth; if (sector.minValue < - M_PI) { mid = -mid; mid -= fanWidth; } // 5 - Add sector to array [sectors addObject:sector]; NSLog(@"cl is %@", sector); } |
Let’s go through the above code step-by-step:
- First, we identify the length (or the width, if you prefer) of the sector in radians.
- Next, we initialize a variable with the initial midpoint. Since our starting point is always zero radians, that becomes our first midpoint.
- Then we iterate through each of the sectors to set up the min, mid, and max values for each sector
- When calculating the min and max values, you add/subtract half of the sector width to get the correct values. Remember that your range is from -pi to pi, so everything has to be “normalized” between those values. If a value is greater than pi or –pi, that means you’ve changed quadrant. Since you’ve populated the wheel clockwise, you have to take into account when the minimum value is less than pi, and in that case change the sign of the midpoint.
- Finally, once we have a sector set up, we add that sector to our previously defined sector array.
Now in the SMViewController.m, modify section #2 in viewDidLoad to set the number of sections to 3, as follows:
SMRotaryWheel *wheel = [[SMRotaryWheel alloc] initWithFrame:CGRectMake(0, 0, 200, 200) andDelegate:self withSections:3]; |
If you compile and run now, the console should show the following results.
These are exactly the same radian values that were in the 3-sectioned wheel in the image above. So your calculations worked as expected!
Now let’s address the case of an even number of sectors by adding the following code to the end ofSMRotaryWheel.m:
As you’ll notice, the basic logic is the same as building an odd number of sectors. The main difference is that in this instance pi (or -pi if you move counterclockwise) is not a max or min point, but it coincides with a midpoint. So you have to check if, by subtracting the sector width from the max value, you pass the -pi limit, and if you do, set the min value as positive.
Now modify SMViewController.m‘s viewDidLoad method (section #2) to switch the code back to creating eight sectors and run the application. The sectors should all go from -pi to pi as follows.
Notice that sector 4 has a positive min value and a negative max value.
Animating the Selection Centering
The last step is to implement the centering of the current sector. Let’s revisit what that means.
When the user lifts their finger from the screen you have to calculate x, the current value of radians, and then determine the sector for that value. Then you have to calculate the difference between x and the midpoint of the sector and use it to build an affine transform.
First add a new property to SMRotaryWheel.h to store the current sector:
@property int currentSector; |
Then, synthesize the new property in SMRotaryWheel.m:
@synthesize currentSector; |
To handle the finger-lifted event, you need to override endTrackingWithTouch:withEvent: (touchesEnded:withEvent: is the event you need if you extend UIView).
In SMRotaryWheel.m, add the following code right below the continueTrackingWithTouch:withEvent:method to handle an odd number of sectors:
- (void)endTrackingWithTouch:(UITouch*)touch withEvent:(UIEvent*)event { // 1 - Get current container rotation in radians CGFloat radians = atan2f(container.transform.b, container.transform.a); // 2 - Initialize new value CGFloat newVal = 0.0; // 3 - Iterate through all the sectors for (SMSector *s in sectors) { // 4 - See if the current sector contains the radian value if (radians > s.minValue && radians < s.maxValue) { // 5 - Set new value newVal = radians - s.midValue; // 6 - Get sector number currentSector = s.sector; break; } } // 7 - Set up animation for final rotation [UIView beginAnimations:nil context:NULL]; [UIView setAnimationDuration:0.2]; CGAffineTransform t = CGAffineTransformRotate(container.transform, -newVal); container.transform = t; [UIView commitAnimations]; } |
The method is pretty simple: it calculates the current value of radians and compares it to min and max values to find the right sector. Then it finds the difference and builds a new CGAffineTransform. To make the effect look natural, the setting of the rotation is wrapped in an animation lasting 0.2 seconds.
Switch the app back to creating 3 sectors again by modifying section #2 of viewDidLoad inSMViewController.m, run, compile and … ta da! It works. Grab the wheel and drag it as you wish. You’ll see that it settles on the right sector when you stop dragging and lift your finger up.
The code in its current form will work for all wheels with an odd number of sectors. To account for an even number of sectors, you have to rework the for loop (section #3) to check for the anomalous case, in which the min point is positive and the max is negative. Replace sections #4, #5, and #6 inendTrackingWithTouch:withEvent: with the following:
// 4 - Check for anomaly (occurs with even number of sectors) if (s.minValue > 0 && s.maxValue < 0) { if (s.maxValue > radians || s.minValue < radians) { // 5 - Find the quadrant (positive or negative) if (radians > 0) { newVal = radians - M_PI; } else { newVal = M_PI + radians; } currentSector = s.sector; } } // 6 - All non-anomalous cases else if (radians > s.minValue && radians < s.maxValue) { newVal = radians - s.midValue; currentSector = s.sector; } |
Compile, run and feel free to experiment by changing the number of sectors!
Adding Protocol Notifications
All the heavy lifting is behind us and it’s all downhill from now on!
Remember the SMRotaryProtocol you defined at the very beginning? If you check initWithFrame: for SMRotaryWheel, you’ll see that we already set the delegate. So, why don’t you add a label to the view controller to show the selected sector?
In SMViewController.h replace the existing code with the following:
#import "SMRotaryProtocol.h" @interface SMViewController : UIViewController<SMRotaryProtocol> @property (nonatomic, strong) UILabel *sectorLabel; @end |
Synthesize the new property in SMViewController.m:
@synthesize sectorLabel; |
Then, replace viewDidLoad with the following:
- (void)viewDidLoad { // 1 - Call super method [super viewDidLoad]; // 2 - Create sector label sectorLabel = [[UILabel alloc] initWithFrame:CGRectMake(100, 350, 120, 30)]; sectorLabel.textAlignment = UITextAlignmentCenter; [self.view addSubview:sectorLabel]; // 3 - Set up rotary wheel SMRotaryWheel *wheel = [[SMRotaryWheel alloc] initWithFrame:CGRectMake(0, 0, 200, 200) andDelegate:self withSections:12]; wheel.center = CGPointMake(160, 240); // 4 - Add wheel to view [self.view addSubview:wheel]; } |
The only method defined for the protocol can be added to the end of the file (before the @end) as follows:
- (void) wheelDidChangeValue:(NSString *)newValue { self.sectorLabel.text = newValue; } |
Now switch to SMRotaryWheel.m and add the following line after section #3:
self.currentSector = 0; |
Then add a call to the protocol method at the end of drawWheel:.
// 9 - Call protocol method [self.delegate wheelDidChangeValue:[NSString stringWithFormat:@"value is %i", self.currentSector]]; |
Add the very same piece of code at the end of endTrackingWithTouch:withEvent: as well.
Compile and run. See? The label gets updated each time a sector is settled.
Cool! Now I know you want to make the component more attractive by adding some graphics.
Adding Graphics
Vicki Wenderlich has been very kind to provide the assets for our component. Here is the complete set.
Go ahead and download the graphics (instead of the single image above) and add them to your project. Once you’ve imported them, add two new static properties to SMRotaryWheel.m (above the @implementation statement).
static float minAlphavalue = 0.6; static float maxAlphavalue = 1.0; |
Then add the following to drawWheel: right before section #8:
// 7.1 - Add background image UIImageView *bg = [[UIImageView alloc] initWithFrame:self.frame]; bg.image = [UIImage imageNamed:@"bg.png"]; [self addSubview:bg]; |
Also add the center button, which you can use to fire an action once a sector has been selected, right after the above:
UIImageView *mask = [[UIImageView alloc] initWithFrame:CGRectMake(0, 0, 58, 58)]; mask.image =[UIImage imageNamed:@"centerButton.png"] ; mask.center = self.center; mask.center = CGPointMake(mask.center.x, mask.center.y+3); [self addSubview:mask]; |
Replace sections #3, #4, #5, and #6 to get rid of the labels and use image views instead to show the segment.png, and add an icon to each segment:
// 3 - Create the sectors for (int i = 0; i < numberOfSections; i++) { // 4 - Create image view UIImageView *im = [[UIImageView alloc] initWithImage:[UIImage imageNamed:@"segment.png"]]; im.layer.anchorPoint = CGPointMake(1.0f, 0.5f); im.layer.position = CGPointMake(container.bounds.size.width/2.0-container.frame.origin.x, container.bounds.size.height/2.0-container.frame.origin.y); im.transform = CGAffineTransformMakeRotation(angleSize*i); im.alpha = minAlphavalue; im.tag = i; if (i == 0) { im.alpha = maxAlphavalue; } // 5 - Set sector image UIImageView *sectorImage = [[UIImageView alloc] initWithFrame:CGRectMake(12, 15, 40, 40)]; sectorImage.image = [UIImage imageNamed:[NSString stringWithFormat:@"icon%i.png", i]]; [im addSubview:sectorImage]; // 6 - Add image view to container [container addSubview:im]; } |
To identify the correct sector each time it’s needed, add a new helper method definition at the top ofSMRotaryWheel.m:
@interface SMRotaryWheel() ... - (UIImageView *) getSectorByValue:(int)value; @end |
Then add the method implementation at the end of SMRotaryWheel.m:
- (UIImageView *) getSectorByValue:(int)value { UIImageView *res; |
Whenever the user taps on the wheel, you have to reset the alpha value of the current sector to its minimum. Add the following to beginTrackingWithTouch:withEvent before the return YES.
// 5 - Set current sector's alpha value to the minimum value UIImageView *im = [self getSectorByValue:currentSector]; im.alpha = minAlphavalue; |
Once a new sector is selected it has to be highlighted, so at the end ofendTrackingWithTouch:withEvent:, add the following:
// 10 - Highlight selected sector UIImageView *im = [self getSectorByValue:currentSector]; im.alpha = maxAlphavalue; |
If you’d like to show the icon name instead of the position number, here’s a helper method to return the corresponding string.
- (NSString *) getSectorName:(int)position { NSString *res = @""; switch (position) { case 0: res = @"Circles"; break; case 1: res = @"Flower"; break; case 2: res = @"Monster"; break; case 3: res = @"Person"; break; case 4: res = @"Smile"; break; case 5: res = @"Sun"; break; case 6: res = @"Swirl"; break; case 7: res = @"3 circles"; break; case 8: res = @"Triangle"; break; default: break; } return res; } |
If you want to use the above method, substitute all the calls to wheelDidChangeValue: inSMRotaryWheel.m with the following:
[self.delegate wheelDidChangeValue:[self getSectorName:currentSector]]; |
You’re almost done. Remember how we set the number of sectors in SMViewController.m to 12 in a previous code change? Well, the icon set only contains 8 icons. So we need to change the number of sectors back to 8 in SMViewController.m.
You’re done! Now when the user is in the process of dragging the wheel, all the sectors are slightly faded. When one is selected it goes fully visible, while the others are still faded. You can tweak this effect as you wish – for example, by adding a gradient or a border.
Where to Go From Here?
An example project with all of the code from the above tutorial can be downloaded from my Github page.
It was a nice trip around the wheel, eh? You’ve built a whole new component from scratch, creating a natural-feeling and fun way for users to select an item.
You can complete this component by adding a selector to the central button that shows a different view according to the sector selected. As an additional exercise, if you like to dig into trigonometry – and who doesn’t :] – try moving the zero point to the top or the right.
I hope you had a rewarding experience with this tutorial and look forward to responding to your questions and comments in the forum!
 This is a post by iOS Tutorial Team member Cesare Rocchi, a UX designer and developer specializing in web and mobile applications. You can also find me on Google+
1、 三角函数
double sin (double);正弦
double cos (double);余弦
double tan (double);正切
2 、反三角函数
double asin (double); 结果介于[-PI/2, PI/2]
double acos (double); 结果介于[0, PI]
double atan (double); 反正切(主值), 结果介于[-PI/2, PI/2]
double atan2 (double, double); 反正切(整圆值), 结果介于[-PI, PI]
3 、双曲三角函数
double sinh (double);
double cosh (double);
double tanh (double);
4 、指数与对数
double exp (double);求取自然数e的幂
double sqrt (double);开平方
double log (double); 以e为底的对数
double log10 (double);以10为底的对数
double pow(double x, double y);计算以x为底数的y次幂
float powf(float x, float y); 功能与pow一致,只是输入与输出皆为浮点数
5 、取整
double ceil (double); 取上整
double floor (double); 取下整
6 、绝对值
double fabs (double);求绝对值
double cabs(struct complex znum) ;求复数的绝对值
7 、标准化浮点数
double frexp (double f, int *p); 标准化浮点数, f = x * 2^p, 已知f求x, p ( x介于[0.5, 1] )
double ldexp (double x, int p); 与frexp相反, 已知x, p求f
8 、取整与取余
double modf (double, double*); 将参数的整数部分通过指针回传, 返回小数部分
double fmod (double, double); 返回两参数相除的余数
9 、其他
double hypot(double x, double y);已知直角三角形两个直角边长度,求斜边长度
double ldexp(double x, int exponent);计算x*(2的exponent次幂)
double poly(double x, int degree, double coeffs [] );计算多项式
nt matherr(struct exception *e);数学错误计算处理程序

