用Eclipse开发与调试纯粹的Android C++程序,非ndk-build、ndk-gdb
在做Android本地程序开发时,Google为我们提供了NDK开发环境,如果只是很小的工程,用NDK开发还是很方便的。但是如果是很大的工程,代码文件很多的时候,手工支配置android.mk文件还是很繁锁的。虽然Google不建议我们用NDK开发大规模的工程,但是在很多时候,例如,现有游戏或者其它工程的移植时,还是不可避免的。本文将介绍一种利用eclipse进行传统C++开发的方法。
一、 开发篇
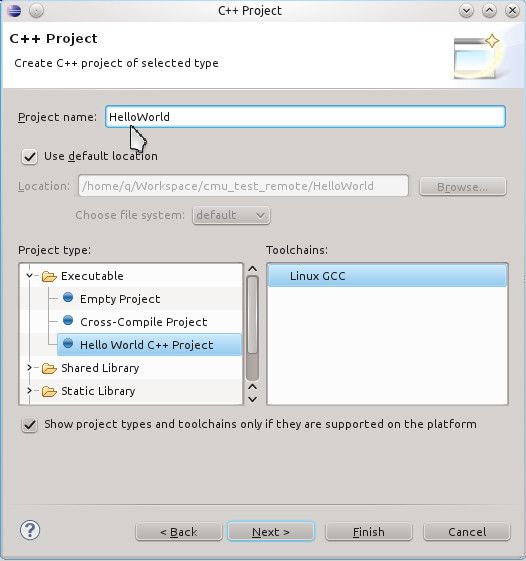
1. 创建工程打开eclipse新建C++工程-->键入工程名并选择Hello World C++ Project-->Finish
创建C++工程
选择Hello World工程
2. 设置工程属性右键工程-->选择属性-->C/C++Build-->Tool Chain Editor :
选择工具链
注意:如果没有所需的工具链选择,可能是eclipse的版本不对。
3. 设置工具链属性右键工程-->选择属性-->C/C++Build-->Settings
工具链设置
3.1. [Cross Settings]
Prefex : arm-linux-androideabi-
Path : /home/q/Workspace/Andriod/NDK/toolchains/arm-linux-androideabi-4.4.3/prebuilt/linux-x86/
注意:
1. Path是指工具链的根目录,并不是可执行文件的目录,所以不需要加上 “/bin”目录。
2. /home/q/Workspace/Andriod/NDK/是NDK的根目录,请根据自己的情况选择。以下设置相同。
3.2. [Cross GCC Compiler]
Include Paths :
 /home/q/Workspace/Andriod/NDK/platforms/android-9/arch-arm/usr/include
 /home/q/Workspace/Andriod/NDK/toolchains/arm-linux-androideabi-4.4.3/prebuilt/linux-x86/include
 /home/q/Workspace/Andriod/NDK/toolchains/arm-linux-androideabi-4.4.3/prebuilt/linux-x86/arm-linux-androideabi/include
 /home/q/Workspace/Andriod/NDK/toolchains/arm-linux-androideabi-4.4.3/prebuilt/linux-x86/lib/gcc/arm-linux-androideabi/4.4.3/include
 /home/q/Workspace/Andriod/NDK/toolchains/arm-linux-androideabi-4.4.3/prebuilt/linux-x86/lib/gcc/arm-linux-androideabi/4.4.3/include-fixed/
 /home/q/Workspace/Andriod/NDK/sources/cxx-stl/stlport/stlport/
Miscellaneous:
 Other Flags :-c -fmessage-length=0 -DANDROID -fno-exceptions
如果使用stlport,“-DANDROID -fno-exceptions” 选项是必须的否则 stlport中的 #include_next 没法使用,会报如下错误:
/home/q/Workspace/Andriod/NDK/sources/cxx-stl/stlport/stlport/stl/_cstddef.h:29:30: error: cstddef: No such file or directory钩选:-fPIC
3.3. [Cross G++ Compiler] 同 3.2。
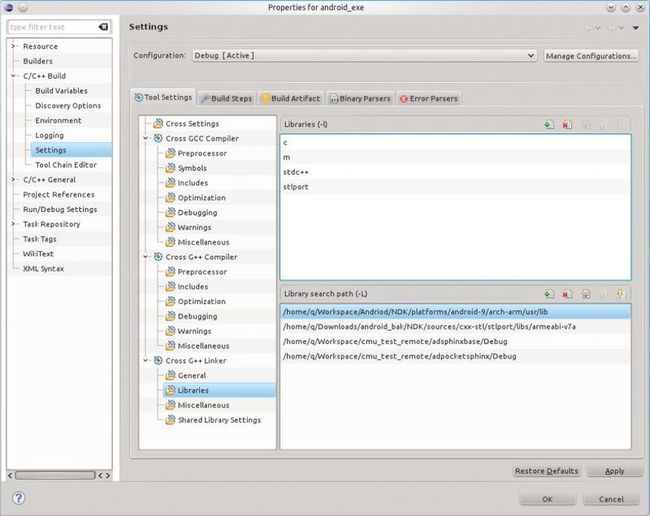
3.4. [Cross G++ Linker]General: -nostdlibLibraries:添加的库:
c
m
stdc++
stlport
库路径:
/home/q/Workspace/Andriod/NDK/platforms/android-9/arch-arm/usr/lib
/home/q/Downloads/android_bak/NDK/sources/cxx-stl/stlport/libs/armeabi-v7a
Libraries设置
注意:在/home/q/Downloads/android_bak/NDK/sources/cxx-stl/stlport/libs/armeabi-v7a路径下是没有libstlport.so文件的。我们需要从我们自己的设备上把此文件下载下来:
adb shell pull /system/lib/libstlport.so /home/q/Downloads/android_bak/NDK/sources/cxx-stl/stlport/libs/armeabi-v7a
Miscellaneous:其它选项:
-R/home/q/Workspace/Andriod/NDK/platforms/android-9/arch-arm/usr/lib
其它对象:/home/q/Workspace/Andriod/NDK/platforms/android-9/arch-arm/usr/lib/crtbegin_dynamic.o/home/q/Workspace/Andriod/NDK/platforms/android-9/arch-arm/usr/lib/crtend_android.o
链接器选项
这样开发的配置就已经完成了,编译一下试试看吧!
adb push ./HelloWorld /data/td/
adb shell /data/td/HelloWorld
注意:如果将程序放到sdcard上是不能执行的,即使已经root了,chmod也设置不了权限的。
二、 调试篇
虽然在NDK里面有ndk-gdb的工具使我们可以调试ndk-build编译出来的程序,但是它需要android.mk文件,从上一篇的介绍中我们并没有生成此文件。还有其它方法可以用吗?分析ndk-gdb文件我们提取出下面这些有用信息。首先我们以命令行的方式来模拟ndk-gdb的操作:
1. 在设备上启动gdbserver监听gdb的请求:
root@g:~# adb devices
List of devices attached
353046FDC1EE00EC        device

root@g:~# adb push /home/q/Workspace/cmu_test_remote/HelloWorld/Debug/HelloWorld  /data/td/
1002 KB/s (136536 bytes in 0.132s)
root@g:~# adb push /home/q/Workspace/Andriod/NDK/toolchains/arm-linux-androideabi-4.4.3/prebuilt/gdbserver /system/xbin/
893 KB/s (125208 bytes in 0.136s)
root@g:~# adb shell gdbserver :5039 /data/td/HelloWorld
Process /data/td/HelloWorld created; pid = 21867
Listening on port 5039
2. 进行端口重定向:
adb forward tcp:5039 tcp:5039
因为gdb需要通过TCP或者串口进行连接,但大多数情况下我们是用USB线进行连接的,所以需要进行端口重定向。
3. Gdb 打开程序,进行调试:
root@g:~# /home/q/Workspace/Andriod/NDK/toolchains/arm-linux-androideabi-4.4.3/prebuilt/linux-x86/bin/arm-linux-androideabi-gdb /home/q/Workspace/cmu_test_remote/HelloWorld/Debug/HelloWorld
GNU gdb 6.6
Copyright (C) 2006 Free Software Foundation, Inc.
GDB is free software, covered by the GNU General Public License, and you are
welcome to change it and/or distribute copies of it under certain conditions.
Type "show copying" to see the conditions.
There is absolutely no warranty for GDB.  Type "show warranty" for details.
This GDB was configured as "--host=x86_64-linux-gnu --target=arm-elf-linux"...
(gdb)
这里的gdb的版本一定要正确。这时已经进入了gdb调试模式,还需要进行与远程的gdbserver进行连接,在gdb模式下输入:
(gdb) target remote :5039
Remote debugging using :5039
warning: Unable to find dynamic linker breakpoint function.
GDB will be unable to debug shared library initializers
and track explicitly loaded dynamic code.
0xb0001000 in ?? ()
(gdb) l
4       // Version     :
5       // Copyright   : Your copyright notice
6       // Description : Hello World in C++, Ansi-style
7       //============================================================================
8
9       #include <iostream>
10      using namespace std;
11
12      int main() {
13              cout << "!!!Hello World!!!" << endl; // prints !!!Hello World!!!
(gdb) b main
Breakpoint 1 at 0x84e8: file ../src/HelloWorld.cpp, line 13.
(gdb) c
Continuing.
Error while mapping shared library sections:
/system/bin/linker: No such file or directory.
Error while mapping shared library sections:
libc.so: Success.
Error while mapping shared library sections:
libm.so: Success.
Error while mapping shared library sections:
libstdc++.so: Success.
Error while mapping shared library sections:
libstlport.so: Success.

Breakpoint 1, main () at ../src/HelloWorld.cpp:13
13              cout << "!!!Hello World!!!" << endl; // prints !!!Hello World!!!
(gdb) c
Continuing.

Program exited normally.
(gdb)
至此已经完成了整个程序的调试过程。
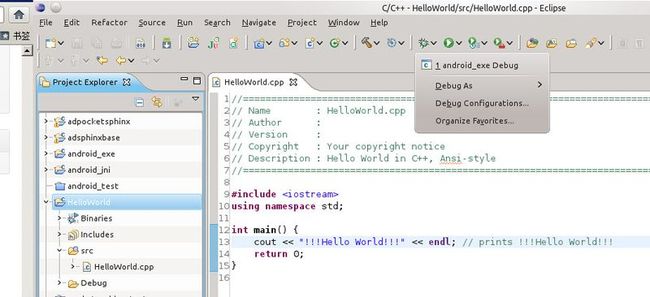
4. 与Eclipse集成虽然通过命令行已经可以对程序进行调试,但毕竟没有图形界面的方便,下面将介绍如何将gdb调试与Eclipse进行集成。
4.1. 到Eclipse中选中需调试的工程 ,打开Debug Configurations..
打开Debug Configurations
4.2. 在打开的Debug Configurations中新建C/C++ Remote Application在main页面中设置:Connection: localRemote Absolute File Path : /data/td/HelloWorldCommands to execute before application:
/home/q/Workspace/Andriod/SDK/platform-tools/adb shell gdbserver :5039 /data/td/HelloWorld
/home/q/Workspace/Andriod/SDK/platform-tools/adb forward tcp:5039 tcp:5039
注意,这里的adb路径一定要完整路径。最后还要选中 “Skip download to target path”
HelloWorld Debug设置
]转到Debugger页片,填入gdb的完整路径,并将GDB command file置空。
Debug gdb路径设置
至此配置工作全部结束,直接点击调试吧。
参考:
1. Android Native Development Using the Android Open Source Project[OL]. http://www.aton.com/android-native-development-using-the-android-open-source-project/
2. Debugging with GDB[OL]. http://www.kandroid.org/online-pdk/guide/debugging_gdb.html
3. GDB 命令详细解释 [OL]. http://blog.csdn.net/wei801004/article/details/4253911
4. How C/C++ Debugging Works on Android[OL]. http://mhandroid.wordpress.com/2011/01/25/how-cc-debugging-works-on-android/
5. ndk-gdb[OL]. http://csipsimple.googlecode.com/svn/trunk/pjsip_android/ndk-gdb


