Java IO
前面我们已经讲了介质流,下面我们来看过滤流(包装流),前面说过,过滤流必须配合其他的一些输入输出流使用,被包装后的对象具有过滤流提供的功能。
过滤流
BufferdInputStream
使用该对象阻止每次读取一个字节都会频繁操作IO。将字节读取一个缓存区,从缓存区读取。(读三遍,体会一下,下面会详细说明)。也就是被BufferdInputStream包装的对象,就具有了缓存功能。我们结合FileInputStream来详细说明一下。
使用FileInputStream读取一个文件,打印所耗费的时间
private static void readNoBuf() throws FileNotFoundException, IOException {
	// 架构之美.pdf 8.21M
	FileInputStream fis = new FileInputStream("D:\\迅雷下载\\架构之美.pdf");
	long begin = System.currentTimeMillis();
	while (fis.read() != -1) {
	}
	fis.close();
	long useTime = System.currentTimeMillis() - begin;
	System.out.println("readNoBuf : " + useTime);
}
使用普通的read()方法读取数据,用此方法每读取一个字节就要访问本地磁盘一次,显然效率不高,我们对代码进行改进
private static void readWithBuf() throws FileNotFoundException, IOException {
	FileInputStream fis = new FileInputStream("D:\\迅雷下载\\架构之美.pdf");
	byte[] buf = new byte[8];
	int bLen = buf.length;
	long begin = System.currentTimeMillis();
	while (fis.read(buf, 0, bLen) != -1) {
	}
	fis.close();
	long useTime = System.currentTimeMillis() - begin;
	System.out.println("readWithBuf : " + useTime);
}
改进后的方法每次读取8个字节,大大提高了效率。我们继续改进,使用BufferedInputStream进行读取。
private static void readWithBufferedInputStream() throws FileNotFoundException, IOException {
	FileInputStream fis = new FileInputStream("D:\\迅雷下载\\架构之美.pdf");
	BufferedInputStream bis = new BufferedInputStream(fis); // defaultBufferSize 8192
	byte[] buf = new byte[8];
	int bLen = buf.length;
	long begin = System.currentTimeMillis();
	while (bis.read(buf, 0, bLen) != -1) {
	}
	fis.close();
	bis.close();
	long useTime = System.currentTimeMillis() - begin;
	System.out.println("readWithBufferedInputStream : " + useTime);
}
运行三个方法,结果如下:
readNoBuf : 16681
readWithBuf : 2098
readWithBufferedInputStream : 63
为什么效率相差这么多呢,BufferedInputStream到底帮我们做了什么呢?通过源代码你可以发现,BufferedInputStream声明了一个大小为8192字节的数组,它每次读取8192个字节进行缓存,当你使用bis.read(buf, 0, bLen)进行读取数据时,BufferedInputStream只是将之前缓存的数据赋值给buf,所以效率相当高。等缓存的数据用完以后,BufferedInputStream才进行第二次读取磁盘,重新读入8192个字节放入缓存,等待被使用。
所以你明白BufferedInputStream的作用了吧,它帮你缓存8192字节的数据,你每次读取数据都是从缓存中拿的,BufferedInputStream就提供了这样的作用。理解了BufferedInputStream你也就理解了过滤流(包装流),我们来看看其它过滤流提供了哪些功能。
DataInputStream
一般和DataOutputStream配对使用,完成基本数据类型的读写。提供了大量的读取基本数据类新的读取方法。
private static void writeData() throws FileNotFoundException, IOException {
	FileOutputStream fos = new FileOutputStream("dataStream");
	DataOutputStream dos = new DataOutputStream(fos);
	String str = "中国";
	dos.writeUTF(str); // 按UTF-8格式写入
	dos.writeChars(str); // 按字符写入
	dos.writeBytes(str); // 会把字符串中的每个字符当作一个字节来写入,会造成数据丢失,读取时会乱码
	byte[] b = str.getBytes();
	dos.write(b); // 将 str 转化为 byte 后写入流,读取时不存在乱码问题
	dos.close();
}
private static void readData() throws FileNotFoundException, IOException {
	FileInputStream fis = new FileInputStream("dataStream");
	DataInputStream dis = new DataInputStream(fis);
	// 按UTF-8格式读取
	System.out.println(dis.readUTF());

	// 字符读取
	char[] c = new char[4];
	for (int i = 0; i < 2; i++) {
		c[i] = dis.readChar();
	}
	System.out.println(new String(c, 0, 2));

	// 字节读取
	byte[] b = new byte[2];
	dis.read(b); // 读取4个字节
	System.out.println(new String(b, 0, 2)); // 输出时会出现乱码

	byte[] b2 = new byte[8];
	int len = dis.read(b2); // 按字节读取剩余的内容
	System.out.println(new String(b2, 0, len));

	dis.close();
}
是的,被DataInputStream包装,流就具有了readLine,readInt,readLong等方法,
不过readLine已经被 @Deprecated,该方法无法将字节正确转换为字符,推荐使用BufferedReader.readLine()。
再说一遍,一般情况下DataInputStream和DataOutputStream需要配对使用,DataOutputStream
以何种类型写入的数据,那么DataInputStream就要以何种类型来读取,否则容易造成乱码
ObjectInputStream
通过名字就知道,它是用来操作对象的。他也提供了readInt,readLong等DataInputStream提供的方法。此外多了一个readObject方法。
我们知道tomcat在重启时,保存在session中的对象会序列化到硬盘,以便重启成功后将对象反序列化到session中。我们来做这么一个程序,将对象序列化和反序列。
private static void writeObject() throws FileNotFoundException, IOException {
	FileOutputStream fos = new FileOutputStream("employee");
	ObjectOutputStream oos = new ObjectOutputStream(fos);
	// Employee的代码就不粘贴了,你自己创建吧
	Employee e = new Employee("libai", 0, true);
	oos.writeObject(e);
	oos.close();
}
public static void main(String[] args) throws Exception {
	FileInputStream fis = new FileInputStream("employee");
	ObjectInputStream ois = new ObjectInputStream(fis);
	Employee emp = (Employee)ois.readObject();
	System.out.println(emp.getName());
	ois.close();
}
PushbackInputStream
不做介绍了,想了解自己百度吧。(我会告诉你我也不懂这个嘛)
想必你也应该了解怎样使用过滤流了吧,是的,它无法单独使用,要包装其它一些IO流才能使用。被包装后的 IO 流就具有了过滤流提供的功能,所以实际应用中,你应该想想你想要怎么操作文件,然后结合不同的过滤流提供的功能,进行你想要的操作。
下面简单介绍下字符流。
字节流能处理所有类型的数据(如图片、avi等),而字符流只能处理字符类型的数据。
字节流在操作的时候本身是不会用到缓冲区的,是文件本身的直接操作的;而字符流在操作的时候下后是会用到缓冲区的,是通过缓冲区来操作文件
再引用一段别人的,你就应该大概了解字符流了。
可以看出IO中的字节流是极其复杂的,存在大量的类,JDK1.1后Sun对IO库进行了重大的改进。看到Reader和Writer类时,大多数人的第一个感觉(不要太相信感觉哦!感觉也许会欺骗你的!)就是它们是用来替换原来的InputStream和OutputStream类。有新的类,干吗还使用旧的呢!?但实情并非如此。尽管Sun不建议使用原始的流库中的某些功能,但原来的流依然得到了保留,不仅为了保持向后兼容,主要原因是新库不是旧库的替代,而是对旧库的增强。从以下两点可以明显地看出
(1) 在老式的类层次结构里加入了新的类,这表明 Sun公司没有放弃老式流库的意图。
(2) 在许多情况下,新库中类的使用需要联合老结构中的类。为达到这个目的,需要使用一些“桥”类,如:InputStreamReader将一个InputStream转换成Reader;OutputStreamWriter将一个OutputStream转换成Writer。
那么Sun为什么在Java 1.1里添加了Reader和Writer层次,最重要的原因便是国际化(Internationalization--i18n)的需求。老式IO流层次结构只支持8位字节流,不能很好地控制16位的Unicode字符。Java本身支持Unicode,Sun又一致吹嘘其支持Unicode,因此有必要实现一个支持Unicode的流的层次结构,所以出现了Reader和Writer层次,以提供对所有IO操作中的Unicode的支持。除此之外,新库也对速度进行了优化,可比旧库更快地运行。
8位的字节流和16位的字符流的对应关系,可以从ByteInputStream/ByteOutputStream与CharArrayInputStream/CharArrayOutputStream的对应关系中看出端倪。
好了,你应该大概知道字符流的由来了吧,我的理解就是字符流是用来高效的操作文本文件的,对于jpg,avi,mp3等文件,还是要老老实实使用字节流的。
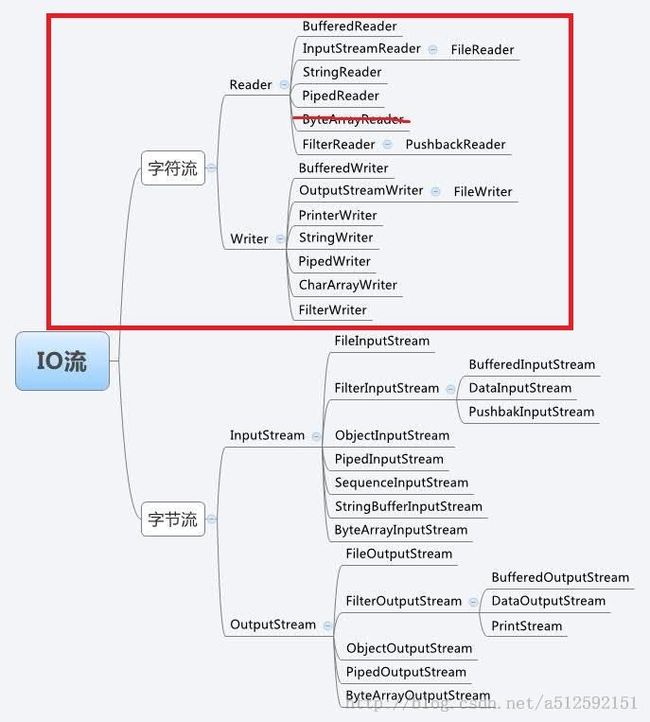
我们结合一张图来简单说一下,看红框里的部分就行了
主意ByteArrayReader是不存在的,应该是画图的人不小心造成的,想想也不会存在这个类。
BufferedReader
结合字节流的知识,你应该可以猜出来它是一个过滤流吧,它和BufferedInputStream相对应。它提供了缓存的功能,具体缓存的大小,你去看看源代码吧
InputStremReader
它是一个桥梁,它可以将字节流转换为字符流。
FileReader
你应该可以猜出来吧,它和FileInputStream相对应,是一个介质流,至于具体怎么使用,你自己去实验一下吧
StringReader,PipedReader 我想你应该懂得
PushbackReader 这个不说,你懂的!
好了,Java IO 知识就先总结这么多了。字符流部分没怎么讲解,如果你真不懂,可以联系我一起交流。
如果有不对的部分,也欢迎指正。
如果你需要相关源代码,戳我
