Enable DCAN For BeagleBoneBlack ChipSee Exp V1
给ChipSee的一段话:
- 1.买了beagblebone_black+7'电容屏,看中的是CAN接口和电容屏,买之前问过CAN的相关资源,确认了是SocketCAN接口;
- 2.在使用CAN接口时遇到了问题咨询ChipSee工程师“许工”,沟通最后表示CAN接口没有用过,亦没有经过测试,然后我就说了几句开发板不测试就敢卖的话,“许工”居然说“那你把东西退回来”(原话),然后就撂了电话。
- 3.贵厂的技术工程师居然是这种素质,多的不说了。
———————————–割,说正事—————————————————-
1.说明
本文档针对ChipSee提供的beaglebone_black核心板+ChipSee 7‘电容屏扩展板的CAN接口使用,记录相关问题和解决办法。

硬件资源
    Base Board:     BeagleBone_Black (version:  a5c)
    Daughter Board: ChipSee Exp V1  (version:       2013.08.15)
软件资源
    BSP(TI叫PSP):    ChipSee提供的SourceCode,(CAN接口未调试)
    EZSDK版本:    5.7

现象
    系统ifconfig后未检测到can0接口
    Canutils无法正常使用

问题&定位(分析过程太曲折,不写了,都是泪)
    Am335x自带了CAN接口,ChipSee没有进行配置,若板卡CAN接口能够正常使用,则应该具备以下:
    ifconfig -a 能看到can0接口
    dmsg | grep -i can能看到如下图所示

实际情况是ifconfig -a看不到can0,dmsg | grep -i can后,上图中黑色的部分 d_can registered 这一行是没有的。
    主要参考文档:
    [http://e2e.ti.com/support/arm/sitara_arm/f/791/t/154560.aspx][2]
    [http://processors.wiki.ti.com/index.php/AM335X_DCAN_Driver_Guide][3]
Am335x CAN驱动框架
![在此输入图片描述][4]
2.使能ChipSee扩展板的CAN接口
针对2个文件进行修改即可解决问题:
A. omap2_mux33xx.h
(linux-3.2.0-bbb-exp/arch/arm/mach-omap2/omap2_mux33xx.h )B. Board-am335xevm.c
(linux-3.2.0-bbb-exp/drivers/net/can/d_can/Board-am335xevm.c)硬件连接:
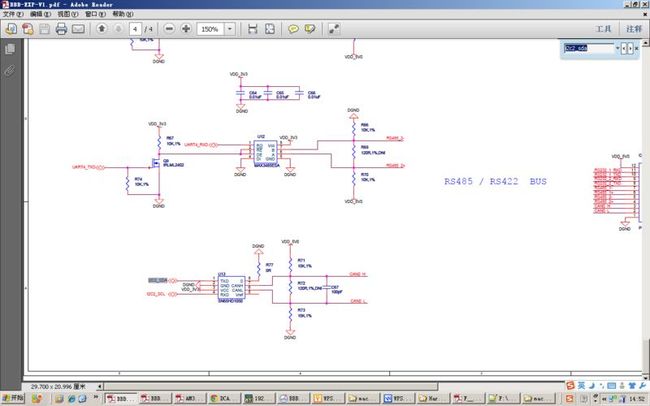
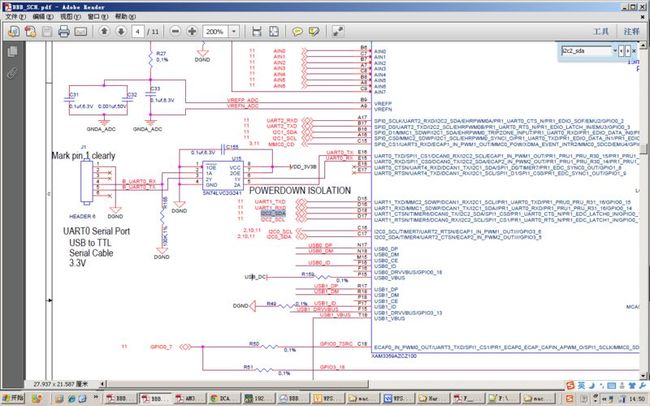
ChipSee扩展板原理图中,CAN接口连接的是I2C2_SDA
要使用核心板卡提供的DCAN0,则需要将复用引脚UART1进行配置:
发送管脚是uart1_ctsn,配置为d_can0_tx
接收管脚是uart1_rtsn,配置为d_can_rx
管脚IO特性配置保持不变(DCAN模式)
2.1 omap2_mux33xx.h
    首先在omap2_mux33xx.h头文件中对urt1_ctsn管脚配置,默认BSP是TI的EVM板卡,并没有复用UART1_CTSN的DCAN0所以默认是NULL:

00324: / *
00325: _AM33XX_MUXENTRY(UART1_CTSN, 0,
00326: "uart1_ctsn", NULL, NULL, "i2c2_sda",
00327: "spi1_cs0", NULL, NULL, "gpio0_12"),
00328: _AM33XX_MUXENTRY(UART1_RTSN, 0,
00329: "uart1_rtsn", NULL, NULL, "i2c2_scl",
00330: "spi1_cs1", NULL, NULL, "gpio0_13"),
00331: */
修改后:
00332: / * Enable DCAN0 for ChipSee Exp , added by hirain */
00333: _AM33XX_MUXENTRY(UART1_CTSN, 0,
00334: "uart1_ctsn", NULL, "d_can0_tx", "i2c2_sda",
00335: "spi1_cs0", NULL, NULL, "gpio0_12"),
00336: _AM33XX_MUXENTRY(UART1_RTSN, 0,
00337: "uart1_rtsn", NULL, "d_can0_rx", "i2c2_scl",
00338: "spi1_cs1", NULL, NULL, "gpio0_13"),
2.2 Omap2_board-am335xevm.c
    然后修改omap2_board-am335xevm.c
ChipSee提供的BSP中默认的d_can的配置

00702: / * gp short for general purpose */
00703: static struct pinmux_config d_can_gp_pin_mux[] = {
00704: {"uart0_ctsn.d_can1_tx", OMAP_MUX_MODE2 | AM33XX_PULL_ENBL},
00705: {"uart0_rtsn.d_can1_rx", OMAP_MUX_MODE2 | AM33XX_PIN_INPUT_PULLUP},
00706: {NULL, 0},
00707: };
00708:
00709: / * ia short for industry & auto */
00710: static struct pinmux_config d_can_ia_pin_mux[] = {
00711: {"uart0_rxd.d_can0_tx", OMAP_MUX_MODE2 | AM33XX_PULL_ENBL},
00712: {"uart0_txd.d_can0_rx", OMAP_MUX_MODE2 | AM33XX_PIN_INPUT_PULLUP},
00713: {NULL, 0},
00714: };
    增加配置:
00716: / * cs short for ChipSee*/
00717: static struct pinmux_config d_can_cs_pin_mux[] = {
00718: {"uart1_ctsn.d_can0_tx", OMAP_MUX_MODE2 | AM33XX_PULL_ENBL},
00719: {"uart1_rtsn.d_can0_rx", OMAP_MUX_MODE2 | AM33XX_PIN_INPUT_PULLUP},
00720: {NULL, 0},
00721: };

    增加配置后,在d_can_init()函数中增加如下:
01926: / * added by hirain */
01927: case CHIPSEE_BBBEXP:
01928: if ((profile == PROFILE_0) || (profile == PROFILE_1) (profile == PROFILE_NONE)) {
01929: setup_pin_mux(d_can_cs_pin_mux);
01930: / * Instance Zero */
01931: am33xx_d_can_init(0);
01932: }
01933: break;
01934: / * end */

    最后在板卡配置结构体中增加d_can_init配置
02384: / * Chipsee Beaglebone Black Expansion Board */
02385: static struct evm_dev_cfg evm_chipsee_bbbexp_dev_cfg[] = {
02386: {mii1_init, DEV_ON_BASEBOARD, PROFILE_ALL},
02387: {usb0_init, DEV_ON_BASEBOARD, PROFILE_ALL},
02388: {usb1_init, DEV_ON_BASEBOARD, PROFILE_ALL},
02389: {mmc0_init, DEV_ON_BASEBOARD, PROFILE_ALL},
02390: {lcdc_init, DEV_ON_BASEBOARD, PROFILE_ALL},
02391: {i2c1_init, DEV_ON_BASEBOARD, PROFILE_ALL},
02392: {cap_tsc_init, DEV_ON_BASEBOARD, PROFILE_ALL},
02393: {mfd_tscadc_init, DEV_ON_BASEBOARD, PROFILE_ALL},
02394: {mcasp0_init, DEV_ON_BASEBOARD, PROFILE_ALL},
02395: {chipsee_gpio_led_init, DEV_ON_BASEBOARD, PROFILE_ALL},
02396: {chipsee_buzz_init, DEV_ON_BASEBOARD, PROFILE_ALL},
02397: {chipsee_backlight_init, DEV_ON_BASEBOARD, PROFILE_ALL},
02398: {chipsee_hmi_audio_init, DEV_ON_BASEBOARD, PROFILE_ALL},
02399: {d_can_init, DEV_ON_BASEBOARD, PROFILE_NONE}, / * added by hirain */
02400: {uart1_init, DEV_ON_BASEBOARD, PROFILE_ALL},
02401: {NULL, 0, 0},
02402: };
3.测试DCAN
3.1 Am335x性能
    Am335x自带can控制器,并符合BOSH DCAN接口(?软件接口?还未找到出处),性能明显比spi转can的方式实现的CAN接口要强,用CAN0E配置250kbps,10ms周期发送报文,am335x一包未丢,而采用spi方式的CAN接口(TE6410典型的)在10ms周期压力下不到10s钟就会挂掉。

3.2 硬件过滤
4参考分析-DCAN初始化
Board-am335xevm.c中bbb_expansion初始化过程:
8.MACHINE_START

02774: MACHINE_START(AM335XEVM, "am335xevm")
02775: / * Maintainer: Texas Instruments */
02776: .atag_offset = 0x100,
02777: .map_io = am335x_evm_map_io,
02778: .init_early = am33xx_init_early,
02779: .init_irq = ti81xx_init_irq,
02780: .handle_irq = omap3_intc_handle_irq,
02781: .timer = &omap3_am33xx_timer,
02782: .init_machine = am335x_evm_init,
02783: MACHINE_END

7.am335x_evm_init
02750: static void __init am335x_evm_init(void)
02751: {
02752: am33xx_cpuidle_init();
02753: am33xx_mux_init(board_mux);
02754: omap_serial_init();
02755: am335x_evm_i2c_init();
02756: omap_sdrc_init(NULL, NULL);
02757: usb_musb_init(&musb_board_data);
02758: omap_board_config = am335x_evm_config;
02759: omap_board_config_size = ARRAY_SIZE(am335x_evm_config);
02760: / * Create an alias for icss clock */
02761: if (clk_add_alias("pruss", NULL, "pruss_uart_gclk", NULL))
02762: pr_warn("failed to create an alias: icss_uart_gclk --> pruss\n");
02763: / * Create an alias for gfx/ sgx clock */
02764: if (clk_add_alias("sgx_ck", NULL, "gfx_fclk", NULL))
02765: pr_warn("failed to create an alias: gfx_fclk --> sgx_ck\n");
02766: }

6.am335x_evm_i2c_init

02677: static void __init am335x_evm_i2c_init(void)
02678: {
02679: / * Initially assume General Purpose EVM Config */
02680: am335x_evm_id = GEN_PURP_EVM;
02681:
02682: evm_init_cpld();
02683:
02684: omap_register_i2c_bus(1, 100, am335x_i2c0_boardinfo,
02685: ARRAY_SIZE(am335x_i2c0_boardinfo));
02686: }

5. am335x_i2c0_boardinfo
02598: / *
02599: * Daughter board Detection.
02600: * Every board has a ID memory (EEPROM) on board. We probe these devices at
02601: * machine init, starting from daughter board and ending with baseboard.
02602: * Assumptions :
02603: * 1. probe for i2c devices are called in the order they are included in
02604: * the below struct. Daughter boards eeprom are probed 1st. Baseboard
02605: * eeprom probe is called last.
02606: */
02607: static struct i2c_board_info __initdata am335x_i2c0_boardinfo[] = {
02608: {
02609: / * Daughter Board EEPROM */
02610: I2C_BOARD_INFO("24c256", DAUG_BOARD_I2C_ADDR),
02611: .platform_data = &am335x_daughter_board_eeprom_info,
02612: },
02613: {
02614: / * Baseboard board EEPROM */
02615: I2C_BOARD_INFO("24c256", BASEBOARD_I2C_ADDR),
02616: .platform_data = &am335x_baseboard_eeprom_info,
02617: },

4. am335x_baseboard_eeprom_info
02535:
02536: static struct at24_platform_data am335x_baseboard_eeprom_info = {
02537: .byte_len = (256*1024) / 8,
02538: .page_size = 64,
02539: .flags = AT24_FLAG_ADDR16,
02540: .setup = am335x_evm_setup,
02541: .context = (void *)NULL,
02542: };

3.  am335x_baseboard_eeprom_info
02535:
02536: static struct at24_platform_data am335x_baseboard_eeprom_info = {
02537: .byte_len = (256*1024) / 8,
02538: .page_size = 64,
02539: .flags = AT24_FLAG_ADDR16,
02540: .setup = am335x_evm_setup,
02541: .context = (void *)NULL,
02542: };

2.am335x_evm_setup();

02521: static void am335x_evm_setup(struct memory_accessor *mem_acc, void *context)
02522: {
02523: / * Chipsee Beaglebone Black Expansion */
02524: setup_chipsee_bbbexp();
02525: return;
02526: }

1.setup_chipsee_bbbexp();

/ * Setup Chipsee Beaglebone Black Expansion */
02481: static void setup_chipsee_bbbexp(void)
02482: {
02483: pr_info("The board is a Chipsee Beaglebone Black Expansion.\n");
02484:
02485: am335x_mmc[0].gpio_wp = -EINVAL;
02486:
02487: _configure_device(CHIPSEE_BBBEXP, evm_chipsee_bbbexp_dev_cfg, PROFILE_NONE);
02488:
02489: am33xx_cpsw_init(AM33XX_CPSW_MODE_MII, NULL, NULL);
02490: / * Atheros Tx Clk delay Phy fixup */
02491: phy_register_fixup_for_uid(AM335X_EVM_PHY_ID, AM335X_EVM_PHY_MASK,
02492: am33xx_evm_tx_clk_dly_phy_fixup);
02493: }

