spring security3.x学习(25)_bean配置跑spring security
本文为转载学习
原文链接:http://blog.csdn.net/dsundsun/article/details/11972811
看spring security有一段时间了,一直迷惑于spring security使用的不方便,今天看书的时候,终于提到了自定义的spring security,下边就是书中提出的神图(我是看了一下,没怎么看懂,但是我觉得自己做完再回来看肯定就差不多了。)

直接看配置文件:
<!-- 配置一个定义的过滤器链 -->
     <bean id="springSecurityFilterChain" class="org.springframework.security.web.FilterChainProxy">
          <security:filter-chain-map path-type="ant">
               <security:filter-chain pattern="/**"
                    filters="
                     securityContextPersistenceFilter,
                     usernamePasswordAuthenticationFilter,
                     anonymousAuthenticationFilter,
                     filterSecurityInterceptor" />
          </security:filter-chain-map>
     </bean>
这样就可以获得一个自己的过滤器链顺序了。
如果将这与<http>风格的配置进行对比的话,我们要注意以下的配置元素:
1. 默认过滤器链的建立是在处理<http>元素的时候自动包含的并不需要直接配置。尽管使用security命名空间的<custom-filter>重写或扩展标准过滤器链的时候,允许很大程度的灵活性,但它并不能够得到FilterChainProxy本身。
2. 基于URL模式修改过滤器链并不适用于<http>风格的声明。如果应用的某些部分不需要特定的处理这将会有用处,并且能使得过滤器的调用尽可能得少。 需要意识到很重要的一点是,不同于Spring 的一些配置(比较明显的如,在web.xml中的contextConfigLocation),在过滤器的名字之间需要需要使用逗号分隔。
接下来就应该是慢慢配置了:
<bean id="securityContextPersistenceFilter"
      class="org.springframework.security.web.context.SecurityContextPersistenceFilter"/>
SecurityContextPersistenceFilter用来建立SecurityContext,而它被用来贯穿整个request过程以跟踪请求者的认证信息。你可能记得我们在上一章的Spring MVC代码中,为了得到当前认证过的Principa时,访问过SecurityContext对象。
<bean id="UsernamePasswordAuthenticationFilter"
          class="org.springframework.security.web.authentication.UsernamePasswordAuthenticationFilter">
          <property name="authenticationManager" ref="customAuthenticationManager" />
</bean>
正如我们在第二章中详细介绍的那样,UsernamePasswordAuthenticationFilter用来处理form 提交并检查认证存储是否为合法凭证。明确配置这个过滤器,对比security命名空间的配置。
     <bean id="anonymousAuthenticationFilter"
          class="org.springframework.security.web.authentication.AnonymousAuthenticationFilter">
          <property name="userAttribute" value="anonymousUser,ROLE_ANONYMOUS" />
          <property name="key" value="BF93JFJ091N00Q7HF" />
     </bean>
我们的站点允许匿名访问。尽管对于比较特殊的条件AnonymousAuthenticationFilter并不需要,但是通常情况下会使用它,因为只对请求添加了一点的预处理。你可能并不认识这个 过 滤 器 , 除 了 我 们 在 第 二 章 对 其 简 短 提 到 以 外 。 这 是 因 为 对 于AnonymousAuthenticationFilter的配置都掩盖在security命名空间之中。
列出的这两个属性都是需要的。userAttribute 属性声明了为匿名用户提供的用户名和GrantedAuthority。用户名和GrantedAuthority可能在我们的应用中用来验证用户是不是匿名用户。Key 可 能 是 随 机 生 成 的 , 但 是 需 要 在 一 个 bean 中 使 用(o.s.s.authentication.AnonymousAuthenticationProvider),我们稍后将会进行配置。
<bean id="filterSecurityInterceptor"
          class="org.springframework.security.web.access.intercept.FilterSecurityInterceptor">
          <property name="authenticationManager" ref="customAuthenticationManager" />
          <property name="accessDecisionManager" ref="affirmativeBased" />
          <property name="securityMetadataSource">
               <security:filter-security-metadata-source>
                    <security:intercept-url pattern="/login.do" access="IS_AUTHENTICATED_ANONYMOUSLY" />
                    <security:intercept-url pattern="/home.do" access="IS_AUTHENTICATED_ANONYMOUSLY" />
                    <security:intercept-url pattern="/account/*.do" access="ROLE_USER" />
                    <security:intercept-url pattern="/*" access="ROLE_USER" />
               </security:filter-security-metadata-source>
          </property>
</bean>
在我们基本处理过滤器链的最后一个是最终负责检查Authentication的,而这是前面已配置的安全过滤器的处理结果。正是这个过滤器确定一个特定的请求最终是被拒绝还是被接受。
再建立一些bean去辅助完成上边的功能:
 <bean class="org.springframework.security.access.vote.AffirmativeBased"
          id="affirmativeBased">
          <property name="decisionVoters">
               <list>
                    <ref bean="roleVoter" />
                    <ref bean="authenticatedVoter" />
               </list>
          </property>
     </bean>
     <bean class="org.springframework.security.access.vote.RoleVoter"
          id="roleVoter" />
     <bean class="org.springframework.security.access.vote.AuthenticatedVoter"
          id="authenticatedVoter" />

     <bean id="daoAuthenticationProvider"
          class="org.springframework.security.authentication.dao.DaoAuthenticationProvider">
          <property name="userDetailsService" ref="jdbcUserService" />
     </bean>
     <bean id="anonymousAuthenticationProvider"
          class="org.springframework.security.authentication.AnonymousAuthenticationProvider">
          <property name="key" value="BF93JFJ091N00Q7HF" />
     </bean>

     <bean id="customAuthenticationManager"
          class="org.springframework.security.authentication.ProviderManager">
          <property name="providers">
               <list>
                    <ref local="daoAuthenticationProvider" />
                    <ref local="anonymousAuthenticationProvider" />
               </list>
          </property>
     </bean>
然后看到这里,我决定自己写一个连接mysql的spring security自定义例子。
<!-- 定义UserDetailsService -->
     <bean id="jdbcUserService" class="org.springframework.security.core.userdetails.jdbc.JdbcDaoImpl">
          <property name="dataSource" ref="dataSource" />
     </bean>

     <!-- 定义数据库源连接池 -->
     <bean id="dataSource" class="org.apache.commons.dbcp.BasicDataSource" destroy-method="close">
        <property name="driverClassName" value="${jdbc.driver}"/>
        <property name="url" value="${jdbc.url}"/>
        <property name="username" value="${jdbc.username}"/>
        <property name="password" value="${jdbc.password}"/>
    </bean>
这样就可以连接我们自己的mysql数据库了。
连接数据库以后,我继续研究这本书中写的知识点,发现突然又跳到了Session生命周期,估计后边肯定能用到,所以我就也跟着看了:
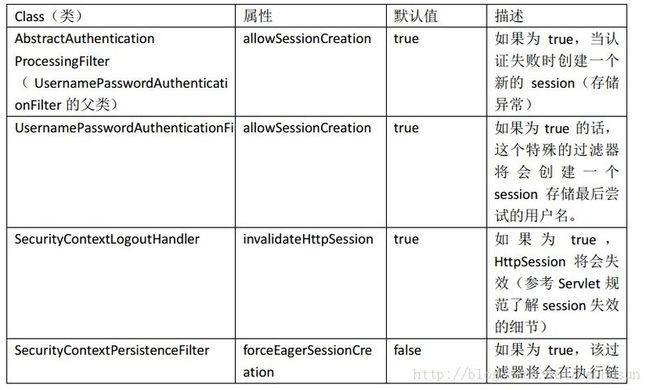
Spring Security有很多地方影响用户的HttpSession的生命周期。有很多功能只有将相关类配置成Spring bean时才可用。以下的表格列出了能够影响session创建和销毁的bean属性:

我们了解这些知识以后,重新进行过滤器链的配置:
<!-- 配置一个定义的过滤器链 -->
     <bean id="springSecurityFilterChain" class="org.springframework.security.web.FilterChainProxy">
          <security:filter-chain-map path-type="ant">
               <security:filter-chain pattern="/**"
                    filters="
                          securityContextPersistenceFilter,
                         logoutFilter,
                         usernamePasswordAuthenticationFilter,
                         rememberMeAuthenticationFilter,
                         anonymousAuthenticationFilter,
                         exceptionTranslationFilter,
                         filterSecurityInterceptor" />
          </security:filter-chain-map>
</bean>
配置一些这里我们还没有写的过滤器。
<!-- 配置退出的过滤器信息 -->
     <bean id="logoutFilter" class="org.springframework.security.web.authentication.logout.LogoutFilter">
          <!-- 用户退出要转向的url -->
          <constructor-arg value="/" />
          <constructor-arg>
               <array>
                    <ref local="logoutHandler" />
               </array>
          </constructor-arg>
          <!-- 要拦截的退出过请求url -->
          <property name="filterProcessesUrl" value="/logout" />
     </bean>
     <!-- 用于处理登陆退出的处理类 -->
     <bean id="logoutHandler" class="org.springframework.security.web.authentication.logout.SecurityContextLogoutHandler"/>
接下来又配置了记住密码过滤器:
<!-- 配置记住密码的过滤器 -->
     <bean id="rememberMeAuthenticationFilter"
          class="org.springframework.security.web.authentication.rememberme.RememberMeAuthenticationFilter">
          <property name="rememberMeServices" ref="rememberMeServices" />
          <property name="authenticationManager" ref="customAuthenticationManager" />
     </bean>
     <!-- 定义记住密码的服务类 -->
     <bean id="rememberMeServices"
          class="org.springframework.security.web.authentication.rememberme.PersistentTokenBasedRememberMeServices">
          <property name="key" value="jbcpPetStore" />
          <property name="tokenValiditySeconds" value="3600" />
          <property name="tokenRepository" ref="jdbcRememberMeTokenRepository" />
          <property name="userDetailsService" ref="jdbcUserService" />
     </bean>
     <!-- 配置rememberme的token存储 -->
     <bean id="jdbcRememberMeTokenRepository"
          class="org.springframework.security.web.authentication.rememberme.JdbcTokenRepositoryImpl">
          <property name="dataSource" ref="dataSource" />
     </bean>
     <!-- 配置记住密码的认证提供者 -->
     <bean id="rememberMeAuthenticationProvider"
          class="org.springframework.security.authentication.RememberMeAuthenticationProvider">
          <property name="key" value="jbcpPetStore" />
     </bean>
因为rememberme是有一个认证提供者,所以我们需要把它加入认证管理器中:
<!-- 自定义的管理器 -->
     <bean id="customAuthenticationManager"
          class="org.springframework.security.authentication.ProviderManager">
          <property name="providers">
               <list>
                    <ref local="daoAuthenticationProvider" />
                    <ref local="anonymousAuthenticationProvider" />
                    <ref local="rememberMeAuthenticationProvider"/>
               </list>
          </property>
     </bean>
那好,加入这个以后,我们知道,当用户登陆时也会判断是否已经记住密码,所以在验证时也会进行判断:
<!-- 监听表单登陆的验证请求 -->
     <bean id="usernamePasswordAuthenticationFilter"
          class="org.springframework.security.web.authentication.UsernamePasswordAuthenticationFilter">
          <property name="authenticationManager" ref="customAuthenticationManager" />
          <property name="rememberMeServices" ref="rememberMeServices"/>
     </bean>
还有一步,就是当我们退出时,我们需要在退出中调用我们的记住密码服务,进而进行退出登陆:
<!-- 配置退出的过滤器信息 -->
     <bean id="logoutFilter"
          class="org.springframework.security.web.authentication.logout.LogoutFilter">
          <!-- 用户退出要转向的url -->
          <constructor-arg value="/" />
          <constructor-arg>
               <array>
                    <ref local="logoutHandler" />
                    <ref local="rememberMeServices"/>
               </array>
          </constructor-arg>
          <!-- 要拦截的退出过请求url -->
          <property name="filterProcessesUrl" value="/logout" />
     </bean>
还有一个过滤器要配置,就是我们的异常过滤器(ExceptionTranslationFilter):
<!-- 配置异常过滤器 -->
     <bean id="exceptionTranslationFilter"
          class="org.springframework.security.web.access.ExceptionTranslationFilter">
          <property name="authenticationEntryPoint" ref="authenticationEntryPoint" />
          <property name="accessDeniedHandler" ref="accessDeniedHandler" />
     </bean>
     <!-- 配置认证进入点 -->
     <bean id="authenticationEntryPoint"
          class="org.springframework.security.web.authentication.LoginUrlAuthenticationEntryPoint">
          <property name="loginFormUrl" value="/login.html" />
     </bean>
     <!-- 配置连接拒绝处理器 -->
     <bean id="accessDeniedHandler"
          class="org.springframework.security.web .access.AccessDeniedHandlerImpl">
          <property name="errorPage" value="/accessDenied.do" />
     </bean>
终于配置完成了,咱们是可以把这个项目运行起来的,先不说这个,书中给了我们两个选择,一个是security命名空间,一个是明确的bean定义,那么如何选择呢:

。。 我整理了一下这个项目,现在是可以跑起来的,而且使用mysql进行了集成。 不用那个hsql了,我觉得看起来可能会好一点。
下载地址:http://download.csdn.net/detail/dulei294948/6312707