Please give this post a +1 if you like it
Also If you find this post useful, you might want to subscribe to the RSS feed for updates on this topic.
Cheers!
Document version number: initial post
As the title states its a beginners tutorial with a lot of stuff to learn.
This tutorial exist to give you a little bit of understanding on how things like NodeJS, ExpressJS, bootstrap, jQuery and Jade template engine work together.
Web Application
In this tutorial we will be creating a full web application with 2 pages.
- Main page where people can compress their Javascript files
- About Page which explains a bit about our app
The web application that we are gonna write address a problem about how to use UglifyJS to compress the JavaScript files. Advanced demo of the application we are going to write can be found here
I am going to add more feature to the above app but for this tutorial lets keep things simple.
I hope that you have installed NodeJS on your box. If you haven’t here are instructions to install it on Ubuntu 12
If you are using Windows you can just download the installer and node will be available from command line.
After your installation npm and node commands will be available to your from command prompt. npm stands for Node Package Manager and it helps install Node Packages.
First up create a folder somewhere on your file system called uglify All our App files will go under this folder.
To start with lets create a package.json file under our parent folder (uglify) with the following contents in it
-
{
-
"name" : "NodeJS-UglifyJS" ,
-
"description" : "A learning project for NodeJS and Express" ,
-
"version" : "0.0.1" ,
-
"private" : false ,
-
"dependencies" : {
-
"express" : "3.0" ,
-
"uglify-js" : "1.3.4" ,
-
"jade" : "0.27.7"
-
}
-
}
Above package file is pretty easy to understand. Main part in above file is dependencies bit and we will see in a second how its really easy to install dependencies for you project in one hit
Now we will just run the following command
make sure that you you are in same directory as package.json and then run this command
-
npm install
This will install node modules essential to run our code smoothly.
So node modules that will get installed are Express framework, uglifyJS, Jade template engine
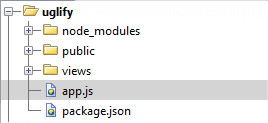
Lets now create couple of more folders in your working directory called public and views and also create a file with name app.js
I’ll explain in a bit what app.js is all about. So here is a screenshot of our folder structure for the time being
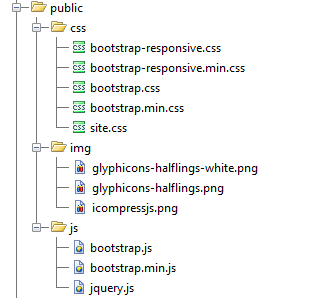
Under public folder I have created three sub folders as shown below
As you can see how I’ve included twitter bootstrap (the CSS framework for responsiveness) under the css folder and then all my public images goes to img folder and likewise all my javascript goes in js folder
Now lets start to work on our app.js file
If you are unaware what expressJS is, then you must read some documentation on Express which can be found here
expressjs in broader terms is a node framework that makes you life easier a bit and save you many lines of code.
ok! lets carry on with our app.js file, app.js defines our application and carry most of the code that deals with user requests.
Here is basic code for our app.js file
-
// instantiate express
-
var express = require ( 'express' ) ;
-
var app = express ( ) ;
-
-
// handle request parsing, this enables request body parsing
-
// API reference http://expressjs.com/api.html#bodyParser
-
app . use (express .bodyParser ( ) ) ;
-
// enable compression
-
app . use (express .compress ( ) ) ;
-
// enable router, router is responsible to route our requests to different actions
-
app . use (app .router ) ;
-
// serve static files, I am directing express to use public folder as my assets folder to server images/js/css files
-
app . use (express .static (__dirname + '/public' ) ) ;
-
// serve views, we will touch base on this in a bit
-
app .set ( 'views' ,__dirname + '/views' ) ;
-
// template engine, tell express to use jade as our template engine for view handling
-
app .engine ( 'jade' , require ( 'jade' ) .__express ) ;
-
// home page request redirected to compress action
-
// does not have any advantage, just showing how to forward requests to different actions
-
app .get ( '/' , function (req , res ) {
-
res .redirect ( "/compress" ) ;
-
} ) ;
-
// compress action, this is something that you will see as you home page
-
app .get ( '/compress' , function (req , res ) {
-
res .render ( 'index.jade' , {path : req .path ,ttl : "Javascript Compressor and beautifier built on Nodejs" } ) ;
-
} ) ;
-
-
app .listen ( 8080 ) ;
Please note that we are not using full MVC in our application, its just views that are separated out. depending on the complexity of your Node App you should be looking for a MVC structure that will help immensely with code maintainability. I won’t recommend that your app.js should go beyond few 10s of lines. We will add one more request handler in our app.js file in a bit
please note that app.listen() tells node which port your application is listening to. In our case its port 8080.
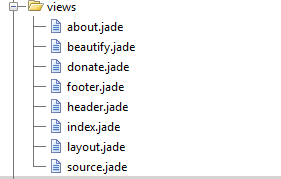
ok! before we can kick of our application we have to look at our view file. So here is a full structure of my views folder for icompressjs.com
We will be concentrating just on layout.jade, header.jade, footer.jade and index.jade in our example application
Remember! that in our app.js we told node to use jade as our template engine. Know more about jade by browsing official documentation page located here
https://github.com/visionmedia/jade#readme
We have a common layout page that will be applied to all other files as shown below
File layout.jade
-
!!! 5
-
html
-
include header
-
block content
-
include footer
All whitespaces are important else your file may not work or produce unexpected results. I will not be explaining about jade how it works but let me share a couple of cool cssdeck’s that explain much of the working of jade
so as you can see that we are using HTML5 as our doctype with !!! 5 declaration
Please remember “block content” is a reference which will be replaced by actual index.jade contents during processing. Its explained later in this article. Just remember this reference for the time being.
then we are including our header file that have our navigation and other includes that will be common to all sub templates, lets check it out
-
head
-
title = ttl
-
script (type = "text/javascript" ,src = "/js/jquery.js" )
-
script (type = "text/javascript" ,src = "/js/bootstrap.js" )
-
script (type = "text/javascript" ,src = "https://apis.google.com/js/plusone.js" )
-
//if lt IE 9
-
script (src = "http://html5shim.googlecode.com/svn/trunk/html5.js" , language = "text/javascript" )
-
body
-
div .navbar .container
-
img (src = "/img/icompressjs.png" ,style = "opacity:0.7;width:170px;height:60px" )
-
br
-
div .navbar -inner
-
a ( class = "brand" ,href = "/" ) icompressjs
-
ul .nav
-
li ( class = "#{path==='/compress' ? 'active' : ''}" ) : a (href = "/compress" ) compress
-
li : a (href = "http://jaspreetchahal.org" ) A service by jaspreetcChahal .org
Before we proceed with our index.jade template lets quickly check whats in our footer.jade file
-
br
-
footer .container copyright © <a href = "JaspreetChahal.org" target = "_blank" >Jaspreet Chahal </a > Powered by <a href = "http://nodejs.org" target = "_blank" >Node JS </a >, <a href = "http://expressjs.com" target = "_blank" >Express JS </a >, <a href = "http://twitter.github.com/bootstrap.org" target = "_blank" >Bootstrap </a >, <a href = "http://jade-lang.com/" target = "_blank" >Jade </a > and <a href = "http://jade-lang.com/" target = "_blank" >Uglify JS </a > { <a href = "/source" >Download iCompressJS Source </a > }
You can have whatever you like in your footer.
Lets now check out out index.jade view
-
extends layout
-
-
block content
-
div .container
-
h1 Paste your JavaScript code below to compress it
-
form (method = 'post' ,onSubmit = "return false" ,id = "compress-form" )
-
div .row
-
div .span2
-
label
-
input (type = "checkbox" ,name = "lift_vars" ,value = "1" ,style = "display:inline-block;float:left;margin-top:4px" )
-
| Lift vars
-
div .span2
-
label
-
input (type = "checkbox" ,name = "inline_scripts" ,style = "display:inline-block;float:left;margin-top:4px" )
-
| Escape < /script >
-
br
-
textarea (name = "js" ,id = "js" ,style = "height:300px;width:98%" )
-
br
-
// input(type='hidden', name="_csrf", value=token)
-
input .btn .btn -success .btn -large (type = "button" ,name = "submit" ,value = "Compress it" ,id = "compress" )
-
h1 Compression result
-
textarea (name = "result" ,id = "result" ,style = "height:300px;width:98%" )
-
input .btn .btn -inverse .btn -large (type = "button" ,value = "Select All" ,onclick = "$('#result').select()" )
-
script
-
$ (document ) .ready ( function ( ) {
-
$ ( "#js" ) .focus ( ) ;
-
$ ( "#compress" ) .click ( function ( ) {
-
$ .ajax ( {
-
type : 'POST' ,
-
url : '/compressit' ,
-
success : function (data ) {
-
$ ( "#result" ) .val (data ) ;
-
}
-
} ) ;
-
} ) ;
-
} ) ;
Couple of things to note above
- extends layout is a reference to layout.jade and explicitly telling that in layout.jade look for
- block content and put the contents at its place
Other stuff is just normal HTML and a click event handler (jQuery) added at the end for compress it button
Alrighty! with all the files in place its time to run our app
run your app as
-
node app .js
If there are any issues you will know straight away. the code above is verified so it should work without giving much grief.
Now that if some other process is not already using port 8080 its time to direct your browser to http://127.0.0.1:8080
You should see something like this


