DevExpress GridControl功能总结
原文:
DevExpress GridControl功能总结
 View Code
 View Code
 全选和反选
全选和反选
写在前面,Dev控件已经很久了,功能也很强大,截止到现在我编写文档出来的Dev的版本已经到了14.1了,看了Demo真的很强大,效果也很好,结合自己这一个月开发,分享一下自己研究过后的经验,不让大家走更多的弯路
- DevExpress安装顺序
- GridControl基本样式设置
- GridControl常用事件和描述
- GridControl右键菜单
- GridControl全选和反选
- GridControl添加小计功能
-
GridControl固定表头
1.安装从未如此简单
Dev的安装文件已经放大百度云中方便大家下载:DevExpress 12.2.7,下载后按照图片数字顺序依次安装,这就是Dev 12.2.7,你值得拥有。
if (bandedGridView1.GetFocusedDataRow() == null) return; //运单编号
            var columnValue= bandedGridView1.GetFocusedRowCellValue("绑定列字段名称").ToString();
注意事项:使用VS2012和2010搭配DevExpress 12.2.7这个版本一起开发是最好的,工具箱暂时无法导入VS2013
2.基本样式设置,你会吗?
面对第一次使用GridControl,
 搞不懂GridControl下面为什么有一堆的GridView呢?后来想想,原来GridControl是一个大容器,下面有很多视图,那么就是操作视图,下面是我的一些常用样式设置。
            bandedGridView1.IndicatorWidth = 40; //自增列宽度
            bandedGridView1.OptionsView.ColumnAutoWidth = false; //自动调整列宽,使所有列的宽度和视图的宽度匹配
            bandedGridView1.OptionsCustomization.AllowSort = false;//禁止用户对数据进行排序操作
            bandedGridView1.OptionsCustomization.AllowColumnResizing = false; //禁止各列头改变列宽
            bandedGridView1.VertScrollVisibility = ScrollVisibility.Auto; //显示垂直滚动条
            bandedGridView1.HorzScrollVisibility = ScrollVisibility.Auto; //显示水平滚动条
            bandedGridView1.OptionsMenu.EnableColumnMenu = false; //禁止列头上的菜单
            bandedGridView1.OptionsMenu.EnableFooterMenu = false; //禁止页脚上的菜单
            bandedGridView1.OptionsMenu.EnableGroupPanelMenu = false; //禁止分组面板上的菜单
            bandedGridView1.OptionsNavigation.UseTabKey = false; //不使用TAB/SHIFT+TAB移动焦点
            bandedGridView1.OptionsBehavior.Editable = false;//不允许编辑
            bandedGridView1.OptionsBehavior.ReadOnly = true;//只读
3.这些事件你会常用
CustomDrawRowIndicator:DGV显示自增行号
            e.Appearance.TextOptions.HAlignment = HorzAlignment.Far;
            if (e.Info.IsRowIndicator)
            {
                if (e.RowHandle >= 0)
                {
                    e.Info.DisplayText = (e.RowHandle + 1).ToString(CultureInfo.InvariantCulture);
                }
                else if (e.RowHandle < 0 && e.RowHandle > -1000)
                {
                    e.Info.Appearance.BackColor = Color.AntiqueWhite;
                    e.Info.DisplayText = "G" + e.RowHandle;
                }
            }
RowCellStyle:GridView隔行变色
 bandedGridView1.Appearance.OddRow.BackColor = Color.White; // 设置奇数行颜色 // 默认也是白色 可以省略
            bandedGridView1.OptionsView.EnableAppearanceOddRow = true; // 使能 // 和和上面绑定 同时使用有效
            bandedGridView1.Appearance.EvenRow.BackColor = Color.FromArgb(255, 250, 205); // 设置偶数行颜色
            bandedGridView1.OptionsView.EnableAppearanceEvenRow = true; // 使能 // 和和上面绑定 同时使用有效
            if (e.RowHandle == bandedGridView1.FocusedRowHandle) { e.Appearance.Font = new Font("宋体", 9, FontStyle.Bold); }
FocusedRowChanged:选中行改变绑定行数据到对应控件中
if (bandedGridView1.GetFocusedDataRow() == null) return;//判断当前选中行是否为null
            //返回值
            var columnValue= bandedGridView1.GetFocusedRowCellValue("绑定列字段名称").ToString();
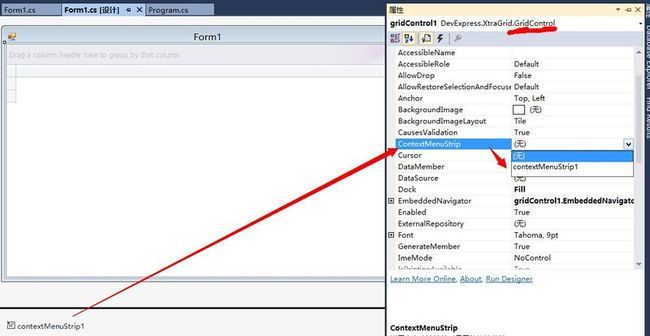
4.添加右击菜单一个很常用的功能
添加ContextMenuStrip控件,然后自定义按钮,可以找一些16*16的小图标点缀一下,很不错
这样一个右键菜单就已经绑定成功
5.GridControl全选和反选
这是一个比较难的问题,这里我结合网上寻找的资料总结了一个实体类贴上源代码
//------------------------------------------------------------------------------------- // All Rights Reserved , Copyright (C) 2014 , ZTO , Ltd . //-------------------------------------------------------------------------------------

using System.Drawing; using System.Windows.Forms; using DevExpress.XtraEditors.Repository; namespace ZTO.WayBill.Utilities { /// <summary>
    /// Dev GridControl 创建全选复选框 ///
    /// 修改纪录 ///
    /// 2014-5-30 版本:1.0 YangHengLian 创建主键,注意命名空间的排序。 ///
    /// 版本:1.0 ///
    /// <author>
    ///        <name>YangHengLian</name>
    ///        <date>2014-5-30</date>
    /// </author>
    /// </summary>
    public class DevControlHelper { /// <summary>
        /// 创建复选框 /// </summary>
        /// <param name="e"></param>
        /// <param name="chk"></param>
        public static void DrawCheckBox(DevExpress.XtraGrid.Views.Grid.ColumnHeaderCustomDrawEventArgs e, bool chk) { RepositoryItemCheckEdit repositoryCheck = e.Column.ColumnEdit as RepositoryItemCheckEdit; if (repositoryCheck != null) { Graphics g = e.Graphics; Rectangle r = e.Bounds; DevExpress.XtraEditors.ViewInfo.CheckEditViewInfo info; DevExpress.XtraEditors.Drawing.CheckEditPainter painter; DevExpress.XtraEditors.Drawing.ControlGraphicsInfoArgs args; info = repositoryCheck.CreateViewInfo() as DevExpress.XtraEditors.ViewInfo.CheckEditViewInfo; painter = repositoryCheck.CreatePainter() as DevExpress.XtraEditors.Drawing.CheckEditPainter; info.EditValue = chk; info.Bounds = r; info.CalcViewInfo(g); args = new DevExpress.XtraEditors.Drawing.ControlGraphicsInfoArgs(info, new DevExpress.Utils.Drawing.GraphicsCache(g), r); painter.Draw(args); args.Cache.Dispose(); } } /// <summary>
        /// 全选,反选 /// </summary>
        /// <param name="gridView"></param>
        /// <param name="fieldName"></param>
        /// <param name="currentStatus"></param>
        /// <returns></returns>
        public static bool ClickGridCheckBox(DevExpress.XtraGrid.Views.Grid.GridView gridView, string fieldName, bool currentStatus) { bool result = false; if (gridView != null) { gridView.ClearSorting();//禁止排序
 gridView.PostEditor(); DevExpress.XtraGrid.Views.Grid.ViewInfo.GridHitInfo info; Point pt = gridView.GridControl.PointToClient(Control.MousePosition); info = gridView.CalcHitInfo(pt); if (info.InColumn && info.Column != null && info.Column.FieldName == fieldName) { for (int i = 0; i < gridView.RowCount; i++) { gridView.SetRowCellValue(i, fieldName, !currentStatus); } return true; } } return result; } } }
下面是使用步骤
窗体加载事件添加一些代码
private bool _mCheckStatus; //GridControl全选,作为全局变量,默认false
        private void FrmInputBill_Load(object sender, EventArgs e) { bandedGridView1.OptionsBehavior.Editable = false; bandedGridView1.OptionsBehavior.ReadOnly = true; var col = new BandedGridColumn { FieldName = "Check", Visible = true, VisibleIndex = 0, ColumnEdit = new RepositoryItemCheckEdit() }; col.OptionsColumn.AllowEdit = true; //CheckBox可以编辑改变
            gridBand1.Columns.Insert(0, col); bandedGridView1.Click += bandedGridView1_Click; bandedGridView1.CustomDrawColumnHeader += bandedGridView1_CustomDrawColumnHeader; bandedGridView1.DataSourceChanged += bandedGridView1_DataSourceChanged;        //这里绑定数据源
 } #region GridControl支持全选事件

        private void bandedGridView1_Click(object sender, EventArgs e) { if (DevControlHelper.ClickGridCheckBox(this.bandedGridView1, "Check", _mCheckStatus)) { _mCheckStatus = !_mCheckStatus; } } private void bandedGridView1_CustomDrawColumnHeader(object sender, ColumnHeaderCustomDrawEventArgs e) { if (e.Column != null && e.Column.FieldName == "Check") { e.Info.InnerElements.Clear(); e.Painter.DrawObject(e.Info); DevControlHelper.DrawCheckBox(e, _mCheckStatus); e.Handled = true; } } private void bandedGridView1_DataSourceChanged(object sender, EventArgs e) { GridColumn column = this.bandedGridView1.Columns.ColumnByFieldName("Check"); if (column != null) { column.Width = 40; column.OptionsColumn.ShowCaption = false; column.ColumnEdit = new RepositoryItemCheckEdit(); } } #endregion
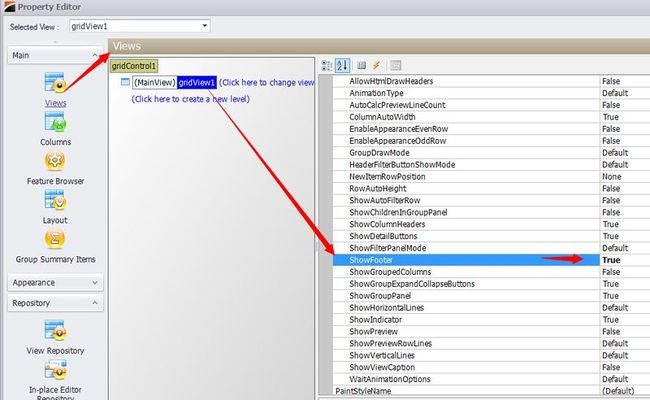
 6.添加小计功能
第一步

第二步
加载完数据之后绑定

bandedGridView1.Columns["绑定字段列名"].Summary.Add(DevExpress.Data.SummaryItemType.Count, "BILL_CODE", "总计:{0}条"); //添加小计功能,在指定的列上添加一个统计对象
删除动作修改对应的小计信息,代码如下:
bandedGridView1.Columns["绑定字段列名"].Summary[0].DisplayFormat = string.Format("小计{0}条", bandedGridView1.RowCount);
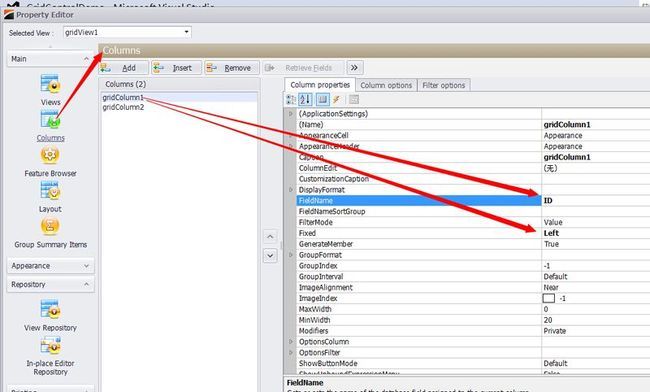
7.固定表头

记录了一些GridControl的常用代码,分享给大家,如果有兴趣的可以到我的群 里进行提问,不仅包括GridControl,其他的控件我也研究了,运用到项目中
将来的你一定会感激现在拼命的自己


