模型模板 — 精通 MVC 3 框架
【译著】16 模型模板 — 精通 MVC 3 框架
C H A P T E R 16
■ ■ ■
Model Templates
模型模板
The HTML helpers that we looked at in the previous chapter, such as Html.CheckBoxFor and Html.TextBoxFor, specify the HTML element required to edit a piece of data. The MVC Framework supports an alternative approach, known as templated view helpers, where we specify which model object or property we want to display or edit and leave the MVC Framework to figure out what HTML elements should be used.
我们在上一章中考察的HTML辅助器,如Html.CheckBoxFor和Html.TextBoxFor等,指定了编辑一片数据所需要的HTML元素。MVC框架支持另一种方式,称为模板视图辅助器。在这些辅助器中,我们指定我们想要显示或编辑的模型对象或属性,而让MVC框架去判断应该用什么HTML元素。
In this chapter, we’ll introduce you to the templated view helpers and demonstrate how to fine-tune, customize, and completely replace parts of the model templates system.
在本章中,我们将向你介绍这些模板视图辅助器,并演示如何进行调整、定制、以及完全替换模型模板系统的部件。
Using Templated View Helpers
使用模板视图辅助器
The idea of the templated view helpers is that they are more flexible. We don’t have to worry about specifying the HTML element we want to represent a model property—we just say which property we want displayed and leave the details to the MVC Framework to figure out. We don’t have to manually update our views when we update a view model; the MVC Framework will figure out what is required automatically. As an example, Listing 16-1 shows a simple model types that we will use for demonstrations.
模板视图辅助器的思想是它们更加灵活。在我们想要表现一个模型属性时,我们不必担心要指定什么HTML元素 — 我们只要说,我们想显示哪个属性,而把细节留给MVC框架去判断。在我们更新视图模型时,我们不必手工地去更新我们的视图。MVC框架会自动地判断需要的是什么。作为一个例子,清单16-1显示了我们将用来演示的一个简单的模型类型。
Listing 16-1. A Simple Model Class
清单16-1. 一个简单的模型类
public class Person {
    public int PersonId { get; set; }
    public string FirstName { get; set; }
    public string LastName { get; set; }
    public DateTime BirthDate { get; set; }
    public Address HomeAddress { get; set; }
    public bool IsApproved { get; set; }
    public Role Role { get; set; }
}
public class Address {
    public string Line1 { get; set; }
    public string Line2 { get; set; }
    public string City { get; set; }
    public string PostalCode { get; set; }
    public string Country { get; set; }
}
public enum Role {
    Admin,
    User,
    Guest
}
As a simple example of a templated helper, the view in Listing 16-2 is strongly typed to a Person view model and uses template helpers to display and create editors.
作为模板辅助器的一个简单例子,清单16-2是一个以Person为视图模型的强类型视图,并使用模板辅助器来创建和显示编辑字段。
Listing 16-2. A View That Uses Templated HTML Helpers
清单16-2. 一个使用HTML模板辅助器的视图
@model MVCApp.Models.Person
@{
ViewBag.Title = "Index";
}
<h4>Person</h4>
<div class="field">
    <label>Name:</label>
    @Html.EditorFor(x => x.FirstName)
    @Html.EditorFor(x => x.LastName)
</div>
<div class="field">
    <label>Approved:</label>
    @Html.EditorFor(x => x.IsApproved)
</div>
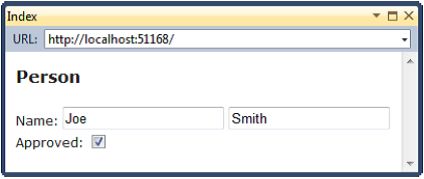
This listing uses the Html.EditorFor helper, which generates an HTML element for editing the property. Figure 16-1 shows the effect of rendering the view.
这个清单使用了Html.EditorFor辅助器,它生成一个对属性进行编辑的HTML元素。图16-1显示了渲染这个视图的结果。
Listing 16-3 shows the HTML that has been generated.
清单16-3显示了已生成的HTML。
Listing 16-3. HTML Generated by Templated Helpers
清单16-3. 由模板辅助器生成的HTML
<div class="field">
    <label>Name:</label>
    <input class="text-box single-line" id="FirstName" name="FirstName" type="text" value="Joe" /> <input class="text-box single-line" id="LastName" name="LastName" type="text" value="Smith" />
</div>
<div class="field">
    <label>Approved:</label>
    <input checked="checked" class="check-box" id="IsApproved" name="IsApproved" type="checkbox" value="true" /><input name="IsApproved" type="hidden" value="false" />
</div>
You can see that the property names that we specified are used for the id and name attributes, text inputs have been created for the FirstName and LastName properties, and a checkbox has been created for the IsApproved property.
你可以看到,我们指定的属性名被用于id和name性质,已经为FirstName和LastName属性创建了文本输入框,并为IsApproved属性创建了一个检查框。
We can also render HTML elements that display values from the model object in a read-only form; we do this using the Html.DisplayFor helper, as shown by the view in Listing 16-4.
我们也可以在一个只读表单中渲染显示模型对象值的HTML元素,这是采用Html.DisplayFor辅助器实现的,如清单16-4的视图所示。
Listing 16-4. Creating Read-Only HTML Using Templated Helpers
清单16-4. 用模板辅助器创建只读HTML
<div class="field">
    <label>Name:</label>
    @Html.DisplayFor(x => x.FirstName)
    @Html.DisplayFor(x => x.LastName)
</div>
<div class="field">
    <label>Approved:</label>
    @Html.DisplayFor(x => x.IsApproved)
</div>
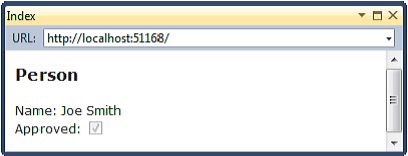
When we render this view, we get the appropriate HTML elements to display the values, as shown in Figure 16-2.
当我们渲染这个视图时,我们得到了显示这些值的相应的HTML元素,如图16-2所示。
As we might expect, we now have HTML that allows the user to see the values but not to edit them. Given that most MVC applications are dominated by either displaying or editing data, the template helpers can be convenient. Table 16-1 shows the different built-in templated helpers that the MVC Framework supports.
正如我们可能期望的那样,我们现在有了用户可以看到其值、但不能编辑的HTML。现行的大多数MVC应用程序,不是显示数据、就是编辑数据,模板辅助器是方便的。表16-1显示了MVC框架所支持的各种内建的模板辅助器。
| Helper 辅助器 |
Example 示例 |
Description 描述 |
|---|---|---|
| Display | Html.Display("FirstName") | Renders a read-only view of the specified model property, choosing an HTML element according to the property’s type and metadata 渲染指定模型属性的只读视图,会根据该属性的类型及元数据选用一个HTML元素 |
| DisplayFor | Html.DisplayFor(x => x.FirstName) | Strongly typed version of the previous helper 上一辅助器的强类型版本 |
| Editor | Html.Editor("FirstName") | Renders an editor for the specified model property, choosing an HTML element according to the property’s type and metadata 对指定的模型属性渲染一个编辑字段,会根据该属性的类型及元数据选用一个HTML元素 |
| EditorFor | Html.EditorFor(x => x.FirstName) | Strongly typed version of the previous helper 上一辅助器的强类型版本 |
| Label | Html.Label("FirstName") | Renders an HTML <label> element referring to the specified model property 渲染引用指定模型属性的HTML <label>元素(HTML标签元素) |
| LabelFor | Html.LabelFor(x => x.FirstName) | Strongly typed version of the previous helper 上一辅助器的强类型版本 |
| DisplayText | Html.DisplayText("FirstName") | Bypasses all templates and renders a simple string representation of the specified model property 绕过所有模板,渲染指定模型属性的简单字符串表示 |
| DisplayTextFor | Html.DisplayTextFor(x => x.FirstName) | Strongly typed version of the previous helper 上一辅助器的强类型版本 |
The helpers in Table 16-1 generate HTML for an individual model property, but the MVC helper also includes helpers that will generate HTML for all the properties in a model object. This process is known as scaffolding, whereby a complete view or editor is created for our model object without us having to explicitly deal with individual elements of the display. (This is runtime scaffolding, which is different from the development scaffolding that populates a controller with preprepared methods). Table 16-2 describes these scaffolding helpers.
表16-1中的辅助器为单个模型属性生成HTML,但MVC辅助器也包含了一些为一个模型对象的所有属性生成HTML的辅助器。这一过程称为支架,由此为我们的模型对象创建完整的显示视图或编辑视图,而不需要我们去明确地处理各个显示元素。(这是运行时支架,它不同于开发支架,那是用预先准备好的一组方法来组装一个控制器)(根据这个解释,我们可以认为,所谓运行时支架,是用一组预先准备好的辅助器来组装一个模型对象的完整视图 — 译者注)。表16-2描述了这些支架辅助器。(请把支架辅助器理解为一种套装的HTML模板辅助器,它可以为一个模型对象的各个属性生成HTML — 译者注)
| Helper 辅助器 |
Example 示例 |
Description 描述 |
|---|---|---|
| DisplayForModel | Html.DisplayForModel() | Renders a read-only view of the entire model object 渲染整个模型对象的只读视图 |
| EditorForModel | Html.EditorForModel() | Renders editor elements for the entire model object 为整个模型对象渲染编辑元素 |
| LabelForModel | Html.LabelForModel() | Renders an HTML <label> element referring to the entire model object 渲染对整个模型对象进行引用的HTML <label>元素(HTML标签元素)。 |
Listing 16-5 shows a view that uses one of these helpers, EditorForModel.
清单16-5显示了使用其中一个辅助器,EditorModel,的视图。
Listing 16-5. Using a Scaffolding Templated HTML Helper
清单16-5. 使用一个HTML支架模板辅助器
@model MVCApp.Models.Person
@{
ViewBag.Title = "Index";
}
<h4>Person</h4>
@Html.EditorForModel()
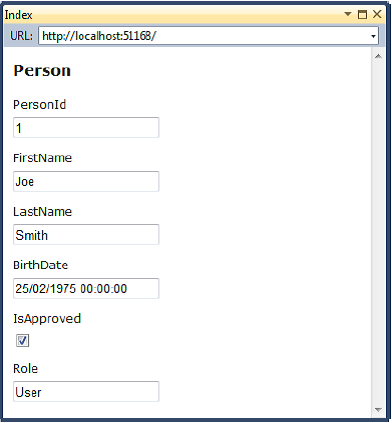
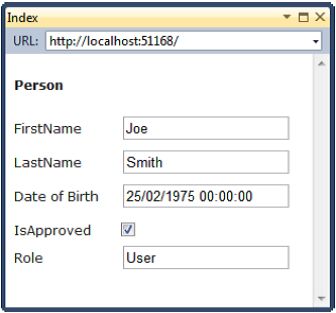
This helper generates HTML labels and editor elements for the properties in the model object; we don’t need to pass the model to the helper as a parameter because it is read directly from the view by the helper. Figure 16-3 shows the rendered view.
这个辅助器为模型对象中的属性生成HTML标签和编辑元素,我们不需要把模型作为参数传递给这个辅助器,因为它是由该辅助器直接从视图读取的。图16-3显示了所渲染的视图。
The templated helpers are a useful and convenient feature. However, as we’ll see, we often have to tweak the way they operate in order to get precisely the results we require—this is particularly true when working with the scaffolding helpers. In the following sections, we’ll show you different techniques for working with templated helpers to fine-tune their behavior.
模板辅助器是一种有用而方便的特性。然而,正如我们所看到的,我们往往要调整它们的操作方式,以精确地获得我们需要的结果 — 当我们使用支架辅助器进行工作时,尤其如此。在以下小节中,我们将向你演示使用这些模板辅助器的不同技术,以调整其行为。
Styling Generated HTML
设置生成HTML的样式
When we use the templated helpers to create editors, the HTML elements that are generated contain useful values for the class attribute, which we can use to style the output. For example, this helper:
当我们用模板辅助器创建编辑字段时,所生成的HTML元素对class属性包含了有用的值,我们可以用它来设置输出的样式。例如,这个辅助器:
@Html.EditorFor(m => m.BirthDate)
generates the following HTML:
会生成以下HTML:
<input class="text-box single-line" id="BirthDate" name="BirthDate" type="text"
    value="25/02/1975 00:00:00" />
When we generate editors for the entire model object, like this:
当我们为整个模型对象生成编辑视图时,像这样:
@Html.EditorForModel()
then the HTML that is generated gives us lots of opportunities to apply styles. The HTML generated for the BirthDate property is as follows (we added the indentation to make the HTML easier to read):
那么,所生成的HTML给了我们很多运用样式的机会。为BirthDate属性所生成的HTML如下所示(我们添加了缩进,以使该HTML便于阅读):
<div class="editor-label">
    <label for="BirthDate">BirthDate</label>
</div>
<div class="editor-field">
    <input class="text-box single-line" id="BirthDate" name="BirthDate" type="text"
        value="25/02/1975 00:00:00" />
</div>
Similar HTML is generated for each property in the model, with variations for the different types of editor. For example, here is the HTML generated for the IsApproved property:
对模型中的每个属性都生成类似的HTML,会随编辑字段的不同类型而有所变化。例如,以下是为IsApproved属性生成的HTML:
<div class="editor-label">
    <label for="IsApproved">IsApproved</label>
</div><div class="editor-field">
    <input checked="checked" class="check-box" id="IsApproved" name="IsApproved"
         type="checkbox" value="true" />
    <input name="IsApproved" type="hidden" value="false" />
</div>
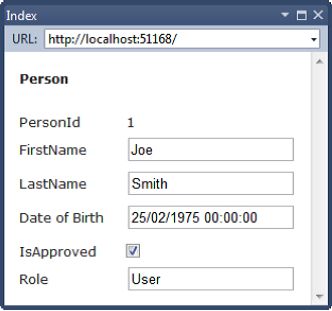
Using these classes, it is a simple matter to apply styles to the generated HTML. To make things easier, there are CSS styles defined in the ~/Content/Site.css file for the editor-label and editor-field classes—you can see the styles in the source code download for this chapter. We have used these styles to align the labels and the editors, as shown in Figure 16-4.
利用这些class属性,把样式运用于这些生成的HTML是一件很简单的事。为了方便,我们在~/Content/Site.css文件中为编辑标签和编辑字段的class定义了一些CSS样式 — 你可以在本书下载的源代码中看到这些样式。我们用这些样式对齐了标签和编辑字段,如图16-4所示。
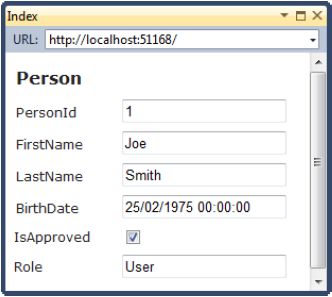
Figure 16-4. Using the class attribute values to apply styles to generated editor elements
图16-4. 用class属性值把样式运用于所生成的编辑元素
Using Model Metadata
使用模型元数据
The templated helpers have no special knowledge about our application and model data types, and often we end up with HTML that isn’t what we require. There are a number of problems with the HTML that was rendered in Figure 16-4; we’ll start with two examples. The first is that the PersonId property is displayed—we rarely want to allow users to edit record identifiers, especially if they are being generated and managed by a database somewhere behind the scenes. The second problem is that our BirthDate property is displayed as a date and time—we just want the date, of course.
模板辅助器对我们的应用程序以及模型数据类型没有特别的感知,而且,通常我们会面对这不是我们所需要的HTML而无法继续。图16-4渲染的HTML有几个问题,我们举两个例子。第一个问题是显示了PersonId属性 — 我们很少会让用户去编辑记录的标识符(Id),特别是当它们是由后台数据库生成和管理的情况下,尤其如此。第二个问题是我们的BirthDate属性被显示成日期时间格式 — 当然,我们想只显示日期。
We can’t blame the templated helpers in these situations; the HTML that is generated is based on a best-guess about what we want. Fortunately, we can use model metadata to provide instructions to the helpers about how to handle our model types. Metadata is expressed using attributes, where attributes and parameter values provide a range of instructions to the view helpers. In the following sections, we’ll show you how to use metadata to provide directions to the helpers for labels, displays, and editors.
我们不能责备这些情况下的模板辅助器,所生成的HTML建立在我们所希望的最佳猜测基础之上。幸运的是,我们可以采用模型元数据为这些辅助器提供指示,告诉它们如何处理我们的模型类型。元数据是用注解属性来表示的,通过注解属性及参数值,给视图辅助器提供一系列指令。在以下小节中,我们将向你演示如何使用元数据对标签、显示和编辑等辅助器提供指令。
注:在原文中,对HTML元素的属性使用了单词attribute,代码段中的注解(annotation)属性也使用了单词attribute,而对于模型属性使用了单词property。在英文中,attribute和property都是“属性”的意思。为了以示区别,我们把HTML元素的attribute译成HTML属性,把注解的attribute译成注解属性,而把模型的property译成模型属性或属性。也请读者在“属性”出现的地方,辨清HTML属性、注解属性、以及模型属性(或对象属性)等概念 — 译者注
Using Metadata to Control Editing and Visibility
用元数据来控制编辑及可见性
In our Person class, the PersonId property is one that we don’t want the user to be able to see or edit. Most model classes have at least one such property, often related to the underlying storage mechanism—a primary key that is managed by a relational database, for example. We can use the HiddenInput attribute, which causes the helper to render a hidden input field, as shown in Listing 16-6.
在我们的Person类中,PersonId属性是一个我们不想用户能够看到或编辑的属性。大多数模型类至少都有一个这样的属性,它们通常关系到底层的存储机制 — 例如,由关系数据库管理的主键。我们可以使用HiddenInput注解属性,它会使辅助器渲染一个隐藏的input字段,如清单16-6所示。
Listing 16-6. Using the HiddenInput Attribute
清单16-6. 使用HiddenInput性质
public class Person {
    [HiddenInput]
    public int PersonId { get; set; }
    public string FirstName { get; set; }
    public string LastName { get; set; }
    public DateTime BirthDate { get; set; }
    public Address HomeAddress { get; set; }
    public bool IsApproved { get; set; }
    public Role Role { get; set; }
}
When this attribute has been applied, the Html.EditorFor and Html.EditorForModel helpers will render a read-only view of the decorated property, as shown in Figure 16-5 (which shows the EditorForModel helper).
当运用这个注解属性时,Html.EditorFor和Html.EditorForModel辅助器会对这个被修饰的属性渲染一个只读字段,如图16-5所示(该图演示了EditorForModel辅助器)。
The value of the PersonId property is shown, but the user cannot edit it. The HTML that is generated for the property is as follows:
它显示了PersonId属性的值,但用户不能编辑它。为该属性生成的HTML如下所示:
<div class="editor-field">
    1
    <input id="PersonId" name="PersonId" type="hidden" value="1" />
</div>
The value of the property (1 in this case) is rendered literally, but the helper also includes a hidden input element for the property, which is helpful when the editors are used with forms—we’ll return to this topic when we look at model binding in Chapter 17 and model validation in Chapter 18. If we want to hide a property entirely, then we can set the value of the DisplayValue property in the DisplayName attribute to false, as shown in Listing 16-7.
该属性的值(此时为1)被渲染成文字,但辅助器也为该属性包含了一个隐藏的input元素,当把这个编辑视图用于表单时,这个隐藏的input字段是有用的 — 我们将在第17章考查模型绑定,以及第18章模型校验时,回到这一论题。如果我们想完全隐藏一个属性,那么我们可以把DisplayName注解属性(此处可能错了,应当是HiddenInput注解属性,参见清单16-7 — 译者注)中的DisplayValue属性的值设置为false,如清单16-7所示。
Listing 16-7. Using the HiddenInput Attribute to Hide a Property
清单16-7. 用HiddenInput性质来隐藏一个属性
public class Person {
    [HiddenInput(DisplayValue=false)]
    public int PersonId { get; set; }
    public string FirstName { get; set; }
    public string LastName { get; set; }
...
When we use the Html.EditorForModel helper on a Person object, a hidden input will be created so that the value for the PersonId property will be included in any form submissions. This has the effect of hiding the PersonId property from the user, as shown by Figure 16-6.
当我们把Html.EditorForModel辅助器运用于Person对象时,将创建一个隐藏的input字段,以便PersonId属性的值可以被包含到任何要递交的表单中去。这具有对用户隐藏PersonId属性的效果,如图16-6所示。
If we have chosen to render HTML for individual properties, we can still create the hidden input for the PersonId property by using the Html.EditorFor helper, like this:
如果我们已经对某个属性选择了显示其HTML,通过运用Html.EditorFor辅助器,我们仍然可以对这个PersonId属性创建隐藏的input,像这样:
@Html.EditorFor(m => m.PersonId)
The HiddenInput property is detected, and if DisplayValue is true, then the following HTML is generated:
这还是会检测HiddenInput属性,而且,如果其DisplayValue是true,那么,会生成以下HTML:
<input id="PersonId" name="PersonId" type="hidden" value="1" />
从支架中排除一个属性
If we want to exclude a property from the generated HTML, we can use the ScaffoldColumn attribute. Whereas the HiddenInput attribute includes a value for the property in a hidden input element, the ScaffoldColumn attribute allows us to mark a property as being off-limits for the scaffolding process. Here is an example of the attribute in use:
如果我们想把一个属性从生成的HTML中排除掉,我们可以使用ScaffoldColumn注解属性。HiddenInput注解属性把一个属性的值包含在一个隐藏的input元素,而ScaffoldColumn注解属性允许我们针对支架过程把一个属性标记为禁止。以下是使用该属性的一个例子:
public class Person {
    [ScaffoldColumn(false)]
    public int PersonId { get; set; }
    ...
When the scaffolding helpers see the ScaffoldColumn attribute, they skip over the property entirely; no hidden input elements will be created, and no details of this property will be included in the generated HTML. The appearance of the generated HTML will be the same as if we had used the HiddenInput attribute, but no value will be returned for the property during a form submission—this has an effect on model binding, which we discuss later in the chapter. The ScaffoldColumn attribute doesn’t have an effect on the per-property helpers, such as EditorFor. If we call @Html.EditorFor(m => m.PersonId) in a view, then an editor for the PersonId property will be generated, even when the ScaffoldColumn attribute is present.
当支架辅助器看到ScaffoldColumn注解属性时,会完全跳过该属性(指ScaffoldColumn标注的模型属性 — 译者注),这将不会创建隐藏的input元素,而且,该属性的细节也不会被包含在生成的HTML中。所生成的HTML的外观与使用HiddenInput注解属性的情况相同,但在表单递交期间没有该属性的值被返回 — 这对模型绑定有影响,本章稍后我们会讨论。ScaffoldColumn注解属性对单属性辅助器,如EditorFor,不起作用。如果我们在视图中调用@Html.EditorFor(m => m.PersonId),那么会生成PersonId属性的编辑字段,哪怕有ScaffoldColumn注解属性存在。
Using Metadata for Labels
使用用于标签的元数据
By default, the Label, LabelFor, LabelForModel, and EditorForModel helpers use the names of properties as the content for the label elements they generate. For example, if we render a label like this:
默认地,Label、LabelFor、LabelForModel、以及EditorForModel辅助器用属性名作为它们生成的标签元素的内容。例如,如果我们像下面这样渲染一个标签:
@Html.LabelFor(m => m.BirthDate)
the HTML element that is generated will be as follows:
生成的HTML元素将如下所示:
<label for="BirthDate">BirthDate</label>
Of course, the names we give to our properties are often not what we want to be displayed to the user. To that end, we can apply the DisplayName attribute from the System.ComponentModel namespace, passing in the value we want as a parameter; Listing 16-8 demonstrates this.
当然,我们给出的属性名通常不是我们希望显示给用户的名字。为此,我们可以运用System.ComponentModel命名空间的DisplayName注解属性,在其中传递我们希望的值作为参数,清单16-8对此作了演示。
Listing 16-8. Using the DisplayName Attribute to Define a Label
清单16-8. 用DisplayName注解属性来定义一个标签
public class Person {
    [HiddenInput(DisplayValue=false)]
    public int PersonId { get; set; }
    public string FirstName { get; set; }
    public string LastName { get; set; }
    [Display(Name="Date of Birth")]
    public DateTime BirthDate { get; set; }
    public Address HomeAddress { get; set; }
    public bool IsApproved { get; set; }
    public Role Role { get; set; }
}
When the label helpers render a label element for the BirthDate property, they will detect the Display attribute and use the value of the Name parameter for the inner text, like this:
当标签辅助器对BirthDate属性渲染一个标签元素时,它们将检测Display注解属性,并用Name参数的值作为其内部文本,像这样:
<label for="BirthDate">Date of Birth</label>
The helpers also recognize the DisplayName attribute, which we can apply in the same way. This attribute has the advantage of being able to be applied to classes, which allows us to use the Html.LabelForModel helper. Listing 16-9 shows the attribute being used on the Person class itself.
这些辅助器也能识别DisplayName注解属性,其使用方式相同。这个注解属性有一个优点,它能够运用于类,这允许我们使用Html.LabelForModel辅助器。清单16-9演示了把这个注解属性运用于Person类。
Listing 16-9. Using the DisplayName Attribute on a Class
清单16-9. 将DisplayName性质用于一个类
[DisplayName("Person Details")]
public class Person {
    [HiddenInput(DisplayValue=false)]
    public int PersonId { get; set; }
    public string FirstName { get; set; }
    public string LastName { get; set; }
    [Display(Name="Date of Birth")]
    public DateTime BirthDate { get; set; }
    public Address HomeAddress { get; set; }
    public bool IsApproved { get; set; }
    public Role Role { get; set; }
}
We can apply the DisplayName attribute to properties as well, but we tend to use this attribute only for model classes. Once we have applied this attribute, if we call this helper:
我们也可以把DisplayName注解属性运用于模型属性,但我们倾向于把这个注解属性只用于模型类。一旦我们运用了这个注解属性,如果我们调用这个辅助器:
@Html.LabelForModel()
the following HTML is generated:
就会生成如下HTML:
<label for="">Person Details</label>
Using Metadata for Data Values
使用用于数据值的元数据
We can also use metadata to provide instructions about how a model property should be displayed; this is how we resolve the problem with our birth date property including a time. The attribute we need to do this is DataType, as shown in Listing 16-10.
我们也可以用元数据对如何显示一个模型属性提供一些指示,我们用这个办法解决出生日期属性包含了时间的这种问题。做这种事的注解属性是DataType,如清单16-10所示。
Listing 16-10. Using the DataType Attribute
清单16-10. 使用DataType性质
public class Person {
    [HiddenInput(DisplayValue=false)]
    public int PersonId { get; set; }
    public string FirstName { get; set; }
    public string LastName { get; set; }
    [DataType(DataType.Date)]
    [Display(Name="Date of Birth")]
    public DateTime BirthDate { get; set; }
    public Address HomeAddress { get; set; }
    public bool IsApproved { get; set; }
    public Role Role { get; set; }
}
The DataType attribute takes a value from the DataType enumeration as a parameter. In the example we have specified the DataType.Date value, which causes the templated helpers to render the value of the BirthDate property as a date without the associated time. You can see the effect of this in Figure 16-7.
DataType注解属性以DataType枚举中的一个值为参数。在这个例子中,我们指定了DataType.Date的值,这使模板辅助器把BirthDate属性的值渲染成一个不带时间的日期。你可以在图16-7中看到这种效果。
Table 16-3 describes the most useful values of the DataType enumeration.
表16-3描述了DataType枚举中最有用的一些值。
| Value 值 |
Description 描述 |
|---|---|
| DateTime | Displays a date and time (this is the default behavior for System.DateTime values) 显示日期和时间(这是System.DateTime值的默认行为) |
| Date | Displays the date portion of a DateTime 显示DateTime的日期部分 |
| Time | Displays the time portion of a DateTime 显示DateTiem的时间部分 |
| Text | Displays a single line of text 显示单行文本 |
| MultilineText | Renders the value in a textarea element 将值渲染在一个文本区(textarea)元素中 |
| Password | Displays the data so that individual characters are masked from view 显示数据,使其字符在视图中以掩码显示 |
| Url | Displays the data as a URL (using an HTML a element) 将数据显示为一个URL(用HTML的a元素) |
| EmailAddress | Displays the data as an e-mail address (using an a element with a mailto href) 将数据显示为一个e-mail地址(用带有mailto的href的a元素) |
The effect of these values depends on the type of the property they are associated with and the helper we are using. For example, the MultilineText value will lead those helpers that create editors for properties to create an HTML textarea element but will be ignored by the display helpers. This makes sense—the textarea element allows the user to edit a value, which doesn’t make sense when we are displaying the data in a read-only form. Equally, the Url value has an effect only on the display helpers, which render an HTML a element to create a link.
这些值的效果依赖于它们所关联的属性类型,以及我们所使用的辅助器。例如,MultilineText值会让编辑辅助器创建一个HTML的文本区元素,但显示辅助器对这个值是忽略的。这是有意义的 — 文本区的作用是让用户编辑一个值,但当我们在一个只读表单中显示数据时,文本区就没有意义了。同样,Url值只对显示辅助器起作用,它渲染一个HTML的a元素以创建一个连接。
Using Metadata to Select a Display Template
用元数据选择显示模板
As their name suggests, templated helpers use display templates to generate HTML. The template that is used is based on the type of the property being processed and the kind of helper being used. We can use the UIHint attribute to specify the template we want to use to render HTML for a property, as shown in Listing 16-11.
正如它们的名字所示意的那样,模板辅助器用显示模板生成HTML。所使用的模板基于属性类型及辅助器种类。我们可以用UIHint注解属性来指定我们想用的模板,来渲染一个属性的HTML,如清单16-11所示。
Listing 16-11. Using the UIHint Attribute
清单16-11. 使用HIHint性质
public class Person {
    [HiddenInput(DisplayValue=false)]
    public int PersonId { get; set; }
    [UIHint("MultilineText")]
    public string FirstName { get; set; }
    public string LastName { get; set; }
    [DataType(DataType.Date)]
    [Display(Name="Date of Birth")]
    public DateTime BirthDate { get; set; }
    public Address HomeAddress { get; set; }
    public bool IsApproved { get; set; }
    public Role Role { get; set; }
}
In the listing, we specified the MultilineText template, which renders an HTML textarea element for the FirstName property when used with one of the editor helpers, such as EditorFor or EditorForModel. Table 16-4 shows the set of built-in templates that the MVC Framework includes.
在这个清单中,我们指定了MultilineText模板,当与编辑辅助器(如EditorFor或EditorForModel)一起使用时,它为FirstName属性渲染一个HTML文本区元素。表16-4显示了MVC框架所包含的一组内建的模板。
| Value 值 |
Effect (Editor) 效果(编辑辅助器) |
Effect (Display) 效果(显示辅助器) |
|---|---|---|
| Boolean | Renders a checkbox for bool values. For nullable bool? values, a select element is created with options for True, False, and Not Set. 渲染一个bool值的检查框。对于nullable的bool?值,创建一个带有True、False、和Not Set选项的select元素。 |
As for the editor helpers, but with the addition of the disabled attribute, which renders read-only HTML controls. 与编辑辅助器同,但在渲染只读HTML控件时附加了disable标记属性。 |
| Collection | Renders the appropriate template for each of the elements in an IEnumerable sequence. The items in the sequence do not have to be of the same type. 为IEnumerable序列中的每一个元素渲染一个相应的模板,该序列中的各个项不必是同种类型。 |
As for the editor helpers. 与编辑辅助器同。 |
| Decimal | Renders a single-line textbox input element and formats the data value to display two decimal places. 渲染一个单行文本框的input元素,并将数据值格式化两位小数。 |
Renders the data value formatted to two decimal places. 渲染格式化成两位小数的数据值。 |
| EmailAddress | Renders the value in a single-line textbox input element. 将值渲染在一个单行文本框的input元素中。 |
Renders a link using an HTML a element and an href attribute that is formatted as a mailto URL. 用HTML的a元素渲染一个连接,且href标记属性格式化成一个mailto的URL |
| HiddenInput | Creates a hidden input element. 创建隐藏的input元素。 |
Renders the data value and creates a hidden input element. 渲染该数据值,并创建一个隐藏的input元素。 |
| Html | Renders the value in a single-line textbox input element. 将值渲染在一个单行文本框的input元素中。 |
Renders a link using an HTML a element. 用HTML的a元素渲染一个连接。 |
| MultilineText | Renders an HTML textarea element that contains the data value. 渲染一个含有该数据值的HTML textarea元素。 |
Renders the data value. 渲染数据值。 |
| Object | See explanation after this table. 参见本表后的解释。 |
See explanation after this table. 参见本表后的解释。 |
| Password | Renders the value in a single-line textbox input element so that the characters are not displayed but can be edited. 将值渲染在一个单行文本框的input元素中,不显示字符,但可编辑。 |
Renders the data value—the characters are not obscured. 渲染数据值 — 字符不模糊。(意为显示明文字符,或者是灰暗字符?请读者自己试一下 — 译者注) |
| String | Renders the value in a single-line textbox input element. 将值渲染在单行文本框的input元素中。 |
Renders the data value. 渲染数据值。 |
| Text | Identical to the String template 等同于String模板 |
Identical to the String template. 等同于String模板。 |
| Url | Renders the value in a single-line textbox input element. 将值渲染在单行文本框的input元素中。 |
Renders a link using an HTML a element. The inner HTML and the href attribute are both set to the data value. 用HTML的a元素渲染一个连接。HTML内文本和href标记属性都设置为该数据值。 |
■ Caution Care must be taken when using the UIHint attribute. We will receive an exception if we select a template that cannot operate on the type of the property we have applied it to—for example, applying the Boolean template to a string property.
警告:在使用UIHint注解属性时必须小心。如果我们把UIHint用于一个属性,但我们选择了一个不能对该属性的类型进行操作的模板,那么我们会收到一个异常 — 例如,把一个Boolean模板运用于一个string属性。
The Object template is a special case—it is the template used by the scaffolding helpers to generate HTML for a view model object. This template examines each of the properties of an object and selects the most suitable template for the property type. The Object template takes metadata such as the UIHint and DataType attributes into account.
Object模板是一个特殊的情况 — 它是由支架辅助器用来为一个视图模型对象生成HTML的模板。这个模板会检查对象的每一个属性,并为相应的属性类型选择最合适的模板。Object模板会把诸如UIHint以及DataType之类的性质考虑进来。
Applying Metadata to a Buddy Class
把元数据运用于伴随类
It isn’t always possible to apply metadata to an entity model class. This is usually the case when the model classes are generated automatically, like sometimes with ORM tools such as the Entity Framework (although not the way we used Entity Framework in the SportsStore application). Any changes we apply to automatically generated classes, such as applying attributes, will be lost the next time the classes are updated by the tool.
并不总是有可能把元数据运用于一个实体模型类。通常的情况是,模型类是自动生成的,就像我们用诸如实体框架之类的ORM工具那样(虽然这不是我们在SportsStore应用程序中使用的实体框架方式)。我们对自动生成类所作的任何修改,比如运用一些注解属性,当工具对类进行更新时,这些修改都将丢失。
The solution to this problem is to ensure that the model class is defined as partial and to create a second partial class that contains the metadata. Many tools that generate classes automatically create partial classes by default, which includes Entity Framework. Listing 16-12 shows the Person class modified such that it could have been generated automatically—there is no metadata, and the class is defined as partial.
这一问题的解决方案是,确保把这些模型类定义成分部类(partial类),并创建第二个分部类以包含元数据。许多自动生成类的工具默认情况下都是创建分部类,这也包括实体框架。清单16-12显示了修改后的Person类,这样,它可以被自动生成 — 它没有元数据,而且这个类被定义成partial。
Listing 16-12. A Partial Model Class
清单16-12. 一个分部模型类
public partial class Person {
    public int PersonId { get; set; }
    public string FirstName { get; set; }
    public string LastName { get; set; }
    public DateTime BirthDate { get; set; }
    public Address HomeAddress { get; set; }
    public bool IsApproved { get; set; }
    public Role Role { get; set; }
}
The next step is to define another partial Person class that will correspond to the one in Listing 16-13. The previous class is off-limits to us—any changes that we make will be lost when the class is regenerated, so we create a second partial Person class to give us something to which we can make persistent additions. When the compiler builds our application, the two partial classes are combined. Listing 16-11 shows the partial class that we can modify.
下一步是定义与之对应的另一个partial Person类,如清单16-13所示。前面一个类对我们是禁用的 — 我们所作的修改在这个类再生时都将丢失,因此,我们创建了第二个partial Person类,这让我们能够做一些保持附加信息的事情。当编译器建立我们的应用程序时,这两个分部类将被合并起来。清单16-11显示了我们可以进行修改的分部类。
Listing 16-13. Defining the Metadata Buddy Class
清单16-13. 定义元数据伴随类
[MetadataType(typeof(PersonMetadataSource))]
public partial class Person {
}
Partial classes must have the same name and be declared in the same namespace—and, of course, be declared using the partial keyword. The key addition for the purposes of metadata is the MetadataType attribute, which allows us to associate the buddy class with the Person class by passing the type of the buddy class as a parameter.
分部类必须同名,而且要在同一个命名空间中声明 — 当然,也是用partial关键词声明。为元数据目的附加的关键是这个MetadataType注解属性,它可以让我们把一个伴随类与这个Person类关联起来,只要以伴随类的类型作为这个性质的参数即可。
In the listing, we have specified that the metadata for the Person class can be found in a class called PersonMetadataSource, which is shown in Listing 16-14.
在这个清单中,我们已经指明,Person类的元数据可以在名为PersonMetadataSource的类中找到,这个类如清单16-14所示。
Listing 16-14. Defining the Metadata Class
清单16-14. 定义元数据类
class PersonMetadataSource {
    [HiddenInput(DisplayValue=false)]
    public int PersonId { get; set; }
    [DataType(DataType.Date)]
    public DateTime BirthDate { get; set; }
}
The buddy class only needs to contain properties that we want to apply metadata to—we don’t have to replicate all of the properties of the Person class, for example. In the listing, we have used the HiddenInput attribute to hide the PersonId property, and we have used the DataType attribute to ensure that the BirthDate property is displayed correctly.
伴随类只需要包含我们希望运用元数据的属性 — 例如,我们不必重复Person类的所有属性。在这个清单中,我们已经使用了HiddenInput注解属性,以隐藏PersonId属性,我们也使用了DataType注解属性,以确保BirthDate属性能正确地显示。
Working with Complex Type Parameters
与复合类型参数一起工作
The templating process relies on the Object template that we described in the previous section. Each property is inspected, and a template is selected to render HTML to represent the property and its data value.
模板形成过程依赖于我们前一小节描述的Object模板。它会检测每一个属性,并选择一个模板来渲染HTML,以表现这个属性及其数据值。
You may have noticed that not all of the properties have been rendered when we have used the scaffolding helpers EditorForModel and DisplayForModel. In particular, the HomeAddress property has been ignored. This happens because the Object template operates only on simple types—in particular those types that can be parsed from a string value using the GetConvertrr method of the System.ComponentModel.TypeDescriptor class. This includes the intrinsic C# types such as int, bool, and double, plus many common framework types including Guid and DateTime.
你可能已经注意到,在我们使用支架辅助器EditorForModel和DisplayForModel时,并未渲染出所有属性。特别地,忽略了HomeAddress属性。发生这种情况是因为Object模板只对简单类型进行操作 — 特别是使用System.ComponentModel.TypeDescriptor类中的GetConvertrr方法,能够通过一个string形式的值进行解析的那些类型。这包括固有的C#类型,如int、bool、以及double等,加上许多普通的框架类型,包括Guid和DateTime等。
The result of this policy is that scaffolding is not recursive. Given an object to process, a scaffolding templated view helper will generate HTML only for simple property types and will ignore any properties that are themselves complex objects. Although it can be inconvenient, this is a sensible policy; the MVC Framework doesn’t know how our model objects are created, and if the Object template was recursive, then we could easily end up triggering our ORM lazy-loading feature, which would lead us to read and render every object in our underlying database. If we want to render HTML for a complex property, we have to do it explicitly, as demonstrated by the view shown in Listing 16-15.
这一策略的结果是支架是非递归的。给定一个要处理的对象,支架模板视图辅助器将只生成简单属性类型的HTML,而会忽略本身是复合对象的任何属性。虽然这可能不方便,但这是一个有意义的策略,因为MVC框架并不知道如何创建我们的模型对象。如果Object模板是递归的,那么,我们就很可能不能触发ORM的惰性加载特性,该特性让我们能够从底层数据库读取并渲染每一个对象。因此,如果我们要渲染一个复合属性的HTML,我们必须明确地做这件事,如清单16-15所示的视图所演示的那样。
注:请根据本章示例所描述的场景来理解所谓递归特性。如果要得到HomeAddress(家庭地址)属性(这是一个复合属性),支架或Object模板就要转到(递归到)Address类中去处理一个个关于地址细节的属性,这就是所谓递归。但支架或Object模板不提供这种功能(是非递归的),因为,这会影响到ORM的惰性加载特性,使我们无法从底层数据库读取对象。 — 译者注
Listing 16-15. Dealing with a Complex-Typed Property
清单16-15. 处理一个复合类型的属性
@model MVCApp.Models.Person
@{
ViewBag.Title = "Index";
}
<h4>Person</h4>
<div class="column">
    @Html.EditorForModel()
</div>
<div class="column">
    @Html.EditorFor(m => m.HomeAddress)
</div>
We can use the EditorForModel to deal with the simple properties of our view model object and then use an explicit call to Html.EditorFor to generate the HTML for the HomeAddress property. Figure 16-8 shows the effect of rendering this view.
我们可以用EditorForModel来处理我们视图模型对象的简单属性,然后用一个明确的Html.EditorFor调用来为HomeAddress属性生成HTML。图16-8显示了渲染这个视图的效果。
The HomeAddress property is typed to return an Address object, and we can apply all of the same metadata to the Address class as we did to the Person class. The Object template is invoked explicitly when we use the EditorFor helpers on the HomeAddress property, and so all of the metadata conventions are honored.
对HomeAddress属性作了类型化,以返回一个Address对象,而且我们可以把运用于Address类的所有元数据运用于Person类。当我们在HomeAddress属性上使用EditorFor辅助器时,会明确地调用Object模板,于是所有元数据约定都得到遵从。
Customizing the Templated View Helper System
定制模板视图辅助器系统
We have shown you how to use metadata to shape the way that the templated helpers render data, but this is the MVC Framework, so there are some advanced options that let us customize the template helpers entirely. In the following sections, we’ll show you how to can supplement or replace the built-in support to create very specific results.
我们已经向你演示了如何用元数据来形成模板辅助器渲染数据的方法。但这是MVC框架,因此有一些让我们完全定制模板辅助器的高级选项。在以下几小节中,我们将向你演示如何补充或替换框架的这种内建支持,以创建十分特殊的结果。
Creating a Custom Editor Template
创建自定义编辑模板
One of the easiest ways of customizing the templated helpers is to create a custom template. This allows us to render exactly the HTML we want. As an example, we are going to create a custom template for the Role property in our Person class. This property is typed to be a value from the Role enumeration, but the way that this is rendered by default is problematic. Listing 16-16 shows a simple view that uses the templated helpers to render HTML for this property.
定制模板辅助器最容易的办法是创建一个自定义模板。这让我们能够严格地渲染我们想要的HTML。作为一个例子,我们打算对Person类的Role属性创建一个自定义模板。这个属性被类型化成Role枚举中的一个值,但默认情况下的渲染是有问题的。清单16-16显示了一个用模板辅助器对这个属性进行渲染的简单的视图。
Listing 16-16. A View That Operates on the Person.Role Property
清单16-16. 对Person.Role属性进行操作的视图
@model MVCApp.Models.Person
<p>
     @Html.LabelFor(m => m.Role):
     @Html.EditorFor(m => m.Role)
</p>
<p>
     @Html.LabelFor(m => m.Role):
     @Html.DisplayFor(m => m.Role)
</p>
This is a very simple view; we render labels, an editor, and a display for the Role property. Figure 16-9 shows the output from rendering this view.
这是一个很简单的视图,我们渲染了Role属性的标签、一个编辑字段、和一个显示字段。图16-9显示了这个视图渲染的结果。
The label and the display templates are fine, but we don’t like the way the editor is rendered. Only three values are defined in the Role enumeration (Admin, User, and Guest), but the HTML that has been generated allows the user to provide an arbitrary value for the property. This is far from ideal. We could, of course, use the Html.DropDownListFor helper, but this isn’t ideal either, because we don’t want to have to duplicate it manually wherever a Role editor is needed.
标签和显示模板很好,但我们不喜欢编辑字段的渲染方式。在Role枚举中只定义了三个值(Admin、User、和Guest),但生成的这个HTML会让用户给这个属性输入任意值。这很不理想。当然,我们可以用Html.DropDownListFor辅助器,但同样也不理想。因为,我们不希望在用到Role编辑字段的其它地方不得不手工复制这些代码。
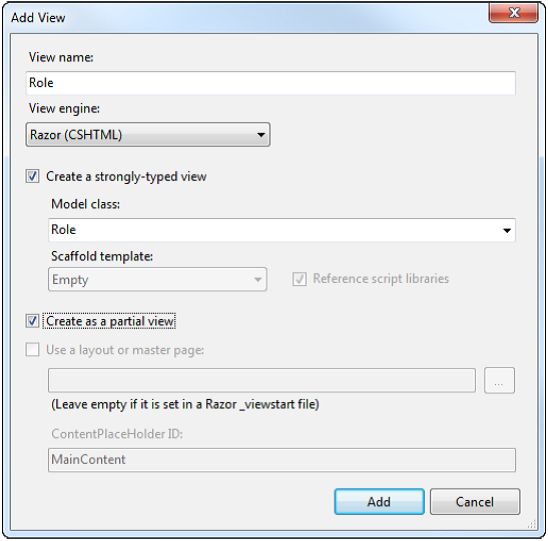
Instead, we are going to create a custom editor view, which in essence means creating a partial view in a particular location (we described partial views in Chapter 15). We first need to create a folder called EditorTemplates in the ~/Views/Shared folder of our project. We then right-click the new folder and select Add View from the pop-up menu. Set the name of the view to be Role, check the option to create a strongly typed view, set the model class to be Role, and check the option to create a partial view, as shown in Figure 16-10.
相反,我们打算创建一个自定义编辑视图,其本质是,在一个特定的位置创建一个分部视图(我们在第15章描述了分部视图)。我们首先需要在项目的~/Views/Shared文件夹中创建一个名为EditorTemplates的文件夹。然后右击这个新建文件夹,并从弹出菜单选择“添加视图”。将该视图名设置为Role、勾选“创建强类型视图”检查框、把模型类设置为Role、勾选“创建分部视图”检查框,如图16-10所示。(注意,在这一段所描述的操作过程中包含了许多MVC框架的约定。比如,分部视图的创建位置、视图名的设定、强类型的类型选择等等 — 译者注)
Once we have created the new partial view, we can add standard Razor syntax to generate the editor we require. There are lots of ways to create the HTML—the simplest is to use a mix of static HTML elements and Razor tags, as shown in Listing 16-17.
一旦我们已经创建了这个新的分部视图,我们可以添加标准的Razor语法,以生成我们需要的编辑字段。有很多办法来创建这个HTML — 最简单的是用混合的静态HTML元素和Razor标签,如清单16-17所示。
Listing 16-17. A Custom View Editor Template
清单16-17. 一个自定义的视图编辑模板
@model Role
<select id="Role" name="Role">
    @foreach (Role value in Enum.GetValues(typeof(Role))) {
        <option value="@value" @(Model == value ? "selected=\"selected\"" : "")>@value
            </option>
    }
</select>
This view creates an HTML select element and populates it with an option element for each value in the Role enumeration. We check to see whether the value we have been passed matches the current element in the foreach loop so that we can set the selected attribute correctly.
这个视图创建了一个HTML的select元素,并用Role枚举中的每个值填充它的选项(option)元素。我们在foreach循环中检查所传递的值是否与的当前元素匹配,以便我们能够正确地设置selected属性。
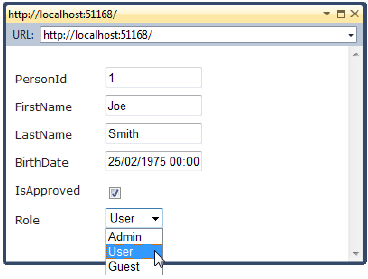
When we render an editor for this property, our partial view will be used to generate the HTML. Figure 16-11 shows the effect of our partial view on the Html.EditorForModel helper. It doesn’t matter which of the built-in editor helpers we use—they will all find and use our Role.cshtml template.
当我们渲染这个属性(指Role属性 — 译者注)的一个编辑字段时,我们的分部视图将被用来生成这个HTML。图16-11显示了我们的分部视图在Html.EditorForModel辅助器上的效果。我们用哪一个内建辅助器没什么关系 — 它们都会查找并使用我们的Role.cshtml模板。
The name of the template corresponds to the type of the parameter, not its name; our custom template will be used for any property that is of the Role type. As a simple example, Listing 16-18 contains a simple model class that uses the Role enumeration.
模板名对应于参数类型而不是参数名,我们的自定义模板将被用于Role类型的任何属性。作为一个简单的例子,清单16-18包含了一个使用Role枚举的简单模型类。
Listing 16-18. A Simple Model Class That Uses the Role Enumeration
清单16-18. 一个使用Role枚举的简单模型类
public class SimpleModel {
    public string Name { get; set; }
    public Role Status { get; set; }
}
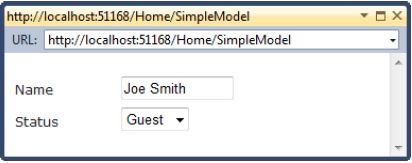
Figure 16-12 shows the effect of the Html.EditorForModel helper applied to a SimpleModel object—we can see that the Role.cshtml template has been used to render an editor for the Status property.
图16-12显示了把Html.EditorForModel辅助器运用于一个SimpleModel对象的效果 — 我们可以看出,Role.cshtml模板已经被用来对Status属性渲染一个编辑字段。
理解模板搜索顺序
Our Role.cshtml template works because the MVC Framework looks for custom templates for a given C# type before it uses one of the built-in templates. In fact, there is a very specific sequence that the MVC Framework follows to find a suitable template:
我们的Role.cshtml模板之所以能够工作,是因为MVC框架在使用一个内建模板之前,会对一个给定的C#类型查找自定义模板。事实上,MVC框架查找适宜模板遵循了一个十分特殊的顺序:
- The template passed to the helper—for example, Html.EditorFor(m => m.SomeProperty, "MyTemplate") would lead to MyTemplate being used.
传递给辅助器的模板 — 例如,Html.EditorFor(m => m.SomeProperty, "MyTemplate")将导致使用MyTemplate。 - Any template that is specified by metadata attributes, such as UIHint.
由元数据注解属性指定的任意模板,如UIHint。 - The template associated with any data type specified by metadata, such as the DataType attribute.
与元数据指定的任意数据类型相关联的模板,如DataType注解属性。 - Any template that corresponds to the.NET class name of the data type being processed.
与待处理数据类型的.NET类名对应的任意模板。 - If the data type being processed is a simple type, then the built-in String template is used.
如果被处理的数据类型是一个简单类型,那么便采用内建的String模板。 - Any template that corresponds to the base classes of the data type.
对应于数据类型基类的任意模板 - If the data type implements IEnumerable, then the built-in Collection template will be used.
如果数据类型实现IEnumerable,那么将使用内建的Collection模板。 - If all else fails, the Object template will be used—subject to the rule that scaffolding is not recursive.
如果上述全部失败,将使用Object模板 — 服从于支架非递归规则
Some of these steps rely on the built-in templates, which are described in Table 16-4. At each stage in the template search process, the MVC Framework looks for a template called EditorTemplates/<name> or DisplayTemplates/<name>. For our Role template, we satisfied step 4 in the search process; we created a template called Role.cshtml and placed it in the ~/Views/Shared/EditorTemplates folder.
其中一些步骤依赖于表16-4所描述的内建模板。在模板搜索的每一个阶段,MVC框架都会查找一个名为EditorTemplates/<name>或DisplayTemplates/<name>的模板。对于我们的Role模板,满足上述搜索过程的第4步,我们创建了一个名为Role.cshtml的模板,并把它放在了~/Views/Shared/EditorTemplates文件夹中。
Custom templates are found using the same search pattern as regular views, which means we can create a controller-specific custom template and place it in the ~/Views/<controller>/EditorTemplates folder to override the templates found in the ~/Views/Shared folder. In Chapter 15 we explain more about the way that views are located.
自定义模板是用搜索规则视图的同样方式来查找的,这意味着我们可以创建一个控制器专用的自定义模板,并把它放在~/Views/<controller>/EditorTemplates文件夹中,以覆盖在~/Views/Shared文件夹中找到的模板。在第15章中,我们较详细地解释了视图定位的方式。
Creating a Custom Display Template
创建一个自定义显示模板
The process for creating a custom display template is similar to that for creating a custom editor, except that we place the templates in the DisplayTemplates folder. Listing 16-19 shows a custom display template for the Role enumeration; we have created this file as ~/Views/Shared/DisplayTemplates/Role.cshtml.
创建一个自定义显示模板的过程类似于创建自定义编辑模板,只不过我们把这个模板放在DisplayTempletes文件夹中。清单16-19演示了一个Role枚举的自定义显示模板,我们已经把这个文件创建为~/Views/Shared/DisplayTemplates/Role.cshtml。
Listing 16-19. A Custom Display Template
清单16-19. 一个自定义显示模板
@model Role
@foreach (Role value in Enum.GetValues(typeof(Role))) {
    if (value == Model) {
        <b>@value</b>
    } else {
        @value
    }
}
This template lists all the values in the Role enumeration and emphasizes the one that corresponds to the model value in bold. Figure 16-13 shows the effect of rendering a display for the Person.Role property.
这个模板列出了Role枚举中的所有值,并以黑体强调了与模型值对应的一个值。图16-13显示了渲染Person.Role属性的显示效果。
Creating a Generic Template
创建一个泛型模板
We are not limited to creating type-specific templates. We can, for example, create a template that works for all enumerations and then specify that this template be selected using the UIHint attribute. If you look at the template search sequence in the “Understanding the Template Search Order” sidebar, you will see that templates specified using the UIHint attribute take precedence over type-specific ones. Listing 16-20 shows a template called Enum.cshtml in the ~/Views/Shared/EditorTemplates folder. This template is a more general treatment for C# enumerations.
我们并不受限于创建类型专用的模板。例如,我们可以创建一个工作于所有枚举的模板,并且随后指定这个模板要用UIHint性质来选择。如果你在“理解模板搜索顺序”说明中查看模板的搜索顺序,你将看到,用UIHint性质指定的模板优先于类型专用模板。清单16-20显示了~/Views/Shared/EditorTemplates文件夹中名为Enum.cshtml的模板。这个模板是对C#枚举的一个更通用的处理。
Listing 16-20. A General Enumeration Editor Template
清单16-20. 一个通用的枚举编辑模板
@model Enum
@Html.DropDownListFor(m => m, Enum.GetValues(Model.GetType())
    .Cast<Enum>()
    .Select(m => {
        string enumVal = Enum.GetName(Model.GetType(), m);
        return new SelectListItem() {
            Selected = (Model.ToString() == enumVal),
            Text = enumVal,
            Value = enumVal
        };
    }))
The view model type for this template is Enum, which allows us to work with any enumeration. We could have created the template using static HTML and Razor tags again, but we wanted to show that you can build templates using other HTML helper methods; in this case, we have used the strongly typed DropDownListFor helper and used some LINQ magic to transform the enumeration values into SelectListItems. Listing 16-21 shows the UIHint template applied to the Person.Role property.
这个模板的视图模型类型是Enum,这允许我们与任何枚举进行工作。我们可以再次用静态HTML和Razor标签来创建这个模板,但我们想向你演示一下,你可以用其它HTML辅助器方法来建立模板。这里,我们使用了强类型的DropDownListFor辅助器,并使用了一些LINQ魔法来把枚举值转换成SelectListItems。清单16-21演示了把UIHint模板运用于Person.Role属性。
Listing 16-21. Using the UIHint Attribute to Specify a Custom Template
清单16-21. 用UIHint注解属性来指定一个自定义模板
public partial class Person {
    public int PersonId { get; set; }
    public string FirstName { get; set; }
    public string LastName { get; set; }
    public DateTime BirthDate { get; set; }
    public Address HomeAddress { get; set; }
    public bool IsApproved { get; set; }
    [UIHint("Enum")]
    public Role Role { get; set; }
}
This approach gives a more general solution, but it lacks the automatic elegance that comes with the type-specific templates. It can be more convenient to have one template that you can apply widely—as long as you remember to apply the attributes correctly.
这种办法给出了一个更通用的解决方案,但它缺乏类型专用模板的那种自动优雅。但它可能是一个更便于广泛运用的模板 — 只要你记住正确地运用注解属性。
Replacing the Built-in Templates
替换内建模板
If we create a custom template that has the same name as one of the built-in templates, the MVC Framework will use the custom version in preference to the built-in one. Listing 16-22 shows a replacement for the Boolean template, which is used to render bool and bool? values. Table 16-4 describes what the other built-in templates do.
如果我们创建一个与内建模板同名的自定义模板,MVC框架将优先于自定义模板来使用这个自定义版本。清单16-22显示了Boolean模板的一个替代品,可以用它来渲染bool和bool?的值。表16-4描述了其它内建模板。
Listing 16-22. Replacing a Built-in Template
清单16-22. 替换内建模板
@model bool?
@if (ViewData.ModelMetadata.IsNullableValueType && Model == null) {
    @:True False <b>Not Set</b>
} else if (Model.Value) {
    @:<b>True</b> False Not Set
} else {
    @:True <b>False</b> Not Set
}
We have taken a different approach to the built-in Boolean template—all values are treated as though they are nullable, and we simply highlight the value that corresponds to the model object. There is no compelling reason to do this, other than to demonstrate how to override a built-in template. The template in the listing is a display template, so we placed it in the ~/Views/Shared/DisplayTemplates folder.
我们对内建的Boolean模板采取了不同的办法 — 所有值都作为nullable来处理,而且我们简单地高亮了与模型对象相对应的值。这么做没什么让人信服和理由,只不过是演示如何覆盖内建模板。清单中的模板是一个显示模板,因此我们把它放在~/Views/Shared/DisplayTemplates文件夹中。
■ Note When creating a template for a type that has a nullable equivalent, it is sensible to set the view model type to the nullable type. For example, in Listing 16-22, we have specified that the model type is bool? rather than bool. The MVC Framework expects templates to cope with null values, and an exception will be thrown if your model type doesn’t support this. We can determine whether the view model object is nullable by reading the ViewData.ModelMetadata.IsNullableValueType property, as shown in the listing.
注:当为一个nullable的类型创建一个模板时,把视图模型的类型设置为nullable类型是有意义的。例如,清单16-22,我们指定的模型类型是bool?而不是bool。MVC框架期望模板可以应付null值,而且,如果你的模型类型不支持它,会弹出异常。如清单所示的那样,我们可以通过读取ViewData.ModelMetadata.IsNullableValueType属性来确定这个视图模型对象是否是nullable的。
When we render a display for a bool or bool? value, our custom template is used. Figure 16-14 shows an example of the output.
当我们为一个bool或bool?值渲染一个显示时,便用我们的自定义模板。图16-14显示了一个输出的示例。
■ Tip The search sequence for custom alternatives to the built-in templates follows the standard template search pattern. We placed our view in the ~/Views/Shared/DisplayTemplates folder, which means that the MVC Framework will use this template in any situation where the Boolean template is required. We can narrow the focus of our template to a single controller by placing it in ~/Views/<controller>/DisplayTempates instead.
提示:对于替代内建模板的自定义模板,其搜索顺序遵循标准的搜索模式。我们把视图放在~/Views/Shared/DisplayTemplates文件夹中,这意味着,MVC框架将在需要Boolean模板的任何情况下都会使用这个模板。我们可以把我们的模板关注点缩小到针对一个单一的控制器,只要把它放在~/Views/<controller>/DisplayTempates文件夹中即可。
Using the ViewData.TemplateInfo Property
使用ViewData.TemplateInfo属性
The MVC Framework provides the ViewData.TemplateInfo property to make writing custom view templates easier. The property returns a TemplateInfo object. Table 16-5 describes the most useful members of this class.
MVC框架提供了ViewData.TemplateInfo属性,以使自定义视图模板的编写更容易。该属性返回一个TemplateInfo对象。表16-5描述了这个类的一些最有用的成员。
| Member 成员 |
Description 描述 |
|---|---|
| FormattedModelValue | Returns a string representation of the current model, taking into account formatting metadata such as the DataType attribute. See the explanation in the following section for details. 返回当前模型的字符串表示,所返回的这个字符串考虑了格式化元数据(如DataType注解属性)的作用。详见下一小节的解释。(格式化元数据是指对模型的某一属性进行格式化注解的一类注解属性 — 译者注) |
| GetFullHtmlFieldId() | Returns a string that can be used in an HTML id attribute. 返回可以用于HTML的id属性的字符串。 |
| GetFullHmlFieldName() | Returns a string that can be used in an HTML name attribute. 返回可以用于HTML的name属性的字符串 |
| HtmlFieldPrefix | Returns the field prefix; see the explanation in the following section for details. 返回字段前缀,详见下一小节的解释。 |
Respecting Data Formatting
关注数据格式化
Perhaps the most useful of the TemplateInfo properties is FormattedModelValue, which allows us to respect formatting metadata without having to detect and process the attributes ourselves. Listing 16-23 shows a custom template called DateTime.cshtml that generates an editor for DateTime objects.
也许,最有用的TempateInfo属性是FormattedModelValue,它允许我们关注格式化元数据(参见表16-5的解释 — 译者注),而不必由我们自己去检测和处理这些注解属性。清单16-23显示了一个名为DateTime.cshtml的模板,它生成一个DateTime对象的编辑字段。
Listing 16-23. Taking Formatting Metadata into Account in a Custom View Template
清单16-23. 在一个自定义视图模板中考虑元数据格式化
@model DateTime
@Html.TextBox("", ViewData.TemplateInfo.FormattedModelValue)
This is a very simple template. We just call the Html.TextBox helper and pass in the value from the ViewData.TemplateInfo.FormattedModelValue property. If we apply the DataType attribute to the BirthDate property from our Person model class, like this:
这是一个很简单的模板。我们只是调用了Html.TextBox辅助器,并在其中传递了ViewData.TemplateInfo.FormattedModelValue属性的值。如果我们把DataType注解属性运用于Person模型类的BirthDate属性,像这样:
...
[DataType(DataType.Date)]
public DateTime BirthDate { get; set; }
...
then the value returned from the FormattedModelValue property will be just the date component of the DateTime value. Figure 16-15 shows the output from the template.
那么,FormattedModelValue属性的返回值将只是DateTime值的日期部分。图16-15显示了这个模板的输出。

Figure 16-15. Using the FormattedModelValue property to take formatting metadata into account
图16-15. 用FormattedModelValue属性计入格式化元数据
Working with HTML Prefixes
用HTML前缀进行工作
When we render a hierarchy of views, the MVC Framework keeps track of the names of the properties that we are rendering and provides us with a unique reference point through the HtmlFieldPrefix property of the TemplateInfo object. This is especially useful when we are processing nested objects, such as the HomeAddress property of our Person class, which is an Address object. If we render a template for a property like this:
当我们渲染一个视图层时,MVC框架会跟踪正在渲染的属性名,并通过TemplateInfo对象的HtmlFieldPrefix属性,为我们提供一个唯一的参考指针。这对我们处理嵌套对象是特别有用的,如Person类的HomeAddress属性,这是一个Address对象。如果我们像下面这样渲染一个属性的模板:
@Html.EditorFor(m => m.HomeAddress.PostalCode)
then the HtmlFieldPrefix value that is passed to the template will be HomeAddress.PostalCode. We can use this information to ensure that the HTML elements we generate can be uniquely identified—the usual way of doing this is through the id and name attributes. The value returned by the HtmlFieldPrefix property will often not be usable directly as an attribute value, so the TemplateInfo object contains the GetFullHtmlFieldId and GetFullHtmlFieldName methods to convert the unique ID into something we can use. The value of the HTML prefix will be apparent when we look at model binding in Chapter 17.
那么,传递给这个模板的HtmlFieldPrefix值将是HomeAddress.PostalCode。我们可以用这个信息来确保所生成的HTML元素能够被唯一标识 — 通常的做法是,通过HTML元素的id和name属性来实现唯一标识。HtmlFieldPrefix属性所渲染的值通常不能直接作为HTML属性的值,因此,TemplateInfo对象包含了GetFullHtmlFieldId和GetFullHtmlFieldName方法,以便把这个唯一ID转换成我们可用的东西。当我们考察第17章的模型绑定时,将会看到这个HTML前缀的值。
Passing Additional Metadata to a Template
给模板传递附加元数据
On occasion, we want to provide additional direction to our templates that we cannot express using the built-in attributes. We can do this using the AdditionalMetadata attribute, as shown in Listing 16-24.
偶尔地,我们希望给模板提供一些附加指示,但我们没有内建的注解属性来表示这些指示。这时,我们可以用AdditionalMetadata注解属性,如清单16-24所示。
Listing 16-24. Using the AdditionalMetadata Attribute
清单16-24. 使用AdditionalMetadata注解属性
...
[AdditionalMetadata("RenderList", "true")]
public bool IsApproved { get; set; }
...
We have applied the AdditionalMetadata attribute to the IsApproved property; this attribute takes key/value parameters for the information we want to pass along. In this example, we have defined a key RenderList that we will use to specify whether the editor for a bool property should be a drop-down list (RenderList is true) or a textbox (RenderList is false). We detect these values through the ViewData property in our template, as the editor template Boolean.cshtml shows in Listing 16-25.
我们把AdditionalMetadata注解属性运用于IsApproved属性,这个注解属性对我们想要传递的信息采用“键/值”形式的参数。在这个例子中,我们定义了一个键RenderList,我们将用它来指示对一个bool属性的编辑字段是否使用一个下拉列表(RenderList为true),还是一个文本框(RenderList为false)。我们可以在模板中通过ViewData属性来检测这些值,正如清单16-25所示的编辑模板Boolean.cshtml那样。
Listing 16-25. Using AdditionalMetadata Values
清单16-25. 使用AdditionalMetadata值
@model bool?
@{
    bool renderList = true;
    if (ViewData.ModelMetadata.AdditionalValues.ContainsKey("RenderList")) { renderList = bool.Parse(ViewData.ModelMetadata.AdditionalValues["RenderList"].ToString()); }
}
@if (renderList) {
    SelectList list = ViewData.ModelMetadata.IsNullableValueType ?
        new SelectList(new [] {"True", "False", "Not Set"}, Model) :
        new SelectList(new [] {"True", "False"}, Model);
    @Html.DropDownListFor(m => m, list)
} else {
    @Html.TextBoxFor(m => m)
}
We can access the key/value pairs from the attribute through the ViewData.ModelMetadata.AdditionalValues collection, as shown in bold in the listing. It is important not to assume that the additional values you are checking for are present. This is especially true when replacing a built-in template, because it can be hard to determine in advance which model objects your template will be used for.
我们可以通过ViewData.ModelMetadata.AdditionalValues集合来访问这个注解属性的“键/值”对,如清单中的黑体字所示。重要的是,不要假设你检查的附加值是存在的。在替换内建模板时尤其如此,因为很难预先确定你的模板会被用于哪一个模型对象。
Understanding the Metadata Provider System
理解元数据提供器系统
The metadata examples we have shown you so far have relied on the DataAnnotationsModelMetadataProvider class, which is the class that has been detecting and processing the attributes we have been adding to our classes so that the templates and formatting options are taken care of.
我们到目前所向你演示的元数据示例都依赖于DataAnnotationsModelMetadataProvider类,这个类的作用是检测和处理我们添加到类上的注解属性,以使模板和格式化选项得到照应。
Underlying the model metadata system is the ModelMetadata class, which contains a number of properties that specify how a model or property should be rendered. The DataAnnotationsModelMetadata processes the attributes we have applied and sets value for the properties in a ModelMetadata object, which is then passed to the template system for processing. Table 16-6 shows the most useful properties of the ModelMetadata class.
支撑模型元数据系统的是ModelMetadata类,它含有指定如何渲染模型或属性的一些属性。DataAnnotationsModelMetadata对我们在ModelMetagata对象的属性上运用并设置了值的注解属性进行处理,然后传递给模板系统进行处理。表16-6显示了ModelMetadata类的最有用的属性。
| Member 成员 |
Description 描述 |
|---|---|
| DataTypeName | Provides information about the meaning of the data item; this is set from the value of the DataType attribute. 提供数据项含义的信息,这是通过DataType注解属性的值来设置的 |
| DisplayFormatString | Returns a composite formatting string, such as {0:2}. This value can be set directly using the DisplayFormat attribute (by providing a value for the DataFormatting property) or indirectly by other attributes. For example, the DataType.Currency value passed to the DataType attribute results in a formatting string that produces two decimal places and a currency symbol. 返回一个复合格式化字符串,如{0:2}。这个值可以用DisplayFormat注解属性直接设置(通过给DataFormatting属性提供一个值),或由其它注解属性间接设置。例如,传递给DataType注解属性的DataType.Currency值会形成一个格式化字符串,它产生两位十进制小数和一个货币符。 |
| DisplayName | Returns a human-readable name for the data item; this is set using the Display or DisplayName attributes. 给数据项返回一个人性化可读的名称,这是用Display或DisplayName注解属性设置的。 |
| EditFormatString | The editor equivalent of DisplayFormatString. 与DisplayFormatString等效的编辑字段 |
| HideSurroundingHtml | Returns true if the HTML element should be hidden; this is set to be true by using the HiddenInput attribute with a DisplayValue value of false. 如果HTML元素应该隐藏,返回true。当HiddenInput性质的DisplayVale值为false时,它被设置为true。 |
| Model | Returns the model object that is being processed. 返回正被处理的模型对象。 |
| NullDisplayText | Returns the string that should be displayed when the value is null. 在值为null时,返回要显示的字符串。 |
| ShowForDisplay | Returns true if the items should be included in display (as opposed to editing) scaffolding. Set using the ScaffoldColumn attribute. 如果数据项应该被包括在显示支架(而不是编辑支架)中,返回true。用ScaffoldColumn性质设置。 |
| ShowForEdit | Returns true if the items should be included in editing (as opposed to display) scaffolding. Set using the ScaffoldColumn attribute. 如果数据项应该被包括在编辑支架(而不是显示支架)中,返回true。用ScaffoldColumn性质设置。 |
| TemplateHint | Returns the name of the template that should be used to render the item. Set using the UIHint attribute. 返回应该用于渲染数据项的模板名。用UIHint性质设置 |
The DataAnnotationsModelMetadataProvider class sets the values in Table 16-6 based on the attributes we have applied. The name of this class comes from the fact that most (but not all) of these attributes are from the System.ComponentModel.DataAnnotations namespace.
DataAnnotationsModelMetadataProvider类基于我们已经运用的注解属性来设置表16-6中的值。这个类的名称基于这样一个事实,这些注解属性的大多数(不是全部)都来自于System.ComponentModel.DataAnnotations命名空间。
Creating a Custom Model Metadata Provider
创建自定义模型元数据提供器
We can create a custom model metadata provider if the data annotations system doesn’t suit our needs. Providers must be derived from the abstract ModelMetadataProvider class, which is shown in Listing 16-26.
如果数据注解系统不符合我们的需求,我们可以创建自定义模型元数据提供器。提供器必须派生于ModelMetadataProvider抽象类,如清单16-26所示。
Listing 16-26. The ModelMetadataProvider Class
清单16-26. ModelMetadataProvider类
namespace System.Web.Mvc {
    using System.Collections.Generic;
    public abstract class ModelMetadataProvider {
        public abstract IEnumerable<ModelMetadata> GetMetadataForProperties(
            object container, Type containerType);
        public abstract ModelMetadata GetMetadataForProperty(
            Func<object> modelAccessor, Type containerType, string propertyName);
        public abstract ModelMetadata GetMetadataForType(
            Func<object> modelAccessor, Type modelType);
    }
}
We can implement each of these methods to create a custom provider. A simpler approach is to derive a class from AssociatedMetadataProvider, which takes care of the reflection for us and requires us only to implement a single method. Listing 16-27 shows a skeletal metadata provider created this way.
我们可以实现其中的每一个方法,以创建一个自定义提供器。一个简单的办法是派生一个AssociatedMetadataProvider类,由它为我们照应反射,并且只需要我们实现一个方法。清单16-27演示了用这种方式创建的一个元数据提供器骨架。
Listing 16-27. A Skeletal Custom Model Metadata Provider
清单16-27. 一个自定义模型元数据提供器骨架
public class CustomModelMetadataProvider : AssociatedMetadataProvider{
    protected override ModelMetadata CreateMetadata(
        IEnumerable<Attribute> attributes,
        Type containerType,
        Func<object> modelAccessor,
        Type modelType,
        string propertyName) {
            //...implementation goes here...
    }
}
This CreateMetadata method will be called by the MVC Framework for each model object or property that is being rendered. Table 16-7 describes the parameters. Our descriptions are for when an individual property is being rendered, because this is the most frequent use, but if we render a scaffolding template, the method will also be called for the view model itself. In our examples, this would mean a call for a Person object and then for each of the properties defined by the Person class.
这个CreateMetadata方法将由MVC框架对要渲染的每个模型对象或属性进行调用。表16-7描述了该方法的参数。我们的描述是针对渲染个别属性的,因为这是最频繁使用的情况。但是,如果我们渲染一个支架模板,该方法也将对视图模型本身进行调用。在我们的例子中,这意味着对Person对象的调用,然后对Person类的每个属性进行调用。
| Parameter 参数 |
Description 描述 |
|---|---|
| attributes | The set of attributes applied to the property 运用于属性的一组注解属性 |
| containerType | The type of the object that contains the current property 含有当前属性的对象类型 |
| modelAccessor | A Func that returns the property value 返回该属性的一个Func |
| modelType | The type of the current property 当前属性类型 |
| propertyName | The name of the current property 当前属性名 |
We are free to implement any metadata policy we choose. Listing 16-28 shows a simple approach that formats the name of certain properties.
我们可以自由地实现我们选用的任何元数据策略。清单16-28演示了格式化属性名的一种简单办法。
Listing 16-28. A Simple Custom Model Metadata Provider
清单16-28. 一个简单的自定义模型元数据提供器
public class CustomModelMetadataProvider : AssociatedMetadataProvider{
    protected override ModelMetadata CreateMetadata(
        IEnumerable<Attribute> attributes,
        Type containerType,
        Func<object> modelAccessor,
        Type modelType,
        string propertyName) {
 ModelMetadata metadata = new ModelMetadata(this, containerType, modelAccessor, modelType, propertyName); if (propertyName != null && propertyName.EndsWith("Name")) { metadata.DisplayName = propertyName.Substring(0, propertyName.Length - 4); }
        return metadata;
    }
}
The first part of our implementation creates the ModelMetadata object that we must return from the CreateMetadata method; the constructor parameters for ModelMetadata line up nicely with the method parameters. Once we have created the result object, we can express our policy by setting the properties we described in Table 16-6. In our simple example, if the name of the property ends with Name, we remove the last four characters of the name so that FirstName becomes First, for example.
这个实现的第一部分创建了我们必须在CreateMetadata方法中返回的ModelMetadata对象。ModelMeatadata的构造器参数排列在该方法的参数中。一旦我们已经创建了这个结果对象,我们就可以通过设置表16-6描述的属性,来表示我们的策略。在我们这个简单例子中,如果属性名以Name结尾,我们便移去该名字的最后四个字符,例如,FirstName会变成First。
We register our provider in the Application_Start method of Global.asax, as shown in Listing 16-29.
我们在Global.asax的Application_Start方法中注册我们的这个提供器,如清单16-29所示。
Listing 16-29. Registering a Custom Model Metadata Provider
清单16-29. 注册自定义模型元数据提供器
protected void Application_Start() {
    AreaRegistration.RegisterAllAreas();
    ModelMetadataProviders.Current = new CustomModelMetadataProvider();
    RegisterGlobalFilters(GlobalFilters.Filters);
    RegisterRoutes(RouteTable.Routes);
}
We set the value of the static ModelMetadataProviders.Current property to an instance of our custom class. The MVC Framework supports only one provider, so our metadata is the only metadata that will be used. Figure 16-16 shows the effect of our provider, where we have used the Html.EditorForModel helper on a Person object.
我们把ModelMetadataProviders.Current属性的值设置为我们的自定义类的一个实例。MVC框架只支持一个提供器,因此我们的元数据将是被使用的唯一元数据。图16-6显示了我们提供器的效果,其中,我们已经在Person对象上使用了Html.EditorForModel辅助器。
Customizing the Data Annotations Model Metadata Provider
定制数据注解模型元数据提供器
The problem with custom model metadata providers is that we lose the benefits of the data annotations metadata. If you look at Figure 16-16, you can see that the HTML we have generated has some of the same problems that we started the chapter with; for instance, the PersonId property is visible and can be edited, and the BirthDate is displayed with a time. It is not all bad; our custom templates are still used. For example, the editor for the Role property is a drop-down list.
自定义模型元数据提供器的问题是,我们失去了数据注解元数据的好处。如果你查看图16-16,你可以看出,我们已经生成的HTML有一些我们本章开始所述的同样问题,例如,PersonId属性是可见且可编辑的,而BirthDate显示了时间。也并不都是坏的方面,它仍然使用了我们的自定义模板。例如,Role属性的编辑字段是一个下拉列表。
If we want to implement a custom policy and we want to take advantage of the data annotations attributes, then we can derive our custom metadata provider from DataAnnotationsModelMetadataProvider. This class is derived from AssociatedMetadataProvider, so we only have to override the CreateMetadata method, as shown in Listing 16-30.
如果我们想实现一个自定义策略,而且,我们想利用数据注解属性,那么,我们可以通过DataAnnotationsModelMetadataProvider来派生我们的元数据提供器。这个类派生于AssociatedMetadataProvider,因此,我们只得覆盖CreateMetadata方法,如清单16-30所示。
Listing 16-30. Deriving a Custom Metadata Provider from AssociatedMetadataProvider
清单16-30. 通过AssociatedMetadataProvider派生一个自定义元数据提供器
public class CustomModelMetadataProvider : DataAnnotationsModelMetadataProvider {
    protected override ModelMetadata CreateMetadata(
        IEnumerable<Attribute> attributes,
        Type containerType,
        Func<object> modelAccessor,
        Type modelType,
        string propertyName) {
 ModelMetadata metadata = base.CreateMetadata(attributes, containerType, modelAccessor, modelType, propertyName);
            if (propertyName != null && propertyName.EndsWith("Name")) {
                metadata.DisplayName = propertyName.Substring(0, propertyName.Length - 4);
            }
            return metadata;
    }
}
The significant change is that we call the base implementation of the CreateMetadata method to get a ModelMetadata object that takes into account the data annotations attributes. We can then apply our custom policy to override the values defined by the DataAnnotationsModelMetadataProvider class—we get the benefits of the attribute system and the flexibility of a custom policy. Figure 16-17 shows the effect on our Person editor.
明显的变化是,我们调用了CreateMetadata方法的基实现,以得到能够把数据注解属性考虑进来的ModelMetadata对象。我们然后可以把我们的自定义策略用来覆盖由DataAnnotationsModelMetadataProvider定义的值 — 我们得到了注解属性系统的好处以及自定义策略的灵活性。图16-17显示了用于Person编辑视图上的效果。
Summary
小结
In this chapter we have shown you the system of model templates that are accessible through the templated view helper methods. It can take a little while to set up the templates, metadata, and providers you need, but creating views is a simpler and more convenient process once these are in place.
本章我们向你演示了通过模板视图辅助器方法可访问的模型模板系统。这可能需要一点时间来建立你所需要的模板、元数据、以及提供器。但是,一旦完成,创建视图就是一个更简单、更便利的过程。
