Windows下Hadoop eclipse开发平台搭建
Windows下Hadoop eclipse开发平台搭建
搞了一个下午,在Linux和Windows下都成功了,步骤相差不大。一些小问题,google一下就能解决。
1.必要条件
Cygwin :我的版本是目前最新的2.774
java JDK
hadoop 0.20.2 迅雷连接(有可能已经失效):thunder://QUFodHRwOi8vZGwuY3IxNzMuY29tLy9zb2Z0My9oYWRvb3AuemlwWlo=
eclipse
2. java安装
具体参考百度。。。。。
3.Cygwin的安装
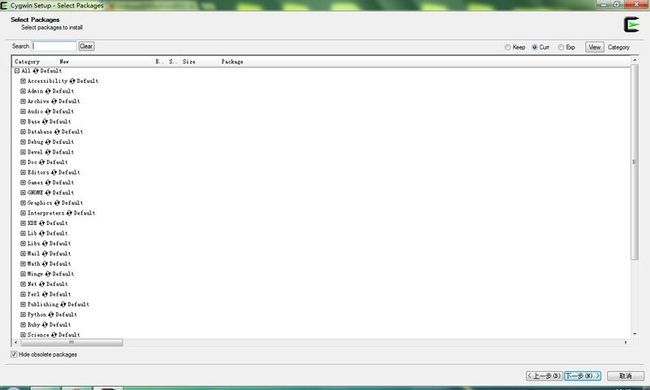
可以按照默认的提示安装到自己需要存放的位置,但是在安装时需要注意下面几点:
- Net 下的:openssh,openssl
![]()
- Base 下的:sed (若需要Eclipse,必须sed)
![]()
- Devel 下的:subversion(建议安装)
![]()
不同的版本可能有所不同,但是基本操作没有变化。。。。
CygWin的bin目录以及usr/sbin 追加到系统环境变量PATH中。
4.启动SSH服务
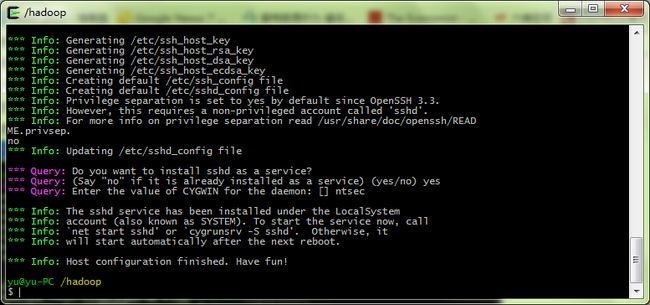
以管理员权限运行Cygwin,并输入
SSH-HOST-CONFIG
接下来,系统会提示以下信息
should privilege  separation be used ?    回答:no
if sshd should be installed as service? 回答:yes
the value of CYGWIN environment variable  输入: ntsec
成功的话,会有下面的提示
Host configuration finished. Have fun!
不要高兴太早,我们还需要在Windows服务中,开启Cygwin服务。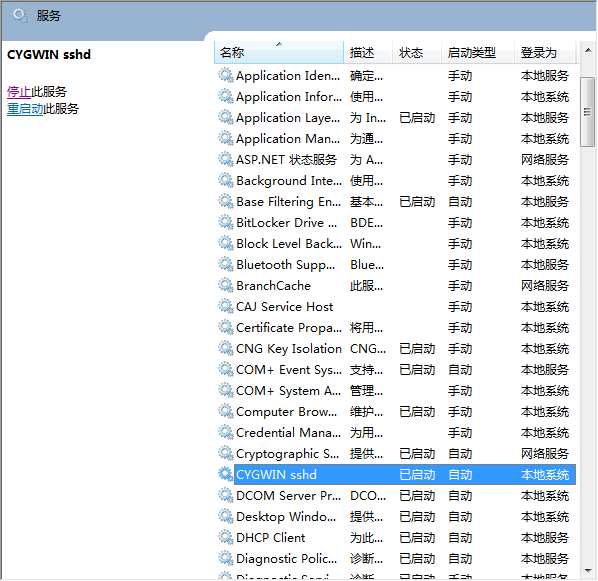
还有活要干。。。
在Cygwin下操作:
- 输入ssh-keygen,回车直到完成输出
- 进入~/.ssh,cd ~/.ssh
- 复制,cp id_rsd.pub anthorized_keys
- 退出,exit
如果没有任何问题的话,应该是完成了。
输入ssh localhost开启SSH服务。(PS:这里我一直都是错误的,不知道为啥我重启下了电脑,好了)
5.hadoop安装
下载hadoop,解压缩到Cygwin下,修改名称为hadoop,方便使用。这里只部署在一个机器上。
需要我们首先修改一些Hadoop的配置信息(这里的端口9000和9001确保没有被占用,也可改变为其他):
- hadoop-env.sh
- core-site.xml
- hdfs-site.xml
- mapred-site.xml
//打开hadoop/conf/hadoop-env.sh文件
export JAVA_HOME=/usr/lib/jvm/java
//打开conf/core-site.xml文件
<?xml version="1.0"?>
<?xml-stylesheet type="text/xsl" href="configuration.xsl"?>

<!-- Put site-specific property overrides in this file. -->

<configuration>
<property>
  <name>fs.default.name</name>
  <value>hdfs://localhost:9000</value>
 </property>
</configuration>
//打开conf/mapred-site.xml文件

<?xml version="1.0"?>
<?xml-stylesheet type="text/xsl" href="configuration.xsl"?>

<!-- Put site-specific property overrides in this file. -->

    <configuration>
     <property>
      <name>mapred.job.tracker</name>
      <value>localhost:9001</value>
     </property>
    </configuration>
//打开conf/hdfs-site.xml文件
<?xml version="1.0"?>
<?xml-stylesheet type="text/xsl" href="configuration.xsl"?>
<configuration>
<property>
<name>dfs.name.dir</name>
<value>/usr/local/hadoop/datalog1,/usr/local/hadoop/datalog2</value>
</property>
<property>
<name>dfs.data.dir</name>
<value>/usr/local/hadoop/data1,/usr/local/hadoop/data2</value>
</property>
<property>
<name>dfs.replication</name>
<value>1</value>
</property>
</configuration>
可以启动hadoop了,激动~~
1.创建Logs日志目录
mkdir logs
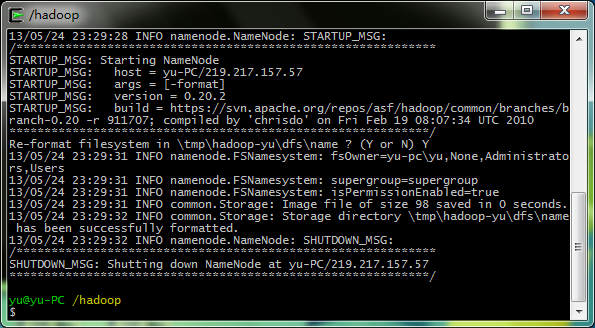
2.格式化namenode,创建HDFS(这要进入hadoop文件夹内操作)
bin/hadoop namenode -format
3.启动hadoop
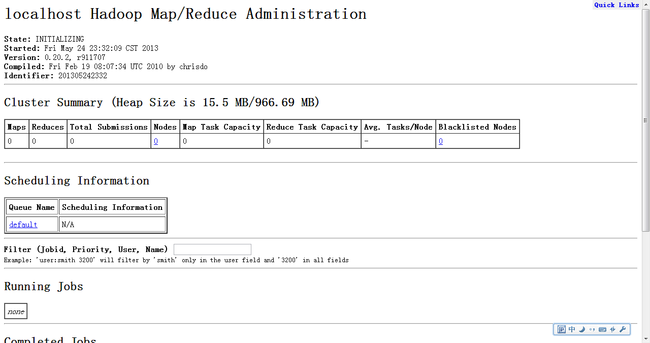
bin/start-all.sh
4.执行JPS
完成启动~~~~~~~~~~~~~~~~~~~~~~~~~~~~~~~~~~~~~~~~~~~~~~~~
6.配置eclipse
Hadoop自带eclipse插件,在hadoop\contrib\eclipse-plugin中。
具体配置步骤如下:
hadoop-0.20.2-eclipse-plugin.jar放入eclipse的插件文件夹中,开启eclipse。
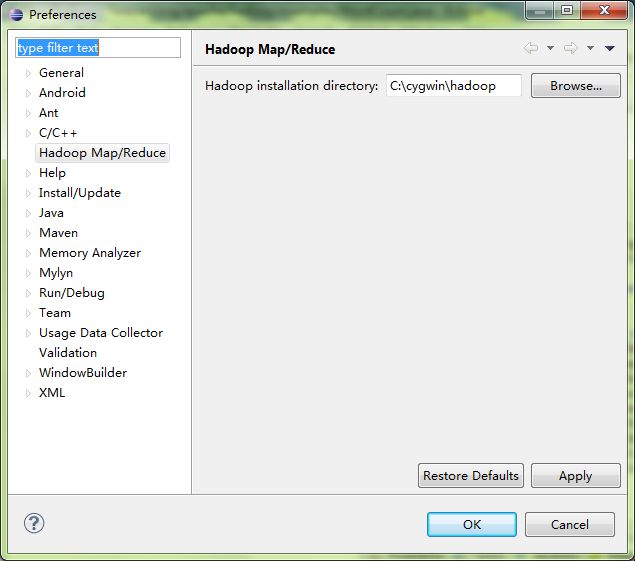
window->Preference->Hadoop Map/Reduce,输入hadoop文件夹位置。
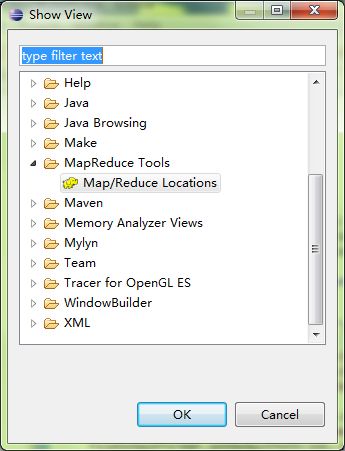
window->Show View,选择Map/Reduce Locations。
点击屏幕右下方新建一个Location.
编辑Location.(注意MAP/REDUCE和DFS的Port分别对应mapred-site.xml和core-site.xml),高级的我设置了Hadoop.tmp.dir
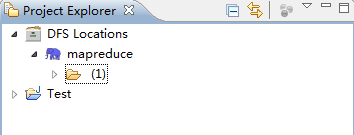
这时,打开Project Explore,刷新。
接下来,你可以new一个MapReduce程序了,找到hadoop的例子试试去吧。
对了,编译这里要配置一下。
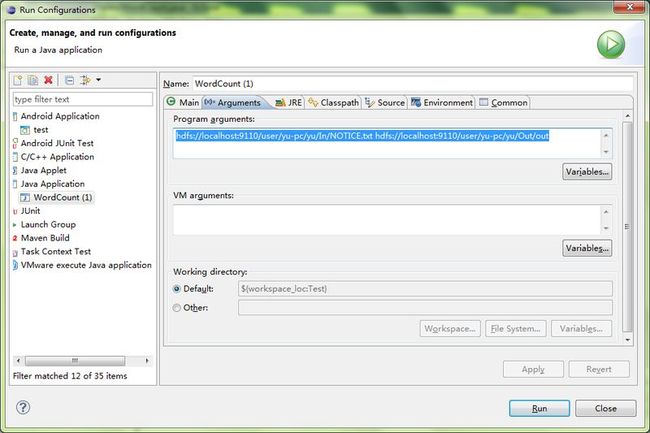
选择Run Configurations->Java Application->Arguments,这里要填入为两个文件,分别为输入文件和输出文件。
主要参考:http://blog.csdn.net/johnnywww/article/details/7378284
http://blog.csdn.net/ruby97/article/details/7423088
摘要:共享已成为互联网的一种主流,尤其是分享一些非常实用的技术,本文收集了20段非常专业的CSS 2/CSS 3代码片段给大家,你可以把它们保存在IDE里、或者存储在CSS文档里,这些代码片段绝对会给你带来意外的惊喜。
Web开发技术每年都在革新,浏览器已逐渐支持CSS3特性,并且网站设计师和前端开发者普遍采用这种新技术进行设计与开发。但仍然有一些开发者迷恋着一些CSS2代码。
本文将分享20段非常专业的CSS2/CSS3代码供大家使用,你可以把它们保存在IDE里、或者存储在CSS文档里,这些代码片段绝对会给你带来意外的惊喜。
1. CSS Resets
网络上关于CSS重置的代码非常多。本段代码是根据Eric Meyer’s reset codes进行改编的,里面包含一点响应式图片和所有核心元素的边界框设置,这样就可以保持页边距和填充可以很好地对齐。
html, body, div, span, applet, object, iframe, h1, h2, h3, h4, h5, h6, p, blockquote, pre, a, abbr, acronym, address, big, cite, code, del, dfn, em, img, ins, kbd, q, s, samp, small, strike, strong, sub, sup, tt, var, b, u, i, center, dl, dt, dd, ol, ul, li, fieldset, form, label, legend, table, caption, tbody, tfoot, thead, tr, th, td, article, aside, canvas, details, embed, figure, figcaption, footer, header, hgroup, menu, nav, output, ruby, section, summary, time, mark, audio, video {
  margin: 0;
  padding: 0;
  border: 0;
  font-size: 100%;
  font: inherit;
  vertical-align: baseline;
  outline: none;
  -webkit-box-sizing: border-box;
  -moz-box-sizing: border-box;
  box-sizing: border-box;
}
html { height: 101%; }
body { font-size: 62.5%; line-height: 1; font-family: Arial, Tahoma, sans-serif; }

article, aside, details, figcaption, figure, footer, header, hgroup, menu, nav, section { display: block; }
ol, ul { list-style: none; }

blockquote, q { quotes: none; }
blockquote:before, blockquote:after, q:before, q:after { content: ''; content: none; }
strong { font-weight: bold; }

table { border-collapse: collapse; border-spacing: 0; }
img { border: 0; max-width: 100%; }

p { font-size: 1.2em; line-height: 1.0em; color: #333; }
2.经典的CSS Clearfix
这个clearfix代码已在Web开发者之间广泛流传,这段类选择器要应用到持有浮动元素的容器中,确保后面的内容都不会浮动,但会被下推和清除。
.clearfix:after { content: "."; display: block; clear: both; visibility: hidden; line-height: 0; height: 0; }
.clearfix { display: inline-block; }
 <font></font>
html[xmlns] .clearfix { display: block; }
* html .clearfix { height: 1%; }
3.升级版的Clearfix
在表现上,新版本和经典版本不存在什么差异,这些类可以有效地清除所有floats,但它们只兼容现代浏览器和传统的IE 6-8。
.clearfix:before, .container:after { content: ""; display: table; }<font></font>
.clearfix:after { clear: both; }
/* IE 6/7 */.
.clearfix { zoom: 1; }
4. Cross-Browser Transparency
CSS3里的许多属性都与浏览器相兼容,但也有特例,比如opacity,需要对它进行一些更新才可以。附加过滤属性可以兼容任何老版的IE浏览器。
.transparent {
    filter: alpha(opacity=50);
/* internet explorer */.
    -khtml-opacity: 0.5;
/* khtml, old safari */.
    -moz-opacity: 0.5;
/* mozilla, netscape */.
    opacity: 0.5;
/* fx, safari, opera */.
}
源码地址: http://perishablepress.com/cross-browser-transparency-via-css/
5. CSS Blockquote模板
这段代码主要用在页面上进行分离引用或复制内容,并且给页面文字提供了默认样式。
blockquote {
    background: #f9f9f9;<
    border-left: 10px solid #ccc;
    margin: 1.5em 10px;
    padding: .5em 10px;
    quotes: "\201C""\201D""\2018""\2019";
}
blockquote:before {
    color: #ccc;
    content: open-quote;
    font-size: 4em;
    line-height: .1em;
    margin-right: .25em;
    vertical-align: -.4em;
}
blockquote p {
    display: inline;
}
查看源码: http://css-tricks.com/snippets/css/simple-and-nice-blockquote-styling/
6. 个性化的圆角代码
许多CSS开发者都非常熟悉圆角语法,但如何为每个角设置不同的值?不如看看下面这段代码吧!
#container {
    -webkit-border-radius: 4px 3px 6px 10px;
    -moz-border-radius: 4px 3px 6px 10px;
    -o-border-radius: 4px 3px 6px 10px;
    border-radius: 4px 3px 6px 10px;
}
/* alternative syntax broken into each line */.
#container {
    -webkit-border-top-left-radius: 4px;
    -webkit-border-top-rightright-radius: 3px;
    -webkit-border-bottom-rightright-radius: 6px;
    -webkit-border-bottom-left-radius: 10px;
    -moz-border-radius-topleft: 4px;
    -moz-border-radius-topright: 3px;
    -moz-border-radius-bottomright: 6px;
    -moz-border-radius-bottomleft: 10px;
}
7. 一般媒体查询
这是一段非常好的模板,用于各种零零碎碎的媒体查询,在移动设备上也可以使用,这段代码甚至可以通过使用min-device-pixel-ratio引用到视网膜设备上。
/* Smartphones (portrait and landscape) ----------- */.
@media only screen
and (min-device-width : 320px) and (max-device-width : 480px) {

/* Styles */.

}
/* Smartphones (landscape) ----------- */.
@media only screen and (min-width : 321px) {

/* Styles */.
}
/* Smartphones (portrait) ----------- */.
@media only screen and (max-width : 320px) {

/* Styles */.

}
/* iPads (portrait and landscape) ----------- */.
@media only screen and (min-device-width : 768px) and (max-device-width : 1024px) {

/* Styles */.

}
<font></font>
/* iPads (landscape) ----------- */.
@media only screen and (min-device-width : 768px) and (max-device-width : 1024px) and (orientation : landscape) {

/* Styles */.
}
/* iPads (portrait) ----------- */.
@media only screen and (min-device-width : 768px) and (max-device-width : 1024px) and (orientation : portrait) {

/* Styles */.
}
/* Desktops and laptops ----------- */.
@media only screen and (min-width : 1224px) {

/* Styles */.
}
/* Large screens ----------- */.
@media only screen and (min-width : 1824px) {

/* Styles */.
}
/* iPhone 4 ----------- */.
@media only screen and (-webkit-min-device-pixel-ratio:1.5), only screen and (min-device-pixel-ratio:1.5) {

/* Styles */.
}
源码地址: http://css-tricks.com/snippets/css/media-queries-for-standard-devices/
8. 现代字体栈
在新网页上设计属于自己的字体栈还是件比较困难的事情,希望下面这段代码能给你带来启发和开发模板,关于更多字体栈源码,你可以访问CSS Font Stacks。
/* Times New Roman-based serif */.

font-family: Cambria, "Hoefler Text", Utopia, "Liberation Serif", "Nimbus Roman No9 L Regular", Times, "Times New Roman", serif;

/* A modern Georgia-based serif */.

font-family: Constantia, "Lucida Bright", Lucidabright, "Lucida Serif", Lucida, "DejaVu Serif," "Bitstream Vera Serif", "Liberation Serif", Georgia, serif;

/*A more traditional Garamond-based serif */.

font-family: "Palatino Linotype", Palatino, Palladio, "URW Palladio L", "Book Antiqua", Baskerville, "Bookman Old Style", "Bitstream Charter", "Nimbus Roman No9 L", Garamond, "Apple Garamond", "ITC Garamond Narrow", "New Century Schoolbook", "Century Schoolbook", "Century Schoolbook L", Georgia, serif;

/*The Helvetica/Arial-based sans serif */.

font-family: Frutiger, "Frutiger Linotype", Univers, Calibri, "Gill Sans", "Gill Sans MT", "Myriad Pro", Myriad, "DejaVu Sans Condensed", "Liberation Sans", "Nimbus Sans L", Tahoma, Geneva, "Helvetica Neue", Helvetica, Arial, sans-serif;

/*The Verdana-based sans serif */.

font-family: Corbel, "Lucida Grande", "Lucida Sans Unicode", "Lucida Sans", "DejaVu Sans", "Bitstream Vera Sans", "Liberation Sans", Verdana, "Verdana Ref", sans-serif;

/*The Trebuchet-based sans serif */.

font-family: "Segoe UI", Candara, "Bitstream Vera Sans", "DejaVu Sans", "Bitstream Vera Sans", "Trebuchet MS", Verdana, "Verdana Ref", sans-serif;

/*The heavier “Impact” sans serif */.

font-family: Impact, Haettenschweiler, "Franklin Gothic Bold", Charcoal, "Helvetica Inserat", "Bitstream Vera Sans Bold", "Arial Black", sans-serif;

/*The monospace */.

font-family: Consolas, "Andale Mono WT", "Andale Mono", "Lucida Console", "Lucida Sans Typewriter", "DejaVu Sans Mono", "Bitstream Vera Sans Mono", "Liberation Mono", "Nimbus Mono L", Monaco, "Courier New", Courier, monospace;
源码地址: http://www.sitepoint.com/eight-definitive-font-stacks/
9. 自定义文本选择
一些新的Web浏览器允许你在网页上自定义一些突出显示的颜色,下面代码的默认颜色是浅蓝色,当然,你可以依据个人爱好进行各种颜色设置。下面代码引用了典型的Webkit和Mozilla供应商前缀::selection 。
::selection { background: #e2eae2; }
::-moz-selection { background: #e2eae2; }
::-webkit-selection { background: #e2eae2; }
10.隐藏Logo上的H1文本
h1 {
    text-indent: -9999px;
    margin: 0 auto;
    width: 320px;
    height: 85px;
    background: transparent url("images/logo.png") no-repeat scroll;
}
11. 为图片创建拍立得效果边框
运用下面代码可以在图片上实现拍立得相片效果——一大片白色边框和细微的阴影。你需要修改图片的宽度/高度值来与你的网站布局相匹配。
img.polaroid {
    background:#000;
/*Change this to a background image or remove*/.

    border:solid #fff;
    border-width:6px 6px 20px 6px;
    box-shadow:1px 1px 5px #333;
/* Standard blur at 5px. Increase for more depth *  .

-webkit-box-shadow:1px 1px 5px #333; .

-moz-box-shadow:1px 1px 5px #333;  .

height:200px; /*Set to height of your image or desired div*/.
    width:200px;
/*Set to width of your image or desired div*/.

}
源码地址: http://www.smipple.net/snippet/kettultim/Polaroid%20Image%20Border%20-%20CSS3
12. 锚链接伪类选择器
a:link { color: blue; }
a:visited { color: purple; }
a:hover { color: red; }
a:active { color: yellow; }
源码地址: http://www.ahrefmagazine.com/web-design/30-useful-css-snippets-for-developers
13. 花俏地CSS3 Pull-Quotes
Pull-quotes不同于页面里的blockquote,它们通常用在文章中来引用文本。
.has-pullquote:before {

/* Reset metrics. */.
    padding: 0;
    border: none;

/* Content */.
    content: attr(data-pullquote);

/* Pull out to the right, modular scale based margins. */.

    float: rightright;
    width: 320px;
    margin: 12px -140px 24px 36px;

/* Baseline correction */.
    position: relative;
    top: 5px;

/* Typography (30px line-height equals 25% incremental leading) */.

    font-size: 23px;
    line-height: 30px;
}
.pullquote-adelle:before {
    font-family: "adelle-1", "adelle-2";
    font-weight: 100;
    top: 10px !important;
}

.pullquote-helvetica:before {
    font-family: "Helvetica Neue", Arial, sans-serif;
    font-weight: bold;
    top: 7px !important;
}
.pullquote-facit:before {
    font-family: "facitweb-1", "facitweb-2", Helvetica, Arial, sans-serif;
    font-weight: bold;
    top: 7px !important;
}
源码地址: http://miekd.com/articles/pull-quotes-with-html5-and-css/
14. CSS3的全屏背景效果
如果你想使用大图片作为网站背景,并希望在页面滚动时保持固定,该代码片段非常适合,不过这段代码无法在旧的浏览器上工作。
html {
    background: url('images/bg.jpg') no-repeat center center fixed;
    -webkit-background-size: cover;
    -moz-background-size: cover;
    -o-background-size: cover;
    background-size: cover;
}
源码: http://css-tricks.com/perfect-full-page-background-image/
15. 内容垂直集中
相对于内容在水平位置,内容在垂直方向是不好把控的,尤其当考虑到滚动条这些因素时。这段纯CSS代码可以很好的工作。
.container {
    min-height: 6.5em;
    display: table-cell;
    vertical-align: middle;
}
源码地址: http://www.w3.org/Style/Examples/007/center
16. 垂直滚动条
这段代码将确保你的HTML元素总是稍微高于浏览器滚动条所停留的位置。
html { height: 101% }
17. CSS3 Gradients模板
#colorbox {
    background: #629721;
    background-image: -webkit-gradient(linear, left top, left bottombottom, from(#83b842), to(#629721));
    background-image: -webkit-linear-gradient(top, #83b842, #629721);
    background-image: -moz-linear-gradient(top, #83b842, #629721);
    background-image: -ms-linear-gradient(top, #83b842, #629721);
    background-image: -o-linear-gradient(top, #83b842, #629721);
    background-image: linear-gradient(top, #83b842, #629721);
}
18. @Font-Face模板
使用@font-face可以把TTF/OTF/SVG/WOFF文件嵌入到网站,并生成自定义font families。
@font-face {
    font-family: 'MyWebFont';
    src: url('webfont.eot');
/* IE9 Compat Modes */.

    src: url('webfont.eot?#iefix') format('embedded-opentype'),
/* IE6-IE8 */.
    url('webfont.woff') format('woff'),
/* Modern Browsers */.
    url('webfont.ttf')  format('truetype'),
/* Safari, Android, iOS */.

    url('webfont.svg#svgFontName') format('svg');
/* Legacy iOS */.
}
body {
    font-family: 'MyWebFont', Arial, sans-serif;
}
源码地址: http://css-tricks.com/snippets/css/using-font-face/
19.创建缝合效果
p {
    position:relative;
    z-index:1;
    padding: 10px;
    margin: 10px;
    font-size: 21px;
    line-height: 1.3em;
    color: #fff;
    background: #ff0030;
    -webkit-box-shadow: 0 0 0 4px #ff0030, 2px 1px 4px 4px rgba(10,10,0,.5);
    -moz-box-shadow: 0 0 0 4px #ff0030, 2px 1px 4px 4px rgba(10,10,0,.5);
    box-shadow: 0 0 0 4px #ff0030, 2px 1px 6px 4px rgba(10,10,0,.5);
    -webkit-border-radius: 3px;
    -moz-border-radius: 3px;
    border-radius: 3px;
}
p:before {
    content: "";
    position: absolute;
    z-index: -1;
    top: 3px;
    bottombottom: 3px;
    left :3px;
    rightright: 3px;
    border: 2px dashed #fff;
}
p a {
    color: #fff;
    text-decoration:none;
}
p a:hover, p a:focus, p a:active {
    text-decoration:underline;
}
20. CSS3 斑马线效果
当用户在浏览许多行数据时,很难分清哪一个单元格是属于哪一行的。默认情况下,通过添加斑马线,用户可以给奇偶行更新不同的背景色。
tbody tr:nth-child(odd) {
    background-color: #ccc;
}
发布:***(IT伯乐网)
