webservice之CXF初探
近期要用到webservice,以前用过axis2,,现研究下CXF,本文基于maven+spring+struts2+cxf,并且参考了cxf官方demo,下面就开始我们的工作。
1.首先加入cxf的依赖:
cxf3.0.2本身是依赖与spring3.2.6,项目中我的spring是4.1.1,cxf会直接使用已经引入的版本,spring3不再引入
2.在web.xml中配置cxf的servlet
由于前端框架使用的是struts2,url配置是/*,我的解决方案是继承struts2的核心过滤器StrutsPrepareAndExecuteFilter,重写其doFilter方法
然后在web.xml中配置上这个filter即可
3.服务端要暴露的方法,这里借用了cxf官网例子:
其实现为:
4.在spring配置文件中beans.xml中注册该服务
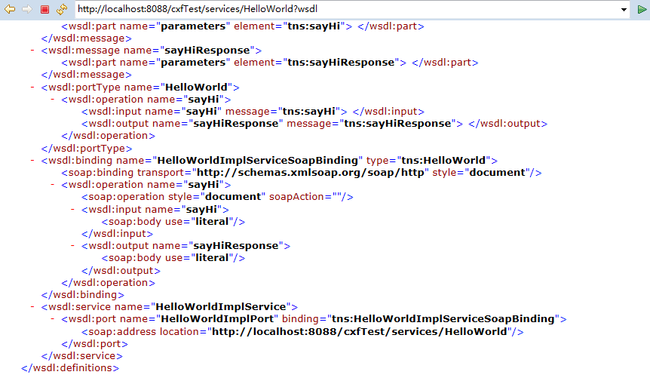
至此,服务器发布方法结束,在浏览器中测试:
[img]

[/img]
5.下面我们来编写客户端,客户端只需要在配置文件中做如下配置即可:
写一个测试:
[img]

[/img]
总结:采用cxf+spring的方式开发webservice,感觉非常的简单,也有疑惑,cxf官网的例子中有一个这个配置:
1.首先加入cxf的依赖:
<dependency>
			<groupId>org.apache.cxf</groupId>
			<artifactId>cxf-rt-frontend-jaxws</artifactId>
			<version>3.0.2</version>
</dependency>
cxf3.0.2本身是依赖与spring3.2.6,项目中我的spring是4.1.1,cxf会直接使用已经引入的版本,spring3不再引入
2.在web.xml中配置cxf的servlet
<!-- cxf -->
<servlet>
		<description>Apache CXF Endpoint</description>
		<servlet-name>cxf</servlet-name>
		<servlet-class>org.apache.cxf.transport.servlet.CXFServlet</servlet-class>
		<load-on-startup>1</load-on-startup>
</servlet>
<servlet-mapping>
		<servlet-name>cxf</servlet-name>
		<url-pattern>/services/*</url-pattern>
</servlet-mapping>
由于前端框架使用的是struts2,url配置是/*,我的解决方案是继承struts2的核心过滤器StrutsPrepareAndExecuteFilter,重写其doFilter方法
public class StrutsFilter extends StrutsPrepareAndExecuteFilter {

	@Override
	public void doFilter(ServletRequest req, ServletResponse res,
			FilterChain chain) throws IOException, ServletException {
		String url = ((HttpServletRequest) req).getRequestURI();
		//url中不含有/services则使用struts2默认过滤器
		if (url.indexOf("services") < 0) {
			super.doFilter(req, res, chain);
		} else {
			//进入cxf的servlet
			chain.doFilter(req, res);
		}
	}

	@Override
	public void init(FilterConfig arg0) throws ServletException {
		super.init(arg0);
	}

}
然后在web.xml中配置上这个filter即可
3.服务端要暴露的方法,这里借用了cxf官网例子:
package demo.spring.service;

import javax.jws.WebService;

@WebService
public interface HelloWorld {
    String sayHi(String text);
}
其实现为:
package demo.spring.service;

import javax.jws.WebService;

@WebService(endpointInterface = "demo.spring.service.HelloWorld")
public class HelloWorldImpl implements HelloWorld {

    public String sayHi(String text) {
        System.out.println("sayHi called");
        return "Hello " + text;
    }
}
// END SNIPPET: service
4.在spring配置文件中beans.xml中注册该服务
<jaxws:endpoint id="helloWorld" implementor="demo.spring.service.HelloWorldImpl"
		address="/HelloWorld" />
,由于这里用到jaxws命名空间,加上对应命名空间:
<beans xmlns="http://www.springframework.org/schema/beans"
	xmlns:jaxws="http://cxf.apache.org/jaxws" xmlns:xsi="http://www.w3.org/2001/XMLSchema-instance"
	xsi:schemaLocation="http://www.springframework.org/schema/beans
        http://www.springframework.org/schema/beans/spring-beans.xsd
        http://cxf.apache.org/jaxws
        http://cxf.apache.org/schemas/jaxws.xsd">
至此,服务器发布方法结束,在浏览器中测试:
[img]

[/img]
5.下面我们来编写客户端,客户端只需要在配置文件中做如下配置即可:
<!-- 客户端获取webservice服务 -->
<bean id="client" class="demo.spring.service.HelloWorld"
		factory-bean="clientFactory" factory-method="create" />
<bean id="clientFactory" class="org.apache.cxf.jaxws.JaxWsProxyFactoryBean">
	<property name="serviceClass" value="demo.spring.service.HelloWorld" />
	<property name="address" value="http://localhost:8088/cxfTest/services/HelloWorld" />
</bean>
写一个测试:
@Test
public void client() {
	ApplicationContext context = new ClassPathXmlApplicationContext(
				"beans.xml");
	HelloWorld client = (HelloWorld) context.getBean("client");
	String response = client.sayHi("Joe");
	System.out.println("Response: " + response);
}
,可顺利在控制台看到输出:
[img]

[/img]
总结:采用cxf+spring的方式开发webservice,感觉非常的简单,也有疑惑,cxf官网的例子中有一个这个配置:
<import resource="classpath:META-INF/cxf/cxf.xml" />
<import resource="classpath:META-INF/cxf/cxf-servlet.xml" />
,并且我参考其他童鞋也有该配置,我不用它也没有问题,不知何故?