一家大企业 A、B系统间通信
(如银行,假设它有
客户关系管理(CRM),
客户信息系统(CIS),
证券结算系统,
账户管理系统 等等,
客户信息系统 需要发送客户信息给 证券结算系统;
客户信息系统 需要发送客户信息给 账户管理系统 等;
若A系统 发送消息给 B系统,A 理解为 B 的上游系统
),
且A、B系统运行于两个独立的JBoss服务器中,A提供了MQ服务,那么B 需读取上游系统A的MQ信息来获取消息;
其实也可以自己根据前面的示例来模拟实现下;
思路:
建立两个JBoss,修改其中一个的端口,
一个模拟A系统,配置了JBossMQ信息;A系统发送一条消息到JBossMQ;
一个模拟B系统,B系统有个MDB来远程访问JBossMQ服务,并把消息打印出来;
环境: JBoss 5.1,JDK1.6
1、拿一个Jboss,copy一份,分别修改其名称为jboss-5.1.0_Sender、jboss-5.1.0_Receiver
修改 jboss-5.1.0_Sender 下的端口(同一机器上,避免冲突,其实也就是两个独立的 AS)
修改%JBOSS_HOME_Sender%\server\default\deploy\jbossweb.sar\server.xml 中的所有端口;
修改%JBOSS_HOME_Sender%\server\default\conf\bindingservice.beans\META-INF\bindings-jboss-beans.xml 中的所有端口;
为了简单快捷,就在端口前加个1,如8080 -> 18080,1099 -> 11099
注意:为防止冲突,需修改全部接口,模拟两个不同的JBOSS
2. 在 jboss-5.1.0_Sender中,进入%JBOSS_HOME_Sender%\server\default\deploy,新建Sender-service.xml文件:
(这里就是配置JBossMQ,集成在JBoss中,这样启动 A 的JBoss 就提供了MQ服务,即构造发送到的目的地址destination)
<?xml version="1.0" encoding="utf-8"?>
<server>
	<mbean xmbean-dd="xmdesc/Queue-xmbean.xml" name="jboss.messaging.destination:service=Queue,name=itcastQueue" 				code="org.jboss.jms.server.destination.QueueService">
		<attribute name="JNDIName">queue/itcastQueue</attribute>
		<depends optional-attribute-name="ServerPeer">jboss.messaging:service=ServerPeer</depends>
		<depends>jboss.messaging:service=PostOffice</depends>
	</mbean>
</server>
Queue的name为itcastQueue
3. 创建Java Project,创建文件QueueSender.java:
(这里就是模拟 A 中的系统往 MQ 发送消息,注意classpath加上JBoss的jar文件)
注意:此处注意导入的是jboss中client下的包,而不是其他
Jboss的client下已经有jboss-javaee.jar,不要再额外引入javaee.jar
javaee.jar冲突:
Absent Code attribute in method that is not native or abstract
https://community.jboss.org/thread/176424?_sscc=t
package com;

import java.util.Properties;

import javax.jms.Destination;
import javax.jms.JMSException;
import javax.jms.MessageProducer;
import javax.jms.QueueConnection;
import javax.jms.QueueConnectionFactory;
import javax.jms.QueueSession;
import javax.naming.InitialContext;
import javax.naming.NamingException;

public class QueueSender{

	public static void main(String[] args) {

		Properties props = new Properties();

		props.setProperty("java.naming.factory.initial",
				"org.jnp.interfaces.NamingContextFactory");

		props.setProperty("java.naming.provider.url", "localhost:11099");

		props.setProperty("java.naming.factory.url.pkgs",
				"org.jboss.naming");

		/**
		 * Context不指定props会报错:
		 * javax.naming.NoInitialContextException: Need to specify class name in environment or system property,
		 * or as an applet parameter, or in an application resource file:  java.naming.factory.initial
		 */
		try {
			InitialContext ctx = new InitialContext(props);
			QueueConnectionFactory factory = (QueueConnectionFactory) ctx.lookup("ConnectionFactory");
			QueueConnection conn = factory.createQueueConnection();

			QueueSession session = conn.createQueueSession(false,QueueSession.AUTO_ACKNOWLEDGE);
			Destination destination = (Destination) ctx.lookup("queue/itcastQueue");
			MessageProducer producer = session.createProducer(destination);

			producer.send(session.createTextMessage("First JMS 消息!"));

			session.close();

			conn.close();
		} catch (NamingException e) {
			e.printStackTrace();
		} catch (JMSException e) {
			e.printStackTrace();
		}
		System.out.println();

	}

}
注意此处的localhost:11099,需跟下面一致
企业B(或B系统)
4. 在 jboss-5.1.0_Receiver中,进入%JBOSS_HOME%\server\default\deploy,新建Receiver-service.xml文件:
(这里就是 A 提供给 B 的MQ中间件配置信息,B根据A提供的信息配置在自己的JBoss中)
<?xml version="1.0" encoding="utf-8"?>
<server>
	<mbean code="org.jboss.jms.jndi.JMSProviderLoader" name="jboss.mq:service=JMSProviderLoader,name=RemoteJMSProvider,server=remotehost">
        <attribute name="ProviderName">RemoteJMSProvider</attribute>
        <attribute name="ProviderAdapterClass">org.jboss.jms.jndi.JNDIProviderAdapter</attribute>
        <attribute name="FactoryRef">XAConnectionFactory</attribute>
        <attribute name="QueueFactoryRef">XAConnectionFactory</attribute>
        <attribute name="TopicFactoryRef">XAConnectionFactory</attribute>
        <attribute name="Properties">
            java.naming.factory.initial=org.jnp.interfaces.NamingContextFactory
            java.naming.factory.url.pkgs=org.jnp.interfaces
            java.naming.provider.url=localhost:11099
        </attribute>
    </mbean>
</server>
注意此处的localhost:11099,需跟上面构造InitialContext时的环境一致,上面引用此处
MQ的name为RemoteJMSProvider
5. 创建EJB Project,新建MDB:
(这里就是当A发送消息到MQ中时,B通过此EJB就能监听收到消息)
import javax.ejb.ActivationConfigProperty;
import javax.ejb.MessageDriven;
import javax.jms.JMSException;
import javax.jms.Message;
import javax.jms.MessageListener;
import javax.jms.TextMessage;

@MessageDriven(activationConfig = {
		@ActivationConfigProperty(propertyName = "destinationType", propertyValue = "javax.jms.Queue"),
		@ActivationConfigProperty(propertyName = "destination", propertyValue = "queue/itcastQueue"),
		@ActivationConfigProperty(propertyName = "providerAdapterJNDI", propertyValue = "java:/RemoteJMSProvider")
})
public class MDBean implements MessageListener {

	public void onMessage(Message message) {
		TextMessage msg = (TextMessage) message;

		try {
			System.out.println(msg.getText());
		} catch (JMSException e) {
			e.printStackTrace();
		}
	}

}
此处的propertyValue = "java:/RemoteJMSProvider"
6. 打包部署EJB到%JBOSS_HOME_Reveiver%\server\default\deploy
7、进入 jboss-5.1.0_Sender下的bin目录,运行run.bat文件,也即启动了A提供的MQ服务器;
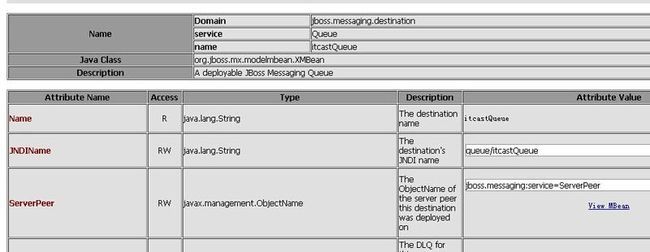
(可以http://localhost:18080/jmx-console/查看MQ的JNDI信息)
8、进入 jboss-5.1.0_Receiver下的bin目录,运行run.bat文件,也即启动了B的系统来接受消息;
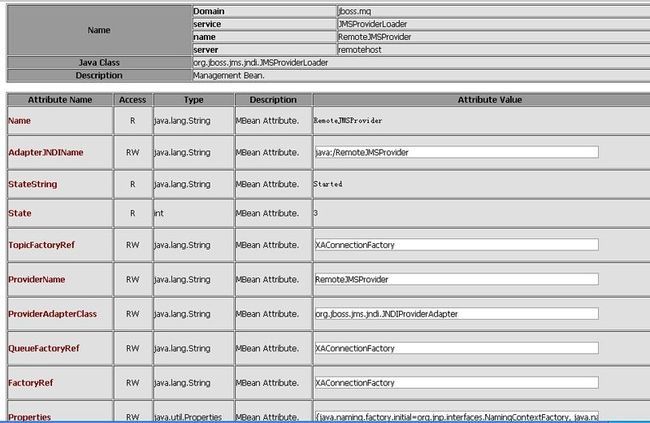
(可以http://localhost:8080/jmx-console/查看remote JMS Provider的JNDI配置信息,也就是MQ服务器的JNDI信息)
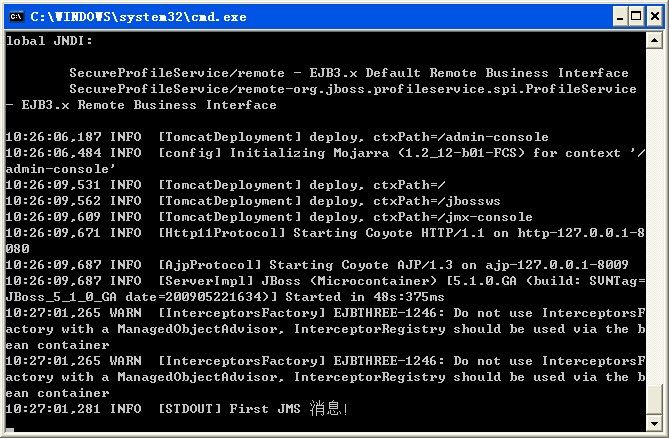
9、直接运行A中的系统QueueSender,发送消息;检查B中JBoss Console:
接收端B JBOSS的Console:
上面就是一个简单的模拟: A -> MQ -> B
如果客户端运行在应用服务器内,我们不需要为InitialContext设置应用服务器的上下文信息,也不建议设置。因为应用服务器启动时会把JNDI驱动类等上下文信息添加进系统属性,创建InitialContext对象时如果没有指定Properties参数,InitialContext内部会调用System.getProperty()方法从系统属性里获取必要的上下文信息。
因此要是在两台机器上测试,不需要修改端口;
实例参考:http://bbs.51cto.com/thread-965361-1.html


