Android开发经验总结——ListView的使用
Android中ListView这个组件比较常用,但对初学者来说,又比较难掌握,在此分享一下我的使用经验。
ListView是以列表的形式展示数据,这里面有三个要素:数据、视图、适配器。
常用的适配器有三种:ArrayAdapter, SimpleAdapter, SimpleCursorAdapter。
其中SimpleAdapter扩展性最好,几乎能实现所有展示需求的列表,我在实际开发中用的全是这个,这里也只介绍这个。
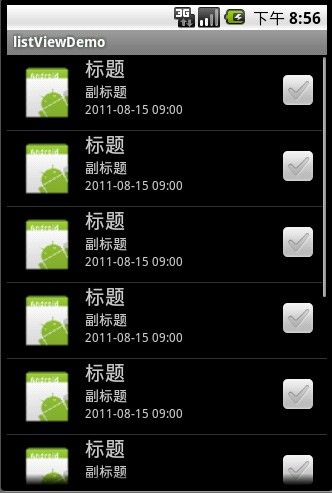
假设要实现如下效果的列表视图:
下面一步步来实现。
首先设计视图,主要设计ListView里面item的显示效果,在layout中创建item.xml文件,如下:
<?xml version="1.0" encoding="utf-8"?>
<RelativeLayout xmlns:android="http://schemas.android.com/apk/res/android"
	android:layout_width="fill_parent" android:layout_height="75dp"
	android:paddingLeft="10dp" android:paddingRight="10dp">
	<ImageView
		android:id="@+id/img"
		android:layout_height="fill_parent"
		android:layout_width="60dp"
		android:layout_alignParentLeft="true" />
	<LinearLayout xmlns:android="http://schemas.android.com/apk/res/android"
		android:orientation="vertical" android:layout_height="fill_parent"
		android:layout_width="fill_parent" android:layout_toRightOf="@id/img"
		android:paddingLeft="8dp">
		<TextView
			android:id="@+id/title1"
			android:layout_width="wrap_content"
			android:layout_height="wrap_content"
			android:textColor="#cbcaca"
			android:textSize="20dp" />
		<TextView
			android:id="@+id/title2"
			android:layout_width="wrap_content"
			android:layout_height="wrap_content"
			android:textColor="#cbcaca"
			android:textSize="14dp" />
		<TextView
			android:id="@+id/time"
			android:layout_width="wrap_content"
			android:layout_height="wrap_content"
			android:textColor="#cbcaca"
			android:textSize="12dp" />
	</LinearLayout>
	<CheckBox
		android:id="@+id/checked"
		android:layout_height="fill_parent"
		android:layout_width="wrap_content"
		android:layout_alignParentRight="true"
		android:checked="false"
		android:focusable="false" />
</RelativeLayout>
此xml文件定义列表中每个项目的布局,如果想要不同的布局,修改此文件的布局即可。
这个文件中给每个需要在程序中动态赋值的地方都取了id,看到后面的代码时,注意对应关系。
然后是适配器和数据,这两个联系比较紧密,就放一起了。
先上代码:
//获取ListView对象
ListView mListView = (ListView)findViewById(R.id.listview);
//下面是数据映射关系,mFrom和mTo按顺序一一对应
String[] mFrom = new String[]{"img","title1","title2","time"};
int[] mTo = new int[]{R.id.img,R.id.title1,R.id.title2,R.id.time};
//获取数据,这里随便加了10条数据,实际开发中可能需要从数据库或网络读取
List<Map<String,Object>> mList = new ArrayList<Map<String,Object>>();
Map<String,Object> mMap = null;
for(int i = 0;i < 10;i++){
	mMap = new HashMap<String,Object>();
	mMap.put("img", R.drawable.icon);
	mMap.put("title1", "标题");
	mMap.put("title2", "副标题");
	mMap.put("time", "2011-08-15 09:00");
	mList.add(mMap);
}
//创建适配器
SimpleAdapter mAdapter = new SimpleAdapter(this,mList,R.layout.item,mFrom,mTo);
mListView.setAdapter(mAdapter);
这里要注意对应关系,Layout中的id,程序中对它的引用,Map中的数据。
到这里已经实现了上面那张图的效果。但是程序需要一些交互操作,比如单击某一项,长按某一项,怎么办?
看下面:
添加点击事件:
mListView.setOnItemClickListener(new AdapterView.OnItemClickListener() {
	@Override
	public void onItemClick(AdapterView<?> parent, View view, int position, long id) {
		@SuppressWarnings("unchecked")
		//获取被点击的item所对应的数据
		HashMap<String,Object> map = (HashMap<String, Object>) parent.getItemAtPosition(position);
		//下面是你的其他事务逻辑
	}
});
这里可以通过position获取被点击的item所对应的Map数据,拿到这个数据了,还怕有什么功能实现不了吗?
举个最常见的例子,数据是从数据库里取的,每条数据有唯一的id,点了某一项之后,需要得到这个id进行数据操作,怎么办?很简单,在准备数据的时候,往Map中多添加一条数据,map.put("id",id),在上面的事件处理中,可以通过(Long) map.get("id")来获取id(此处假设id是long类型),取到id之后就可以进行数据库操作了。放心,添加的额外数据不会影响View的显示,因为有对应关系在。
长按事件和这个类似,无非是注册OnItemLongClickListener事件,在此就不列代码了。
还有最后一个问题,界面中每个item后面显示了一个单选框,明显是为批处理留的,该如何实现呢?
仔细想一下,会发现难点在于单选框状态的记录及获取。下面是我的方法:
在定义SimpleAdapter对象的时候,重写它的getView方法。如下:
mAdapter = new SimpleAdapter(this, pictureList, R.layout.picturelist, mFrom, mTo){
	@Override
	public View getView(final int position, View convertView, ViewGroup parent) {
		View view = super.getView(position, convertView, parent);
		@SuppressWarnings("unchecked")
		final HashMap<String,Object> map = (HashMap<String, Object>) this.getItem(position);
		//获取相应View中的Checkbox对象
		CheckBox checkBox = (CheckBox)view.findViewById(R.id.checked);
		checkBox.setChecked((Boolean) map.get("checked"));
		//添加单击事件,在map中记录状态
		checkBox.setOnClickListener(new View.OnClickListener() {
			@Override
			public void onClick(View view) {
				map.put("checked", ((CheckBox)view).isChecked());
			}
		});
		return view;
	}
};
在其他地方获取状态并处理:
//获取列表中的项目总数
int count = pictureListView.getCount();
Map<String,Object> map = null;
boolean isChecked;
long id;
for(int i = 0;i < count;i++){
	map = (Map<String, Object>) pictureListView.getItemAtPosition(i);
	isChecked = (Boolean) map.get("isChecked");
	if(isChecked){
		id = (Long) map.get("id");
		//被选中的逻辑
	}
	else{
		id = (Long) map.get("id");
		//未被选中的逻辑
	}
}
//如果操作过程中对列表内容进行了添加或删除,需要调用下面这个方法来更新视图
mAdapter.notifyDataSetChanged();
还有一点忘了写了,demo中的图片是drawable里面的图片,如果map中只有图片的地址,如何把它转成drawable对象显示出来呢?我在这里也研究了好久,map中放入drawable对象传过去好像没用,不会显示,怎么办?好在前面有重写SimpleAdapter的getView方法。map中把图片地址放进去,在getView方法里面,把此地址转成drawable对象,然后设置给ImageView,大功告成!代码如下:
mAdapter = new SimpleAdapter(this, pictureList, R.layout.picturelist, mFrom, mTo){
	@Override
	public View getView(final int position, View convertView, ViewGroup parent) {
		View view = super.getView(position, convertView, parent);
		@SuppressWarnings("unchecked")
		final HashMap<String,Object> map = (HashMap<String, Object>) this.getItem(position);
		ImageView imageView = (ImageView)view.findViewById(R.id.img);
		FileInputStream fin;
		try {
			if(map.get("img") == null){
				throw new IOException();
			}
			fin = getApplicationContext().openFileInput((String) map.get("img"));
			imageView.setImageDrawable(Drawable.createFromStream(fin, "src"));
			fin.close();
		} catch (FileNotFoundException e) {
			imageView.setImageResource(R.drawable.default);
		} catch (IOException e) {
			imageView.setImageResource(R.drawable.default);
		}
		return view;
	}
};
好了,就到这里了。
