android2.3 api demo 学习系列(9)--App/Activity/QuickContactsDemo
现在我们来学习如何使用Content Provider来访问android的contacts数据库。
1、布局配置
<?xml version="1.0" encoding="utf-8"?>
<RelativeLayout xmlns:android="http://schemas.android.com/apk/res/android"
    android:layout_width="match_parent"
    android:layout_height="wrap_content"
    android:minHeight="48dip"
    android:paddingLeft="0dip"
    android:paddingRight="9dip" >

    <QuickContactBadge
        android:id="@+id/app_activity_quick_contacks_badge"
        style="?android:attr/quickContactBadgeStyleWindowSmall"
        android:layout_width="wrap_content"
        android:layout_height="wrap_content"
        android:layout_alignParentLeft="true"
        android:layout_alignParentTop="true"
        android:layout_marginBottom="3dip"
        android:layout_marginLeft="2dip"
        android:layout_marginRight="14dip"
        android:layout_marginTop="4dip"
        android:src="@drawable/phone"/>
    <TextView
        android:id="@+id/app_activity_quick_contacks_name"
        android:layout_width="match_parent"
        android:layout_height="wrap_content"
        android:layout_centerVertical="true"
        android:layout_toRightOf="@id/app_activity_quick_contacks_badge"
        android:paddingLeft="2dip"
        android:textAppearance="?android:attr/textAppearanceMedium" />

</RelativeLayout>
2、代码实现
//定义需要的列
	 static final String[] CONTACTS_SUMMARY_PROJECTION = new String[] {
         Contacts._ID, // 0
         Contacts.DISPLAY_NAME, // 1
         Contacts.STARRED, // 2
         Contacts.TIMES_CONTACTED, // 3
         Contacts.CONTACT_PRESENCE, // 4
         Contacts.PHOTO_ID, // 5
         Contacts.LOOKUP_KEY, // 6
         Contacts.HAS_PHONE_NUMBER, // 7
	 };

	 static final int SUMMARY_ID_COLUMN_INDEX = 0;
	 static final int SUMMARY_NAME_COLUMN_INDEX = 1;
	 static final int SUMMARY_STARRED_COLUMN_INDEX = 2;
	 static final int SUMMARY_TIMES_CONTACTED_COLUMN_INDEX = 3;
	 static final int SUMMARY_PRESENCE_STATUS_COLUMN_INDEX = 4;
	 static final int SUMMARY_PHOTO_ID_COLUMN_INDEX = 5;
	 static final int SUMMARY_LOOKUP_KEY = 6;
	 static final int SUMMARY_HAS_PHONE_COLUMN_INDEX = 7;


	 @Override
	 public void onCreate(Bundle savedInstanceState) {
	     super.onCreate(savedInstanceState);
	     //定义查询条件
	     String select = "((" + Contacts.DISPLAY_NAME + " NOTNULL) AND ("
	             + Contacts.HAS_PHONE_NUMBER + "=1) AND ("
	             + Contacts.DISPLAY_NAME + " != '' ))";
	     //请求需要的数据
	     Cursor c =
	             getContentResolver().query(Contacts.CONTENT_URI, CONTACTS_SUMMARY_PROJECTION, select,
	             null, Contacts.DISPLAY_NAME + " COLLATE LOCALIZED ASC");
	     startManagingCursor(c);//Cursor生命周期交由activity负责管理
	     ContactListItemAdapter adapter = new ContactListItemAdapter(this, R.layout.app_activity_quick_contacts, c);
	     setListAdapter(adapter);

	 }

	private final class ContactListItemAdapter extends ResourceCursorAdapter {
		public ContactListItemAdapter(Context context, int layout, Cursor c) {
		    super(context, layout, c);
		}

		@Override
		public void bindView(View view, Context context, Cursor cursor) {
		    final ContactListItemCache cache = (ContactListItemCache) view.getTag();
		    TextView nameView = cache.nameView;
		    QuickContactBadge photoView = cache.photoView;
		    // Set the name
		    cursor.copyStringToBuffer(SUMMARY_NAME_COLUMN_INDEX, cache.nameBuffer);
		    int size = cache.nameBuffer.sizeCopied;
		    cache.nameView.setText(cache.nameBuffer.data, 0, size);
		    final long contactId = cursor.getLong(SUMMARY_ID_COLUMN_INDEX);
		    final String lookupKey = cursor.getString(SUMMARY_LOOKUP_KEY);
		    cache.photoView.assignContactUri(Contacts.getLookupUri(contactId, lookupKey));
		}

		@Override
		public View newView(Context context, Cursor cursor, ViewGroup parent) {
		    View view = super.newView(context, cursor, parent);
		    ContactListItemCache cache = new ContactListItemCache();
		    cache.nameView = (TextView) view.findViewById(R.id.app_activity_quick_contacks_name);
		    cache.photoView = (QuickContactBadge) view.findViewById(R.id.app_activity_quick_contacks_badge);
		    view.setTag(cache);

		    return view;
		}
	}

	final static class ContactListItemCache {
		public TextView nameView;
		public QuickContactBadge photoView;
		public CharArrayBuffer nameBuffer = new CharArrayBuffer(128);
	}
3、在manifest中添加权限
<uses-permission android:name="android.permission.READ_CONTACTS" />
<uses-permission android:name="android.permission.WRITE_CONTACTS" />
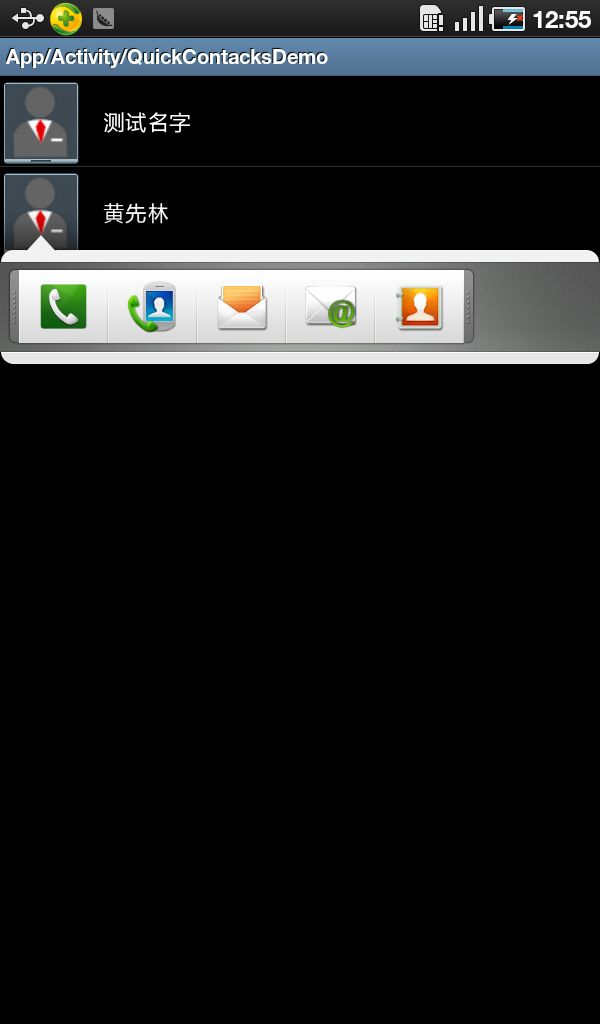
4、效果图:
知识扩展(源自sdk)
Content Provider 为不同应用之间共享数据提供了统一的接口,通过对底层数据源的抽象,Content Provider 实现了应用程序代码和数据层分离。Android 平台对大部分的数据库都提供了对应的Content Provider 接口:
- Browser: 读取和修改Bookmark,Browser history 或Web Searches。
- CallLog: 查看或是更新Call History(打入电话或是打出电话,未接电话等)
- Contacts: 检索,修改或存储通讯录。
- MediaStore: 访问媒体库(包括声音,视频,图像等)。
- Settings: 访问系统设置,查看或是修改蓝牙设置,铃声设置等。
Android 系统的每个Content Provider 都定义了一个CONTENT_URI,功能类似于数据库的名称。Android 中每个Context 对象(如Activity)都含有一个ContentResolver,ContentResolver 可以根据CONTENT_URI 获取对应的Content Provider。
具体使用时我们在spplication中获取到 call ContentResolver对象,调用其 ContentResolver.query()方法,该query方法接着调用具体ContentProvider提供者的ContentProvider.query()方法。
mCursor = getContentResolver().query(
    UserDictionary.Words.CONTENT_URI,   // The content URI
    mProjection,                        // 列名
    mSelectionClause                    // 查询条件
    mSelectionArgs,                     // 查询参数
    mSortOrder);                        // 排序
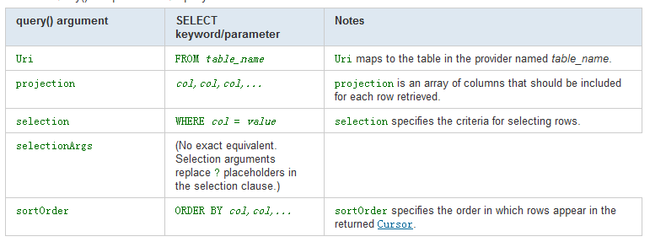
query的参数说明:
String[] mSelectionArgs = {"test"};
mSelectionClause = UserDictionary.Words.WORD + " = ?";

mCursor = getContentResolver().query(
    UserDictionary.Words.CONTENT_URI,
    mProjection,
    mSelectionClause,
    mSelectionArgs,
    mSortOrder);
//数据显示可以绑定到列表上
String[] mWordListColumns =
{
    UserDictionary.Words.WORD,   // Contract class constant containing the word column name
    UserDictionary.Words.LOCALE  // Contract class constant containing the locale column name
};

// Defines a list of View IDs
int[] mWordListItems = { R.id.dictWord, R.id.locale};

// Creates a new SimpleCursorAdapter
mCursorAdapter = new SimpleCursorAdapter(
    getApplicationContext(),               // The application's Context object
    R.layout.wordlistrow,                  // A layout in XML for one row in the ListView
    mCursor,                               // The result from the query
    mWordListColumns,                      // A string array of column names in the cursor
    mWordListItems,                        // An integer array of view IDs in the row layout
    0);                                    // Flags (usually none are needed)

// Sets the adapter for the ListView
mWordList.setAdapter(mCursorAdapter);
//或者自行处理数据
while (mCursor.moveToNext()) {

        // Gets the value from the column.
        newWord = mCursor.getString(index);

        // Insert code here to process the retrieved word.

        ...

        // end of while loop
    }
2、插入数据
// Defines a new Uri object that receives the result of the insertion
Uri mNewUri;

...

// Defines an object to contain the new values to insert
ContentValues mNewValues = new ContentValues();

/*
 * Sets the values of each column and inserts the word. The arguments to the "put"
 * method are "column name" and "value"
 */
mNewValues.put(UserDictionary.Words.APP_ID, "example.user");
mNewValues.put(UserDictionary.Words.LOCALE, "en_US");
mNewValues.put(UserDictionary.Words.WORD, "insert");
mNewValues.put(UserDictionary.Words.FREQUENCY, "100");

mNewUri = getContentResolver().insert(
    UserDictionary.Word.CONTENT_URI,   // the user dictionary content URI
    mNewValues                          // the values to insert
);
3、更新数据
// Defines an object to contain the updated values
ContentValues mUpdateValues = new ContentValues();

// Defines selection criteria for the rows you want to update
String mSelectionClause = UserDictionary.Words.LOCALE +  "LIKE ?";
String[] mSelectionArgs = {"en_%"};

// Defines a variable to contain the number of updated rows
int mRowsUpdated = 0;

...

/*
 * Sets the updated value and updates the selected words.
 */
mUpdateValues.putNull(UserDictionary.Words.LOCALE);

mRowsUpdated = getContentResolver().update(
    UserDictionary.Words.CONTENT_URI,   // the user dictionary content URI
    mUpdateValues                       // the columns to update
    mSelectionClause                    // the column to select on
    mSelectionArgs                      // the value to compare to
);
4、删除数据
// Defines selection criteria for the rows you want to delete
String mSelectionClause = UserDictionary.Words.APP_ID + " LIKE ?";
String[] mSelectionArgs = {"user"};

// Defines a variable to contain the number of rows deleted
int mRowsDeleted = 0;

...

// Deletes the words that match the selection criteria
mRowsDeleted = getContentResolver().delete(
    UserDictionary.Words.CONTENT_URI,   // the user dictionary content URI
    mSelectionClause                    // the column to select on
    mSelectionArgs                      // the value to compare to
);
其中关于批量处理的请参看sdk
最后需要在manifest中加入需要的权限

