2012-08-06 23:53:25
原创作品,允许转载,转载时请务必以超链接形式标明文章
原始出处 、作者信息和本声明。否则将追究法律责任。
http://legend2011.blog.51cto.com/3018495/956585
一、引子
前面的博文介绍了如何查询一个具有has-a关系的实体,今天就来看看如何向数据库中插入这样的一个实体。仍以学生为例,现在的问题是:学生实体把教师对象作为自己的指导教师属性,然而在学生表中,却仅有指导教师的ID一列,这如何映射呢?
解决的方法其实很简单(这个方法是笔者猜出来的,哈哈,得瑟中…),关键在于在StudentMapper.xml中如下编写insert语句:
- <insert id="add" parameterType="Student"
- useGeneratedKeys="true" keyProperty="id">
- insert into student(name,gender,major,grade,supervisor_id)
- values(#{name},#{gender},#{major},#{grade},#{supervisor.id})
- </insert>
当然在StudentMapper.java中插入实体的方法声明是少不了的,如下:
- public void add(Student student);
- package com.demo;
- import org.springframework.context.ApplicationContext;
- import com.abc.mapper.StudentMapper;
- import com.abc.domain.Student;
- import com.abc.domain.Teacher;
- import org.springframework.context.support.ClassPathXmlApplicationContext;
- public class MyBatisSpringDemo
- {
- private static ApplicationContext ctx;
- static
- {
- //在类路径下寻找resources/beans.xml文件
- ctx = new ClassPathXmlApplicationContext("resources/beans.xml");
- }
- public static void main(String[] args)
- {
- StudentMapper mapper =
- (StudentMapper)ctx.getBean("studentMapper");
- Student student = new Student();
- student.setName("李林");
- student.setGender("男");
- student.setMajor("计算机科学与技术");
- student.setGrade("2011");
- Teacher supervisor = new Teacher();
- supervisor.setId(1);
- student.setSupervisor(supervisor);
- mapper.add(student);
- }
- }
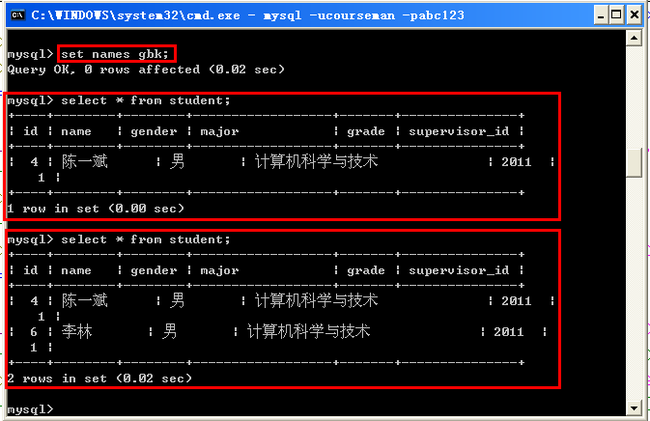
从第二个和第三个红框之间的对比可以看出,数据已被写入到数据库(
点此进入无事务处理的源码下载页面)。
二、事务管理
首先在Spring的配置文件(本例中为beans.xml)中配置MyBatis-Spring要用到的事务管理器,即org.springframework.jdbc.datasource.DataSourceTransactionManager。配置内容如下:
- <bean id="transactionManager" class="org.springframework.jdbc.datasource.DataSourceTransactionManager">
- <property name="dataSource" ref="dataSource" />
- </bean>
- package com.demo;
- import org.springframework.context.ApplicationContext;
- import com.abc.mapper.StudentMapper;
- import com.abc.domain.Student;
- import com.abc.domain.Teacher;
- import org.springframework.context.support.ClassPathXmlApplicationContext;
- import org.springframework.transaction.support.DefaultTransactionDefinition;
- import org.springframework.transaction.TransactionDefinition;
- import org.springframework.transaction.TransactionStatus;
- import org.springframework.transaction.PlatformTransactionManager;
- import org.springframework.jdbc.datasource.DataSourceTransactionManager;
- public class MyBatisSpringDemo
- {
- private static ApplicationContext ctx;
- static
- {
- //在类路径下寻找resources/beans.xml文件
- ctx = new ClassPathXmlApplicationContext("resources/beans.xml");
- }
- public static void main(String[] args)
- {
- //从Spring容器中请求映射器
- StudentMapper mapper =
- (StudentMapper)ctx.getBean("studentMapper");
- //从Spring容器中请求事务管理器,用PlatformTransactionManager
- //类型的引用指向它
- PlatformTransactionManager tm =
- (PlatformTransactionManager)ctx.getBean("transactionManager");
- Student student = new Student();
- student.setName("王芳");
- student.setGender("女");
- student.setMajor("计算机科学与技术");
- student.setGrade("2011");
- Teacher supervisor = new Teacher();
- supervisor.setId(1);
- student.setSupervisor(supervisor);
- //TransactionDefinition对象代表着事务的定义,即事务的传播行为,
- //隔离级别和是否可读等属性。DefaultTransactionDefinition是此
- //接口的默认实现,给上述属性指定了默认值。如传播行为是PROPAGATION_REQUIRED,
- //只读为false等(可参见Spring api文档)
- TransactionDefinition def = new DefaultTransactionDefinition();
- //TransactionStatus对象代表着事务的状态。以下代码根据传入的事务定义
- //对象返回事务并启动事务
- TransactionStatus status = (TransactionStatus)tm.getTransaction(def);
- try {
- mapper.add(student);
- //若执行下述语句,则事务回滚。
- //读者可自行验证
- //int a = 1/0;
- }
- catch (Exception e) {
- //回滚事务
- tm.rollback(status);
- e.printStackTrace();
- }
- //提交事务
- tm.commit(status);
- }
- }
当我们需要在beans.xml中配置多个映射器时,它们的class和sqlSessionFactory属性都是一样的(也许还有其它一样的属性)。显然,我们需要消除这种冗余信息。借助于bean继承机制,我们可以达到这个目的。如下所示:
- <bean id="parentMapper" class="org.mybatis.spring.mapper.MapperFactoryBean"
- abstract="true">
- <!--sqlSessionFactory属性指定要用到的SqlSessionFactory实例-->
- <property name="sqlSessionFactory" ref="sqlSessionFactory" />
- </bean>
- <bean id="studentMapper" parent="parentMapper">
- <!--mapperInterface属性指定映射器接口,用于实现此接口并生成映射器对象-->
- <property name="mapperInterface" value="com.abc.mapper.StudentMapper" />
- </bean>


