参考: http://axis.apache.org/axis2/java/core/docs/quickstartguide.html
1. 工具准备(JDK要事先安装好,JDK版本为1.5以上)
(1) 从 http://axis.apache.org/axis2/java/core/download.cgi
下载 Axis2的Binary Distribution(版本axis2-1.6.2),并解压,解压后,目录如下:
(2) 拷贝webapp文件夹(包含其中的全部文件) 到tomcat的 webapps 目录下面.
将webapp重命名为axis,
将解压后的Axis2版本中的lib文件夹axis2-1.6.2\lib整体
拷贝到apache-tomcat-5.5.26\webapps\axis\WEB-INF目录下
形成下面的目录结构:
(3) 启动tomcat,访问:http://localhost:8080/axis/axis2-web/
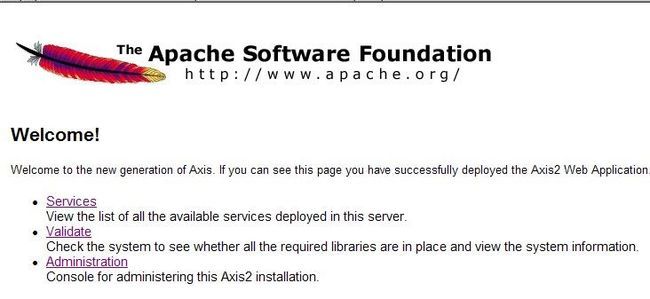
出现以下界面,说明部署成功.
以上步骤得到一个axis管理环境.
2. 了解axis.war
(1) 从http://axis.apache.org/axis2/java/core/download.cgi
下载下载 Axis2的WAR Distribution(版本axis2-1.6.2)
(2) 解压上面下载的文件 得到 axis2-1.6.2-war
(3) 将 axis2-1.6.2-war/axis2.war拷贝到tomcat的webapps目录下,如图:
(4) 访问http://localhost:8080/axis2/,得到下面的页面
3. Axis2 Services Axis2服务详解
Axis2 的服务端可以部署在任何的servlet容器中,
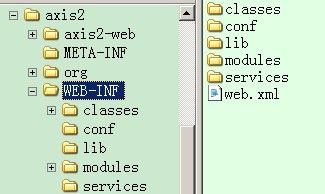
Axis2服务端一般有下面的目录结构(axis2.war解压后的目录结构):
axis2-web
META-INF
WEB-INF
classes
conf
axis2.xml
lib
activation.jar
...
xmlSchema.jar
modules
modules.list
addressing.mar
...
soapmonitor.mar
services
services.list
aservice.aar
...
version.aar
web.xml
Starting at the top, axis2-web is a collection of JSPs that make up the Axis2 administration application,
through which you can perform any action such as adding services and engaging and dis-engaging modules.
The WEB-INF directory contains the actual java classes and
other support files to run any services deployed to the services directory.
从上到下来看上面的目录结构, axis2-web中放了一些关于Axis2的管理程序的jsp文件,
通过这个管理程序,你可以增加服务以及增减模块.WEB-INF目录中包含实际的Java类文件以及其他支持文件
以便部署到services目录中的服务能跑起来.
The main file in all this is axis2.xml, which controls how the application deals with the received messages,
determining whether Axis2 needs to apply any of the modules defined in the modules directory.
最主要的文件是axis2.xml,这个文件控制着程序如何处理接收到的消息,决定Axis2是否需要应用modules文件夹中定义的模块.
Services can be deployed as *.aar files, as you can see here,
but their contents must be arranged in a specific way. For example,
the structure of this service will be as follows:
服务可以通过*.aar文件的方式分发,就像在上面的目录结构图中看到的那样,
*.aar文件的内容必须符合特定的结构.比如,服务的结构应该如下面所示:
- StockQuoteService
- META-INF
- services.xml
- lib
- samples
- quickstart
- service
- pojo
- StockQuoteService.class
(注: *.aar文件和.jar,.war文件类似,是一个压缩文件,里面包含了很多内容,可以使用7z解压
一个.arr文件,解压后,获得的目录结构就如上面所示了.
比如上面的axis2.war文件解压后,在services里面有个version-1.6.2.aar文件,
改文件解压后的目录结构如下:
)
Here, the name of the service is StockQuoteService, which is specified in the services.xml file and corresponds
to the top-level folder of this service. Compiled Java classes are placed underneath this in their proper
place based on the package name. The lib directory holds any service-specific JAR files needed
for the service to run (none in this case) besides those already stored with the Axis2 WAR file and
the servlet container's common JAR directories. Finally, the META-INF directory contains any additional
information about the service that Axis2 needs to execute it properly. The services.xml file defines the
service itself and links the Java class to it (See Code Listing 3)
这里,StockQuoteService是服务的名字,这个名字也会配置到services.xml中,同时也作为一个顶级文件夹名.在这个文件夹下面
包含与服务配置相关的其他文件.编译后的Java类文件(.class)也放到这个顶级文件夹下面,文件的存放路径通过类的包名来组织.
(注:比如,服务名是StockQuoteService,则需要建一个顶级文件夹StockQuoteService,
然后有一个类samples.quickstart.service.pojo.StockQuoteService.Java,通过这个类提供服务,则需要把这个类编译成.class文件,
存放成StockQuoteService/samples/quickstart/service/pojo/StockQuoteService.class).
lib文件夹中存放提供服务的java类需要用到的一些jar包文件(servlet 容器(tomcat) common目录中存在的jar之外的jar包).
META-INF文件夹中包含其他的服务正确执行所必须的信息.
services.xml文件定义服务本身,并且连接到提供服务的Java类(参考下面的代码Code Listing 3).
Code Listing 3: The Service Definition File(服务定义文件)
<service name="StockQuoteService" scope="application">
<description>
Stock Quote Sample Service
</description>
<messageReceivers>
<messageReceiver
mep="http://www.w3.org/2004/08/wsdl/in-only"
class="org.apache.axis2.rpc.receivers.RPCInOnlyMessageReceiver"/>
<messageReceiver
mep="http://www.w3.org/2004/08/wsdl/in-out"
class="org.apache.axis2.rpc.receivers.RPCMessageReceiver"/>
</messageReceivers>
<parameter name="ServiceClass">
samples.quickstart.service.pojo.StockQuoteService
</parameter>
</service>
Here the service is defined, along with the relevant messageReceiver
types for the different message exchange patterns.
这样就定义了一个服务,通过定义不同的messageReceiver定义不同的消息交换模式.
The META-INF directory is also the location for any custom WSDL files
you intend to include for this application.
在META-INF中也可包含任何必要的WSDL文件..
You can deploy a service by simply taking this hierarchy of files and copying
it to the webapps/axis2/WEB-INF/services directory of your servlet engine.
(Note the Axis2 WAR file must be installed first in the servlet engine.)
This is known as the "exploded" format. You can also compress your documents
into an *.aar file, similar to a *.jar file, and place the *.aar
file directly in the servlet engine's webapps/axis2/WEB-INF/services directory.
你可以通过下面的方式部署一个服务: 创建符合上述的目录结构的顶级文件夹(比如StockQuoteService),
然后将这个文件夹复制到servle容器的webapps/axis2/WEB-INF/services目录下.
(注意Axis2 的 WAR axis2.wa必须事先复制到servlet 容器(比如tomcat)的webapps目录下了).
这种方式称之为"exploded"方式.另外,你可以将上述的顶级文件夹中的所有文件压缩为一个.arr文件(与.jar文件类似),
然后将这个.arr文件拷贝得到servlet容器的webapps/axis2/WEB-INF/services目录下.
Let's look at some different ways to create clients and services.
下面看看集中不同的创建服务端和客户端的方法.
4. Creating Services 创建服务
In this section, we'll look at five ways to create a service based on the StockQuoteService class:
deploying Plain Old Java Objects (POJO),
building the service using AXIOM's OMElement,
generating the service using Axis2 Databinding Framework (ADB),
generating the service using XMLBeans,
and generating the service using JiBX.
下面,我们将看到创建一个基于StockQuoteService类的服务的五种方式:
部署普通Java对象方式(POJO方式),
使用AXIOM's OMElement方式创建服务,
Axis2 Databinding Framework (ADB)方式,
XMLBeans方式,
JiBX方式.
4.1 Deploying POJOs 部署POJOs
To deploy the service using POJOs (Plain Old Java Objects),
execute the following steps.
使用下面的步骤,使用POJO部署服务.
Note the directory structure contained at AXIS2_HOME/samples/quickstart
(the services.xml file is from the first section of this guide):
注意,下面的目录来自AXIS2_HOME/samples/quickstart(AXIS2_HOME是由解压后Axis2版本存放的位置,定义成的环境变量)
- quickstart
- README.txt
- build.xml
- resources
- META-INF
- services.xml
- src
- samples
- quickstart
- service
- pojo
- StockQuoteService.java
Note that you can generate a WSDL from the quickstart directory by typing:
ant generate.wsdl
注意,到AXIS2_HOME/samples/quickstart目录下面,通过执行ant generate.wsdl命令,可以获取wsdl文件.
However, creating StockQuoteService.wsdl is optional.
It can be the version generated directly from the Java class,
or a customized version of that file, and that services.xml is
the same file referenced earlier in this document.
然而,创建StockQuoteService.wsdl文件并不是必须的.这个文件可以是直接通过Java类文件获取,
或者是修改后的版本,services.xml还是本文档之前提到的那个services.xml文件.
Now build the project by typing ant generate.service in the
quickstart directory, which creates the following directory structure:
现在,在AXIS2_HOME/samples/quickstart目录下面执行 ant generate.service 命令
创建下面的目录结构:
- quickstart/build/classes
- META-INF
- services.xml
- samples
- quickstart
- service
- pojo
- StockQuoteService.class
If you want to deploy the service in an exploded directory format,
rename the classes directory to StockQuoteService,
and copy it to the webapps/axis2/WEB-INF/services directory in your servlet engine.
Otherwise, copy the build/StockQuoteService.aar file to the
webapps/axis2/WEB-INF/services directory in your servlet engine.
如果你打算使用"exploded" 方式部署服务,那么将classes文件夹重命名为StockQuoteService
然后拷贝到webapps/axis2/WEB-INF/services目录下即可.或者,也可以直接拷贝build/StockQuoteService.aar文件
到webapps/axis2/WEB-INF/services目录下面.
Then check to make sure that the service has been
properly deployed by viewing the list of services at:
通过访问下面的地址检查服务是否成功部署了:
http://localhost:8080/axis2/services/listServices
You can also checkout the WSDL at:
通过下面地址查看wsdl文件:
http://localhost:8080/axis2/services/StockQuoteService?wsdl
And the schema at:
通过下面地址,查看schema:
http://localhost:8080/axis2/services/StockQuoteService?xsd
Once the URLs are working, quickly test the service. Try pointing your browser to the following URL:
如果上面的URL测试都成功的话,可以通过下面的URL测试webservice服务:
http://localhost:8080/axis2/services/StockQuoteService/getPrice?symbol=IBM
注:测试输出如下:
- <ns:getPriceResponse xmlns:ns="http://quickstart.samples/xsd">
<ns:return>42.0</ns:return>
</ns:getPriceResponse>
If you invoke the update method as,
如果你通过下面的方式调用了update方法,
http://localhost:8080/axis2/services/StockQuoteService/update?symbol=IBM&price=100
当方法执行完毕后,在调用前面的URL,得到的结果如下:
- <ns:getPriceResponse xmlns:ns="http://quickstart.samples/xsd">
<ns:return>100.0</ns:return>
</ns:getPriceResponse>
注:价格已经被改成100了.
4.2 Building the Service using AXIOM
AXIOM方式部署服务
To build a service "from scratch" using AXIOM, execute the following steps.
Note the directory structure contained at /samples/quickstartaxiom:
- quickstartaxiom
- README.txt
- build.xml
- resources
- META-INF
- services.xml
- StockQuoteService.wsdl
- src
- samples
- quickstart
- service
- axiom
- StockQuoteService.java
- clients
- AXIOMClient.java
Since AXIOM is a little different, you're going to need a different services.xml file from the one used for POJO.
Define it, as shown in Code Listing 4.
AXIOM方式和POJO方式不同,所以你需要重新定义services.xml.
Code Listing 4: The Service Definition File.
<service name="StockQuoteService" scope="application">
<description>
Stock Quote Service
</description>
<operation name="getPrice">
<messageReceiver class="org.apache.axis2.receivers.RawXMLINOutMessageReceiver"/>
</operation>
<operation name="update">
<messageReceiver class="org.apache.axis2.receivers.RawXMLINOnlyMessageReceiver"/>
</operation>
<parameter name="ServiceClass">samples.quickstart.service.axiom.StockQuoteService</parameter>
</service>
Note that it's almost the same, except that the operations are explicitly
defined in the service.xml file, and the MessageReceivers are now RawXML.
注意,这种方式配置的service.xml,operations配置更加严格,并且
MessageReceivers配置成RawXML了(与POJO方式相比的).
以下省略....
4.3 Generating the Service using ADB
4.3 Generating the Service using ADB
使用ADB方式创建服务
To generate and deploy the service using the Axis2 Databinding Framework (ADB),
execute the following steps.
按照下面步骤,使用ADB方式创建服务:
Generate the skeleton using the WSDL2Java utility
by typing the following in the Axis2_HOME/samples/quickstartadb directory:
以Axis2_HOME/samples/quickstartadb为当前目录,
输入下面的命令,使用WSDL2Java工具创建服务代码的框架:
(Windows)
%AXIS2_HOME%\bin\wsdl2java -uri resources\META-INF\StockQuoteService.wsdl -p samples.quickstart.service.adb -d adb -s -ss -sd -ssi -o build\service
(Linux)
$AXIS2_HOME/bin/wsdl2java -uri resources/META-INF/StockQuoteService.wsdl -p samples.quickstart.service.adb -d adb -s -ss -sd -ssi -o build/service
Else, simply type ant generate.service in the Axis2_HOME/samples/quickstartadb directory.
另外,还需要以Axis2_HOME/samples/quickstartadb目录为当前目录,执行命令ant generate.service
The option -d adb specifies Axis Data Binding (ADB).
The -s switch specifies synchronous or blocking calls only.
The -ss switch creates the server side code (skeleton and related files).
The -sd switch creates a service descriptor (services.xml file).
The -ssi switch creates an interface for the service skeleton.
The service files should now be located at build/service.
上面的wsdl2java命令中:
-d表示使用Axis Data Binding (ADB)
-s表示使用同步或者阻塞方式
-ss表示生成服务端代码(代码框架及其相关文件)
-sd表示生成services.xml文件
-ssi表示为服务框架生成接口
执行改命令后,生成的服务相关文件 放在build\service目录中.
If you generated the code by using WSDL2Java directly,
next you have to modify the generated skeleton to implement the service
(if you used "ant generate.service", a completed skeleton will be copied over the generated one automatically).
如果是直接使用WSDL2Java生成的代码,你需要修改生成的服务框架代码以实现服务.
(如果执行ant generate.service,完整的框架代码将被自动拷贝(即服务中仅仅是空的框架代码).)
Open the build/service/src/samples/quickstart/adb/service/StockQuoteServiceSkeleton.java file
and modify it to add the functionality of your service to the generated methods; shown in Code Listing 6.
打开build/service/src/samples/quickstart/adb/service/StockQuoteServiceSkeleton.java这个文件,修改成下面
Code Listing 6的样子以实现服务功能.
Code Listing 6: Defining the Service Skeleton File
package samples.quickstart.service.adb;
import samples.quickstart.service.adb.xsd.GetPriceResponse;
import samples.quickstart.service.adb.xsd.Update;
import samples.quickstart.service.adb.xsd.GetPrice;
import java.util.HashMap;
public class StockQuoteServiceSkeleton {
private static HashMap map;
static{ map = new HashMap(); }
public void update(Update param0) {
map.put(param0.getSymbol(), new Double(param0.getPrice()));
}
public GetPriceResponse getPrice(GetPrice param1) {
Double price = (Double) map.get(param1.getSymbol());
double ret = 42;
if(price != null){
ret = price.doubleValue();
}
GetPriceResponse res =
new GetPriceResponse();
res.set_return(ret);
return res;
}
}
Now you can build the project by typing the following command in the build/service directory:
现在,可以构建工程了,到build/service目录下面,执行:
ant jar.server
If all goes well, you should see the BUILD SUCCESSFUL message in your window,
and the StockQuoteService.aar file in the build/service/build/lib directory.
Copy this file to the webapps/axis2/WEB-INF/services directory of the servlet engine.
如果一切正常,你将看到BUILD SUCCESSFUL的提示信息.同时build/service/build/lib目录下面会生成
StockQuoteService.aar文件,拷贝这个文件到webapps/axis2/WEB-INF/services目录下面.
You can check to make sure that the service
has been properly deployed by viewing the list of services at,
可以通过下面的方式检查服务部署是否成功.
http://localhost:8080/axis2/services/listServices
You can also check the custom WSDL at,
http://localhost:8080/axis2/services/StockQuoteService?wsdl
and the schema at,
http://localhost:8080/axis2/services/StockQuoteService?xsd
4.4 Generating the Service using XMLBeans
待续
4.5 Generating the Service using JiBX
待续
5. Creating Clients
创建客户端
In this section, we'll look at four ways to create clients based on the StockQuoteService class:
building an AXIOM based client,
generating a client using Axis2 Databinding Framework (ADB),
generating a client using XMLBeans,
and generating a client using JiBX.
下面将看到通过4中方式创建客户端:
AXIOM,
ADB,
XMLBeans,
JiBX方式
5.1 Creating a Client with AXIOM
AXIOM方式创建客户端
To build a client using AXIOM, execute the following steps.
Also, note the directory structure shown in the Creating a service with AXIOM section, duplicated below for completeness.
- quickstartaxiom
- README.txt
- build.xml
- resources
- META-INF
- services.xml
- StockQuoteService.wsdl
- src
- samples
- quickstart
- service
- axiom
- StockQuoteService.java
- clients
- AXIOMClient.java
The above referenced AXIOMClient.java class is defined as follows, shown in Code Listing 9.
Code Listing 9: The AXIOMClient class using AXIOM
package samples.quickstart.clients;
import org.apache.axiom.om.OMAbstractFactory;
import org.apache.axiom.om.OMElement;
import org.apache.axiom.om.OMFactory;
import org.apache.axiom.om.OMNamespace;
import org.apache.axis2.Constants;
import org.apache.axis2.addressing.EndpointReference;
import org.apache.axis2.client.Options;
import org.apache.axis2.client.ServiceClient;
public class AXIOMClient {
private static EndpointReference targetEPR =
new EndpointReference("http://localhost:8080/axis2/services/StockQuoteService");
public static OMElement getPricePayload(String symbol) {
OMFactory fac = OMAbstractFactory.getOMFactory();
OMNamespace omNs = fac.createOMNamespace("http://axiom.service.quickstart.samples/xsd", "tns");
OMElement method = fac.createOMElement("getPrice", omNs);
OMElement value = fac.createOMElement("symbol", omNs);
value.addChild(fac.createOMText(value, symbol));
method.addChild(value);
return method;
}
public static OMElement updatePayload(String symbol, double price) {
OMFactory fac = OMAbstractFactory.getOMFactory();
OMNamespace omNs = fac.createOMNamespace("http://axiom.service.quickstart.samples/xsd", "tns");
OMElement method = fac.createOMElement("update", omNs);
OMElement value1 = fac.createOMElement("symbol", omNs);
value1.addChild(fac.createOMText(value1, symbol));
method.addChild(value1);
OMElement value2 = fac.createOMElement("price", omNs);
value2.addChild(fac.createOMText(value2,
Double.toString(price)));
method.addChild(value2);
return method;
}
public static void main(String[] args) {
try {
OMElement getPricePayload = getPricePayload("WSO");
OMElement updatePayload = updatePayload("WSO", 123.42);
Options options = new Options();
options.setTo(targetEPR);
options.setTransportInProtocol(Constants.TRANSPORT_HTTP);
ServiceClient sender = new ServiceClient();
sender.setOptions(options);
sender.fireAndForget(updatePayload);
System.err.println("price updated");
OMElement result = sender.sendReceive(getPricePayload);
String response = result.getFirstElement().getText();
System.err.println("Current price of WSO: " + response);
} catch (Exception e) {
e.printStackTrace();
}
}
}
Axis2 uses AXIOM, or the AXIs Object Model, a DOM (Document Object Model)-like structure that is based on the StAX API (Streaming API for XML).
Here you setup the payload for the update and getPrice methods of the service.
The payloads are created similar to how you created the getPriceResponse payload for the AXIOM service.
Then you setup the Options class, and create a ServiceClient that you'll use to communicate with the service.
First you call the update method, which is a fireAndForget method that returns nothing. Lastly,
you call the getPrice method, and retrieve the current price from the service and display it.
Now you can build and run the AXIOM client by typing ant run.client in the Axis2_HOME/samples/quickstartaxiom directory.
You should get the following as output:
done
Current price of WSO: 123.42
5.2 Generating a Client using ADB
使用ADB方式创建客户端
To build a client using Axis Data Binding (ADB), execute the following steps.
创建ADB方式绑定的客户端,需要执行下面的步骤:
Generate the client databings by typing the following in the Axis2_HOME/samples/quickstartadb directory:
以Axis2_HOME/samples/quickstartadb目录为当前目录,执行下面的命令:
%AXIS2_HOME%\bin\wsdl2java -uri resources\META-INF\StockQuoteService.wsdl -p samples.quickstart.clients -d adb -s -o build\client
注:命令执行完毕后生成:samples.quickstart.clients.StockQuoteServiceStub文件
目录结构为:
Else, simply type ant generate.client in the Axis2_HOME/samples/quickstartadb directory.
另外,以Axis2_HOME/samples/quickstartadb为当前目录,执行:ant generate.client
执行这个命令后,ant中会重新调用上面的命令,生成新的StockQuoteServiceStub文件,
放到这个包中:samples.quickstart.service.adb.
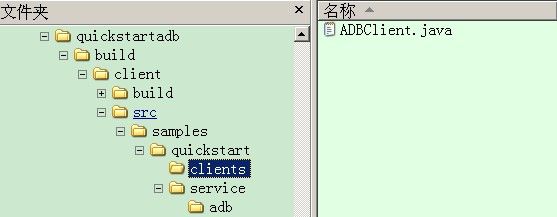
然后将${basedir}/src/samples/quickstart/clients/ADBClient.java文件拷贝到:
${build.dir}/client/src/samples/quickstart/clients/中,${build.dir}即, Axis2_HOME/samples/quickstartadb目录.
命令完成后目录结构为:
注: StockQuoteServiceStub.java是wsdl2java命令自动生成的客户端调用类.具体调用的时候,是使用这个类,参考ADBClient.java中的代码调用完成.
Next take a look at quickstartadb/src/samples/quickstart/clients/ADBClient.java, and see how it's defined in Code Listing 10.
接下面看看quickstartadb/src/samples/quickstart/clients/ADBClient.java文件,看看Code Listing 10代码是如何组织的.
Code Listing 10: The ADBClient Class
package samples.quickstart.clients;
import samples.quickstart.service.adb.StockQuoteServiceStub;
public class ADBClient{
public static void main(java.lang.String args[]){
try{
StockQuoteServiceStub stub =
new StockQuoteServiceStub
("http://localhost:8080/axis2/services/StockQuoteService");
getPrice(stub);
update(stub);
getPrice(stub);
} catch(Exception e){
e.printStackTrace();
System.err.println("\n\n\n");
}
}
/* fire and forget */
public static void update(StockQuoteServiceStub stub){
try{
StockQuoteServiceStub.Update req = new StockQuoteServiceStub.Update();
req.setSymbol ("ABC");
req.setPrice (42.35);
stub.update(req);
System.err.println("price updated");
} catch(Exception e){
e.printStackTrace();
System.err.println("\n\n\n");
}
}
/* two way call/receive */
public static void getPrice(StockQuoteServiceStub stub){
try{
StockQuoteServiceStub.GetPrice req = new StockQuoteServiceStub.GetPrice();
req.setSymbol("ABC");
StockQuoteServiceStub.GetPriceResponse res =
stub.getPrice(req);
System.err.println(res.get_return());
} catch(Exception e){
e.printStackTrace();
System.err.println("\n\n\n");
}
}
}
This class creates a client stub using the Axis Data Bindings you created.
Then it calls the getPrice and update operations on the Web service.
The getPrice method operation creates the GetPrice payload and sets the symbol to ABC.
It then sends the request and displays the current price.
The update method creates an Update payload, setting the symbol to ABC and the price to 42.35.
Now build and run the client by typing ant run.client in the Axis2_HOME/samples/quickstartadb directory.
You should get the following as output:
42
price updated
42.35


