使用Nexus创建私服
私服:见 Maven入门实战笔记04-仓库 一节中相关内容
三种Maven仓库管理软件:
Apache的Archiva
JFrog的Artifactory
Sonatype的Nexus
安装Nexus
Bundle:http://www.sonatype.org/downloads/nexus-latest-bundle.zip
WAR:http://www.sonatype.org/downloads/nexus-latest.war
安装
Bundle方式安装
自带Jetty容器
将下载的压缩包解压到 D:\tools\nexus-2.3.1-01-bundle
nexus-2.3.1-01包:包含Nexus运行所需文件
sonatype-work包:包含Nexus生成的配置文件、日志文件、仓库文件
备份Nexus,默认备份第2个文件
启动:命令行到该目录下 D:\tools\nexus-2.3.1-01-bundle\nexus-2.3.1-01\bin\
运行
nexus install
nexus start
问题:(1)启动问题
wrapper | OpenSCManager failed - 拒绝访问。 (0x5)
解决:以管理员身份运行命令行,再执行即可
(2)安装问题
wrapper | The nexus-webapp service is not installed - 指定的服务未安装。 (0x424)
解决:未安装,先安装,再运行即可
(3)启动问题
wrapper  | Starting the nexus service...
wrapper  | The nexus service was launched, but failed to start.
到D:\tools\nexus-2.3.1-01-bundle\nexus-2.3.1-01\bin\jsw\conf目录,找到wrapper.conf文件将
wrapper.java.command=java
修改如下
wrapper.java.command=D:\tools\java\jdk1.7.0\bin\java
不明白:我明明配了java环境,但是只写java就是启动不起来
War方式安装
下载war包,该war包支持主流的Web容器,如Tomcat,Glassfish,Jetty和Resin
安装完成后访问:http://localhost:8081/nexus/index.html#welcome,默认端口是8081
登录Nexus
默认管理员用户名和密码admin/admin123
Nexus的仓库与仓库组
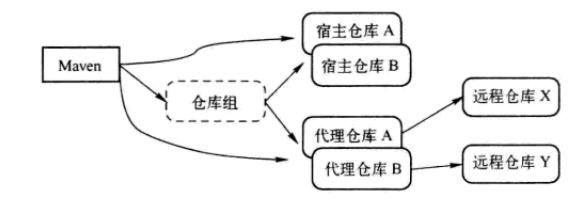
Nexus包含了各种类型的仓库概念,包括代理仓库、宿主仓库和仓库组
Nexus的内置仓库
仓库有四种类型:group(仓库组)、hosted(宿主)、proxy(代理)和virtual(虚拟)
仓库的格式:Maven1或Maven2
仓库的策略(Policy):表示该仓库是发布(Release)版本仓库还是快照(Snapshot)版本仓库
最后两列为仓库的状态和路径
各个仓库用途:
1.Maven1格式和虚拟类型仓库不提,虚拟类型仓库作用实际上是动态地将仓库内容格式转换,也是为了服务Maven1格式
Nexus仓库分类的概念:
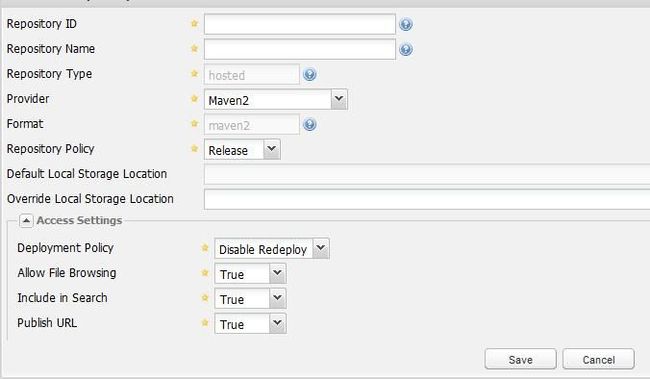
add->Hosted Repository

Repository ID:仓库ID、Repository Name:仓库名称、Repository Type:仓库类型
Provider:仓库格式、Repository Polioy:发布版还是快照版
Default Local Storage Location:表示该仓库的默认存储目录,待仓库创建好之后,该值就会成为基于sonatype-work的一个文件
Override Local Storage Location:可以用来 配置自定义仓库目录位置
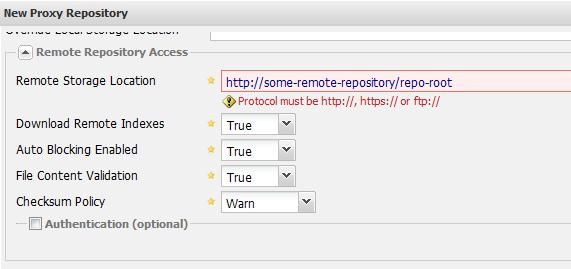
多了Remote Storage Location:代表远程仓库的地址,必须输入有效值
Download Remote Indexes 表示是否下载远程仓库的索引
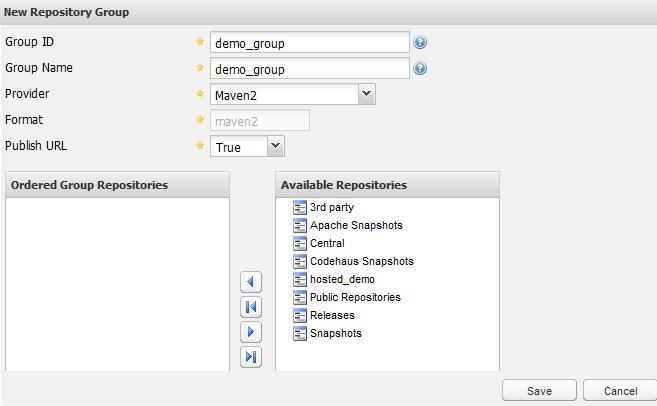
创建Nexus仓库组 在配置界面中,用户可以非常直观地选择Nexus中的仓库,将其聚合成一个虚拟的仓库组
Nexus的索引与构件搜索
为了能够搜索Maven中央库,首先设置Nexus中的Maven Central代理仓库下载远程索引
默认情况这个配置是关闭的
设置:选择中央-->Configuration-->设置Download Remote Indexes为true-->保存
查看状态:左侧Scheduled Tasks
GAV搜索:通过GroupId、ArtifactId和Version信息搜索
类名搜索:搜索包含某个Java类的构件
校验和搜索:直接使用构件的校验和来搜索该构件
以上搜索基于Nexus索引而实现,称为nexus-indexer
为宿主仓库和代理仓库建立索引,在仓库上右击,选择Update Index
配置Maven从Nexus下载构件
在Pom中为Maven配置仓库和插件仓库,只对当前Maven项目有效
通过一次配置让本机所有Maven项目都使用自己的Maven私服,配置settings.xml
但settings.xml并不支持直接配置repositories和pluginRepositories。Maven提供了Profile机制,能让用户将仓库配置放到setting.xml中的Profile中,如:
<settings>
	<profiles>
		<profile>
			<id>nexus</id>
			<repositories>
				<repository>
					<id>nexus</id>
					<name>Nexus</name>
					<url>http://localhost:8081/nexus/content/groups/public/</url>
					<releases>
						<enabled>true</enabled>
					</releases>
					<snapshots>
						<enabled>true</enabled>
					</snapshots>
				</repository>
			</repositories>
			<pluginRepositories>
				<pluginRepository>
					<id>nexus</id>
					<name>Nexus</name>
					<url>http://localhost:8081/nexus/content/groups/public</url>
				</pluginRepository>
			</pluginRepositories>
		</profile>
	</profiles>
	<activeProfiles>
		<activeProfile>nexus</activeProfile>
	</activeProfiles>
</settings>
该配置中使用了一个叫id为nexus的profile
activeProfile元素将nexus这个profile激活,这样当执行Maven构建时,激活的profile会将仓库配置应用到项目中去
配置镜像,让Maven只使用私服
	<!-- 配置镜像,让Maven只使用私服 -->
	<mirrors>
		<mirror>
			<id>nexus</id>
			<url>http://localhost:8081/nexus/content/groups/public</url>
			<mirrorOf>*</mirrorOf>
		</mirror>
	</mirrors>

	<profiles>
		<profile>
			<id>nexus</id>
			<repositories>
				<repository>
					<id>nexus</id>
					<url>http://central</url>
					<releases>
						<enabled>true</enabled>
					</releases>
					<snapshots>
						<enabled>true</enabled>
					</snapshots>
				</repository>
			</repositories>
			<pluginRepositories>
				<pluginRepository>
					<id>nexus</id>
					<url>http://central</url>
				</pluginRepository>
			</pluginRepositories>
		</profile>
	</profiles>
	<activeProfiles>
		<activeProfile>nexus</activeProfile>
	</activeProfiles>
</settings>


