最近公司的一个项目需要使用spring-data-jpa框架,所以来学习下该框架。感觉spring对jpa的支持主要有下面两点:
1.根据JPA的规范,我们需要在类路径下的META-INF文件夹中创建persistence.xml文件,spring为我们提供了org.springframework.orm.jpa.LocalContainerEntityManagerFactoryBean来进行配置,persistence.xml中的属性都可以在这个bean中进行注入。
2.spring对EntityManagerFactoryBean的创建和销毁进行统一管理,开发者不需要关心这些。
目前暂时想到这两点。
那么下面就通过一个例子来完成基本的CRUD操作。
1.通过MAVEN来创建一个简单的项目,在pom里面加入对应的jar文件
  <properties>
		<spring.version>3.2.0.RELEASE</spring.version>
		<jpa.version>2.0.0</jpa.version>
		<hibernate.version>4.1.4.Final</hibernate.version>
		<slf4j.version>1.6.6</slf4j.version>
		<aspectj.version>1.6.12</aspectj.version>
		<jodatime.version>2.1</jodatime.version>
		<project.build.sourceEncoding>UTF-8</project.build.sourceEncoding>
		<mysql.version>5.1.24</mysql.version>
		<commons-dbcp.version>1.4</commons-dbcp.version>
	</properties>
2.在类路径下创建META-INF文件夹,同时创建persistence.xml文件,内容如下:
<?xml version="1.0" encoding="UTF-8"?>
<persistence version="2.0" xmlns="http://java.sun.com/xml/ns/persistence"
xmlns:xsi="http://www.w3.org/2001/XMLSchema-instance"
xsi:schemaLocation="http://java.sun.com/xml/ns/persistence
http://java.sun.com/xml/ns/persistence/persistence_2_0.xsd">
<persistence-unit name="myJPA" >
<provider>org.hibernate.ejb.HibernatePersistence</provider>
<properties>
<property name="hibernate.dialect" value="org.hibernate.dialect.MySQL5Dialect" />
<property name="hibernate.connection.driver_class" value="com.mysql.jdbc.Driver" />
<property name="hibernate.connection.username" value="root" />
<property name="hibernate.connection.password" value="root" />
<property name="hibernate.connection.url" value="jdbc:mysql://localhost:3306/spring_data_jpa?useUnicode=true&characterEncoding=UTF-8" />
<property name="hibernate.max_fetch_depth" value="3" />
<property name="hibernate.hbm2ddl.auto" value="update" />
<property name="hibernate.show_sql" value="true" />
<property name="hibernate.format_sql" value="true" />
<property name="javax.persistence.validation.mode" value="none"/>
</properties>
</persistence-unit>
</persistence>
我这里需要打印执行sql语句以及其他信息,如果不需要的话,可以直接写一句:
<persistence-unit name="myJPA" >
也可以的。
persistence-unit是定义一个单元名称,当然可以定义多个,在实际使用的时候选择其中一个就可以了。
3.创建applicationContext.xml
<?xml version="1.0" encoding="UTF-8"?>
<beans xmlns="http://www.springframework.org/schema/beans"
xmlns:xsi="http://www.w3.org/2001/XMLSchema-instance"
xmlns:context="http://www.springframework.org/schema/context"
xmlns:aop="http://www.springframework.org/schema/aop"
xmlns:tx="http://www.springframework.org/schema/tx"
xmlns:p="http://www.springframework.org/schema/p"
xmlns:cache="http://www.springframework.org/schema/cache"
xmlns:jpa="http://www.springframework.org/schema/data/jpa"
xsi:schemaLocation="http://www.springframework.org/schema/beans
http://www.springframework.org/schema/beans/spring-beans-3.1.xsd
http://www.springframework.org/schema/context
http://www.springframework.org/schema/context/spring-context-3.1.xsd
http://www.springframework.org/schema/aop
http://www.springframework.org/schema/aop/spring-aop-3.1.xsd
http://www.springframework.org/schema/tx
http://www.springframework.org/schema/tx/spring-tx-3.1.xsd
http://www.springframework.org/schema/cache
http://www.springframework.org/schema/cache/spring-cache-3.1.xsd
http://www.springframework.org/schema/data/jpa
http://www.springframework.org/schema/data/jpa/spring-jpa.xsd">
<context:annotation-config />
<context:component-scan base-package="com.jacksoft"/>
<bean id="dataSource" class="org.apache.commons.dbcp.BasicDataSource">
<property name="driverClassName" value="com.mysql.jdbc.Driver"></property>
<property name="url" value="jdbc:mysql://localhost:3306/spring_data_jpa?useUnicode=true&characterEncoding=UTF-8"></property>
<property name="username" value="root"></property>
<property name="password" value="root"></property>
<property name="maxActive" value="10"></property>
<property name="maxIdle" value="30"></property>
<property name="maxWait" value="10"></property>
</bean>
<bean id="entityManagerFactory"
class="org.springframework.orm.jpa.LocalContainerEntityManagerFactoryBean">
<property name="dataSource" ref="dataSource" />
<property name="jpaVendorAdapter">
<bean class="org.springframework.orm.jpa.vendor.HibernateJpaVendorAdapter">
<property name="generateDdl" value="true" />
<property name="database" value="MYSQL" />
</bean>
</property>
<property name="persistenceUnitName" value="myJPA" />
</bean>
<!-- 配置事务管理器 -->
<bean id="transactionManager" class="org.springframework.orm.jpa.JpaTransactionManager">
<property name="entityManagerFactory" ref="entityManagerFactory" />
</bean>
<!-- 启用 annotation事务-->
<tx:annotation-driven transaction-manager="transactionManager"/>
<!-- 配置Spring Data JPA扫描目录-->
<jpa:repositories base-package="com.jacksoft"/>
</beans>
主要就是<jpa:repositories base-package="com.jacksoft"/>,这个可以扫描我们自己写的repository接口,当然这个也可以通过注解的形式来描述。
4. 创建log4j.properties文件
在类目录下创建log4j.properties文件
# Direct log messages to stdout
log4j.appender.stdout=org.apache.log4j.ConsoleAppender
log4j.appender.stdout.Target=System.out
log4j.appender.stdout.layout=org.apache.log4j.PatternLayout
log4j.appender.stdout.layout.ConversionPattern=%d{ABSOLUTE} %5p %40.40c:%4L - %m%n

# Root logger option
log4j.rootLogger=error, stdout

# Hibernate logging options (INFO only shows startup messages)
#log4j.logger.org.springframework=INFO
log4j.logger.org.springframework.data=error
我这里设置的都是error才会显示信息,当然可以根据实际情况进行修改
5.创建Entry类
这里我只有一个table:t_user,所以只需要创建一个User类,该类需要符合JPA规范
package com.jacksoft.entry;


import java.io.Serializable;

import javax.persistence.Column;
import javax.persistence.Entity;
import javax.persistence.GeneratedValue;
import javax.persistence.GenerationType;
import javax.persistence.Id;
import javax.persistence.Table;


@Entity
@Table(name="t_user")
public class User implements Serializable{

    /**
      * @Fields serialVersionUID : TODO
      */

    private static final long serialVersionUID = 1L;

    @Id
    @GeneratedValue(strategy = GenerationType.AUTO)
    private Integer id;

    @Column(name="username")
    private String username;

    @Column(name="password")
    private String password;

    public int getId() {
        return id;
    }

    public void setId(Integer id) {
        this.id = id;
    }

    public String getUsername() {
        return username;
    }

    public void setUsername(String username) {
        this.username = username;
    }

    public String getPassword() {
        return password;
    }

    public void setPassword(String password) {
        this.password = password;
    }

    @Override
    public String toString() {
        return "id:" + this.id + "   username:" + this.username + "  password:" + this.password;
    }


}
6.创建Repository
这里只需要创建接口,而不需要对其进行实现,创建UserDao继承JpaRepository
package com.jacksoft.repository;

import org.springframework.data.jpa.repository.JpaRepository;

import com.jacksoft.entry.User;

public interface UserDao extends JpaRepository<User, Integer>{

}
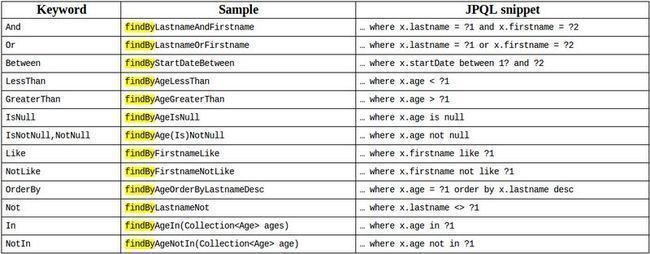
注意这里的泛型,第一个是我们的Entry类,第二个是这个ID的类型,就这样就可以了,除非需要补充自己的方法,那么需要根据规范来对方法进行命名,比如 findByUsername 意思是通过username栏位进行数据查找,具体可以参照下面的表格(copy来的):
Named Query: 针对一些复杂的SQL,支持原生SQL方式,进行查询,保证性能
Criteria Query: 支持JPA标准中的Criteria Query
7.创建Service类
package com.jacksoft.entry.service;

import java.util.List;

import org.springframework.beans.factory.annotation.Autowired;
import org.springframework.data.domain.Page;
import org.springframework.data.domain.PageRequest;
import org.springframework.data.domain.Pageable;
import org.springframework.stereotype.Service;
import org.springframework.transaction.annotation.Transactional;

import com.jacksoft.entry.User;
import com.jacksoft.repository.UserDao;


@Service("userService")
@Transactional(readOnly=true)
public class UserServiceImpl {

    @Autowired
    private UserDao userDao;

    public List<User> getAll(){
        List<User> list = userDao.findAll();
        return list;
    }

    public void deleteById(Integer id){
        userDao.delete(id);
    }

    public Page<User> getListWithPaging(int pages,int pageSize){
        Pageable pageAble = new PageRequest(pages, pageSize);
        Page<User> page = userDao.findAll(pageAble);
        return page;
    }


    public void updateById(User user){
        userDao.save(user);
    }

    @Transactional
    public void saveUser(User user) throws Exception{
        try{
        userDao.save(user);
        int i = 0;
        System.out.println(5/i);
        userDao.save(user);
        }catch(Exception ex){
            System.out.println("执行出错哦:" + ex.getMessage());
            throw ex;
        }
    }
}
这里使用@Transactional(readOnly=true)来对设置只读的事务,当然在其他操作的时候,在方法上需要加上注解:@Transactional来添加事务。
8.测试
写一个client来进行CURD操作
首先进行查询操作,查询所有的数据:
package com.jacksoft.client;

import java.util.List;

import org.springframework.context.ApplicationContext;
import org.springframework.context.support.ClassPathXmlApplicationContext;

import com.jacksoft.entry.User;
import com.jacksoft.entry.service.UserServiceImpl;


public class Client {

    public static void main(String[] args) {
        ApplicationContext context = new ClassPathXmlApplicationContext("classpath:applicationContext.xml");
        UserServiceImpl userService = context.getBean("userService",UserServiceImpl.class);

        List<User> list = userService.getAll();
        for(User user : list){
            System.out.println(user);
        }
    }
}
也就是调用UserDao的findAll方法来进行查询,运行后得到结果。
接着再来分页查询数据,分页查询时需要使用一个接口来进行分页:
org.springframework.data.domain.Pageable,
它的一个实现类:
org.springframework.data.domain.PageRequest
从PageRequest来看,有这么一句话:Pages are zero indexed,所以我们在分页的时候,页码是从0开始的,这个需要进行处理下。
public class Client {

    public static void main(String[] args) {
        ApplicationContext context = new ClassPathXmlApplicationContext("classpath:applicationContext.xml");
        UserServiceImpl userService = context.getBean("userService",UserServiceImpl.class);

        Pageable pageAble = new PageRequest(0, 2);
        Page<User> pager = userService.getListWithPaging(pageAble);
        System.out.println("总页数:" + pager.getTotalPages());
        List<User> list =  pager.getContent();
        for(User user : list){
            System.out.println(user.toString());
        }
    }
}
查询返回的结果都在Page里面,需要的信息可以从这个进行获取。
删除修改和新增操作基本的都已经为我们提供了,只需要调用具体的方法就可以了。
9.自定义查询
当然有时候框架提供的不一定够我们使用,那么就需要我们进行自定义查询,这里我使用@Query注解的形式来完成,当然也可以通过在Entry上面用@NamedQuery注解具体的sql和对应的方法。
在UserDao中添加两个方法,如下:
    @Query(value="select * from t_user u where u.username=?1",nativeQuery=true)
    public User findByusername(String username);

    @Query("select u from User u where u.password=:password")
    public User findByPassword(@Param("password") String password);
第一个方法通过注解值nativeQuery=true说明这个是一个原生的sql语句查询,当然结果会自动帮我们进行转换,是不是很方便?对于参数赋值,可以通过?占位符,这个的话,就需要注意参数的位置,也可以通过:的形式,这个就需要@Param注解来定义。
分别执行这两个方法,我们查看log信息:
Hibernate:
    select
        *
    from
        t_user u
    where
        u.username=?
id:2   username:Jack  password:5555
Hibernate:
    select
        user0_.id as id0_,
        user0_.password as password0_,
        user0_.username as username0_
    from
        t_user user0_
    where
        user0_.password=? limit ?
id:2   username:Jack  password:5555
可以看到原生sql和生成的语句区别。
